How to Create a Video from Images with FFmpeg (and Add Audio)
FFmpeg
is a powerful open-source multimedia framework that allows users to
convert, edit, and process audio and video files. One of its most useful
features is the ability to create a video from a sequence of images. This guide will walk you through the process of generating a high-quality video from images and adding background audio for a professional touch.
Table of Contents
Why Use FFmpeg for Image to Video Conversion?
FFmpeg
is lightweight, efficient, and works on almost any operating system. It
supports various image and video formats, making it ideal for:
Creating time-lapse videos from sequential images.
Converting slideshow presentations into video formats.
Automating video creation for social media or presentations.
Step 1: Prepare Your Images
Before running FFmpeg, ensure your images are properly formatted:
Number them sequentially (e.g., 1.jpg, 2.jpg, 3.jpg, … 100.jpg).
Place them in the same directory.
Ensure they have the same resolution to avoid scaling issues.
Step 2: Create a Video from Images with FFmpeg
Run the following FFmpeg command to generate a video from the images:
-i audio.mp3
→ Adds an audio track. You need to place the audio file in the same
directory. If it is in the other directory, mention its explicit path.
I
have been using this command to convert the images to video with audio.
FFmpeg has a vast number of options. For more FFmpeg command examples.
please visit the following link:
FFmpeg
is an incredibly versatile tool for creating videos from images.
Whether you're making slideshows, animations, or time-lapse videos,
these FFmpeg commands ensure a smooth workflow with high-quality
results.
Linux administrators have to be aware of existing users in the Linux
system for different reasons, like finding out their roles or
privileges.
This all requires knowledge of the commands, which help us list all the current users on the Linux system.
Today, we will learn different ways to list users in Linux, with or without a home directory.
Method 1: Reading the Passwd File
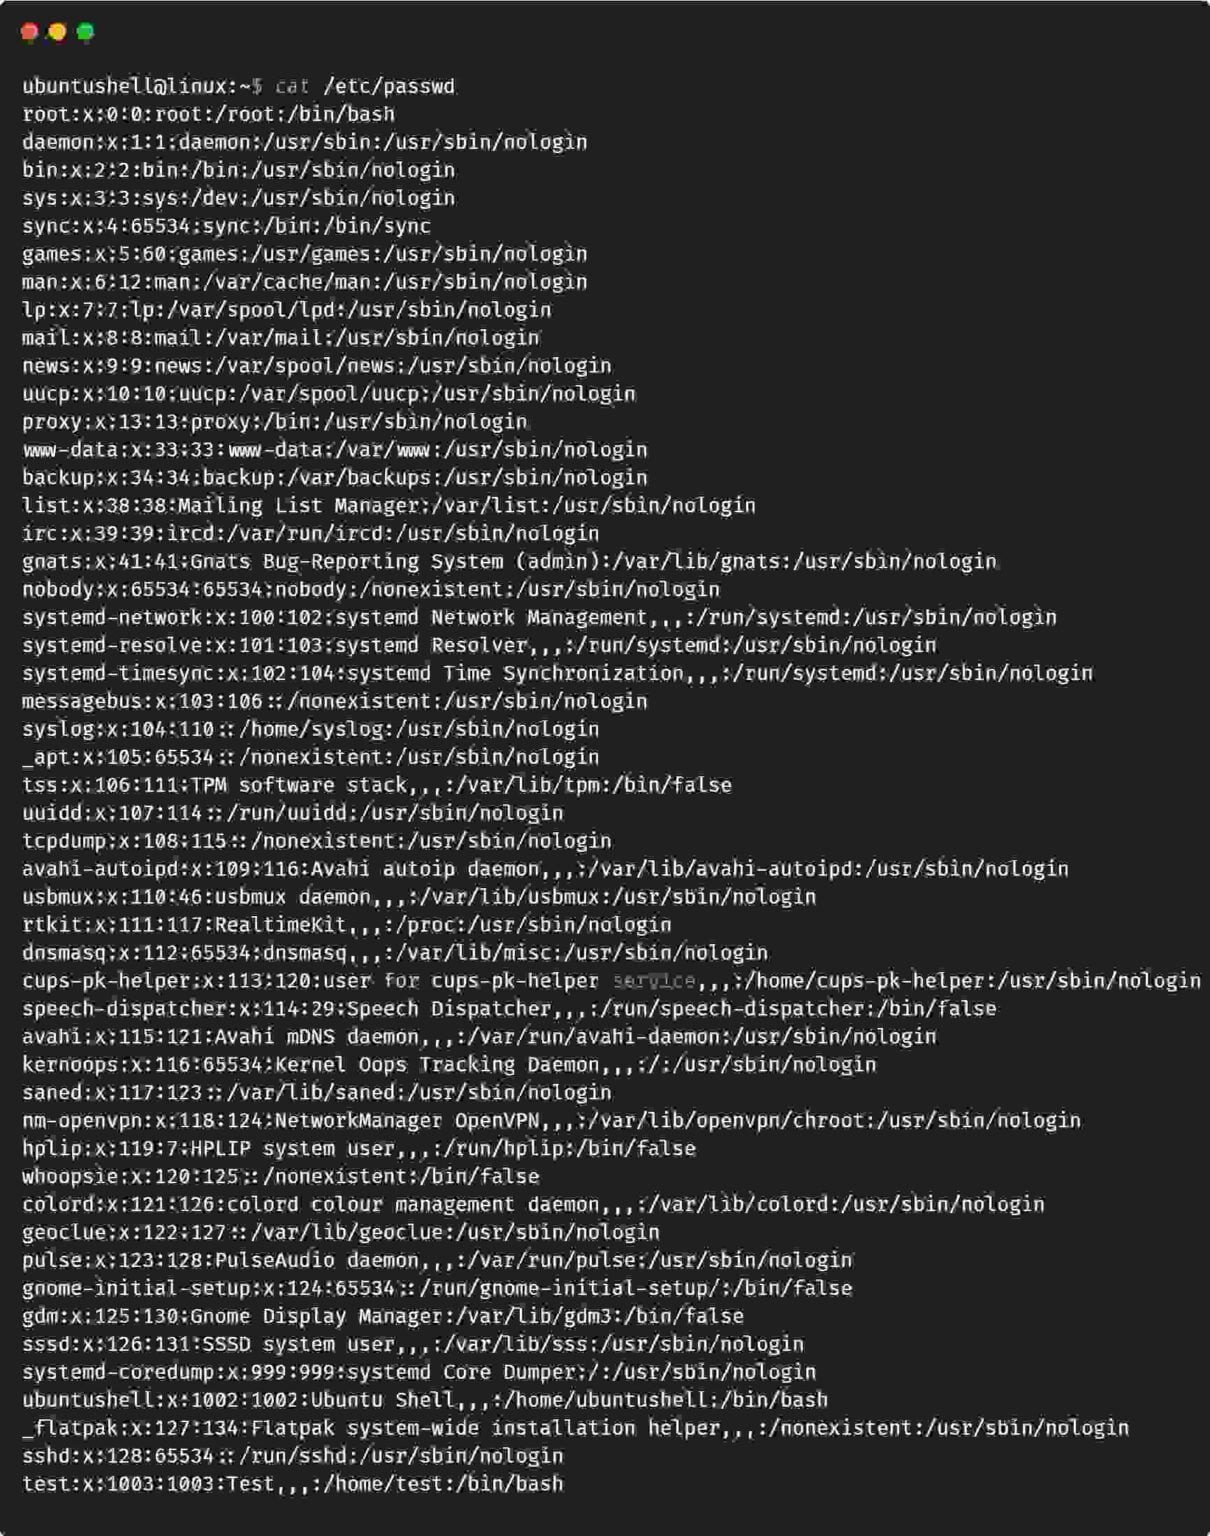
The generic way to list users is by reading the content of the passwd file. For example, the cat command can be used along with a passwd file path, as shown below.
cat /etc/passwd
Below is the behavior of the above command.
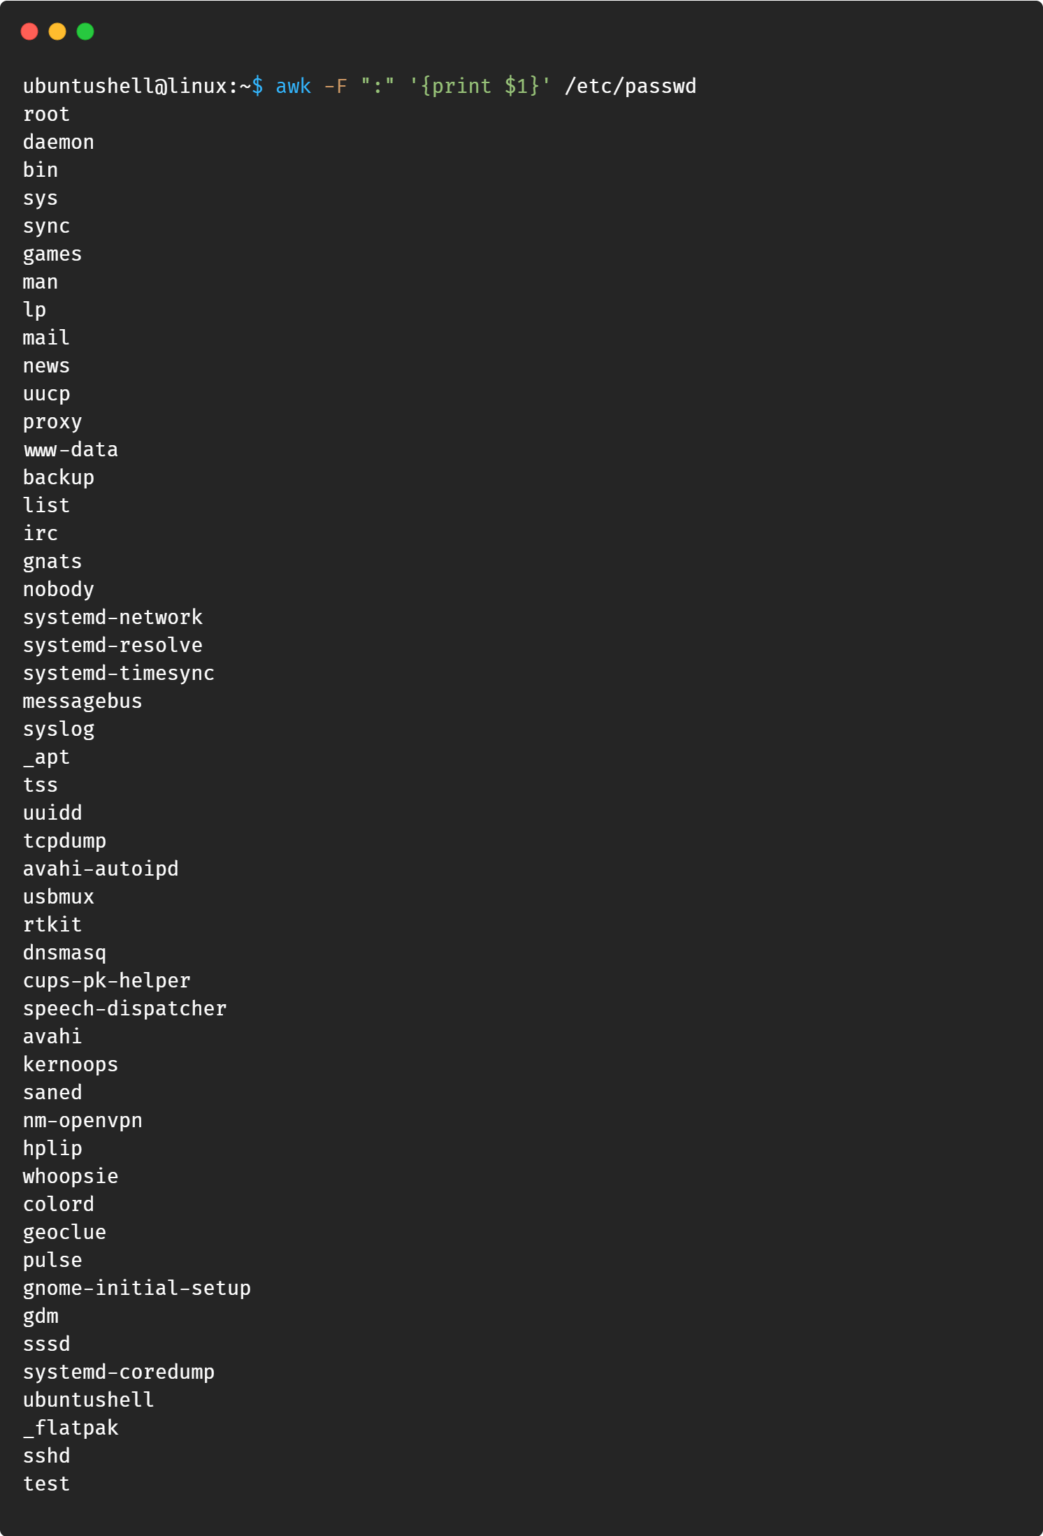
The cat command also lists all other information related to the users, which might be unnecessary to you.
For that, use the awk command to list the username from the passwd file, as shown below.
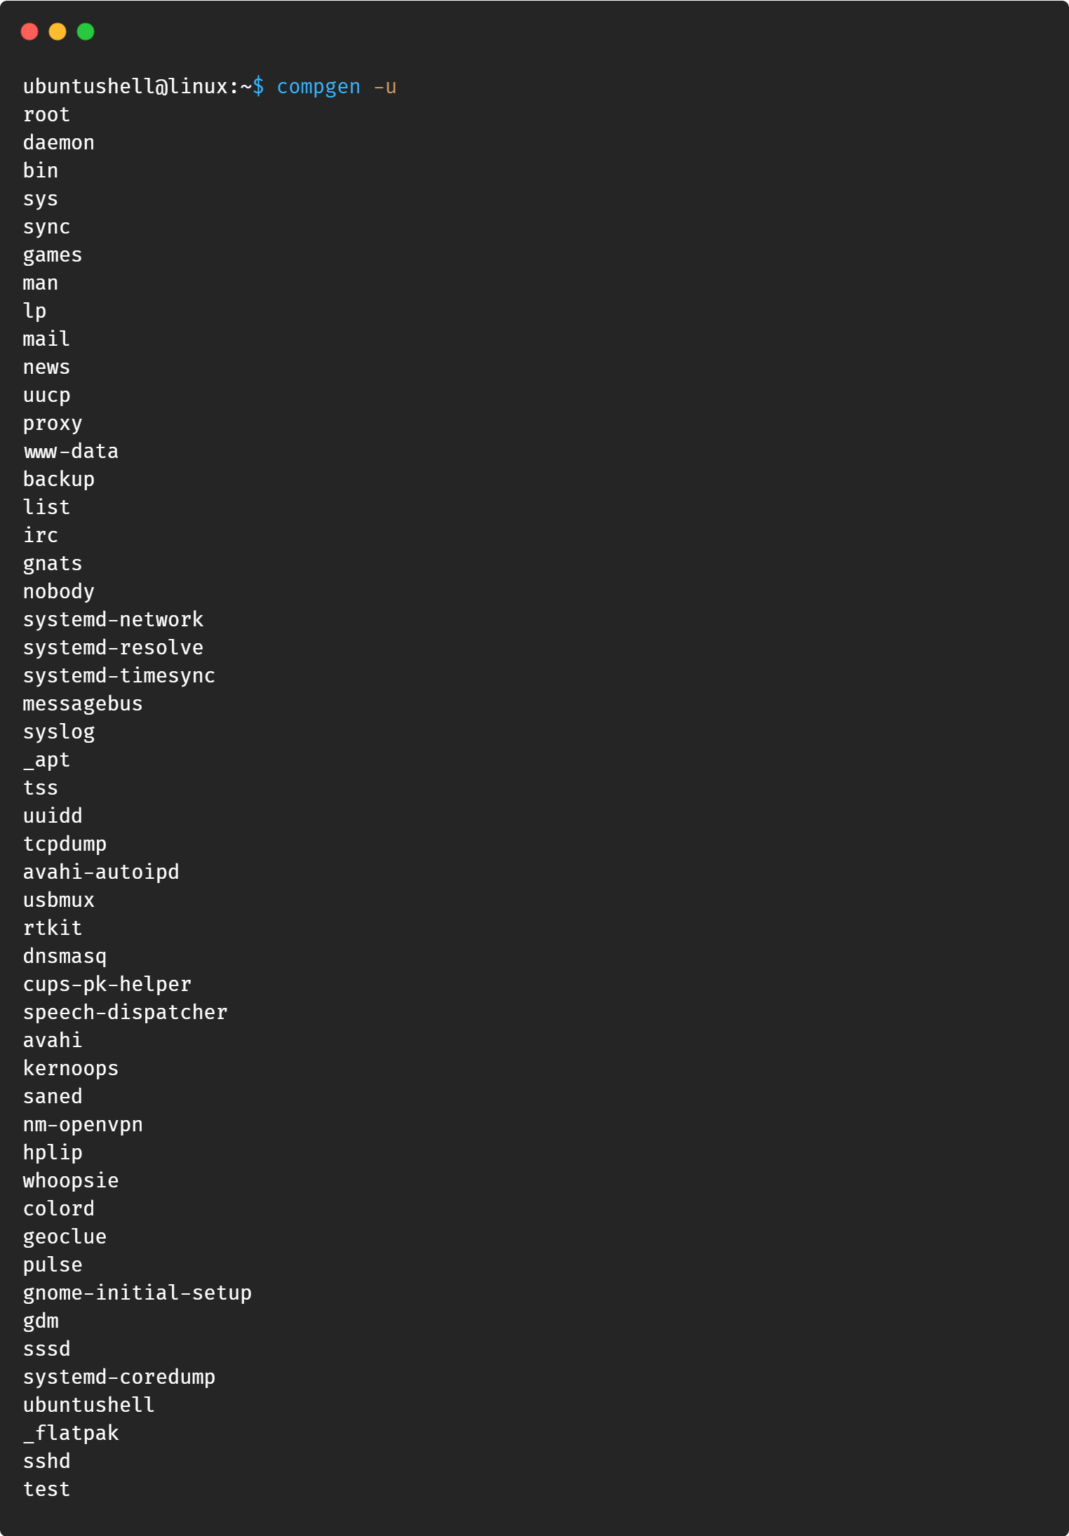
Just like the awk command, which ignores all the other details except the username, you can use the compgen command to do the same job without writing a long line of code, as shown below.
compgen -u
Below is the behavior of the above command.
Method 3: Using the Getent Command
Just like the cat command, getent includes all the other details. You can use this command to do the same job without specifying the passwd path, as shown below.
getent passwd
Below is the behavior of the above command.
Method 4: Filtering Users Based on Home Directory
From
the above-mentioned commands, you might be thinking that they were
listing all users created manually by you or by services.
It is
true that users are frequently unable to distinguish between users that
they manually created and those that the services created.
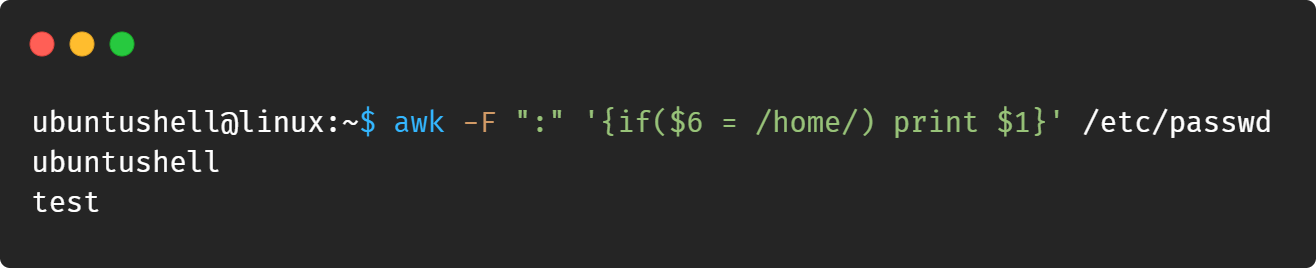
To solve this problem, we can list users with the home directory located at the /home/ path using the awk command, as shown below.
The above command only lists the users with a home directory created using the adduser command.
As you can see, I have created two users, "ubuntushell" and "test", manually with their home directory using the adduser command.
Final Thought
A
GUI application is available on the market to do the same job, which I
have not listed. After all, Linux without a terminal is insolent work,
according to me.
Most
Linux distributions that are installed using virtual machine software
like VirtualBox or VMware are configured to skip the GRUB bootloader for
a seamless user experience.
However,
certain events might require you to access the GRUB menu, such as
switching to an older kernel version, editing the kernel parameter,
entering recovery mode, or resetting the password.
In this quick
guide, I'll show you two different ways to access the GRUB menu of
Debian, Ubuntu, Red Hat, or Fedora running on virtual machines.
Most
users might not need to access the GRUB menu regularly. For that
purpose, you can use a temporary solution to access the GRUB menu
without any configuration changes.
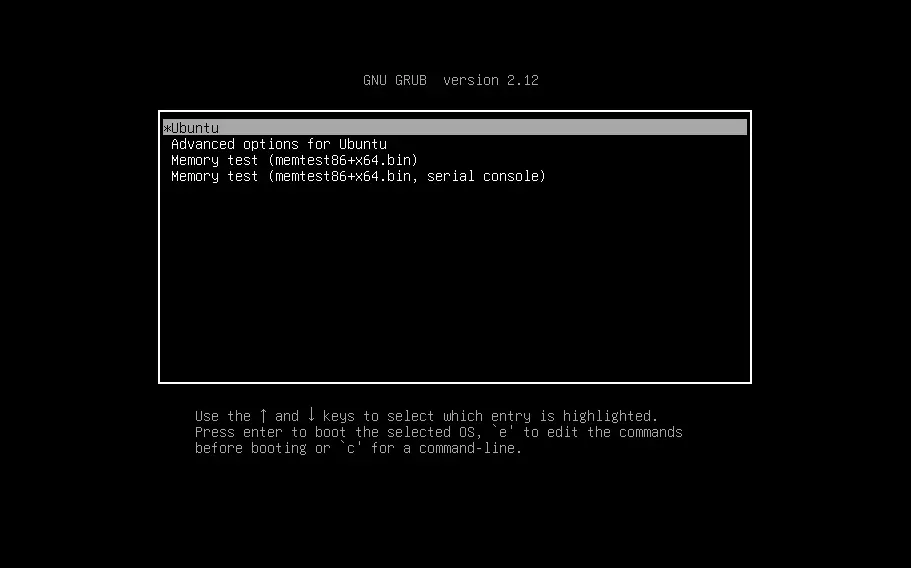
Method 1: Access the GRUB Menu in VM (One-Time Solution)
To access GRUB just once, simply boot your system and hold the shift key until the GRUB bootloader appears.
You'll have the GRUB without any time limit.
As
you can see, it's straightforward to access GRUB on a Linux VM with a
simple one-time shortcut key solution. However, this method only works
for single boots. So, if you want a permanent solution, then check out
the next method.
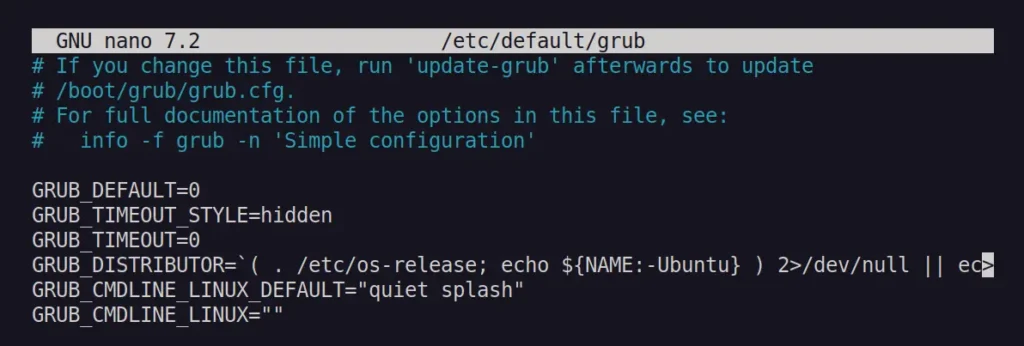
Method 2: Access the GRUB Menu in VM (Permanent Solution)
This
method involves editing the GRUB config file in the command line, so if
you need to access GRUB on a daily basis, you can follow this method.
First, open your terminal and edit the GRUB config file using this
command:
$ sudo nano /etc/default/grub
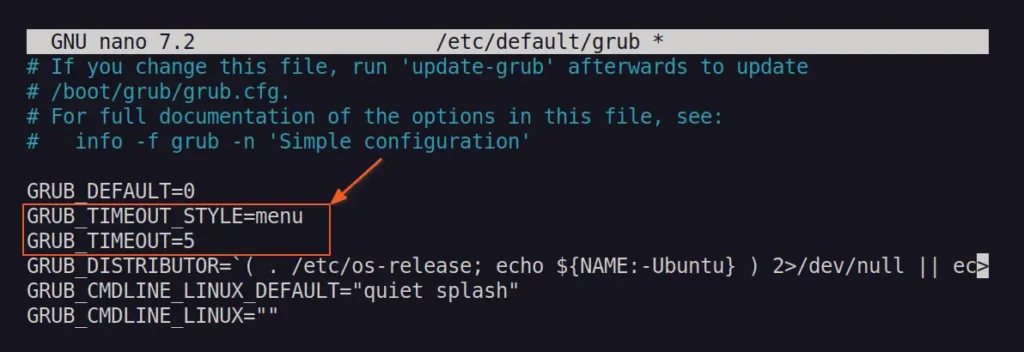
Then change the GRUB_TIMEOUT_STYLE parameter value to "menu", which will display the GRUB menu, and set the GRUB_TIMEOUT parameter value to "5", which will display the GRUB menu for only 5 seconds.
After editing, save and close the file.
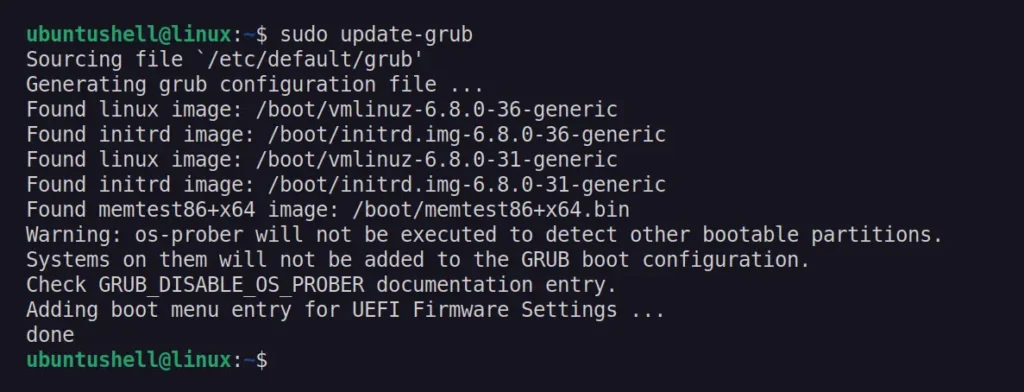
Apply the new changes you made to the GRUB configuration file using this command:
$ sudo update-grub
That's it. You can now reboot your system to check the GRUB menu.
Today,
you've learned how to display the GRUB menu on a Linux system running
on a VM. The method described in this article is demonstrated on Ubuntu
24.04 but is applicable to all other Linux distributions.
How to Find Running Services in Linux with Systemd Commands
Linux systems provide a variety of system services (such as process management, login, syslog, cron, etc.) and network services (such as remote login, e-mail, printers, web hosting, data storage, file transfer, domain name resolution (using DNS), dynamic IP address assignment (using DHCP), and much more).
Technically, a service is a process or group of processes (commonly known as daemons) running continuously in the background, waiting for requests to come in (especially from clients).
Linux supports different ways to manage (start, stop, restart, enable
auto-start at system boot, etc.) services, typically through a process
or service manager. Most if not all modern Linux distributions now use the same process manager: systemd.
Systemd is a system and service manager for Linux; a drop-in replacement for the init process, which is compatible with SysV and LSB init scripts, and the systemctl command is the primary tool to manage systemd.
Why List Running Services in Linux?
Knowing which services are running on your Linux system is important for:
Monitoring resource utilization
Troubleshooting performance issues
Ensuring critical services are active
Optimizing system performance and security
Systemd simplifies service management with powerful systemctl commands (which is also known as essential commands), making it easy to list, monitor, and manage active services.
In this guide, we will demonstrate the process of listing all running services under Systemd in Linux, providing a comprehensive walkthrough for users of all experience levels.
Listing Running Services Under SystemD in Linux
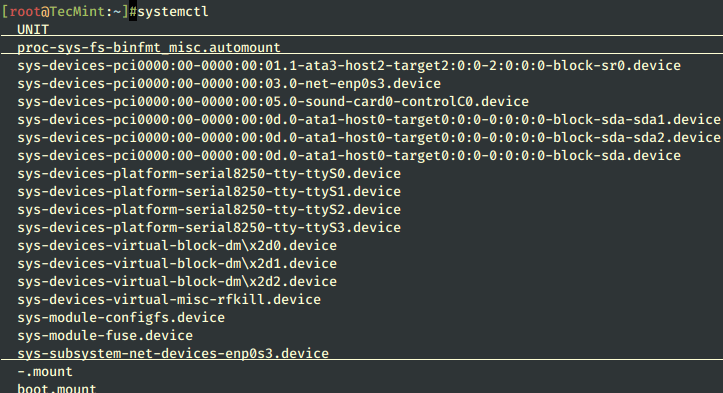
When you run the systemctl command without any
arguments, it will display a list of all loaded systemd units (read the
systemd documentation for more information about systemd units)
including services, showing their status (whether active or not).
# systemctl
List Systemctl Units in Linux
List All Loaded Services in Linux
To list all loaded services on your system (whether active; running, exited, or failed, use the list-units subcommand and --type switch with a value of service.
# systemctl list-units --type=service
OR
# systemctl --type=service
List All Services Under Systemd
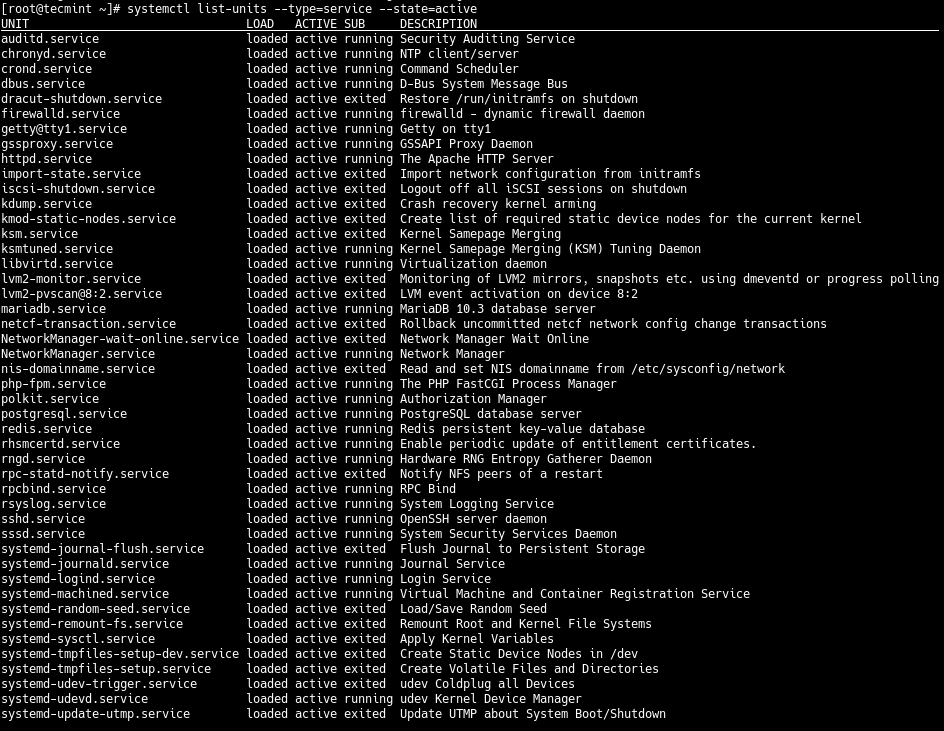
List Only Active Services in Linux
And to list all loaded but active services, both running and those that have exited, you can add the --state option with a value of active, as follows.
# systemctl list-units --type=service --state=active
OR
# systemctl --type=service --state=active
List All Active Running Services in Systemd
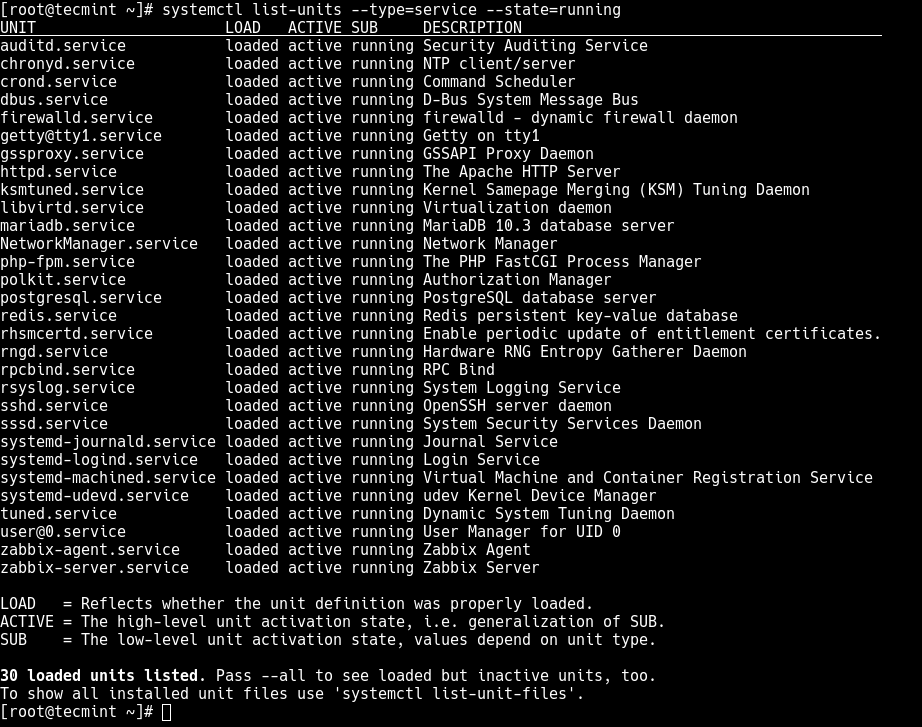
List Running Services in Linux Using systemctl
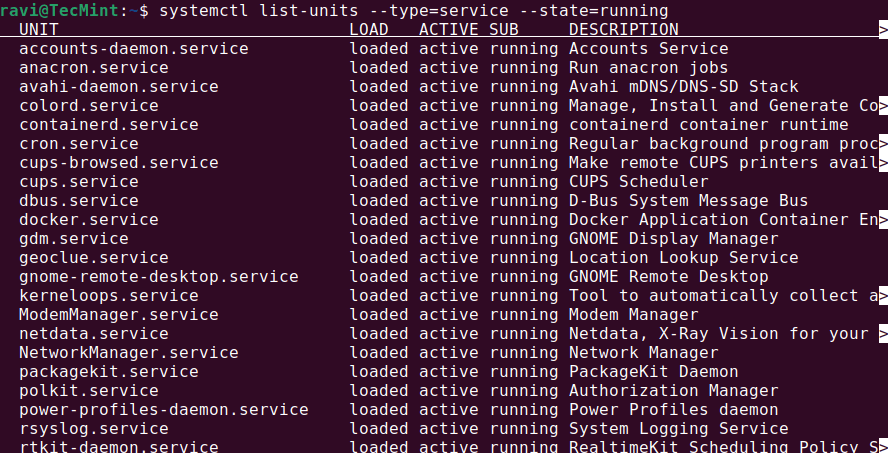
But to get a quick glance at all running services (i.e. all loaded and actively running services), run the following command.
# systemctl list-units --type=service --state=running
OR
# systemctl --type=service --state=running
List Running Services in Systemd
Let’s explore the key terms related to Systemd units and their status:
Unit – A unit could be a service, a socket, a device, or various other entities.
Load – It indicates whether the unit is loaded or not. A unit can be loaded but not necessarily active.
Active – It shows whether the unit is actively running or whether it has encountered issues and is in a failed or inactive state.
SUB – It provides additional details about the
specific state of the unit. For services, it might indicate whether the
service is running (running), stopped (exited), or encountering issues
(failed).
Description – It helps users identify and understand the purpose of the unit without delving into the detailed configuration files.
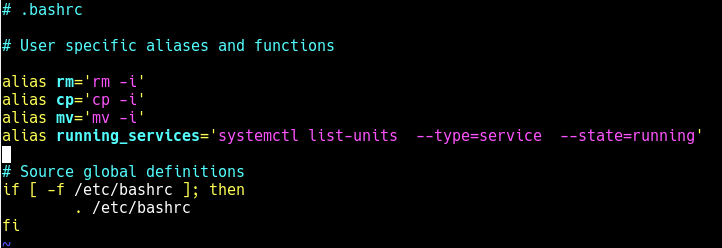
Creating an Alias for systemctl Commands
If you frequently use the previous command, you can create an alias command in your ~/.bashrc file as shown, to easily invoke it.
# vim ~/.bashrc
Then add the following line under the list of aliases as shown in the screenshot.
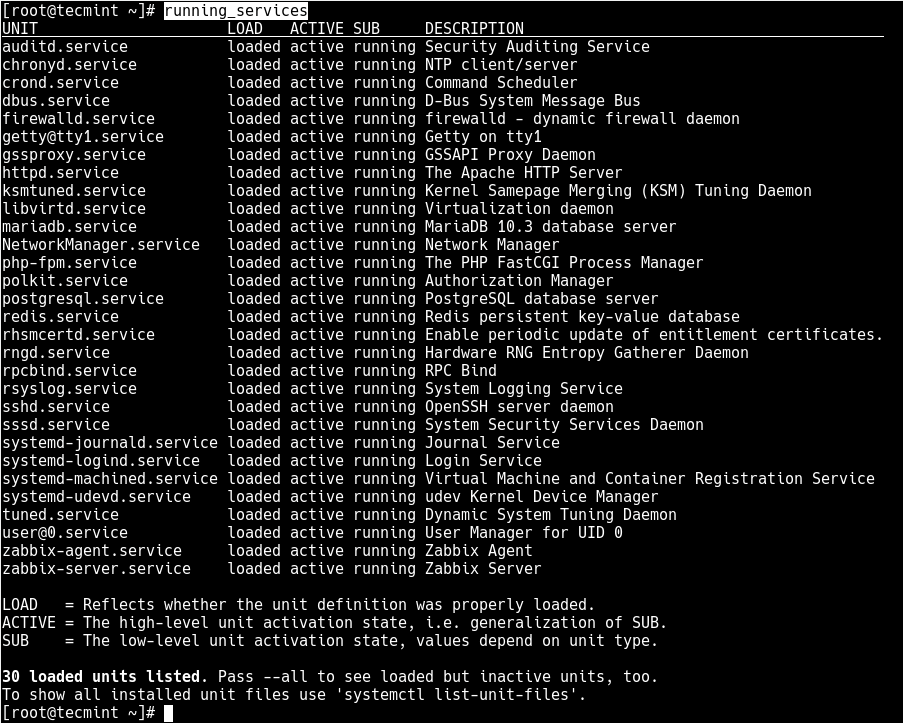
alias running_services='systemctl list-units --type=service --state=running'
Create an Alias for Long Command
Save the changes in the file and close it. From now onwards, use the “running_services” command to view a list of all loaded, actively running services on your server.
# running_services #use the Tab completion
View All Running Services
Find Which Port a Service is Using
Besides, an important aspect of services is the port they use. To
determine the port a daemon process is listening on, you can use the netstat or ss command as shown.
Where the flag -l means print all listening sockets, -t displays all TCP connections, -u shows all UDP connections, -n means print numeric port numbers (instead of application names) and -p means show the application name.
netstat -ltup | grep zabbix_agentd
OR
ss -ltup | grep zabbix_agentd
The fifth column shows the socket: Local Address:Port. In this case, the process zabbix_agentd is listening on port 10050.
Determine Process Port
Listing Open Firewall Services and Ports
Also, if your server has a firewall service running, which controls
how to block or allow traffic to or from selected services or ports, you
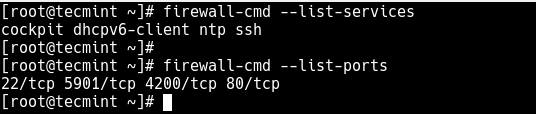
can list services or ports that have been opened in the firewall, using the firewall-cmd or ufw command (depending on the Linux distributions you are using) as shown.
firewall-cmd --list-services   [FirewallD]
firewall-cmd --list-ports
sudo ufw status     [UFW Firewall]
List Open Services and Ports on the Firewall
Automating Service Monitoring in Linux
Manually checking running services can be tedious, especially on
production servers. Automating this process ensures you are always aware
of service status changes without needing to check manually.
Check Running Services Every 5 Minutes with a Cron Job
A cron job
is a scheduled task in Linux that runs at a specific interval. You can
use it to log running services periodically and review them later in
case of failures or unexpected shutdowns.
crontab -e
Add this line to log running services every 5 minutes.
The output will be saved in /tmp/running_services.log file and you can check the latest recorded services using:
cat /tmp/running_services.log
OR
tail -f /tmp/running_services.log
Restart a Service if It Fails
By default, if a service crashes or stops unexpectedly, it does not
restart automatically unless explicitly configured. To ensure a service restarts whenever it fails, you can modify its systemd service unit file.
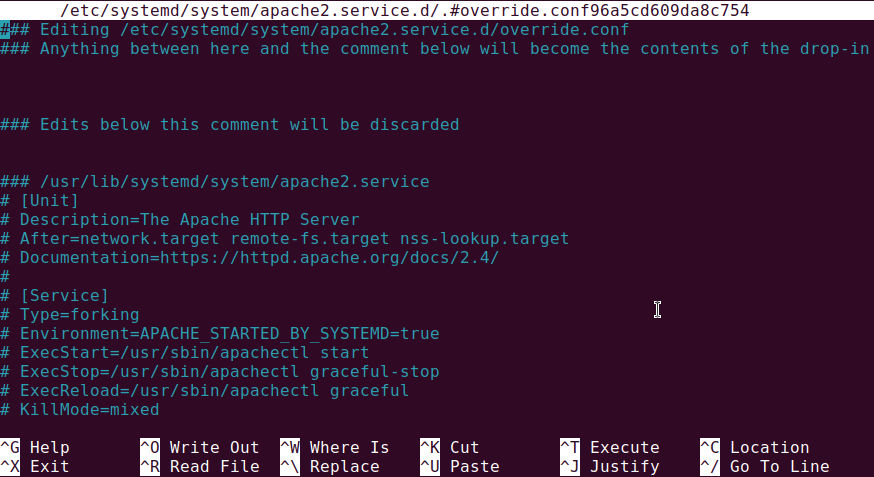
For example, use the following command to edit the service configuration (replace apache2 with the actual service name you want to restart automatically):
systemctl edit apache2
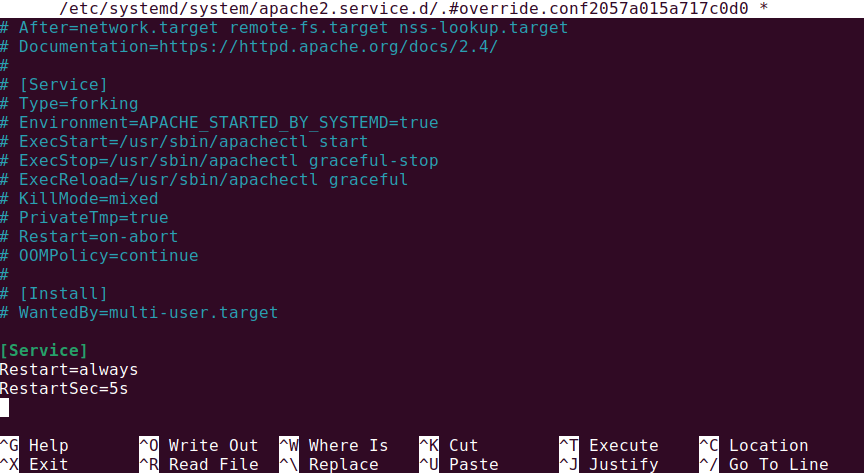
Once inside the editor, add the following lines.
[Service]
Restart=always
RestartSec=5s
Now, reload systemd to apply the changes.
systemctl daemon-reload
Then restart the service to ensure it picks up the new settings
systemctl restart apache2
To confirm that the systemd is set to restart the service automatically.
systemctl show apache2 --property=Restart
Conclusion
That’s all for now! In this guide, we demonstrated how to view running services under systemd
in Linux. We also covered how to check the port service is listening on
and how to view services or ports opened in the system firewall.
Do you have any additions to make or questions? If yes, reach us using the comment form below.
How to Automatically Restart a Failed Service in Linux
In a Linux system, services (also called daemons)
play a critical role in handling various tasks such as web hosting,
database management, and networking. However, services can sometimes
crash or stop due to errors, high resource usage, or unexpected system
failures.
To prevent downtime and ensure smooth operations, system
administrators can configure services to restart automatically whenever
they fail, which is especially useful for web servers (Apache, Nginx), databases (MySQL, PostgreSQL), or other critical applications that need to be available at all times.
In this guide, we’ll explain how to use systemd to configure a Linux service to restart automatically if it stops.
Why Restart a Service Automatically?
There are several reasons why you might want to automatically restart a service in Linux:
Minimize downtime: If a service stops unexpectedly, automatic restarts ensure that users experience minimal disruption.
Improve reliability: Services like web servers, databases, and background processes should always be running.
Reduce manual work: Without automation, you’d need to check services frequently and restart them manually if they fail.
Handle unexpected failures: If a service crashes
due to software bugs, resource limits, or system errors, the systemd can
restart it without admin intervention.
Now, let’s go through the steps to set up automatic restarts using systemd.
Step 1: Identify the Service You Want to Restart
Before making changes, you need to know the exact name of the service you want to configure by listing all running services.
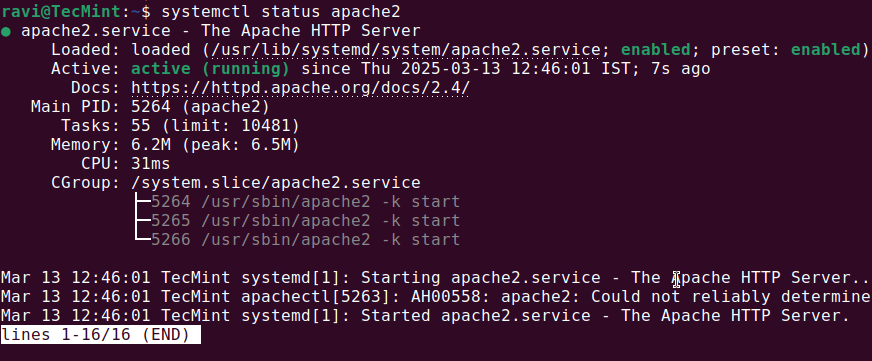
If you already know the service name, you can check its status.
systemctl status apache2
Check Running Service Status
Replace apache2 with the actual service name you want to manage.
Step 2: Edit the Service Configuration
Systemd allows you to modify service behavior using
custom configuration files. Instead of modifying system-wide settings
(which can be overwritten during updates), we’ll use systemctl edit to create an override file.
To confirm that the service is now set to restart automatically, run:
sudo systemctl show apache2 | grep Restart
If everything is configured correctly, you should see:
Restart=always
Step 4: Test the Automatic Restart in Linux
To ensure the configuration works, you can manually stop the service and check if it restarts.
sudo systemctl stop apache2
Wait for 5 seconds, then check its status.
sudo systemctl status apache2
If the service is running again, the automatic restart is working!
Additional Restart Options
Depending on your needs, systemd provides different restart policies:
Restart=always – The service always restarts, even if it was manually stopped.
Restart=on-failure – Restarts only if the service exits with an error (but not if stopped manually).
Restart=on-abnormal – Restarts the service if it crashes due to a signal (like a segmentation fault).
Restart=on-watchdog – Restart the service if it times out while running.
You can replace Restart=always with any of these options based on your requirements.
How to Check Service Logs for Issues
If a service keeps failing, it’s a good idea to check logs using the journalctl command, which will show logs for the service from the last 10 minutes.
journalctl -u apache2 --since "10 minutes ago"
For a real-time log stream, use:
journalctl -u apache2 -f
Conclusion
Setting up automatic restarts for failing services ensures that
critical applications keep running without manual intervention. By using
systemd’s restart options, you can minimize downtime, improve system
stability, and reduce the need for manual troubleshooting.
A Comprehensive Guide To Recover Data In Linux After Accidentally Deleting Your OS
Recovering Deleted Files After Accidentally Running `sudo rm -rf /*` on Linux
Sometimes,
you may lose important data—whether by accident or due to a lack of
knowledge. This detailed, step-by-step guide provides a structured
approach to recovering lost files in Linux using a live USB environment and recovery tools such as TestDisk, PhotoRec, and extundelete.
Table of Contents
Introduction
Very
few people lose data due to external factors like hardware failure,
power outages or natural disasters. More often, we lose data because of
our own mistakes, right?
Picture this: You just executed the command sudo rm -rf /* on your Linux system. You’re not entirely sure what it does, but you ran it anyway—and boom! All your data is gone. I made this mistake a long time ago when I was new to Linux.
Accidentally running sudo rm -rf /* is one of the most destructive commands
you can execute on a Linux system. For those who might not know, it
wipes nearly everything, including system files, personal documents, and
configurations.
This is a classic (and painful) example of what can happen when you run commands without fully understanding them.
Here's the breakdown of what does sudo rm -rf /* command do.
sudo: Runs the command with superuser (root) privileges, giving it access to delete any file or directory on the system.
rm: The "remove" command, used to delete files and directories.
-r: Recursively deletes directories and their contents.
-f: Forces deletion without prompting for confirmation.
/*: Targets the root directory (/) and everything inside it.
When combined, sudo rm -rf /* tells the system to forcefully and recursively delete every file and directory starting from the root of the filesystem.
While
the OS itself is beyond recovery, some of your files may still be
retrievable if you act quickly and follow the correct steps.
Important: If the data is critically important, seek professional help.
If
the data is critical and you need to recover it at any cost, I strongly
recommend leaving it to professional data recovery experts.
They use advanced tools (E.g. Stellar Data Recovery Toolkit) to retrieve lost files. It may be expensive, but you’ll likely get your data back—and, more importantly, peace of mind.
If you want to recover files on your own using the freely available Linux data recovery tools, this guide is for you. Read on.
Things You Should Know Before Attempting File Recovery
I
tested the following steps in a safe virtual environment. I created a
test virtual machine (VM) that contained no important data.
I intentionally deleted files, and then attempted to recover them using the tools mentioned in this guide. My goal was to learn how data recovery works.
I want to emphasize that data recovery is not always 100% successful. Depending on the situation, you may or may not recover all your lost data.
Here are some key points to keep in mind:
1. File Names May Be Lost
When using the recovery tools (E.g. PhotoRec),
you will likely lose all original file names. Recovered files will be
organized by file type, but you’ll need to manually identify and rename
them.
2. SSDs vs. HDDs
If you’re using an SSD, the chances of recovering data are significantly lower. This is especially true if the TRIM function is active, as it permanently deletes data to optimize performance.
If you’re using an HDD, the chances of successful data recovery are much higher.
3. Use External Drives for Storing Recovered Data
You may need one or two external drives
with sufficient storage space. One drive can be used to run a live OS
(e.g., Ubuntu Live USB), while the other can store backups or recovered
files.
DO NOT save the recovered data in the same local disk itself.
If possible, try to use a persistent live USB. This way you don't need to install the recovery software on every reboot.
4. Data Recovery is a Time-Consuming Process
Data recovery can take several hours or even days, depending on the size of the drive and the extent of data loss. Be prepared to wait patiently for the process to complete.
By
understanding these factors, you can set realistic expectations and
prepare adequately before attempting file recovery in Linux.
Let us get started!
Step 1: Stop Using the System Immediately
Every second the affected drive is in use increases the risk of overwriting recoverable data. If the system is still running, shut it down immediately. Avoid rebooting or installing any new software on the drive.
Step 2: Boot from a Live USB
Since the installed OS is no longer functional, use a live Linux environment for recovery. Recommended options include:
Ubuntu/Kubuntu/Linux Mint Live ISO (User-friendly and familiar)
SystemRescue (Designed for system recovery)
Kali Linux (Contains forensic tools)
Rescuezilla (GUI-based recovery tool)
Creating a Live USB
If you don’t already have a live USB, create one on another computer using:
My Recommendation: Always Keep a Persistent Live USB for Emergency Use
If you have a spare external USB drive, consider creating a persistent live USB. You can either do a full install of an operating system onto the external drive or use a live USB distro like Kali Linux that
supports persistence. Persistence allows you to save installed
packages, configurations, and changes permanently to the external drive.
You can use Ventoy or Mkusb tools to create persistent live USBs:
Having
a persistent live USB is incredibly useful in emergencies, such as
accidentally deleting partitions, formatting drives, or encountering
sudden data loss, an unbootable OS, or other catastrophic situations.
You’ll have a ready-to-go recovery tool at your fingertips.
Pro tip: Mark your emergency thumb drive with a distinctive label, so it’s easy to identify among other flash drives.
Booting from the Live USB
Insert the USB drive.
Restart the system and enter the BIOS (press F2, F12, or Del, depending on the manufacturer).
Set the USB drive as the first boot device.
Save changes and exit the BIOS.
For the demonstration purpose, I am booting into Ubuntu 24.04 LTS live environment.
Boot into Live OS
Step 3: Identify the Affected Drive
Once booted into the live environment, open a terminal and run:
lsblk
OR
fdisk -l
This will display the available disks and partitions (e.g., /dev/sda, /dev/nvme0n1). Take note of the affected disk.
As you can see in the above output, /dev/sda is my local drive with three partitions (/dev/sda1, /dev/sda2 and /dev/sda3). And /dev/sdb is the external drive for backup purpose.
Refer to the following article for more methods to list disk partitions in Unix-like systems:
Before attempting file recovery, create a backup image of the entire disk to avoid further data loss.
First, connect an External drive that has a sufficient space
to save the disk image and the data that we are going to recover in the
subsequent steps. If possible, use two external drives. One for saving
the disk image and another for saving the recovered data.
Please
note that the target drive should be larger than the source drive. For
instance, if you want to recover data from a 50GB disk (i.e. source
drive), the target drive (i.e destination drive) must be larger than
50GB.
Next, run the following command to create the full disk image:
(Replace /dev/sda with the correct disk identifier, /media/ubuntu/Backup/ with external drive's path and ensure the image is stored on the external drive.)
This can be useful for a few reasons:
Prevents Further Data Loss – Any failed recovery attempt on the original disk can overwrite recoverable data.
Safer to Experiment – You can try different recovery tools without affecting the actual drive.
Faster Recovery – You can restore data multiple times without re-imaging the disk.
Step 5: Use TestDisk to Recover Lost Partitions and Deleted Files
TestDisk is a powerful open-source tool for recovering lost partitions and deleted files. It works on Linux, Windows, and macOS.
Installing and Running TestDisk
sudo apt update && sudo apt install testdisk -y
Launch TestDisk:
sudo testdisk
When TestDisk starts, it will ask you to create a log file. Select Create to proceed. Select [Create] to create a new log file.
Create a New Log File
Recover Lost Partitions
TestDisk will list all available disks. Use the arrow keys to select the disk you want to recover data from, then press Enter. Select the source (affected) drive → [Proceed].
Christophe GRENIER <grenier@cgsecurity.org>
https://www.cgsecurity.org

  TestDisk is free software, and
comes with ABSOLUTELY NO WARRANTY.

Select a media (use Arrow keys, then press Enter):
>Disk /dev/sda - 53 GB / 50 GiB - QEMU QEMU HARDDISK
 Disk /dev/sdb - 10 GB / 10 GiB - QEMU QEMU HARDDISK
 Disk /dev/sr0 - 6114 MB / 5831 MiB (RO) - QEMU DVD-ROM
 Disk /dev/loop0 - 1748 MB / 1667 MiB (RO)
 Disk /dev/loop1 - 479 MB / 457 MiB (RO)
 Disk /dev/loop10 - 122 MB / 116 MiB (RO)
 Disk /dev/loop11 - 143 MB / 137 MiB (RO)
 Disk /dev/loop12 - 40 MB / 38 MiB (RO)
 Disk /dev/loop13 - 487 KB / 476 KiB (RO)
 Disk /dev/loop2 - 910 MB / 868 MiB (RO)
 Disk /dev/loop3 - 4096 B (RO)
 Disk /dev/loop4 - 77 MB / 74 MiB (RO)
 Disk /dev/loop5 - 11 MB / 10 MiB (RO)
 Disk /dev/loop6 - 96 MB / 91 MiB (RO)
 Disk /dev/loop7 - 529 MB / 505 MiB (RO)
 Disk /dev/loop8 - 282 MB / 269 MiB (RO)
 Disk /dev/loop9 - 10 MB / 10 MiB (RO)


>[Proceed ]  [  Quit  ]

Note: Disk capacity must be correctly detected for a successful recovery.
If a disk listed above has an incorrect size, check HD jumper settings and BIOS
detection, and install the latest OS patches and disk drivers.
Select Source Drive
TestDisk will ask you to select the partition table type (usually Intel/PC for most systems). Select the correct type and press Enter. Choose [Intel] or [EFI GPT] based on your partition type.
TestDisk 7.1, Data Recovery Utility, July 2019
Christophe GRENIER <grenier@cgsecurity.org>
https://www.cgsecurity.org


Disk /dev/sda - 53 GB / 50 GiB - QEMU QEMU HARDDISK

Please select the partition table type, press Enter when done.
 [Intel  ] Intel/PC partition
>[EFI GPT] EFI GPT partition map (Mac i386, some x86_64...)
 [Humax  ] Humax partition table
 [Mac    ] Apple partition map (legacy)
 [None   ] Non partitioned media
 [Sun    ] Sun Solaris partition
 [XBox   ] XBox partition
 [Return ] Return to disk selection


Hint: EFI GPT partition table type has been detected.
Note: Do NOT select 'None' for media with only a single partition. It's very
rare for a disk to be 'Non-partitioned'.
Select the Partition Table Type
Select [Analyze] to scan for lost partitions:
TestDisk 7.1, Data Recovery Utility, July 2019
Christophe GRENIER <grenier@cgsecurity.org>
https://www.cgsecurity.org


Disk /dev/sda - 53 GB / 50 GiB - QEMU QEMU HARDDISK
     CHS 51200 64 32 - sector size=512

>[ Analyse  ] Analyse current partition structure and search for lost partitions
 [ Advanced ] Filesystem Utils
 [ Geometry ] Change disk geometry
 [ Options  ] Modify options
 [ Quit     ] Return to disk selection


Note: Correct disk geometry is required for a successful recovery. 'Analyse'
process may give some warnings if it thinks the logical geometry is mismatched.
Analyze Partition
TestDisk
will display the current partition structure. If partitions are
missing, it will search for them. You can also manually do it by
choosing Quick Search option.
TestDisk 7.1, Data Recovery Utility, July 2019
Christophe GRENIER <grenier@cgsecurity.org>
https://www.cgsecurity.org

Disk /dev/sda - 53 GB / 50 GiB - CHS 51200 64 32
Current partition structure:
     Partition                  Start        End    Size in sectors

 1 P Unknown                     2048       4095       2048
 2 P EFI System                  4096    1054719    1050624 [EFI System Partition]
 3 P Linux filesys. data      1054720  104855551  103800832


                P=Primary  D=Deleted
>[Quick Search]  [ Backup ]
                            Try to locate partition
TestDisk will now perform a "Quick Search" to find lost partitions. If it finds any, it will list them.
TestDisk 7.1, Data Recovery Utility, July 2019
Christophe GRENIER <grenier@cgsecurity.org>
https://www.cgsecurity.org

Disk /dev/sda - 53 GB / 50 GiB - CHS 51200 64 32
     Partition               Start        End    Size in sectors
 P MS Data                     4096    1054719    1050624 [NO NAME]
>P Linux filesys. data      1054720  104855551  103800832


Structure: Ok.  Use Up/Down Arrow keys to select partition.
Use Left/Right Arrow keys to CHANGE partition characteristics:
                P=Primary  D=Deleted
Keys A: add partition, L: load backup, T: change type, P: list files,
     Enter: to continue
ext4 blocksize=4096 Large_file Sparse_SB, 53 GB / 49 GiB
If the Quick Search doesn't find your lost partitions, select Deeper Search for a more thorough scan.
After the scan, TestDisk will list the partitions it found. Use the arrow keys to select the partition you want to recover.
Select Partition to Restore
If the partition looks correct, select Write to save the partition table to the disk. This will restore the lost partition.
TestDisk 7.1, Data Recovery Utility, July 2019
Christophe GRENIER <grenier@cgsecurity.org>
https://www.cgsecurity.org

Disk /dev/sda - 53 GB / 50 GiB - CHS 51200 64 32

     Partition                  Start        End    Size in sectors

 1 P MS Data                     4096    1054719    1050624 [NO NAME]
 2 P Linux filesys. data      1054720  104855551  103800832


 [  Quit  ]  [ Return ]  [Deeper Search] >[ Write  ]
                       Write partition structure to disk
Choose Write to Restore Partition
Type Y to confirm:
TestDisk 7.1, Data Recovery Utility, July 2019
Christophe GRENIER <grenier@cgsecurity.org>
https://www.cgsecurity.org

Write partition table, confirm ? (Y/N)
Confirm to Write Partition Table
Next, quit from the Testdisk and reboot your computer to see if the partition is restored.
In my case, Testdisk has successfully restored the partition.
Now, we will try to recover files from the restored partitions.
Recover Deleted Files
Log in to the live environment as described in the earlier steps.
To recover deleted files, we need to install the TestDisk again. Because, we rebooted the live system and testdisk is gone now.
sudo apt update && sudo apt install testdisk -y
Launch the TestDisk:
sudo testdisk
In TestDisk, select the partition where the files were located.
Select Advanced from the menu.
Select Advanced
Choose a partition and press P to view the files on the partition.
TestDisk 7.1, Data Recovery Utility, July 2019
Christophe GRENIER <grenier@cgsecurity.org>
https://www.cgsecurity.org

Disk /dev/sda - 53 GB / 50 GiB - CHS 51200 64 32
     Partition               Start        End    Size in sectors
 P MS Data                     4096    1054719    1050624 [NO NAME]
>P Linux filesys. data      1054720  104855551  103800832


Structure: Ok.  Use Up/Down Arrow keys to select partition.
Use Left/Right Arrow keys to CHANGE partition characteristics:
                P=Primary  D=Deleted
Keys A: add partition, L: load backup, T: change type, P: list files,
     Enter: to continue
ext4 blocksize=4096 Large_file Sparse_SB, 53 GB / 49 GiB
List Files in Partition
Now you will see available files in the selected partition. Navigate through the directories to find the deleted files.
TestDisk 7.1, Data Recovery Utility, July 2019
Christophe GRENIER <grenier@cgsecurity.org>
https://www.cgsecurity.org
   P Linux filesys. data      1054720  104855551  103800832
Directory /

>drwxr-xr-x     0     0      4096  5-Mar-2025 11:43 .
 drwxr-xr-x     0     0      4096  5-Mar-2025 11:43 ..
 drwxr-xr-x     0     0      4096  5-Mar-2025 11:42 boot
 -rw-------     0     0 2147483648 25-Apr-2024 12:48 swapfile
 drwxr-xr-x     0     0      4096  5-Mar-2025 11:43 var
 drwxr-xr-x     0     0      4096  7-Aug-2023 22:52 dev
 drwxr-xr-x     0     0      4096 18-Apr-2022 10:28 proc
 drwxr-xr-x     0     0      4096 25-Apr-2024 12:52 run
 drwxr-xr-x     0     0      4096  5-Mar-2025 11:43 snap
 drwxr-xr-x     0     0      4096 18-Apr-2022 10:28 sys


                                                   Next
Use Right to change directory, h to hide deleted files
    q to quit, : to select the current file, a to select all files
    C to copy the selected files, c to copy the current file
Navigate Files and Folders in the Partition
Use the C key to copy the deleted files to a safe location (e.g., another drive) and then press C to save the file in the destination drive.
estDisk 7.1, Data Recovery Utility, July 2019

Please select a destination where the marked files will be copied.
Keys: Arrow keys to select another directory
      C when the destination is correct
      Q to quit
Directory /media/ubuntu/Backup
>drwx------  1000  1000      4096  5-Mar-2025 12:15 .
 drwxr-x---     0     0        80  5-Mar-2025 13:27 ..
 drwx------     0     0     16384  5-Mar-2025 11:49 lost+found
Press C to copy the files in the destination:
TestDisk 7.1, Data Recovery Utility, July 2019
Christophe GRENIER <grenier@cgsecurity.org>
https://www.cgsecurity.org
   P Linux filesys. data      1054720  104855551  103800832
Directory /
Copy done! 7 ok, 0 failed
>drwxr-xr-x     0     0      4096  5-Mar-2025 11:43 .
 drwxr-xr-x     0     0      4096  5-Mar-2025 11:43 ..
 drwxr-xr-x     0     0      4096  5-Mar-2025 11:42 boot
 -rw-------     0     0 2147483648 25-Apr-2024 12:48 swapfile
 drwxr-xr-x     0     0      4096  5-Mar-2025 11:43 var
 drwxr-xr-x     0     0      4096  7-Aug-2023 22:52 dev
 drwxr-xr-x     0     0      4096 18-Apr-2022 10:28 proc
 drwxr-xr-x     0     0      4096 25-Apr-2024 12:52 run
 drwxr-xr-x     0     0      4096  5-Mar-2025 11:43 snap
 drwxr-xr-x     0     0      4096 18-Apr-2022 10:28 sys

  Stop

                                                   Next
Use Right to change directory, h to hide deleted files
    q to quit, : to select the current file, a to deselect all files
    C to copy the selected files, c to copy the current file
Restore Files using Testdisk
Depending on the size of the items, it will take a few minutes to several minutes.
If you want to backup more than one file, press a to select all files, and press C to save them in your preferred destination.
Once you're done, exit TestDisk by selecting Quit.
Step 6: Use PhotoRec for Deep File Recovery
If TestDisk doesn’t restore everything, PhotoRec can help recover individual files.
PhotoRec is a companion tool to TestDisk that specializes in file recovery. It works even if the file system is damaged or the partition is lost.
Let us say you accidentally deleted files (documents, images, or videos) from an ext4 partition on the local drive (/dev/sda2). I will explain how to recover them using Photorec.
Install PhotoRec
PhotoRec is included with TestDisk. If it’s not installed, run:
sudo apt update
sudo apt install testdisk
Launch PhotoRec
Run the following command:
sudo photorec
It will open a text-based interface. The Photorec interface is very similar to Testdisk, but with a few different options.
Select the Affected Drive
Use the arrow keys to highlight the affected disk (/dev/sda for local drive) and press Enter to select it.
PhotoRec
Choose a Partition or Whole Disk
If you remember the partition where files were deleted (e.g., /dev/sda2), select it. If the partition table is corrupted, select "No partition" and scan the whole disk.
Press Enter to proceed.
Select Partition
Select File System Type
PhotoRec asks for the file system type:
If your files were on Linux (ext4, ext3, ext2), choose [ ext2/ext3/ext4 ].
For Windows (NTFS, FAT32, exFAT), choose [ Other ].
Select File System Type
Press Enter to continue.
Select Recovery Mode
Free Space → Only scan unallocated space (faster).
Whole Disk → Scan the entire drive (slower, but finds more files).
Use arrow keys to select Free Space first. If it doesn’t recover what you need, try Whole Disk.
Press Enter to continue.
Choose Where to Save Recovered Files
PhotoRec asks for a destination folder to store recovered files. Press the Left arrow key to choose the destination drive.
DO NOT save recovered files on the same drive (this prevents data overwriting).
Use the left key to navigate to a different disk (e.g., /media/ubuntu/Backup - an external drive).
The destination drive should be larger in size than the source drive.
Press C to confirm the destination.
Choose Destination Location to Save Recovered Files
Start Recovery Process
PhotoRec begins recovering files automatically. You’ll see a progress bar showing:
Total files found
Estimated time remaining
Types of recovered files
Recover Files using PhotoRec
Wait until it completes.
Verify Recovered Files
Once finished, navigate to the recovery folder and check your files:
ls -lh /media/ubuntu/Backup/
PhotoRec recovers files without original names but retains extensions (.jpg, .pdf, .mp4).
If needed, sort files by type:
ls -lh /media/ubuntu/Backup/ | grep .pdf
Additional Tips:
If you want to recover specific file types (e.g., only PDFs or images), press S before starting the scan and select file types.
If files are corrupted, try recovering from Whole Disk instead of Free Space.
Use ExifTool to retrieve metadata from images: sudo apt install exiftool exiftool /media/ubuntu/Backup/image.jpg
If
you got your files back, you can skip the following step and go
straight to STEP 8. But if you still didn't get the files you need, read
on.
Step 7: Use extundelete for Ext4 File Recovery (If Applicable)
extundelete is another powerful tool for recovering deleted files from ext3/ext4 file systems.
Unlike PhotoRec, which works at the raw data level, extundelete attempts to restore files with their original filenames and directory structure—if the data blocks haven't been overwritten.
Stop Using the System
As I already said, immediately stop writing data to the disk and stop using your system. Log in to the live environment as I described in STEP 4.
Install extundelete
If not installed, run:
sudo apt update
sudo apt install extundelete
Check the Partition for Deleted Files
Run the following command to list recoverable files:
sudo extundelete /dev/sda2 --list-deleted
This scans the partition and shows files that can be recovered.
Recover a Specific File
If you found a specific file (e.g., important.doc), recover it using:
This will attempt to recover every deleted file and save them in RECOVERED_FILES/.
Verify Recovered Files
Once recovery is complete, check the folder:
ls -lh RECOVERED_FILES/
Important Notes
extundelete works best if the file system is not journaled.
If files are partially overwritten, they may not be fully recoverable.
If extundelete doesn’t work, use PhotoRec for raw file recovery.
Step 8: Review and Restore Recovered Files
Once
recovery is complete, review the retrieved files and make sure you have
moved them to a safe location. Ensure they are intact before proceeding
with a fresh OS installation.
Step 9: Reinstall the OS
Since
the system files are beyond repair, a full OS reinstall is necessary.
Use your live USB to install your preferred Linux distribution.
Step 10: Restore Backups (If Available)
If you had backups using tools like Timeshift, rsync, or cloud storage, now is the time to restore them. Check out the Backup tools category for exploring more backup options.
Use --preserve-root: This prevents rm from running on the root directory.
Test recovery procedures: Practice using TestDisk and backup recovery in a virtual machine.
Do not blindly Run Commands:
If you don't know what a command actually does, DO NO RUN it. Do a
quick web search, read manual pages, or seek an experienced user's help.
Conclusion
While running sudo rm -rf /*
is a disastrous mistake, data recovery is possible if you act quickly
and follow a structured approach. The key steps are stopping all
activity on the drive, using a live USB, leveraging recovery tools like TestDisk, PhotoRec and Extundelete, and reinstalling the OS.
Have
you encountered a similar situation? Share your experiences and
recovery tips in the comments below! I will check and update the guide
accordingly.