Thursday, August 30, 2018

Linux cut Command Explained for Beginners (with Examples)

https://www.howtoforge.com/linux-cut-command

In Linux, if you want to print a file's content on stdout, the first command that comes to mind is cat. However, there may be times when the requirement is to remove certain part of the file and print only the rest of the content. You'll be glad to know there exists a tool - dubbed cut - that lets you do this.
In this article, we will discuss this tool using some easy to understand examples. But before we do that, it's worth mentioning that all examples in this article have been tested on an Ubuntu 18.04 LTS machine.

Linux cut command

The cut command in Linux lets users remove sections from each line of files. Following is its syntax:
cut OPTION... [FILE]...
Here's what the man page says about this utility:
       Print selected parts of lines from each FILE to standard output.

       With no FILE, or when FILE is -, read standard input.
And following are some Q&A-styled examples that should give you a good idea on how this utility works.

Q1. How to use the cut command?

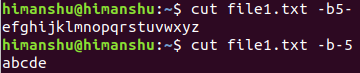
The cut command expects user to provide a list of bytes, characters, or fields. You can provide bytes using the -b command line option.
For example, suppose there's a file named file1.txt that contains the following line:
abcdefghijklmnopqrstuvwxyz
And you want to only display the first three bytes. Then in this case, you can use the -b option in the following way:
cut file1.txt -b1,2,3
The output will be:
abc
You can also specify a range:
cut file1.txt -b1-10
Following is the output produced in this case:
abcdefghij
Moving on, you can also use hyphen (-) with a number to tell the cut command to either display all bytes after the byte at that number or all bytes before the byte at that number.
For example, the following command will make sure that all bytes including and after the one at number 5 are displayed.
cut file1.txt -b5-
And the following command will display the first 5 bytes:
cut file1.txt -b-5
How to use the cut command

Q2. How to deal with characters?

Sometimes, the file you pass to the cut command contains characters that are more than one byte in size. In that case, it's advisable to use the -c option which lets the tool correctly understand which characters you want to display or remove.
For example, ♣ is a special character that occupies multiple bytes. So if you want to use the cut command on a text stream that contains these kind of characters, then it's better to use -c instead of -b. Functionality wise, both -c and -b work in similar way.

Q3. How cut works with delimiters?

You can also make the cut command work with delimiters. For this, you can use the -d command line option.
For example, suppose the input file contains comma-separated fields:
Howtoforge, HTF, howtoforge.com
FaqForge, FF, faqforge.com
And you want only first and third entries, then this can be done in the following way:
cut file1.txt -d, -f1,3
Note that the -f option lets you choose the fields you wanna display.

Conclusion

So you see, the cut command has the potential to save a lot of your time if the task involves selective output of a file's content. Here, in this tutorial, we have discussed some basic command line options this tool offers. To learn more, head to the tool's man page.

15 command-line aliases to save you time

https://opensource.com/article/18/8/time-saving-command-line-aliases

Some aliases are included by default in your installed Linux distro.

Image by : 
opensource.com
x

Get the newsletter

Join the 85,000 open source advocates who receive our giveaway alerts and article roundups.
Linux command-line aliases are great for helping you work more efficiently. Better still, some are included by default in your installed Linux distro.
This is an example of a command-line alias in Fedora 27:
The command alias shows the list of existing aliases. Setting an alias is as simple as typing: alias new_name="command"
Here are 15 command-line aliases that will save you time:
  1. To install any utility/application:
    alias install="sudo yum install -y"
    Here, sudo and -y are optional as per user’s preferences:
  2. To update the system:
    alias update="sudo yum update -y"
  3. To upgrade the system:
    alias upgrade="sudo yum upgrade -y"
  4. To change to the root user:
    alias root="sudo su -"
  5. To change to "user," where "user" is set as your username:
    alias user="su user"
  6. To display the list of all available ports, their status, and IP:
    alias myip="ip -br -c a"
  7. To ssh to the server myserver:
    alias myserver="ssh user@my_server_ip”
  8. To list all processes in the system:
    alias process="ps -aux"
  9. To check the status of any system service:
    alias sstatus="sudo systemctl status"
  10. To restart any system service:
    alias srestart="sudo systemctl restart"
  11. To kill any process by its name:
    alias kill="sudo pkill"
  12. To display the total used and free memory of the system:
    alias mem="free -h"
  13. To display the CPU architecture, number of CPUs, threads, etc. of the system:
    alias cpu="lscpu"
  14. To display the total disk size of the system:
    alias disk="df -h"
  15. To display the current system Linux distro (for CentOS, Fedora, and Red Hat):
    alias os="cat /etc/redhat-release"

Wednesday, August 8, 2018

Bash Globbing Tutorial

https://linuxhint.com/bash_globbing_tutorial

Bash does not support native regular expressions like some other standard programming languages. The Bash shell feature that is used for matching or expanding specific types of patterns is called globbing. Globbing is mainly used to match filenames or searching for content in a file. Globbing uses wildcard characters to create the pattern. The most common wildcard characters that are used for creating globbing patterns are described below.

Question mark – (?)

‘?’ is used to match any single character. You can use ‘?’ for multiple times for matching multiple characters.
Example-1:
Suppose, you want to search those text filenames whose names are 4 characters long and extension is .txt. You can apply globbing pattern by using ‘?’ four times to do this task.
Find out the list of all files and folder of the current directory.
$ ls –l
Run the following command search those files whose names are four characters long and unknown.
$ ls -l ????.txt

Example-2:
Suppose, you want to search those document files whose names are 8 characters long, first 4 characters are f, o, o and t and extension is doc. Run the following command with globbing pattern to search the files.
$ ls -l foot????.doc

Example-3:
Suppose, you know the filename is ‘best’ and extension is 3 characters long, but don’t know the extension. Run the following command by using ‘?’ to search all files with the name ‘test’ having any extension of three characters long.
$ ls -l best.???

Asterisk – (*)

‘*’ is used to match zero or more characters. If you have less information to search any file or information then you can use ‘*’ in globbing pattern.
Example -1:
Suppose, you want to search all files of ‘pl’ extension. Run the following command using ‘*’ to do that task.
$ ls -l *.pl

Example-2:
Suppose, you know the starting character of the filename only which is ‘a’. Run the following command using ‘*’ to search all files of the current directory whose names are started with ‘a’.
$ ls -l a*.*

Example-3:
You can apply ‘*’ in bash script for various purposes without searching files. Create a bash file named ‘check.sh’ with the following script. Here, when the user will type ‘y’ or ‘Y’ or ‘yes’ or ‘Yes’ then ‘confirmed’ will print and when the type will type ‘n’ or ‘N’ or ‘no’ or ‘No’ then  ‘Not confirmed’ will print.
#!/bin/bash
echo "Do you want to confirm?"
read answer
case $answer in
[Yy]* )  echo "confirmed.";;
[Nn]* )  echo "Not confirmed.";;
*) echo "Try again.";;
esac
Run the script.
$ bash check.sh

Square Bracket – ([])

‘[]’ is used to match the character from the range. Some of the mostly used range declarations are mentioned below.
All uppercase alphabets are defined by the range as, [:upper:] or [A-Z] .
All lowercase alphabets are defined by the range as, [:lower:] or [a-z].
All numeric digits are defined by the range as, [:digit:] or [0-9].
All uppercase and lower alphabets are defined by the range as, [:alpha:] or [a-zA-z].
All uppercase alphabets, lowercase alphabet and digits are defined by the range as, [:alnum:] or [a-zA-Z0-9]
Example -1:
Run the following command to search all files and folders whose name contains p or q or r or s.
$ ls -l [p-s]*

Example-2:
Run the following command to search all files and folders whose name starts with any digit from 1 to 5.
$ ls -l [1-5]*

Caret – (^)

You can use ‘^’ with square bracket to define globbing pattern more specifically. ‘^’ can be used inside or outside of square bracket. ‘^’ is used outside the square bracket to search those contents of the file that starts with a given range of characters. ‘^’ is used inside the square bracket to show all content of the file by highlighting the lines start with a given range of characters . You can use different types of globbing patterns for searching particular content from a file. ‘grep’ command is used for content searching in bash. Suppose, you have a text file named ‘list.txt’ with the following content. Test the following examples for that file.
Apple
4000
Banana
700
Orange
850
Pear
9000
Jackdruit
Example – 1:
Run the following command to search those lines from list.txt file that starts with P or Q or R.
$ grep '^[P-R]' list.txt

Example – 2:
Run the following command to highlight those lines from list.txt file that starts with A or B or C.
$ grep '[^A-C]' list.txt

Exclamatory Sign – (!)

You can use ‘!’ inside the range pattern. It works same as the use of ‘^’ symbol outside the range pattern. Some examples of using ‘!’ sign are given below.
Example – 1:
Run the following command to show those lines from list.txt file that starts with ‘P’ or Q or R.
$ grep [!P-R] list.txt

Example – 2:
Run the following command to show those lines from list.txt file that starts with any digit from 4 to 8.
$ grep [!4-8] list.txt

Dollar Sign – ($)

‘$’ is used to define the ending character. If you know want to search information based on last character then you can use ‘$’ in globbing pattern.
Example – 1:
Run the following command to search those lines from list.txt file that ends with ‘a’.
$ grep a$ list.txt

Example – 2:
Run the following command to search those lines from list.txt file that end with the number 50.
$ grep 50$ list.txt

Curly bracket – ({})

‘{}’ can be used to match filenames with more than one globbing patterns. Each pattern is separated by ‘,’ in curly bracket without any space. Some examples are given below.
Example – 1:
Run the following command to search those files whose names are 5 characters long and the extension is ‘sh’ or the last two characters of the files are ‘st’ and the extension is ‘txt’.
$ ls -l {?????.sh,*st.txt}

Example – 2:
Run the following command to delete all files whose extensions are ‘doc’ or ‘docx’.
$ rm {*.doc,*.docx}

Logical OR – ( | )

‘|’ sign is also used for applying more than one condition or globbing pattern. Each pattern is separated by ‘|’ symbol in the command.
Example – 1:
Run the following command to search the filenames with four characters long having ‘bash’ extension or the filename having any number of characters with ‘sh’ extension.
$ ls -l ????.bash|ls -l *.sh
Example – 2:
Create a bash file named ‘menu.bash’ and add the following script. If the user type 1 or S then it will print “Searching text”. If the user type 2 or R then it will print “Replacing text”. If the user type 3 or D then it will print “Deleting text”. It will print “Try again” for any other input.
#!/bin/bash
echo "Select any option from the menu:"
read answer
case $answer in
1 | S )  echo "Searching text";;
2 | R )  echo "Replacing text";;
3 | D )  echo "Deleting text";;
*) echo "Try again.";;
esac
Run the script.
$ bash menu.bash

CONCLUSION

Some of the most commonly used globbing patterns are explained in this tutorial by using very simple examples. I hope after practicing the above examples, the concept of globbing will be clear to you and you will be able to apply it in bash commands and scripts successfully.

Why and How to Edit Your Sudoers File in Linux

https://www.maketecheasier.com/edit-sudoers-file-linux

Within your Linux or macOS system, there’s a file called “sudoers” which controls the deepest levels of your permissions system. It permits or denies users from gaining super-user access and holds some special preferences for sudo.
The sudoers file is a text file that lives at “/etc/sudoers.” It controls how sudo works on your machine. You are probably familiar with sudo’s primary role of elevating your current account’s privileges to root, the superuser on all Unix-based systems. This permits your users to execute commands that would be otherwise prohibited.
When you first install Linux (or macOS), the first and default user will be auto-added to the sudoers file so it can run administrative tasks with the sudo command. However, if you create a new user account, it will not have the superuser permission by default. If you need to grant it superuser permission, you will need to edit the sudoers file and add this user account to it.
Never edit the sudoers file in a normal text editor. This can lead to simultaneous editing and corrupted files, potentially denying any admin access. Sudoers must be edited by running visudo in Terminal, like so:
edit-sudoers-file-change-sudo-timeout-visudo-command
Note that you need to use sudo to run visudo. This will open the sudoers file in the default text editor in Terminal (by default, nano).
edit-sudoers-file-change-sudo-timeout-sudoer-file-in-vim
The sudoers file’s main job is defining which users can use sudo for what. It also holds some simple preferences, which we can adjust first to get a feel for how visudo works.

Change the sudo timeout

By default, entering your sudo password elevates your permissions until you close the shell or exit. This can be insecure, and some might prefer entering their password each time they use sudo.
1. Run sudo visudo as mentioned above.
2. Press Alt + / to navigate to the end of the document. If you are using Vi or Vim, press Shift + G instead.
edit-sudoers-file-change-sudo-timeout-jump-to-end
3. Create a new line at the bottom of the document and add the following line:
edit-sudoers-file-change-sudo-timeout-add-default-timeout
This will set your sudo timeout to zero seconds, so you’ll have sudo permissions for zero seconds after you execute the first command. If you prefer a different interval, enter that value in seconds instead.
You can also set the timeout to “-1,” which gives you an infinite grace period. Don’t do that. It’s a handy way to accidentally nuke your system one day.
4. Press Ctrl + o to save and Ctrl + x to exit.

Limit who can use sudo and for what

The main purpose of the sudoers file is to control which users can run sudo. Without sudo, users can’t elevate their permissions. If you have multiple users accessing the same system through shells, you can control their access by setting values in sudo.
Every sudoers file will have the following line:
This permits the root user on ALL hosts using ALL users to execute ALL commands. ALL is a special value in the sudoers file meaning “no restrictions.” The syntax is as below:
If you want to add another user as root, simply copy the root line and change the user like so:
For more control, you could add a line like the following, which would only permit the “alexander” user to run apt-get update.
Put a “%” in front of the user, and it will define a group. The line below would allow every user in the group “admin” to have root-level permissions. This would be the group as defined by your OS permission groups.

Change the visudo editor

Depending on what version of Linux you’re running, there are two primary ways to change the editor.
For Ubuntu, you’ll want to run the Terminal command below:
You’ll see something like the following:
If you wanted to select vim as your visudo editor from the default of nano, you would press its selection number 3 then press Enter.
For other flavors of Linux, you’ll want to add a new line to your “~./bashrc” file as seen below:
Then save out the file. That would set your visudo editor to vim.
The sudoers file isn’t something you’ll typically need to mess with on single user systems. But system administrators will have more than enough reason to explore its inner workings.

6 Best Online Linux Bash Editors

https://www.fossmint.com/online-linux-bash-editors


Online Linux Bash Editors
Written by Martins D. Okoi
If you have been following our posts, we published an article that lists the best online terminal platforms for learning how to work with the Linux not too long ago.
I hear you ask “how are online Linux terminals different from online Bash editors?” – well, for starters, bash editors are the best apps to use for creating and executing bash scripts and some online terminals don’t even allow you to work with local files and save data.
If you want to go beyond the beginner-level scripting then a bash editor is what you need and below is our list of the best online platforms you can use right from your browser.

1. ShellCheck

ShellCheck is an efficient script analysis tool. It is written in Haskel, open-source, available on GitHub, and package ready for virtually any Linux distro.
Shellcheck Bash Editor

2. Learn Shell

Learn Shell offers free interactive programming tutorials. It breaks down the learning process into sections and you can also join its group on Facebook to post questions and engage in productive discussions.
Learn Shell Online
Learn Shell Online

3. Bash Compiler on Tutorials Point

As mentioned in our article on online Linux terminals, Tutorials Point is popular learning platform with series of awesome educational content and coding playgrounds for free so you can trust it to feature an online compiler for bash scripts.
Run Bash Shell Online

4. Paiza

Paiza is an online platform that provides its users with coding environments for different programming languages. It features a customizable editor, support for GitHub integration, real-time collaboration, and task scheduling, among other functions.
Paiza Online Bash Editor

5. JDoodle

JDoodle is among the coolest online bash editors you will ever find and it offers a quick and easy way to compile and run bash scripts.
using it, you can save projects, change the UI theme, collaborate with other users, and embed the playground in a blog or website, among other options.
Jdoodle Online Bash Shell

6. Rex Tester

Rex Tester is a straight-to-the-point online coding playground for different programming languages including bash. You can save your projects, customize the working editor, and collaborate with other users, among other functions.
Rextester Run Bash Online
That rounds up our list and I’m sure you have found at least one that you can work with.
Which other online bash editors do you know? Feel free to add your suggestions in the comments section below.

Monday, August 6, 2018

6 Easy Ways to Check User Name And Other Information in Linux

https://www.2daygeek.com/6-easy-ways-to-check-user-name-and-other-information-in-linux

This is very basic topic, everyone knows how to find a user information in Linux using id command. Some of the users are filtering a user information from /etc/passwd file.
We also using these commands to get a user information.
You may ask, Why are you discussing this basic topic? Even i thought the same, there is no other ways except this two but we are having some good alternatives too.
Those are giving more detailed information compared with those two, which is very helpful for newbies.
This is one of the basic command which helps admin to find out a user information in Linux. Everything is file in Linux, even user information were stored in a file.
All the users are added in /etc/passwd file. This keep user name and other related details. Users details will be stored in /etc/passwd file when you created a user in Linux. The passwd file contain each/every user details as a single line with seven fields.
We can find a user information using the below six methods.
  • id :Print user and group information for the specified username.
  • getent :Get entries from Name Service Switch libraries.
  • /etc/passwd file :The /etc/passwd file contain each/every user details as a single line with seven fields.
  • finger :User information lookup program
  • lslogins :lslogins display information about known users in the system
  • compgen :compgen is bash built-in command and it will show all available commands for the user.

1) Using id Command

id stands for identity. print real and effective user and group IDs. To print user and group information for the specified user, or for the current user.
# id daygeek
uid=1000(daygeek) gid=1000(daygeek) groups=1000(daygeek),4(adm),24(cdrom),27(sudo),30(dip),46(plugdev),118(lpadmin),128(sambashare)
Below are the detailed information for the above output.
  • uid (1000/daygeek): It displays user ID & Name
  • gid (1000/daygeek): It displays user’s primary group ID & Name
  • groups: It displays user’s secondary groups ID & Name

2) Using getent Command

The getent command displays entries from databases supported by the Name Service Switch libraries, which are configured in /etc/nsswitch.conf.
getent command shows user details similar to /etc/passwd file, it shows every user details as a single line with seven fields.
# getent passwd
root:x:0:0:root:/root:/bin/bash
bin:x:1:1:bin:/bin:/sbin/nologin
daemon:x:2:2:daemon:/sbin:/sbin/nologin
adm:x:3:4:adm:/var/adm:/sbin/nologin
lp:x:4:7:lp:/var/spool/lpd:/sbin/nologin
sync:x:5:0:sync:/sbin:/bin/sync
shutdown:x:6:0:shutdown:/sbin:/sbin/shutdown
halt:x:7:0:halt:/sbin:/sbin/halt
mail:x:8:12:mail:/var/spool/mail:/sbin/nologin
uucp:x:10:14:uucp:/var/spool/uucp:/sbin/nologin
operator:x:11:0:operator:/root:/sbin/nologin
games:x:12:100:games:/usr/games:/sbin/nologin
gopher:x:13:30:gopher:/var/gopher:/sbin/nologin
ftp:x:14:50:FTP User:/var/ftp:/sbin/nologin
nobody:x:99:99:Nobody:/:/sbin/nologin
dbus:x:81:81:System message bus:/:/sbin/nologin
vcsa:x:69:69:virtual console memory owner:/dev:/sbin/nologin
abrt:x:173:173::/etc/abrt:/sbin/nologin
haldaemon:x:68:68:HAL daemon:/:/sbin/nologin
ntp:x:38:38::/etc/ntp:/sbin/nologin
saslauth:x:499:76:Saslauthd user:/var/empty/saslauth:/sbin/nologin
postfix:x:89:89::/var/spool/postfix:/sbin/nologin
sshd:x:74:74:Privilege-separated SSH:/var/empty/sshd:/sbin/nologin
tcpdump:x:72:72::/:/sbin/nologin
centos:x:500:500:Cloud User:/home/centos:/bin/bash
prakash:x:501:501:2018/04/12:/home/prakash:/bin/bash
apache:x:48:48:Apache:/var/www:/sbin/nologin
nagios:x:498:498::/var/spool/nagios:/sbin/nologin
rpc:x:32:32:Rpcbind Daemon:/var/lib/rpcbind:/sbin/nologin
nrpe:x:497:497:NRPE user for the NRPE service:/var/run/nrpe:/sbin/nologin
magesh:x:502:503:2g Admin - Magesh M:/home/magesh:/bin/bash
thanu:x:503:504:2g Editor - Thanisha M:/home/thanu:/bin/bash
sudha:x:504:505:2g Editor - Sudha M:/home/sudha:/bin/bash
Below are the detailed information about seven fields.
magesh:x:502:503:2g Admin - Magesh M:/home/magesh:/bin/bash
  • Username (magesh): Username of created user. Characters length should be between 1 to 32.
  • Password (x): It indicates that encrypted password is stored at /etc/shadow file.
  • User ID (UID-502): It indicates the user ID (UID) each user should be contain unique UID. UID (0-Zero) is reserved for root, UID (1-99) reserved for system users and UID (100-999) reserved for system accounts/groups
  • Group ID (GID-503): It indicates the group ID (GID) each group should be contain unique GID is stored at /etc/group file.
  • User ID Info (2g Admin - Magesh M): It indicates the command field. This field can be used to describe the user information.
  • Home Directory (/home/magesh): It indicates the user home directory.
  • shell (/bin/bash): It indicates the user’s bash shell.
If you would like to display only user names from the getent command output, use the below format.
# getent passwd | cut -d: -f1
root
bin
daemon
adm
lp
sync
shutdown
halt
mail
uucp
operator
games
gopher
ftp
nobody
dbus
vcsa
abrt
haldaemon
ntp
saslauth
postfix
sshd
tcpdump
centos
prakash
apache
nagios
rpc
nrpe
magesh
thanu
sudha
To display only home directory users, use the below format.
# getent passwd | grep '/home' | cut -d: -f1
centos
prakash
magesh
thanu
sudha

3) Using /etc/passwd file

The /etc/passwd is a text file that contains each user information, which is necessary to login Linux system. It maintain useful information about users such as username, password, user ID, group ID, user ID info, home directory and shell. The /etc/passwd file contain every user details as a single line with seven fields as described below.
# cat /etc/passwd
root:x:0:0:root:/root:/bin/bash
bin:x:1:1:bin:/bin:/sbin/nologin
daemon:x:2:2:daemon:/sbin:/sbin/nologin
adm:x:3:4:adm:/var/adm:/sbin/nologin
lp:x:4:7:lp:/var/spool/lpd:/sbin/nologin
sync:x:5:0:sync:/sbin:/bin/sync
shutdown:x:6:0:shutdown:/sbin:/sbin/shutdown
halt:x:7:0:halt:/sbin:/sbin/halt
mail:x:8:12:mail:/var/spool/mail:/sbin/nologin
uucp:x:10:14:uucp:/var/spool/uucp:/sbin/nologin
operator:x:11:0:operator:/root:/sbin/nologin
games:x:12:100:games:/usr/games:/sbin/nologin
gopher:x:13:30:gopher:/var/gopher:/sbin/nologin
ftp:x:14:50:FTP User:/var/ftp:/sbin/nologin
nobody:x:99:99:Nobody:/:/sbin/nologin
dbus:x:81:81:System message bus:/:/sbin/nologin
vcsa:x:69:69:virtual console memory owner:/dev:/sbin/nologin
abrt:x:173:173::/etc/abrt:/sbin/nologin
haldaemon:x:68:68:HAL daemon:/:/sbin/nologin
ntp:x:38:38::/etc/ntp:/sbin/nologin
saslauth:x:499:76:Saslauthd user:/var/empty/saslauth:/sbin/nologin
postfix:x:89:89::/var/spool/postfix:/sbin/nologin
sshd:x:74:74:Privilege-separated SSH:/var/empty/sshd:/sbin/nologin
tcpdump:x:72:72::/:/sbin/nologin
centos:x:500:500:Cloud User:/home/centos:/bin/bash
prakash:x:501:501:2018/04/12:/home/prakash:/bin/bash
apache:x:48:48:Apache:/var/www:/sbin/nologin
nagios:x:498:498::/var/spool/nagios:/sbin/nologin
rpc:x:32:32:Rpcbind Daemon:/var/lib/rpcbind:/sbin/nologin
nrpe:x:497:497:NRPE user for the NRPE service:/var/run/nrpe:/sbin/nologin
magesh:x:502:503:2g Admin - Magesh M:/home/magesh:/bin/bash
thanu:x:503:504:2g Editor - Thanisha M:/home/thanu:/bin/bash
sudha:x:504:505:2g Editor - Sudha M:/home/sudha:/bin/bash
Below are the detailed information about seven fields.
magesh:x:502:503:2g Admin - Magesh M:/home/magesh:/bin/bash
  • Username (magesh): Username of created user. Characters length should be between 1 to 32.
  • Password (x): It indicates that encrypted password is stored at /etc/shadow file.
  • User ID (UID-502): It indicates the user ID (UID) each user should be contain unique UID. UID (0-Zero) is reserved for root, UID (1-99) reserved for system users and UID (100-999) reserved for system accounts/groups
  • Group ID (GID-503): It indicates the group ID (GID) each group should be contain unique GID is stored at /etc/group file.
  • User ID Info (2g Admin - Magesh M): It indicates the command field. This field can be used to describe the user information.
  • Home Directory (/home/magesh): It indicates the user home directory.
  • shell (/bin/bash): It indicates the user’s bash shell.
If you would like to display only user names from the /etc/passwd file, use the below format.
# cut -d: -f1 /etc/passwd
root
bin
daemon
adm
lp
sync
shutdown
halt
mail
uucp
operator
games
gopher
ftp
nobody
dbus
vcsa
abrt
haldaemon
ntp
saslauth
postfix
sshd
tcpdump
centos
prakash
apache
nagios
rpc
nrpe
magesh
thanu
sudha
To display only home directory users, use the below format.
# cat /etc/passwd | grep '/home' | cut -d: -f1
centos
prakash
magesh
thanu
sudha

4) Using finger Command

The finger comamnd displays information about the system users. It displays the user’s real name, terminal name and write status (as a ‘‘*’’ after the terminal name if write permission is denied), idle time and login time.
# finger magesh
Login: magesh                           Name: 2g Admin - Magesh M
Directory: /home/magesh                 Shell: /bin/bash
Last login Tue Jul 17 22:46 (EDT) on pts/2 from 103.5.134.167
No mail.
No Plan.
Below are the detailed information for the above output.
  • Login: User’s login name
  • Name: Additional/Other information about the user
  • Directory: User home directory information
  • Shell: User’s shell information
  • LAST-LOGIN: Date of last login and other information

5) Using lslogins Command

It displays information about known users in the system. By default it will list information about all the users in the system.
The lslogins utility is inspired by the logins utility, which first appeared in FreeBSD 4.10.
# lslogins -u
UID USER    PWD-LOCK PWD-DENY  LAST-LOGIN GECOS
  0 root           0        0    00:17:28 root
500 centos         0        1             Cloud User
501 prakash        0        0 Apr12/04:08 2018/04/12
502 magesh         0        0 Jul17/22:46 2g Admin - Magesh M
503 thanu          0        0 Jul18/00:40 2g Editor - Thanisha M
504 sudha          0        0 Jul18/01:18 2g Editor - Sudha M
Below are the detailed information for the above output.
  • UID: User id
  • USER: Name of the user
  • PWD-LOCK: password defined, but locked
  • PWD-DENY: login by password disabled
  • LAST-LOGIN: Date of last login
  • GECOS: Other information about the user

6) Using compgen Command

compgen is bash built-in command and it will show all available commands, aliases, and functions for you.
# compgen -u
root
bin
daemon
adm
lp
sync
shutdown
halt
mail
uucp
operator
games
gopher
ftp
nobody
dbus
vcsa
abrt
haldaemon
ntp
saslauth
postfix
sshd
tcpdump
centos
prakash
apache
nagios
rpc
nrpe
magesh
thanu
sudha

Sunday, August 5, 2018

s-tui: CPU Monitoring And Stress Testing Console UI Tool

https://www.linuxuprising.com/2018/08/s-tui-cpu-monitoring-and-stress-testing.html

s-tui console ui for cpu monitoring and stress testing

s-tui is a terminal user interface for monitoring the CPU frequency, utilization, temperature and power.

Besides monitoring your CPU using colored graphs, the TUI (terminal user interface) application can also stress test your CPU using stress or stress-ng. The stress test is configurable, allowing you to specify parameters like time out, Sqrt() and Sync() worker count, Malloc() / Free() worker count, and more.

s-tui can also integrate with FIRESTARTER, a process stress test utility, though note that this requires building s-tui from source, and apparently FIRESTARTER doesn't work on all systems.

The 4 graphs (CPU temperature, utilization, power and frequency) displayed by s-tui can be toggled on / off, and in the s-tui sidebar (you may need to scroll down in its sidebar if the terminal is not full-screen) you'll find the top and current CPU frequency, maximum and current temperature, current fan speed, and maximum and current power:

s-tui console ui for cpu values stress test

What's more, s-tui allows running custom shell scripts when certain thresholds are reached / exceeded, for example when the CPU temperature or utilization reaches a certain value. See how to do this here.

Other s-tui features include:

  • Shows performance dips caused by thermal throttling
  • Allows choosing the temperature sensor to display in the graph
  • Vim h, j, k, l key navigation for its sidebar
  • Save stats to CSV file (-c, --csv)
  • Option to display a single line of stats without TUI on the command line (-t, --terminal), or display it in a JSON format (-j, --json)
  • Option to disable the mouse for TTY systems (-nm, --no-mouse)

For its user interface, s-tui uses Urwid, a console user interface for Python. The tool is lightweight, requiring minimal system resources, and it doesn't require an X server to run.

Download s-tui


The link above includes Ubuntu / Linux Mint installation from PPA, Arch packages and PIP installation (it's not recommended using pip with sudo!).

A s-tui binary is available for download here (download the "s-tui" file).

To be able to run stress tests, you'll need to install stress or stress-ng. In Debian, Ubuntu, Linux Mint, and other Debian-based Linux distributions, you can install the stress package using this command:

sudo apt install stress

or stress-ng (you only need one of these two):

sudo apt install stress-ng

SDKMAN – A CLI Tool To Easily Manage Multiple Software Development Kits

https://www.ostechnix.com/sdkman-a-cli-tool-to-easily-manage-multiple-software-development-kits

sdkman - manage multiple software development kits

Squashing inclusivity bugs in open source software

https://opensource.com/article/18/8/inclusivity-bugs-open-source-software

GenderMag methodology identifies gender bias in software tools to help designers eliminate it.

diversity
Image credits : 
LGBTQ Symbols via Pixabay. CC0.
x

Get the newsletter

Join the 85,000 open source advocates who receive our giveaway alerts and article roundups.
When people talk about diversity and inclusion in open source, the discussion is usually about how to improve a project culture's inclusivity. But can the software itself be gender biased? Our research says it can. So, how do you know if your software is biased? And, if it is, how can you make it more inclusive?
The GenderMag method is a way to identify gender-inclusiveness problems in your software. It is available in a "kit" freely available for download at GenderMag.org.
The method was developed by Oregon State University distinguished professor Margaret Burnett, whose internationally recognized work with students and collaborators has shown gender differences in how people problem-solve with software—from people who are working with Excel formulas to professional programmers.
She was inspired to design GenderMag by a software product manager who asked her for help with his company's application for medical practitioners to program medical devices for patients' needs. His customer base was mostly women, and unfortunately, many women did not like the software. With an all-male development team, the manager was at a loss for what to do.
In this article, I will share reasons for gender biases in software and then describe what these biases mean for open source tools.

How does gender bias sneak into software?

Individual differences in how people problem-solve and use software features often cluster by gender; that is, certain problem-solving styles are more favored by men than by women (and vice versa). Software tools often support the tool developers' preferred style of problem-solving. When those tools are developed by male-dominated teams, they can inadvertently create gender bias.
Research over the past 10 years across numerous populations has identified the following five problem-solving facets that impact how individuals use software:
  1. Motivations for using the software
  2. Style of processing information
  3. Computer self-efficacy
  4. Attitudes toward technological risks
  5. Preferred styles for learning technology
The GenderMag method has identified inclusivity issues in real-world software teams. As the following chart shows, 17 different software teams across different domains have found gender biases in their own software when using GenderMag.

gender-inclusiveness-in-software.png

Percentage of software features with embedded gender biases
Percentage of software features with embedded gender biases.

How does GenderMag work?

The GenderMag method consists of a gender-specific cognitive walkthrough with a set of personas. Each persona represents a subset of a system's target users as they relate to the five problem-solving facets listed above. Tool designers perform the GenderMag walkthrough to identify potential usability issues for new users to a program or feature.
In a GenderMag walkthrough, tool designers answer three questions through the lens of a specific persona's problem-solving facets—one question about each subgoal in a detailed use case and two questions about each interface action.
To explain, let's look at a walkthrough using the Abby Jones persona: Subgoal Q: Will Abby Jones have formed this subgoal as a step to her overall goal? (Yes/no/maybe, why, what facets did you use)
Action Q1: Will Abby Jones know what to do in the user interface at this step? (Yes/no/maybe, why, what facets did you use)
Action Q2: If Abby Jones does the right thing, will she know she did the right thing and is she making progress toward her goal? (Yes/no/maybe, why, what facets did you use).
If your answer to any of the above questions is no or maybe, you might have an inclusivity bug if it is also associated with one of the five facets.

Where are the biases in open source?

Our research shows that open source software would benefit from considering these individual differences in problem-solving styles in software design, as they might be contributing to open source communities' low diversity rates. In a recent field study, five open source teams used the GenderMag method to analyze open source tools in a code-hosting site, an issue tracker, and project documentation.
Using the GenderMag cognitive walkthrough, the open source teams identified gender bias in more than 70% of the tool issues they uncovered.
For example, one frequent problem showing gender bias is the fragmented way issues and their associated information are recorded in GitHub. The teams' analysis revealed that information fragmentation would disproportionately affect individuals with a comprehensive information processing style (i.e., getting a good understanding of the problem by gathering the pertinent information about it before proceeding with a solution). This fragmentation problem has gender bias because comprehensive information processing is statistically more prevalent among women than men. Even so, solving the fragmentation problem would help everyone who prefers comprehensive information processing, regardless of their gender.
Another problem the teams found was related to individual differences in learning style. When information was spread across the project site, with many actions for a newcomer to consider (e.g., clone, fork, different pull request options, finding issues), the teams showed that newcomers who like to learn by tinkering were likely to become disoriented. This problem also has gender biases but they disproportionately affect men because learning by tinkering is statistically more prevalent among men than women. Here again, although this problem affects one gender more than others, solving it would help everyone who prefers to learn by tinkering.
In these examples, the tools and technology were biased against people with problem-solving styles favored by women in one case, and against styles favored by men in the other case. In total, however, most of the technology-embedded problems the open source software teams in our study found were biased against problem-solving styles favored by women.
A subsequent study of newcomers' experiences with open source showed that these teams' findings were correct. The gender biases identified by the open source teams in our previous study matched the problems the newcomers in the second study reported in their diaries. Over the course of several months, these newcomers recorded the problems they faced with the tools and technology as they worked toward making their first contribution to an open source project. The newcomers' diaries showed statistically significant gender differences in how their problem-solving facets interacted with the barriers they encountered when they tried to participate.

What can you do?

You can help by using the freely available GenderMag method to find and then fix inclusivity bugs in the software you're building. You can also contribute to the GenderMag Recorder's Assistant, an emerging open source tool that aims to make the GenderMag process easier. If you're interested in partnering on other ways to help address gender biases in software, please contact us via the project website.

Thursday, August 2, 2018

Docker Guide: Installing Traefik - a Modern Reverse Proxy for Microservices

https://www.howtoforge.com/tutorial/ubuntu-docker-traefik-proxy

Traefik is a modern HTTP reverse proxy and load balancer for microservices. Traefik makes all microservices deployment easy, integrated with existing infrastructure components such as Docker, Swarm Mode, Kubernetes, Amazon ECS, Rancher, Etcd, Consul etc.
Traefik serves as a router for all your microservices applications, routing all client requests to correct microservices destination.
In this tutorial, I will show you step by step how to install and configure Traefik modern reverse proxy as a Docker container on Ubuntu 18.04 LTS (Bionic Beaver).

Prerequisites

  • Ubuntu 18.04
  • Root privileges

What we will do?

  1. Install Docker on Ubuntu 18.04
  2. Install Docker Compose
  3. Create Custom Docker Network
  4. Install and Configure Traefik
  5. Testing

Step 1 - Install Docker on Ubuntu 18.04

For this guide, we will be using the latest docker version that can be installed from the official docker repository.
Add the docker key and repository using the command below.
curl -fsSL https://download.docker.com/linux/ubuntu/gpg | sudo apt-key add -
sudo add-apt-repository \
   "deb [arch=amd64] https://download.docker.com/linux/ubuntu \
   $(lsb_release -cs) \
   stable"
The 'add-apt-repository' command will automatically update all repositories.
Install Docker on Ubuntu
Now install the latest docker-ce.
sudo apt install docker-ce
After the installation is complete, start the docker service and enable it to launch everytime at system boot.
systemctl start docker
systemctl enable docker
The docker community-edition has been installed on Ubuntu 18.04 system, check the installed docker version.
docker version
Check docker version

Additional: Running Docker for non-root user

Docker container can be run under the non-root user. We just need to add the user to the docker group.
Add 'mohammad' user.
useradd -m -s /bin/bash mohammad
Now add the 'mohammad' user to the docker group, then restart the docker service.
usermod -a -G docker mohammad
systemctl restart docker
Test by running the docker hello-world.
docker run -it hello-world
And following is the result.
Running Docker for non-root user

Step 2 - Install Docker Compose

Docker-Compose is a command line tool for defining and managing multi-container docker applications.
Docker Compose is a python script, it can be installed with the python pip command or with the apt command from Ubuntu repository easily. With compose, we can run multiple Docker containers with a single command.
Install docker compose from the repository using the apt command below.
sudo apt install docker-compose
After the installation is complete, check the docker compose version.
docker-compose version
The docker compose 1.17 has been installed on Ubuntu 18.04.
Install Docker Compose

Step 3 - Create Custom Docker Network

In this tutorial, the traefik container will be running on the docker custom network. So we need to create a new docker custom network on the server.
Check the available docker network on the system.
docker network ls
Now create a new custom network named 'proxy' for the traefik container.
docker network create proxy
And you will get a random string of the network container name. Check again the available network.
docker network ls
Shown below is the result.
Create Custom Docker Network
The custom docker network named 'proxy' for traefik has been created.

Step 4 - Install and Configure Traefik Reverse Proxy

In this step, we will create the traefik container with HTTPS letsencrypt enabled (using a domain name 'traefik.hakase-labs.io), and automatically redirect HTTP to HTTPS on traefik.

Traefik Pre-Installation

Before creating all traefik configuration, we need to install 'apache2-utils' for generating the encrypted htpasswd password and creating the new traefik directory.
Install 'apache2-utils' using the apt command below.
sudo apt install apache2-utils -y
Now run the htpasswd command below to generate a new password for traefik dashboard authentication.
htpasswd -nb mohammad password
Keep the result in your note.
mohammad:$apr1$hEgpZUN2$OYG3KwpzI3T1FqIg9LIbi.
Install and Configure Traefik Reverse Proxy
Next, login to the 'mohammad' user.
su - mohammad
Create a new directory named 'traefik' for all traefik configuration.
mkdir -p traefik/
cd traefik/

Create Traefik Configuration

Go to the 'traefik' directory and create a new configuration file 'traefik.toml' using vim editor.
cd traefik/
vim traefik.toml
Paste the configuration below.
#Traefik Global Configuration
debug = false
checkNewVersion = true
logLevel = "ERROR"

#Define the EntryPoint for HTTP and HTTPS
defaultEntryPoints = ["https","http"]

#Enable Traefik Dashboard on port 8080
#with basic authentication method
#mohammad and password
[web]
address = ":8080"
[web.auth.basic]
users = ["mohammad:$apr1$hEgpZUN2$OYG3KwpzI3T1FqIg9LIbi."]

#Define the HTTP port 80 and
#HTTPS port 443 EntryPoint
#Enable automatically redirect HTTP to HTTPS
[entryPoints]
[entryPoints.http]
address = ":80"
[entryPoints.http.redirect]
entryPoint = "https"
[entryPoints.https]
address = ":443"
[entryPoints.https.tls]

#Enable retry sending a request if the network error
[retry]

#Define Docker Backend Configuration
[docker]
endpoint = "unix:///var/run/docker.sock"
domain = "traefik.hakase-labs.io"
watch = true
exposedbydefault = false

#Letsencrypt Registration
#Define the Letsencrypt ACME HTTP challenge
[acme]
email = "hakaselabs@gmail.com"
storage = "acme.json"
entryPoint = "https"
OnHostRule = true
  [acme.httpChallenge]
  entryPoint = "http"
Save and exit.
Note:
All information about the configuration is in the comment section '#...'.

Create Traefik Docker Compose Script

Now create the docker-compose yml script.
vim docker-compose.yml
Paste the configuration below.
version: '3'

services:

  traefik:
    image: traefik:latest
    command: --docker --docker.domain=hakase-labs.io
    ports:
      - 80:80
      - 443:443
    networks:
      - proxy
    volumes:
      - /var/run/docker.sock:/var/run/docker.sock
      - ./traefik.toml:/traefik.toml
      - ./acme.json:/acme.json
    labels:
      - "traefik.frontend.rule=Host:traefik.hakase-labs.io"
      - "traefik.port=8080"
    container_name: traefik
    restart: always

networks:
  proxy:
    external: true
Save and exit.
Note:
  1. We're creating a new container named 'traefik' based on the 'traefik:latest' docker image.
  2. The 'traefik' container will be running on the custom docker network named 'proxy' and expose external ports HTTP 80 and HTTPS 443.
  3. The container will mount traefik configuration 'traefik.toml' and 'acme.json', including the docker sock file.
  4. Label configuration for traefik, the frontend domain name, and the traefik port.

Letsencrypt ACME Configuration

The acme configuration on 'traefik.toml' is used for automatically generate the SSL letsencrypt. And it's required for the storage file 'acme.json'.
Create a new JSON file 'acme.json' and change the permission to '600'.
touch acme.json
chmod 600 acme.json
All logs about SSL letsencrypt info will be saved in the file.

Build Traefik Container

Now we're ready to build our own traefik container using the above configuration files.
cd traefik/
ls -lah
All configuration 'traefik.toml', 'docker-compose.yml', and 'acme.json' files.
Build Traefik Container
Build the container using docker compose command below.
docker-compose up -d
Build the container using docker compose
When it's complete, check the running container.
docker-compose ps
And you will get the Traefik container up and running, expose the external ports HTTP and HTTPS.
Traefik container up and running

Step 5 - Testing

Open your web browser and type the traefik domain name on the address bar. Mine is:
http://traefik.hakase-labs.io/
You will be redirected to the HTTPS connection and will be asked for the username and password authentication.
Password based authentication
Log in with the user 'mohammad' and password is 'password'.
And you will get the Traefik dashboard as below.
Traefik Dashboard
Traefik Health status page.
Traefik Health status page
Traefik modern HTTP reverse-proxy has been installed as a Docker container on Ubuntu 18.04.

Reference