How to Verify Debian and Ubuntu Packages Using MD5 Checksums
Have you ever wondered why a given binary or package installed on
your system does not work according to your expectations, meaning it
does not function correctly as it is supposed to, or perhaps it cannot
even start at all?
While downloading packages, you may face challenges such as unsteady
network connections or unexpected power blackouts. This can result in
the installation of a corrupted package.
Considering this an important factor in maintaining uncorrupted
packages on your system, it is therefore a vital step to verify the
files on the file system against the information stored in the package.
In this article, we will explain how to verify the MD5 checksums of installed packages on Debian-based distributions such as Ubuntu and Mint.
How to Verify Installed Packages Against MD5 Checksums
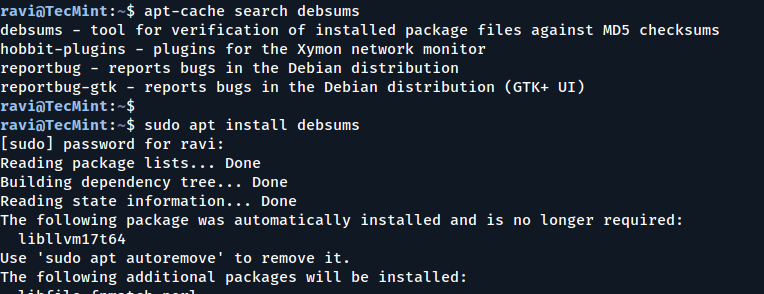
On Debian/Ubuntu systems, you can use the debsums
tool to check the MD5 sums of installed packages. If you want to know
more about the debsums package before installing it, you can use the apt-cache command as follows:
Now it’s time to learn how to use the debsums tool to verify the MD5 sum of installed packages.
Note: I have used sudo with all the commands below, because certain files may not have read permissions for regular users.
Understanding the Output of debsums
The output from the debsums command shows you the file location on the left and the check results on the right.
There are three possible results you can get:
OK – indicates that a file’s MD5 sum is good.
FAILED – shows that a file’s MD5 sum does not match.
REPLACED – means that the specific file has been replaced by a file from another package.
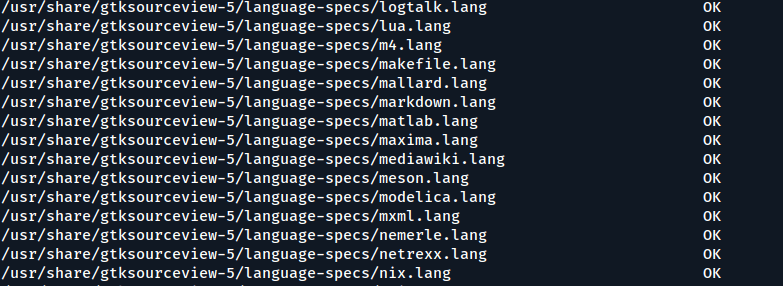
When you run it without any options, debsums checks every file on your system against the stock MD5 sum files.
sudo debsums
Verify MD5 Checksums of Installed Packages
Checking MD5 Sums of All Files for Changes
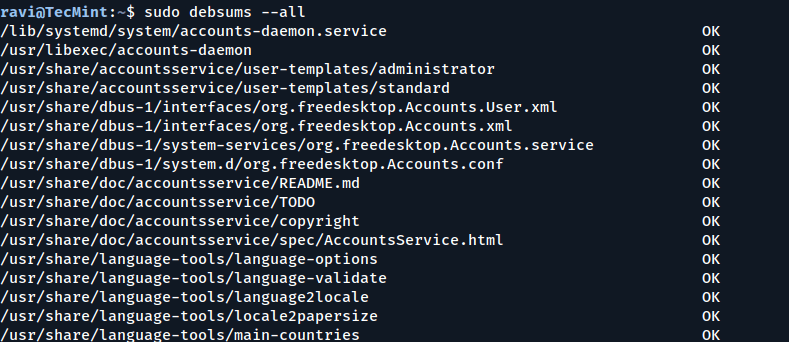
To enable checking every file and configuration file for changes, include the -a or --all option.
sudo debsums --all
Check Every File and Configuration for Changes
Checking MD5 Sums of Only Configuration Files
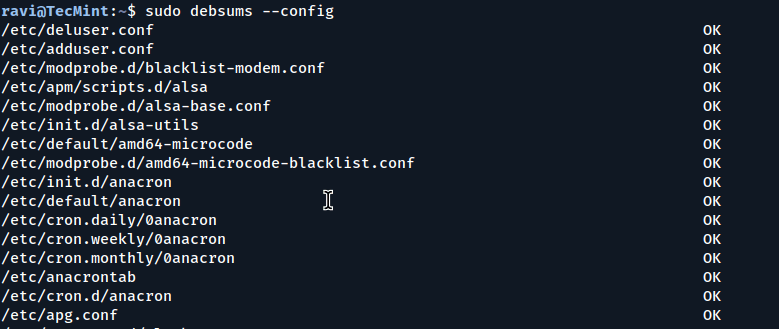
It is also possible to check only the configuration files, excluding all other package files, by using the -e or --config option.
sudo debsums --config
Check MD5 Sums of Configuration Files
Displaying Only Changed Files
To display only the changed files in the output of debsums, use the -c or --changed option.
sudo debsums --changed
Checking for Modified Files
Listing Missing MD5 Sums of Files
To display files that do not have MD5 sum information, use the -l or --list-missing option. On my system, this command does not show any files.
sudo debsums --list-missing
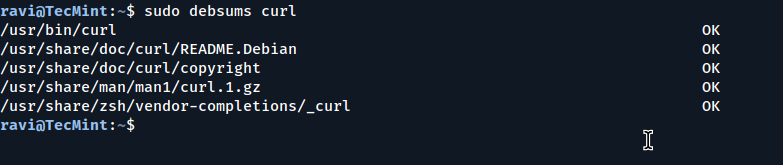
Verify the MD5 Sum of a Single Package
You can also verify the MD5 sum of a single package by specifying its name.
sudo debsums curl
Verify MD5 Checksums of Single Package
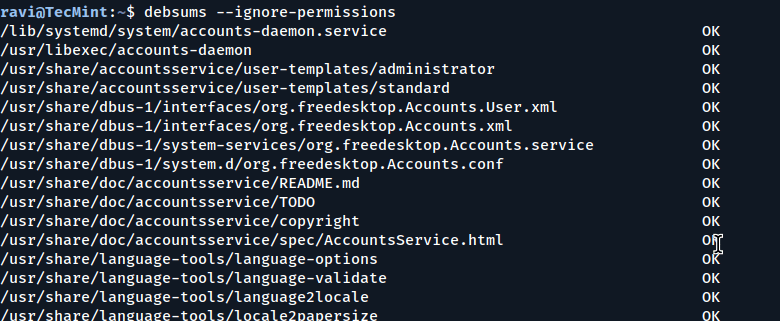
Ignoring File Permission Errors in Debsums
Assuming that you are running debsums as a regular user without sudo, you can treat permission errors as warnings by using the --ignore-permissions option:
debsums --ignore-permissions
Using Debsums Without Sudo Privileges
How to Generate MD5 Sums from .Deb Files
The -g option tells debsums to generate MD5 sums from the .deb contents.
Here are the additional options you can use:
missing – instructs debsums to generate MD5 sums from the .deb for packages that don’t provide one.
all – directs debsums to ignore the on-disk sums and use the one present in the .deb file, or generate one from it if none exists.
keep – tells debsums to write the extracted/generated sums to /var/lib/dpkg/info/package.md5sums file.
nocheck – means the extracted/generated sums are not checked against the installed package.
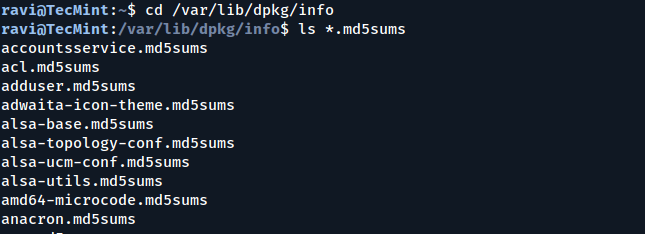
When you look at the contents of the /var/lib/dpkg/info/ directory, you will see MD5 sums for various files that packages include, as shown below:
cd /var/lib/dpkg/info
ls *.md5sums
Listing MD5 Sum Files from Installed Packages
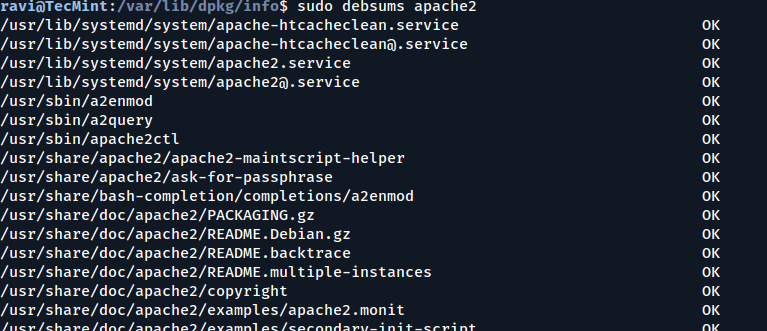
You can generate an MD5 sum for the apache2 package by running the following command:
sudo debsums --generate=missing apache2
Since the apache2 package on my system already has MD5 sums, it will show the same output as running.
sudo debsums apache2
Generating MD5 Sums for a Specific Package
For more interesting options and usage information, look through the debsums man page:
man debsums
Conclusion
In this article, we shared how to verify installed Debian/Ubuntu
packages against MD5 checksums. This can be useful to avoid installing
and executing corrupted binaries or package files on your system by
checking the files on the file system against the information stored in
the package.
For any questions or feedback, feel free to use the comment form
below. You can also offer one or two suggestions to make this post
better.
Have you ever wondered just how much power your computer is using? With energy costs going up, it’s good to know. That’s why Naveen Kulandaivelu, a robotics and machine learning engineer, created WattWise. It’s a real time power monitoring cli tool that runs in your computer’s terminal and helps you track power usage.
Table of Contents
What is WattWise?
WattWise is a lightweight, opensource, command-line tool to monitor the power usage of your system in real-time.
WattWise Dashboard
WattWise leverages smart plugs (primarily TP-Link Kasa) to gather real-time power data and presents it in a user-friendly terminal-based dashboard.
Initially,
the developer created it to track the power usage of his
high-performance workstation. The future goal of this project is to
automatically throttle CPU and GPU performance based on electricity
pricing (Time-of-Use) and system load, aiming to reduce energy costs
during peak hours.
The power monitoring functionality is currently available, while the automatic power management features are under development.
Features
Here are some cool things WattWise can do right now:
1. Real-time power monitoring
It shows you the current power your system is using in watts (that's the amount of power) and amperes (that's the electrical current).
2. Multiple connection options
You can connect WattWise directly to your TP-Link Kasa smart plugs or even through Home Assistant if you use that smart home platform. This gives you flexibility in how you get the power data.
3. Colour-coded display
To make it super easy to understand, the power usage is shown with colours.
If it's green, you're using less than 300 watts;
yellow means you're between 300 and 1200 watts;
and red pops up if you're going over 1200 watts.
It's a quick way to see if your system is working hard!
4. Historical data
WattWise
can even show you charts of your power usage over time right in the
terminal. It uses simple block characters so it works on pretty much any
terminal. This helps you see trends and how your power consumption
changes.
5. Simple command-line interface
Don't worry if you're not a super techy person! The commands are straightforward.
For example, just typing wattwise can give you a quick view, and wattwise --watch keeps monitoring in real-time with those cool charts.
6. Raw output
If
you're into scripting and want to use the power data in other tools,
WattWise can even output just the raw wattage number using the --raw flag.
7. Configurable refresh
You can even tell WattWise how often you want it to check the power usage, say every 5 seconds with wattwise --watch --interval 5.
Why Was WattWise Created?
Naveen built a powerful workstation for tasks like AI work. But using a high-performance system means higher electricity bills.
He had TP-Link Kasa smart plugs in his home. These plugs can measure electricity use. The Kasa app and Home Assistant could show the data, but switching between apps was inconvenient.
He wanted something that worked inside the terminal. That’s how WattWise was born.
How to get WattWise?
WattWise is open-source and free to use! You can grab it from GitHub. There are a couple of ways to install it: Using Pip or Using Docker.
Please note that WattWise requires Python 3.8 or later. For Docker usage, you will need to have Docker installed on your system.
Also,
note that the power management features, which include automatic
throttling, currently require Linux systems with appropriate CPU/GPU
frequency control capabilities.
For easier Docker usage, you can also create a bash alias as described in the documentation:
Add the following line to your ~/.bashrc or ~/.zshrc file:
alias wattwise='docker run -it --rm --network host \
  -v ~/.config/wattwise:/root/.config/wattwise \
  -v ~/.local/share/wattwise:/root/.local/share/wattwise \
  wattwise'
After adding the alias, you'll need to source your bash configuration (e.g., source ~/.bashrc or source ~/.zshrc) for the alias to take effect.
You can then use the wattwise command directly, just like the normal command:
wattwise
wattwise --watch
Here's the visual demonstration of WattWise:
Monitor Your PC's Power Usage Using WattWise
Future Plans
While the current version is great for monitoring, Naveen's original idea was even more ambitious.
Since his electricity provider uses Time-of-Use (ToU) pricing – meaning electricity costs more during peak hours – he wanted WattWise to be able to automatically adjust his computer's performance based on these prices.
Imagine this: during those expensive peak hours, WattWise could automatically reduce the speed of his CPU and maybe even his GPUs.
This would use less power and save him some money. Then, when the prices drop, it could go back to full speed.
Naveen
has even done some testing that showed reducing his CPU speed could
save around 225 watts. That can add up! The plan is to use some clever
tech, like a Proportional-Integral (PI) controller, to manage this power and performance balancing act.
Current Limitations
It's still a work in progress, and there are a few things to keep in mind:
Right now, it only supports one smart plug at a time.
It only works with TP-Link Kasa smart plugs that can monitor energy usage (like the EP25).
For the power management features (the automatic throttling), you'll need a Linux system with the ability to control CPU/GPU frequencies.
The automatic power optimiser part isn't fully ready yet – the current open-source version on GitHub is mostly the monitoring dashboard.
What's next for WattWise?
Naveen has lots of ideas for the future, including:
Supporting multiple smart plugs and showing combined power usage.
Adding compatibility for more brands of smart plugs.
Improving the visualisations and maybe even allowing you to export the data.
Integrating with other power management tools.
Making the predictions for power usage even smarter.
Naveen's goal with WattWise was simple:
to solve his own problem of wanting to monitor his power-hungry
workstation from the terminal he always has open. The idea of
automatically saving money during peak electricity hours is just a
fantastic bonus.
The dashboard part of WattWise is open-source under the MIT license. So, if you're interested, feel free to check out the official WattWise GitHub Repository. You can also contribute your own ideas and help make it even better!
Linux Problem-Solving Scenarios: Real-World Challenges & Solutions
Linux is a powerful and reliable operating system,
but even seasoned users encounter unexpected problems. Whether it’s a
deleted file, a forgotten root password, or a sluggish system, knowing
how to troubleshoot efficiently is key to becoming a true Linux expert.
This guide presents real-world Linux problem-solving scenarios along
with step-by-step solutions, which are common among system
administrators, developers, and everyday Linux users.
Scenario 1: You Accidentally Deleted an Important File
You accidentally deleted an important file using the rm command, and now you need to recover it. Unlike Windows and macOS, Linux does not have a built-in “Recycle Bin” for files deleted from the terminal.
Your recovery options depend on the filesystem in use.
For EXT3/EXT4 Filesystems
Use extundelete, which is an open-source utility designed to recover deleted files from ext3 and ext4 filesystems in Linux.
Run testdisk and follow the interactive prompts to restore lost files.
sudo testdisk
Prevention Tips:
Use trash-cli: Instead of rm, use trash-cli to send files to a recoverable trash bin.
sudo apt install trash-cli
trash-put myfile.txt
Enable regular backups: Set up rsync or Timeshift to automatically back up important files.
Scenario 2: Recovering a Forgotten Root Password
You forgot your root password and can’t perform administrative tasks,
which means you can’t install software, change system settings, or
access critical files.
You can reset the root password by booting into recovery mode or modifying the GRUB bootloader.
Using Recovery Mode (Ubuntu/Debian)
First, reboot your system and hold Shift during startup to access the GRUB menu, then select “Advanced options” → “Recovery mode” and choose “Drop to root shell prompt“.
Here, remount the root filesystem as writable and reset the root password.
mount -o remount,rw /
passwd root
Reboot the system.
reboot
Using rd.break (RHEL/CentOS/Fedora)
First, reboot your system, press e at the GRUB menu and find the line starting with linux and add rd.break at the end.
Next, mount the root filesystem and reset the root password.
mount -o remount,rw /sysroot
chroot /sysroot
passwd root
Use SSH keys instead of passwords for authentication.
Scenario 3: You Installed a Package, but It’s Not Working
You installed a package, but it says “command not found” when you try to run it, which usually happens when the binary isn’t in your system’s PATH, the package isn’t installed correctly, or there’s a missing dependency.
The solution is, first you need to verify that the package is installed or not.
Next, check if the command is in your system PATH.
which package-name
echo $PATH
If the binary is in a non-standard location, add it to PATH:
export PATH=$PATH:/usr/local/bin
Prevention Tips:
Restart the terminal or run hash -r after installing new packages.
Use package managers like Snap or Flatpak, which handle dependencies better.
Scenario 4: Your System is Running Out of Disk Space
Your system displays a “No space left on device” error, preventing software updates, logging, and normal operations.
Here’s how to reclaim disk space and keep your system running smoothly.
Step 1: Check Disk Usage
The solution is, first you need to check how much space is used on each partition on your system using the df command.
df -h
Step 2: Find and Delete Large Files
Next, locate the largest files consuming space by running du command, which will scan your system and list the top 10 largest files or directories. Delete unnecessary files using rm or move them to an external drive.
du -ah / | sort -rh | head -10
Step 3: Remove Unnecessary Logs
Logs are essential for troubleshooting and monitoring system
activity, but they can grow rapidly and consume a significant amount of
disk space.
Over time, old logs may no longer be needed, making them prime candidates for cleanup.
sudo journalctl --vacuum-time=2d  # Deletes logs older than 2 days
sudo apt autoclean                # Removes outdated package files
Step 4: Remove Old Kernels (Ubuntu/Debian)
When you update your system, especially on Ubuntu or Debian-based distributions, new versions of the Linux kernel are often installed.
However, the old kernels are not automatically removed and over time,
these old kernels can accumulate and take up a significant amount of
disk space.
Removing them is a safe and effective way to free up space without affecting your system’s functionality.
sudo apt autoremove --purge
Prevention Tips:
Set Up Log Rotation: Use logrotate to automatically manage log file sizes and retention periods.
Monitor Disk Usage: Install tools like ncdu to track disk usage and identify space hogs.
Regular Cleanups: Schedule periodic cleanups to remove temporary files, caches, and unused packages.
Scenario 5: Your Server is Suddenly Unresponsive
You are managing a Linux server, and suddenly, it stops responding and you try connecting via SSH,
but the connection times out or refuses to establish. You might even
notice that the server is still powered on, but it doesn’t react to any
commands.
This situation can be caused by various issues, including:
Disk I/O bottlenecks, where the system is overloaded with read/write operations.
Kernel panics or system crashes.
Network failures, preventing remote access.
To restore control, follow these troubleshooting steps.
Step 1: Access the Server Locally or via TTY
If SSH isn’t working, try accessing the server directly or through a TTY session:
On a physical machine, use the local console.
On a virtual machine, use the hypervisor’s console.
For Linux systems, switch to another TTY session using Ctrl + Alt + F2 (or F3, F4, etc.).
Step 2: Check System Load
Once logged in, check the system’s load and resource usage, which
will show the system’s load averages over 1, 5, and 15 minutes. A load
value higher than the number of CPU cores indicates high demand.
uptime
Next, use top or htop to monitor processes in real time:
top
Or
htop
Look for processes consuming excessive CPU or memory.
Step 3: Identify and Kill Runaway Processes
To identify the most resource-intensive processes, run:
ps aux --sort=-%cpu | head
This lists the top CPU-consuming processes, where you can find a problematic process, and terminate it using:
kill -9 PID
Replace PID with the process ID of the problematic application.
Step 4: Check System Logs
If the system is still responsive, check logs for errors:
sudo tail -f /var/log/syslog
Or
sudo dmesg | tail
These commands display recent system messages and kernel logs, which can help identify hardware or software issues.
Step 5: Reboot Safely Using SysRq
If the system is completely frozen, use the SysRq key combination to reboot safely:
echo b > /proc/sysrq-trigger
This triggers a safe reboot, ensuring data integrity by syncing disks and unmounting filesystems.
Conclusion
Troubleshooting is an essential skill for every Linux user. Whether
it’s recovering deleted files, resetting passwords, or fixing system
errors, knowing the right commands can save time and frustration.
Do you have your own troubleshooting tips? Share them in the comments! Let’s build a helpful Linux community together.
Fd: The Find Command Alternative For Mastering File Search In Linux
Supercharge Your File and Directory Searches with fd Command: The Ultimate File Search Tool for Linux.
Written by skPublished:Updated:3541 views23 mins read
0 comments8
In this detailed tutorial, we will discuss what is fd, key differences between the fd and find command. We will also learn how to install and use fd command to efficiently search files and directories in Linux.
Table of Contents
Introduction
When
it comes to managing files on a computer, finding specific files or
directories quickly and efficiently can be a common task.
Whether
you're a developer looking for a specific code file, a system
administrator searching for log files, or a regular user trying to
locate a document, having a reliable and user-friendly file search tool
can greatly simplify the process. One such tool that has gained
popularity among Linux users is "fd".
Designed as a user-friendly alternative to the traditional find command, fd provides a more intuitive and efficient method for searching files and directories.
What is fd Command?
fd
is a program that helps you find files and directories in your
computer's file system. It's designed to be a simple, fast, and
easy-to-use alternative to the "find" command. While it may not have all the advanced features of "find," it offers convenient and practical options for most common uses.
fd is written in Rust,
a programming language known for its focus on speed and reliability. It
aims to provide an efficient and user-friendly way to search for files
and directories on your Linux system.
Key Differences Between fd and find Command
The key difference between the fd and find commands is as follows:
Syntax: The fd command has a simpler and more intuitive syntax compared to the "find" command. Instead of using lengthy command syntax like "find -iname 'PATTERN'", you can directly use "fd PATTERN" to search for files.
Patterns:
fd supports both regular expressions and glob-based patterns by
default. This allows you to use flexible and powerful patterns to match
file names or patterns of your choice.
Speed:
fd is designed to be very fast. It achieves this by parallelizing the
process of traversing directories, resulting in quicker search results
compared to "find".
Colors: Similar to the "ls"
command, fd uses colors to highlight different types of files. This
makes it easier to visually identify different file types in the search
results.
Parallel Execution: fd supports
parallel execution of commands. This means it can perform multiple
search operations simultaneously, further improving performance in
certain scenarios.
Smart Case: By default, fd
performs case-insensitive searches. However, if your search pattern
contains an uppercase character, it automatically switches to
case-sensitive mode. This smart behavior helps in more accurate
searches.
Ignoring Hidden and Git-Ignored Files:
fd ignores hidden directories and files by default, so they won't
appear in the search results. Additionally, it also ignores patterns
specified in your .gitignore file, making it convenient when working with Git repositories.
Command Name Length: The name of the fd command is 50% shorter than the "find" command. This makes it easier to type and remember when using the tool.
Overall, fd aims to provide a simpler, faster, and more user-friendly alternative to "find"
by offering intuitive syntax, advanced pattern matching, speed
optimizations, visual enhancements, and convenient default behaviors.
Install fd in Linux
To install fd on different Linux distributions, follow the specific instructions provided below:
Note: The binary name for Debian is fdfind, so it's recommended to create a symbolic link to fd.
If the directory $HOME/.local/bin does not exist, you can create it and add it to your $PATH environment variable. Here are the steps to do so:
Check if the directory $HOME/.local/bin already exists by running the following command:
$ ls $HOME/.local/bin
If the directory does not exist and the command from the previous
step returns an error, create the directory using the following command:
$ mkdir -p $HOME/.local/bin
Next, you need to add the directory to your $PATH environment variable. Edit your shell configuration file, such as ~/.bashrc, ~/.bash_profile, or ~/.zshrc, depending on the shell you are using.
Open the shell configuration file in a text editor:
$ nano ~/.bashrc
Add the following line at the end of the file:
export PATH="$HOME/.local/bin:$PATH"
Save the file and exit the text editor. In Nano, you can do this by pressing Ctrl + X, then Y, and finally Enter.
To apply the changes, either restart your terminal or run the following command:
$ source ~/.bashrc
Now, the directory $HOME/.local/bin has been created (if it didn't exist before), and it has been added to your $PATH environment variable. This means that any executable files placed in $HOME/.local/bin will be accessible from anywhere in your system by simply typing their names in the terminal.
Note: The binary name for Ubuntu is fdfind, so it's recommended to create a symbolic link to fd.
On Ubuntu (for older versions):
Download the latest .deb package from the release page and install it using dpkg package manager like below:
$ sudo dpkg -i fd_8.7.0_amd64.deb # Adapt the version number and architecture accordingly
On FreeBSD:
# pkg install fd-find
From source (using Rust's package manager cargo):
Since fd is written in Rust, you can install it using cargo package manager. Just make sure Rust is installed on your Linux system. And then run the following command to install fd using cargo:
$ cargo install fd-find
These instructions should guide you through the installation process of fd on your chosen Linux distribution.
Mastering File Search with fd Command in Linux
1. Getting Help
Before start using fd command, you need to understand the various command line options provided by fd.
To get a summary of all the available command line options for fd, you have two options:
For a brief and concise help message, you can run fd -h in the terminal.
Display fd Command Help
If you prefer a more detailed version of the help message, you can run fd --help.
2. Basic Search
The fd command is specifically designed to search for entries (files and directories) in your filesystem. The simplest way to use fd is by providing it with a single argument, which is the search pattern.
Let us try a simple search.
Example 1:
For instance, let's say you want to find an old script of yours that includes the word "file" in its name. You can run fd file
in the terminal. This command will search the current directory and all
its subdirectories recursively for any entries that contain the pattern
"file".
$ fd file
In the given example, the command fd file is used to search for entries containing the word "file" in their names.
file1
file2
testdir/file3
testdir/file4
Basic Search with fd Command
Here's an explanation of the example results:
file1 and file2: These are two files found in the current directory that have "file" in their names. They match the search pattern "file".
testdir/file3 and testdir/file4:
These are two files found within the subdirectory "testdir". They also
have "file" in their names and match the search pattern "file".
Overall, the fd
command, when executed with the search pattern "file", searches the
current directory and its subdirectories recursively. It returns a list
of files that contain the specified pattern in their names.
Example 2:
Let
us try a different example with more sub-directories and files. Suppose
you want to find any files or directories related to recipes. You can
use fd with the search pattern "recipe" as follows:
$ fd recipe
When
you execute this command, fd will recursively search the current
directory and its subdirectories for any entries that contain the
pattern "recipe". Here's a sample example of the search results:
In this example, fd found the directory "Recipes" in the "Documents" folder, a text file named "chocolate-cake-recipe.txt" within the "Recipes" directory, a subdirectory called "pasta-recipes" within "Recipes", and a picture file named "recipe-book-cover.jpg" in the "Pictures/Food" directory. These entries all match the search pattern "recipe".
3. Regular Expression Search
We can perform regular expression search with fd command. A regular expression allows us to define complex patterns to search for specific entries.
Example 1:
Take a look at the following example:
$ cd /etc/
$ fd '^x.*rc$'
In the given example, the fd command is used with a regular expression search pattern. The search pattern is specified as ^x.*rc$, which means it should start with "x" and end with "rc".
Sample output for the above command is given below:
X11/xinit/xinitrc: This entry is found in the /etc
directory. It matches the regular expression search pattern as it
starts with "x" and ends with "rc". It represents a file named xinitrc located within the X11/xinit directory.
X11/xinit/xinputrc: This entry is found in the /etc
directory. It matches the regular expression search pattern as it
starts with "x" and ends with "rc". It represents a file named xinputrc located within the X11/xinit directory.
X11/xinit/xserverrc: This entry is also found in the /etc
directory. It matches the regular expression search pattern as it
starts with "x" and ends with "rc". It corresponds to a file named xserverrc located within the X11/xinit directory.
In this example, the fd command searches the /etc directory (as indicated by cd /etc) and its subdirectories for entries that match the specified regular expression pattern ^x.*rc$. The ^ represents the start of the line, .* matches any characters in between, and $
denotes the end of the line. Therefore, any entries that start with "x"
and end with "rc" are considered matches and included in the search
results.
Example 2:
Let's consider a different example for a regular expression search using the fd command.
Suppose
you want to find all files that contain numbers in their names. You can
use a regular expression to accomplish this. Here's an example:
$ fd '[0-9]+'
In this case, we are using the regular expression [0-9]+, which represents a sequence of one or more digits. Here is the output of the above command:
In this example, the fd command searches the current directory and its subdirectories using the regular expression [0-9]+. It returns all the files that have one or more digits in their names. The search results include files such as file1.txt, file2.jpg, document_2021.docx, and report_123.pdf, which match the specified regular expression pattern.
By using regular expressions with fd,
you can create flexible and powerful search patterns to find entries
that meet specific criteria, such as containing numbers, specific
characters, or following certain patterns.
4. Search Files and Directories in a Specific Directory
When you want to search in a specific directory using the fd command, you can provide that directory as a second argument after the search pattern.
Here's an example for searching in a specific directory using the fd command:
Suppose you want to search for files with the extension ".log" in the "var/log" directory. You can use the following command:
$ fd .log /var/log
In this example, we are searching for entries that have the ".log" extension within the "/var/log" directory.
These files are found within the "/var/log" directory and its subdirectories, and they have the ".log" extension.
By providing the target directory as the second argument to fd,
you can narrow down the search to that specific directory. This allows
you to search within a particular location of interest, making it easier
to find relevant entries within a large filesystem.
5. List All Files Recursively
To list all files recursively using the fd
command, you can call it without any arguments. This is particularly
helpful for quickly getting an overview of all entries (files and
directories) in the current directory, similar to using ls -R command.
For example, if you run fd
without any additional arguments, it will display all the entries
within the current working directory recursively. The output might look
like this:
To list all files in a specific directory, you can use a catch-all pattern such as . or ^ along with the directory path. For instance, running fd . testdir/ will provide a list of all files within the testdir/ directory, including its subdirectories.
When we want to search for files with a specific file extension, we can use the -e (or --extension) option with the fd command. This is useful when we are interested in files of a particular type.
Here's an example for searching files with a specific file extension using the fd command:
Let's say you are working on a project and want to find all Python script files (files with the ".py" extension) within the project directory and its subdirectories. You can use the following command:
$ fd -e py
Running this command in the project directory will search for files with the ".py" extension.
These files are the Python script files found within the project directory and its subdirectories.
The -e option can also be combined with a search pattern. For instance, running the command:
$ fd -e docx file
will search for files with the extension ".docx" that also contain the pattern "file". The output might look like:
file5.docx
testdir/file6.docx
These files match the search criteria: they have the ".docx" extension and contain the pattern "file".
By utilizing the -e option with fd and specifying the desired file extension, you can conveniently search for and locate files of a particular type.
7. Searching for a Particular File Name
If you want to search for a file with an exact match to the search pattern, you can use the -g (or --glob) option with the fd command.
For instance, let's say you want to find a file named "ssh_host_rsa_key.pub" within the "/etc" directory and its subdirectories. You can run the following command:
$ fd -g ssh_host_rsa_key.pub /etc
In this example, the fd command will search for a file that has an exact match to the provided search pattern "ssh_host_rsa_key.pub" within the "/etc" directory.
The output for this command will be:
/etc/ssh/ssh_host_rsa_key.pub
This file matches the exact search pattern "ssh_host_rsa_key.pub" and is found within the "/etc" directory.
By utilizing the -g option with fd,
you can search for files that have an exact name match, making it
easier to locate specific files within a given directory and its
subdirectories.
8. Search for Hidden Files
By default, when using the fd
command, it does not search hidden directories and does not display
hidden files in the search results. However, if you want to change this
behavior, you can make use of the -H (or --hidden) option.
Example 1:
Take a look at the following example.
$ fd bash
This
command should return all files that match the search pattern "bash".
But it didn't return any such files in my Debian 12 system.
Now let us run the same command again with -H flag and see what happens.
$ fd -H bash
.bash_history
.bash_logout
.bashrc
Searching for Hidden Files with fd Command
Now we see some output. This command searches for files and directories that match the search pattern "bash" and includes hidden entries in the search results.
Example 2:
Now, we will see another example. Let us search for all files with the extension ".txt" within the testdir directory (including its subdirectories) using command:
$ fd . -e txt testdir/
It doesn't return anything in my system. Now let us run the same command with -H flag.
$ fd . -H -e txt testdir/
testdir/.secret.txt
Search Hidden Files
See? Now it displays a hidden file named secret.txt.
9. Search for Ignored Files
If you are working in a directory that contains Git repositories or is a Git repository itself, fd has a default behavior of not searching folders and not displaying files that match any patterns specified in the .gitignore file. However, you can change this behavior by using the -I (or --no-ignore) option.
For instance, consider the following example:
$ fd num_cpu
In this case, fd
is searching for files or directories that contain the pattern
"num_cpu". However, if there are any matches within folders or files
that are ignored by Git according to the .gitignore file, they will not be displayed in the search results.
To override this behavior and include the ignored files and folders in the search results, you can use the -I option, like so:
$ fd -I num_cpu
With this command, fd
will search for files or directories that match the pattern "num_cpu",
regardless of whether they are ignored by Git. The search result may
include files or folders that were previously excluded due to Git's
ignore rules.
If you want to search for all files and directories, including hidden entries and those ignored by Git, you can combine the -H (or --hidden) and -I (or --no-ignore) options:
$ fd -HI search_pattern
By using the -HI option together, fd
will search for all files and directories, displaying both hidden
entries and those ignored by Git. This allows you to perform a
comprehensive search that includes all files and directories within the
specified search pattern.
10. Combine fd with other Commands
Instead of simply displaying the search results, you may often need to perform actions on them. fd offers two methods for executing external commands on each search result:
The -x (or --exec) option allows you to run an external command individually for each search result in parallel.
The -X (or --exec-batch) option executes the external command once with all the search results as arguments.
Here are some examples to illustrate their usage.
Example 1:
Let's
say you want to find all text files within a directory and perform a
word count on each file. You can achieve this using the -x (or --exec) option with the wc command:
$ fd -e docx -x wc -w
In this example, fd searches for files with the .docx extension. The -x option is used to execute the external command wc -w for each search result. The wc command with the -w option is used to count the number of words in each file.
Each line shows the word count followed by the file name.
By utilizing the -x option and specifying the external command (wc -w
in this case), you can perform actions on each search result
individually. This enables you to automate various tasks or apply
operations to multiple files found by fd.
Example 2:
Here's the additional example for converting all *.jpg files to *.png files using the fd command:
$ fd -e jpg -x sh -c "convert {} {.}.png"
In this example, fd searches for files with the .jpg extension. The -x option is used to execute the external command sh -c, allowing us to run a shell command with multiple arguments. The shell command consists of the following part:
convert {} {.}.png is the command executed for each *.jpg file found. The convert command is a popular image conversion utility, and {} represents the matched file name. {.} is used to extract the file name without the extension, and png is appended to convert the file to the *.png format.
By running this command, each *.jpg file found by fd will be converted to the *.png format using the convert command.
Please make sure to have the necessary dependencies, such as the ImageMagick package, installed for the convert command to work properly.
11. Exclude Specific Files and Directories
To exclude specific files or directories during a search, you can utilize the -E (or --exclude) option with the fd
command. This option allows you to specify an arbitrary glob pattern as
an argument to exclude certain entries from the search results.
For example, if you want to exclude files with the .docx extension from the search, you can run the following command:
$ fd -E '*.docx' ...
In this example, fd will perform the search while excluding any files that match the *.docx glob pattern. The ... represents the current directory.
By using the -E option with fd
and providing a glob pattern, you can easily exclude specific file
types or directories from the search results, narrowing down the scope
of your search to focus on the desired entries.
12. Search and Delete Files
You can utilize fd to delete files and directories that match your search pattern. If you only want to remove files, you can use the --exec-batch (or -X) option to invoke the rm command. Here's an example to recursively remove all .docx files:
$ fd -H '^\docx$' -tf -X rm
In this example, fd searches for .docx files, and the -H option ensures hidden files are included. The -tf option is used to display the file path relative to the current directory. The -X rm part executes the rm command on each matched file.
It's recommended to run fd without -X rm first if you are uncertain. Alternatively, you can use the interactive mode of rm by adding the -i option:
$ fd -H '^\.docx$' -tf -X rm -i
With this command, you will be prompted to confirm the deletion of each file.
Always
exercise caution when using deletion commands to avoid unintentional
removal of important files. Make sure to review the search results
before executing commands that delete files and directories.
13. Use fd Command with other Programs
You can integrate fd with other programs. For instance, you can utilize fd in combination with xargs or parallel to perform command execution on the search results.
Although fd has its own built-in options for command execution (-x/--exec and -X/--exec-batch), you can still use it with xargs if you prefer.
Here's an example:
$ fd -0 -e docx | xargs -0 wc -l
Sample output for the above command:
  0 ./document_2023.docx
  0 ./file6.docx
  4 ./testdir/file5.docx
  4 total
In this example, fd is used to search for files with the .docx extension (-e docx). The -0 option is used with both fd and xargs to separate the search results and input by the NULL character (\0) instead of newlines. This ensures proper handling of filenames that may contain spaces or other special characters.
The output of fd is then passed as input to xargs, which in turn executes the wc -l command on each file. The wc -l command counts the number of lines in each file.
Frequently Asked Questions
Q: What is fd?
A: fd is a command-line tool in Linux used for finding files and directories in a fast and user-friendly manner.
Q: How does fd differ from the find command?
A: fd offers a more intuitive syntax, faster performance, and sensible defaults compared to find. It ignores hidden files by default, integrates with Git ignore patterns, and provides a simpler and faster search experience.
Q: Is fd an alternative to the find command?
A2: fd is a simpler and more intuitive alternative to the find
command. It provides opinionated defaults, faster performance due to
parallelized directory traversal, and features like colored output and
pattern matching.
Q: How do I install fd?
A: The installation method for fd depends on your Linux distribution. For example, you can install fd in Fedora using sudo dnf install fd. Refer to the official documentation or package manager instructions specific to your distribution.
Q: Can fd search using regular expressions?
A: Yes, fd treats the search pattern as a regular expression by default. You can perform more complex searches using regular expressions.
Q: Can fd exclude hidden files and directories from the search results?
A: Yes, by default, fd ignores hidden files and directories.
Q: How to include hidden files and directories using fd in search results?
A: You can use the -H or --hidden option to include hidden files in search results.
Q: How can I exclude specific files or directories from the search?
A: Use the -E or --exclude option followed by a glob pattern to exclude specific files or directories from the search results.
Q: Can I execute commands on the search results using fd?
A: Yes, fd provides options like -x and -X to execute external commands on the search results. You can also combine fd with tools like xargs or parallel for more flexibility.
Q: Is fd faster than the find command?
A: Yes, fd is generally faster than find due to its parallelized directory traversal and optimized search algorithms. You can refer the benchmark results in this link- https://github.com/sharkdp/fd#benchmark
Q: Can fd be used with other programs for command execution on search results?
A: Yes, you can utilize fd in combination with other programs like xargs or parallel to perform command execution on the search results.
Conclusion
The fd
command is a user-friendly and efficient tool for finding files and
directories in Linux. With its intuitive syntax, fast performance, and
helpful features like pattern matching and filtering, fd simplifies file searches and enhances command-line productivity.