Tuesday, July 15, 2014

How to set up two-factor authentication for SSH login on Linux

http://xmodulo.com/2014/07/two-factor-authentication-ssh-login-linux.html

With many high-profile password leaks nowadays, there is a lot of buzz in the industry on "multi-factor" authentication. In a multi-factor authentication system, users are required to go through two distinct authentication procedures: providing something they know (e.g., username/password), and leveraging something they have "physical" access to (e.g., one-time passcode generated by their mobile phone). This scheme is also commonly known as two-factor authentication or two-step verification.

To encourage the wide adoption of two-factor authentication, Google released Google Authenticator, an open-source application that can generate one-time passcode based on open standards (e.g., HMAP/time-based). It is available on multiple platforms including Linux, Android, iOS. Google also offers a pluggable authentication module (PAM) for Google Authenticator, allowing it to be integrated with other PAM-enabled applications such as OpenSSH.

In this tutorial, I will describe how to set up two-factor authentication for an SSH server by integrating Google Authenticator with OpenSSH. I am going to use a Android device to generate one-time passcode. In this tutorial, you will need two things: (1) a Linux host where OpenSSH server is running, and (2) an Android device.

Install Google Authenticator on Linux

The first step is to install Google Authenticator on the Linux host where OpenSSH server is running. Follow this guide to install Google Authenticator and its PAM module on your system.
Once Google Authenticator is ready, you need to go through one-time configuration which involves creating an authentication key from this Linux host, and registering it with an Android device. This will be explained next.
Generate an Authentication Key

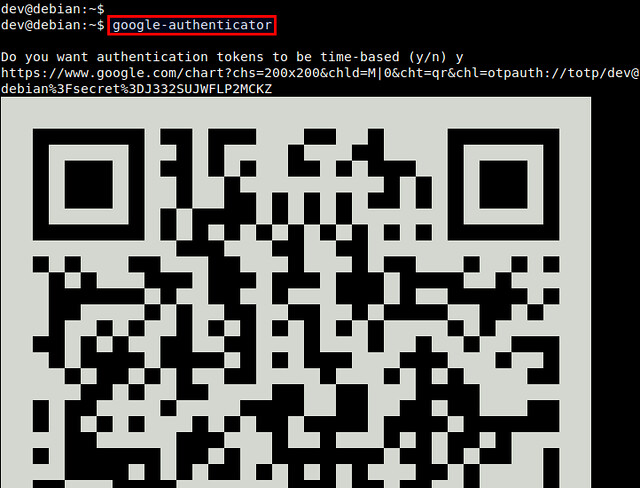
To start, simply run Google Authenticator on the Linux server host.
$ google-authenticator
You will see a QR code, as well as a secret key underneath it. The displayed QR code simply represents the numeric secret key. You will need either information to finalize configuration with an Android device.


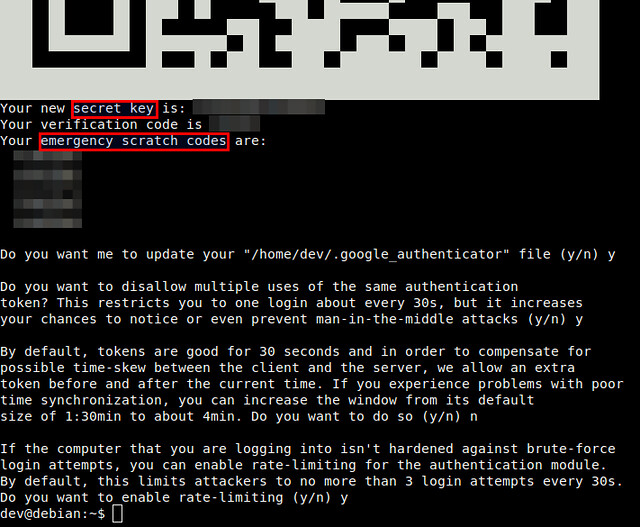
Google Authenticator will ask you several questions. If you are not sure, you an answer "Yes" to all questions. The emergency scratch codes can be used to regain access to the SSH server in case you lose your Android device, and so cannot generate one-time passcode. So it's better to write them down somewhere.

Run Google Authenticator on Android

As we are going to use an Android device for two-factor authentication, you will need to install Google Authenticator app on Android. Go to Google Play to install it on Android.
When you start Google Authenticator on Android, you will see the following configuration menu.
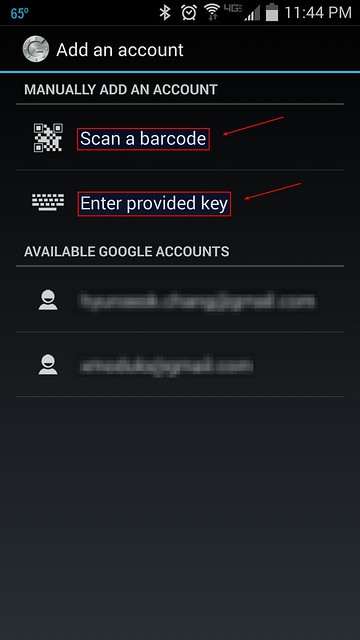
You can choose either "Scan a barcode" or "Enter provided key" option. The first option allows you to enter the security key, simply by scanning the generated QR code. In this case, you will need to install Barcode Scanner app first. If you choose the second option, you can type the security key using Android keyboard as follows.
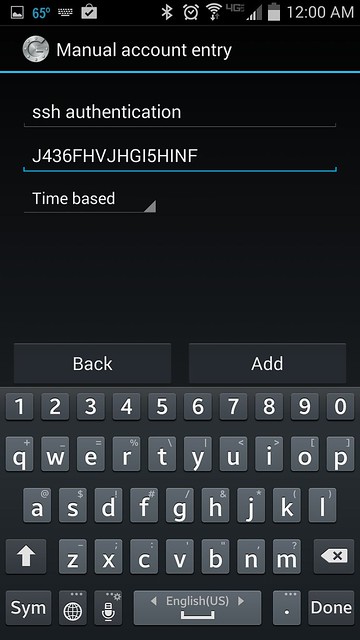
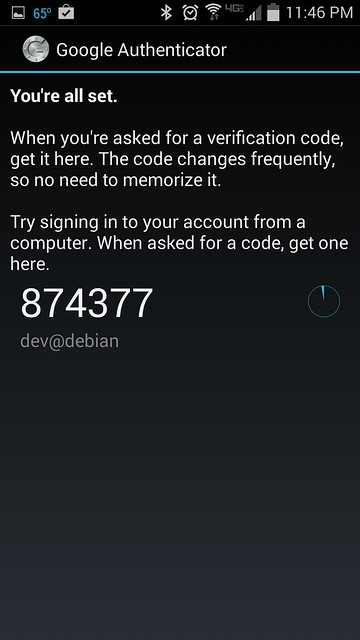
Once you register a secret key either way, you will see the following screen on Android.
Enable Google Authenticator on SSH Server

The final step is to integrate Google Authenticator with OpenSSH server. For that, you need to edit two files.
First, edit a PAM configuration file, and append the line below.
$ sudo vi /etc/pam.d/sshd
1
auth required pam_google_authenticator.so
Then open an SSH server config file, search for ChallengeResponseAuthentication, and enable it.
$ sudo vi /etc/ssh/sshd_config
1
ChallengeResponseAuthentication yes
Finally, restart SSH server.
On Ubuntu, Debian or Linux Mint:
$ sudo service ssh restart
On Fedora:
$ sudo systemctl restart sshd
On CentOS or RHEL:
$ sudo service sshd restart

Test Two-factor Authentication

Here is how you use two-factor authentication for SSH logins.
Run Google Authenticator app on Android to obtain one-time verification code. Once generated, a given passcode is valid for 30 seconds. Once it expires, Google Authenticator will automatically generate a new one.
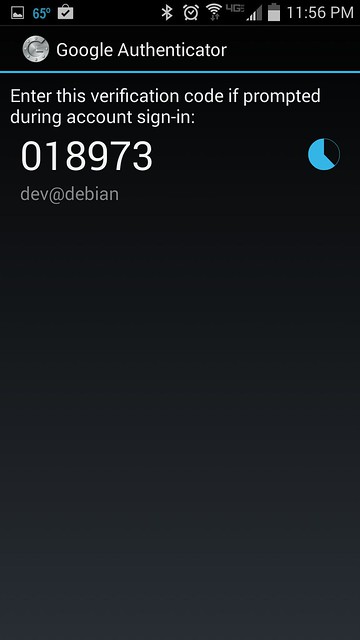
Now log in to the SSH server as you normally do.
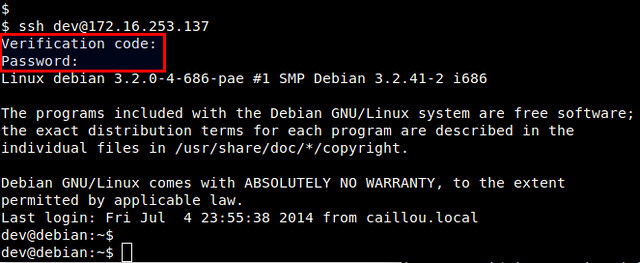
$ ssh user@ssh_server
When you are asked to enter "Verification code", type in the verification code generated by Android. After successful verification, then you can type in your SSH login password.

To conclude, two-factor authentication can be an effective means to secure password authentication by adding an extra layer of protection. You can use Google Authenticator to secure other logins such as Google account, WordPress.com, Dropbox.com, Outlook.com, etc. Whether you decide to use it or not, it's up to you, but there is a clear industry trend towards the adoption of two-factor authentication.

Open source tools: Five outstanding audio editors

http://www.techrepublic.com/blog/five-apps/open-source-tools-five-outstanding-audio-editors

Whether you're producing podcasts or creating highly sophisticated sound recordings, one of these open source apps will suit your needs.
hero
Image: iStockphoto.com/Sergey Nivens
A solid audio editor might not seem to belong at the top of your must-have list. It is, however, a tool that can go a long way toward helping you with your business. How? With an audio editor, you can add audio to your business website, create and edit a podcast to help promote your service or product, record and submit audio for radio ads, and more. But what software titles are available from the open source community? Believe it or not, some of the finest audio editors available are open source and offer power and options you might expect only in costly, proprietary software.
Let's take a look at five open source audio editors and see if there's one that will fit your bill.
Note: This article is also available as an image gallery.

1: Audacity

Audacity (Figure A) is the software I've been using for years to record Zombie Radio. It's a powerful multi-track recording app, and it's easy to use. Audacity allows you to record live audio, record from your desktop, convert old tapes/records, edit various formats, cut/copy/splice/mix audio, add effects, change speed/pitch, and much more. At first blush, you might think Audacity is an out-of-date application. But do not let appearances fool you. Audacity is one of the single best recording apps I've ever used. For features and ease of use, you can't beat this recording tool. Audacity is available for Linux, Windows, and Mac.

Figure A

Figure A

2: Ardour

Now we're talking real recording power. Ardour (Figure B) is a digital audio workstation that isn't for the faint of heart. It is to musicians, engineers, soundtrack editors, and composers what Audacity is to podcasters -- the best tool for the job. Not only can you record audio from multiple inputs, you can cut, move, stretch, copy, paste, delete, align, trim, crossfade, rename, snapshot, zoom, transpose, quantize, swing, drag, and drop. The caveat to all of this power is that Ardour comes with a steep learning curve, and It's overkill for podcasters and those wanting to create simple sound recordings.

Figure B

Figure B
Hundreds of plugins are available for this amazing piece of software. The best way to experience Ardour is by downloading and installing Ubuntu Studio or installing on OS X.

3: Traverso

Traverso (Figure C) leans more toward Audacity, but it relies upon the same underlying system that Ardour does: Jack. So although the interface is vastly easier to use than Ardour's, the foundation for connecting to devices (mics, instruments, etc.) is far more complex than Audacity.

Figure C

Figure C
You can use Traverso for a small scale recording session on a netbook or scale up to recording a full-blown orchestra. One outstanding feature that's built into Traverso is the ability to burn your recording straight to CD from within the UI itself. Once you're finished with a project, just burn it and you're done. Traverso is available only for Linux.

4: QTractor

QTractor (Figure D) is another digital audio workstation that requires the Jack Audio Connection Kit. QTractor is a multi-track audio and MIDI sequencing and recording studio. It requires a much better understanding of Jack than Traverso does. But it also delivers a level of power you won't find with lesser applications.

Figure D

Figure D
QTractor lets you drag, move, drop, cut, copy, paste, paste-repeat, delete, split, and merge. It offers unlimited undo/redo, has a built-in patch bay, and much more. QTractor is a great solution for anyone who wants the power of Jack but not the massive complexity (or flexibility and feature set) of Ardour. QTractor is available only for Linux.

5: Linux Multimedia Studio (LMMS)

Linux Multimedia Studio (Figure E) is geared toward songwriters, offering a beat editor and an FX mixer. LMMS includes an incredible array of effects and an impressive number of instruments. With LMMS you can compose entire songs without plugging in a single instrument. Just drag and drop an instrument plug-in to the song editor and you're good to go.

Figure E

LMMS does have a fairly steep learning curve, so be prepared to spend some time getting up to speed with the interface and tools. The name Linux Multimedia Studio a bit misleading, as it is actually available for both Linux and Windows.

Audio tasks?

If you're looking for an audio editor, and you don't want to shell out the money for proprietary software, you don't have to worry about losing features or power. The five editors listed here will get your job done and done right.
How do you make use of audio? Do you use it for training, marketing, PR? Or is audio yet to make its way into your business plan?

Monday, July 14, 2014

How to use systemd for system administration on Debian

http://xmodulo.com/2014/07/use-systemd-system-administration-debian.html

Soon enough, hardly any Linux user will be able to escape the ever growing grasp that systemd imposes on Linux, unless they manually opt out. systemd has created more technical, emotional, and social issues than any other piece of software as of late. This predominantly came to show in the heated discussions also dubbed as the 'Init Wars', that occupied parts of the Debian developer body for months. While the Debian Technical Comittee finally decided to include systemd in Debian 8 "Jessie", there were efforts to supersede the decision by a General Resolution, and even threats to the health of developers in favor of systemd.
This goes to show how deep systemd interferes with the way of handling Linux systems that has, in large parts, been passed down to us from the Unix days. Theorems like "one tool for the job" are overthrown by the new kid in town. Besides substituting sysvinit as init system, it digs deep into system administration. For right now a lot of the commands you are used to will keep on working due to the compatibility layer provided by the package systemd-sysv. That might change as soon as systemd 214 is uploaded to Debian, destined to be released in the stable branch with Debian 8 "Jessie". From thereon, users need to utilize the new commands that come with systemd for managing services, processes, switching run levels, and querying the logging system. A workaround is to set up aliases in .bashrc.
So let's have a look at how systemd will change your habits of administrating your computers and the pros and cons involved. Before making the switch to systemd, it is a good security measure to save the old sysvinit to be able to still boot, should systemd fail. This will only work as long as systemd-sysv is not yet installed, and can be easily obtained by running:
# cp -av /sbin/init /sbin/init.sysvinit
Thusly prepared, in case of emergency, just append:
init=/sbin/init.sysvinit
to the kernel boot-time parameters.

Basic Usage of systemctl

systemctl is the command that substitutes the old "/etc/init.d/foo start/stop", but also does a lot more, as you can learn from its man page.
Some basic use-cases are:
  • systemctl - list all loaded units and their state (where unit is the term for a job/service)
  • systemctl list-units - list all units
  • systemctl start [NAME...] - start (activate) one or more units
  • systemctl stop [NAME...] - stop (deactivate) one or more units
  • systemctl disable [NAME...] - disable one or more unit files
  • systemctl list-unit-files - show all installed unit files and their state
  • systemctl --failed - show which units failed during boot
  • systemctl --type=mount - filter for types; types could be: service, mount, device, socket, target
  • systemctl enable debug-shell.service - start a root shell on TTY 9 for debugging
For more convinience in handling units, there is the package systemd-ui, which is started as user with the command systemadm.
Switching runlevels, reboot and shutdown are also handled by systemctl:
  • systemctl isolate graphical.target - take you to what you know as init 5, where your X-server runs
  • systemctl isolate multi-user.target - take you to what you know as init 3, TTY, no X
  • systemctl reboot - shut down and reboot the system
  • systemctl poweroff - shut down the system
All these commands, other than the ones for switching runlevels, can be executed as normal user.

Basic Usage of journalctl

systemd does not only boot machines faster than the old init system, it also starts logging much earlier, including messages from the kernel initialization phase, the initial RAM disk, the early boot logic, and the main system runtime. So the days where you needed to use a camera to provide the output of a kernel panic or otherwise stalled system for debugging are mostly over.
With systemd, logs are aggregated in the journal which resides in /var/log/. To be able to make full use of the journal, we first need to set it up, as Debian does not do that for you yet:
# addgroup --system systemd-journal
# mkdir -p /var/log/journal
# chown root:systemd-journal /var/log/journal
# gpasswd -a $user systemd-journal
That will set up the journal in a way where you can query it as normal user. Querying the journal with journalctl offers some advantages over the way syslog works:
  • journalctl --all - show the full journal of the system and all its users
  • journalctl -f - show a live view of the journal (equivalent to "tail -f /var/log/messages")
  • journalctl -b - show the log since the last boot
  • journalctl -k -b -1 - show all kernel logs from the boot before last (-b -1)
  • journalctl -b -p err - shows the log of the last boot, limited to the priority "ERROR"
  • journalctl --since=yesterday - since Linux people normally do not often reboot, this limits the size more than -b would
  • journalctl -u cron.service --since='2014-07-06 07:00' --until='2014-07-06 08:23' - show the log for cron for a defined timeframe
  • journalctl -p 2 --since=today - show the log for priority 2, which covers emerg, alert and crit; resembles syslog priorities emerg (0), alert (1), crit (2), err (3), warning (4), notice (5), info (6), debug (7)
  • journalctl > yourlog.log - copy the binary journal as text into your current directory
Journal and syslog can work side-by-side. On the other hand, you can remove any syslog packages like rsyslog or syslog-ng once you are satisfied with the way the journal works.
For very detailed output, append "systemd.log_level=debug" to the kernel boot-time parameter list, and then run:
# journalctl -alb
Log levels can also be edited in /etc/systemd/system.conf.

Analyzing the Boot Process with systemd

systemd allows you to effectively analyze and optimize your boot process:
  • systemd-analyze - show how long the last boot took for kernel and userspace
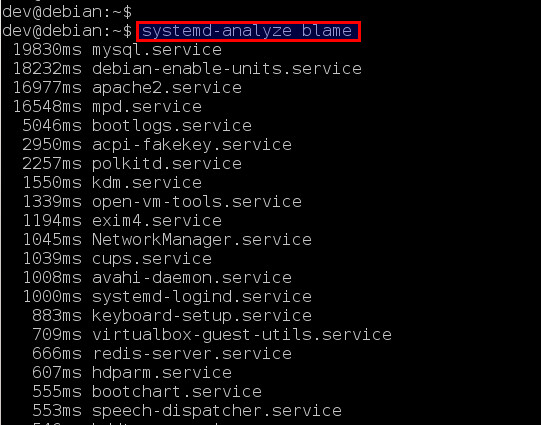
  • systemd-analyze blame - show details of how long each service took to start
  • systemd-analyze critical-chain - print a tree of the time-critical chain of units
  • systemd-analyze dot | dot -Tsvg > systemd.svg - put a vector graphic of your boot process (requires graphviz package)
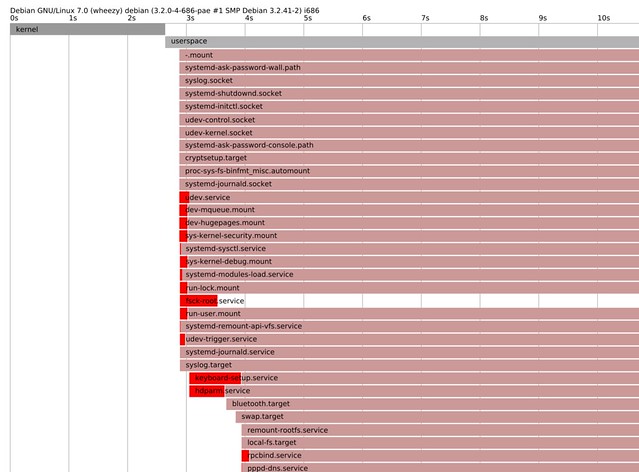
  • systemd-analyze plot > bootplot.svg - generate a graphical timechart of the boot process


systemd has pretty good documentation for such a young project under heavy developement. First of all, there is the 0pointer series by Lennart Poettering. The series is highly technical and quite verbose, and holds a wealth of information. Another good source is the distro agnostic Freedesktop info page with the largest collection of links to systemd resources, distro specific pages, bugtrackers and documentation. A quick glance at:
# man systemd.index
will give you an overview of all systemd man pages. The command structure for systemd for various distributions is pretty much the same, differences are found mainly in the packaging.