Times New Roman, Calibri, and many other popular fonts are created by
Microsoft and can’t be included with Linux. If you open a Word document
or another Microsoft Office document in LibreOffice or OpenOffice, you’ll need Microsoft’s fonts installed on your Linux system to see the documents as they were intended to look.
You can also use Microsoft’s fonts to create documents of your own,
so you can compose a document in Calibri or Times New Roman and save it
as a DOCX or DOC file for maximum compatibility with Office.
Install Microsoft’s TrueType Core fonts
Microsoft released a package of “TrueType core fonts for the web”
back in 1996. These fonts were given a very permissive license
agreement, so anyone could install them. Microsoft wanted their fonts to
be the standard fonts everyone with a web browser had, so they gave
them away. Microsoft terminated this project in 2002, but the fonts can
still be installed thanks to MIcrosoft’s old license agreement.
This font pack contains Andale Mono, Arial, Arial Black, Comic Sans
MS, Courier New, Georgia, Impact, Times New Roman, Trebuchet, Verdana,
and Webdings. Times New Roman was the default font for Office documents
until Calibri debuted in Office 2007.
This package can be easily installed on Ubuntu. Unfortunately, you can’t install it from the Ubuntu Software Center on modern versions of Ubuntu like Ubuntu 14.04.
If you try to install this package from the Ubuntu Software Center, the
Software Center will freeze—you need to use the terminal so you can
accept Microsoft’s License agreement. Don’t worry! This is easy.
First, open a terminal. Click the Ubuntu icon on the dock, search for “Terminal,” and click the terminal shortcut.
Type or copy-and-paste the following command into the terminal and press Enter.
This command asks for administrator access (sudo) before launching the
package manager (apt-get) and telling it to download and install
(install) the ttf-mscorefonts-installer package:
sudo apt-get install ttf-mscorefonts-installer
Type your password when prompted and press Enter again. When the license agreement appears, use the arrow and Page Down/Page Up keys to scroll through it. Press Tab to select the OK button and press Enter
to accept Microsoft’s license agreement. The installer will download
the fonts onto your system and configure them so they’re immediately
available to applications like LibreOffice and OpenOffice.
Other Linux distributions also offer similarly named “corefonts”
packages you can easily install. Search your Linux distribution’s
package manager for such a package.
Install Microsoft’s ClearType fonts
Microsoft added a group of new “ClearType Fonts” to Windows with
Windows Vista and Office 2007. These fonts are named Constantia, Corbel,
Calibri, Cambria, Candara, and Consolas. Calibri became the default
font on Microsoft Word 2007, and it’s still the default font on Word
2013 today.
Microsoft never released these fonts to everyone like they did with
the older core fonts. However, Microsoft does make these fonts available
to download as part of their free PowerPoint Viewer 2007 application.
If you don’t have a Windows system around, you can use a script that
downloads the PowerPoint Viewer 2007 application from Microsoft,
extracts the six ClearType fonts, and installs them on your Linux
system. This script will install the ClearType fonts for just your user
account, while the above script installs the TrueType core fonts for
every user account on your system.
The fastest, easiest way to do this is with a few terminal commands.
These commands are easy-to-use—rather than walk you through clicking
many different things, we can just have you copy-and-paste a few
commands.
If you haven’t yet installed the TrueType core fonts, you’ll need to run the sudo apt-get install cabextract
command to install the cabextract utility on your system. If you
installed the Microsoft core fonts using the command above, this should
already be installed.
Next, type mkdir .fonts and press Enter to
create the fonts directory the script requires. The script will complain
that you don’t have a .fonts directory if you don’t do this first.
Next, copy-and-paste or type the following command into the terminal and press Enter. This command downloads the VistaFonts-Installer script and runs it. The script downloads the fonts from Microsoft and installs them on your system:
The above two font packages are probably all you’ll need. They’ll
give you the standard Microsoft Office fonts, from the older TrueType
core fonts like Times New Roman to the newer ClearType Fonts like
calibri. These are the standard fonts used in Microsoft Office documents
by default.
However, some fonts aren’t included in these packages. Tahoma isn’t
included with the TrueType core fonts package, while Segoe UI and other
newer Windows fonts aren’t included with the ClearType Fonts package.
If you have a Windows system lying around, these fonts are fairly
easy to install. For example, let’s say you’re dual-booting Ubuntu Linux
and Windows. You’ll find your Windows partition in Ubuntu’s file
manager. Click the Windows drive in the sidebar to access it. Navigate
to the Windows\Fonts directory and you’ll see all the fonts installed on
your Windows PC, including the fonts that came with it. Double-click a
font and click the Install button to install it for your user
account. You can use this trick to quickly install any other Windows
fonts you want, including Tahoma and Segoe UI. In fact, you can even use
this trick to install fonts like Times New Roman and Calibri if you
have a Windows system.
If you have another Windows computer, you can navigate to the Fonts pane in the Control Panel or open the Fonts folder at C:\Windows\Fonts.
Select the fonts you want to use, then drag-and-drop them to a
removable drive. You’ll get copies of the fonts in .ttf form. Take the
removable drive to your Ubuntu system, double-click each .ttf file you
want to install, and click the Install button to install it.
Configure LibreOffice or OpenOffice
Whether your Linux distribution uses LibreOffice or OpenOffice,
configuring your office suite of choice to work with these fonts is
easy. If you’ve installed them using any of the instructions above,
they’ll already be available to use. If either office suite was open as
you installed the fonts, you may have to first close the office suite
and re-open it. The fonts will appear as options in the Fonts dropdown
box, so you can use them like any other font.
Open a Microsoft Office document created using these fonts and
LibreOffice or OpenOffice will automatically use the appropriate fonts.
They’ll display the document as it was intended to look, Microsoft fonts
and all.
If you’d like to change your default fonts for new documents, click Tools > Options > LibreOffice Writer or OpenOffice Writer > Basic Fonts (Western). Your office suite of choice will use Microsoft’s fonts as the default fonts in future documents if you choose them here.
Ubuntu and other Linux distributions actually include Red Hat’s
“Liberation Fonts” and use them by default in their office suites. These
fonts were designed to substitute for Arial, Arial Narrow, Times New
Roman, and Courier New. They have the same widths as Microsoft’s popular
fonts. If you open a document written with Times New Roman, the
appropriate Liberation font will be used instead so the flow of the
document won’t be interrupted. However, these fonts don’t look identical
to Microsoft’s fonts. The Liberation project also doesn’t provide fonts
designed to match the width of Calibri and Microsoft’s other newer
ClearType fonts. If you’re a Linux user that wants the best Microsoft
Office compatibility possible, you should install Microsoft’s fonts.
To be completely honest, I find Git to be a dry subject. But a
version control system is essential to a modern dev workflow so I had to
learn it. Any good VCS is fine but Git seems to be the most popular. So
I went with Git.
What made learning Git easier for me were web-based interactive
tutorials and online courses. They made the task more fun and engaging,
which in turn made it less tempting to give up on. Plus they didn’t
require me to install and configure Git on my computer, so I was able to
explore and experiment right away.
Here’s a list of three free interactive tutorials
that can help you learn Git. They are organized in order of difficulty,
and I suggest using them sequentially from top to bottom.
Developers who use the following tutorials should be able to get their Git knowledge up to an adequate level.
Try Git is an interactive tutorial that’s an excellent intro
for first-time Git users. It goes over essential Git commands — the
stuff you’ll likely use day-to-day — such as creating a Git repository,
committing changes and working with remotes.
It’s a lightning-fast crash course designed to be completed in 15 minutes.
Git Real is an interactive online course on Code School. It has video instructions and provides hands-on interactive challenges.
Only the first level of the Git Real course (aptly named
"Introduction") is free, but the level covers the key things you’d want
to know about Git. Think of this level as a more detailed overview of
Git compared to Try Git.
What I like about the entire Git Real course is it’s focused on things we’ll likely use during web development.
For me, the toughest Git concepts to understand are the source tree,
source-tree traversal and branching. This web-based interactive Git
tutorial helped me tremendously. Learn Git Branching is divided into five parts that increase in difficulty, and each part has two to five modules in it.
Learning Tips
The following advice comes from someone who’s had to teach himself Git from scratch, up to a practical level of mastery.
Learn Git through the command line
It’s tempting to use a graphical user interface, and there’s nothing
wrong with using a GUI later on to speed things up. And, as a visual
person, I avoid command line interfaces as much as possible.
But learning Git through a CLI really helped me understand Git’s
abstract concepts because I didn’t have any visual crutches to rely on
(e.g. source tree diagrams).
Using a CLI is more challenging, and that’s a good thing because it forces us to slow down and truly absorb the material.
Also, getting comfortable with CLIs will help you later on when using
other open source web components like CSS preprocessors, Node, Bower,
Grunt and so forth.
Take your time
Anything worth doing, is worth doing right.
Most people with a programming background will be able to complete
these interactive Git tutorials in a couple of days, and will have ample
time to review and redo the trickier sections.
If you’re new to web development and programming, it might take longer, and you might need to read other Git tutorials
outside the ones mentioned here to fill in any gaps. But I believe
that’s OK because you’ll be learning a valuable skill that will save you
time in the long run. Knowing how to use Git can also unlock new career
opportunities, or at least give you an edge over candidates who aren’t
familiar with version control systems.
Looking at learning Git as an investment in yourself is motivating.
Use Git in the real-world as soon as possible
Use Git in an ongoing dev project or the next available opportunity
so you can instantly reap the rewards of your investment. Doing so will
encourage you to move forward with Git, and give you the opportunity to
practice the things you’ve learned.
Other things you can do right away:
Clone an open source project from GitHub onto your computer and make modifications to it. Use branching to your advantage to keep track of changes.
Release a small open source project on GitHub. It
doesn’t have to be a full-blown web app framework or something — those
will take a while to create and will thus defeat the purpose of this
exercise. A simple UI component such as a navigation bar or a CSS demo
are great places to start.
Create pull requests on open source projects. It’s
important to follow open source etiquette and the project’s own
guidelines before doing this. To start, you can issue pull requests on my GitHub repos if you spot anything that needs to be fixed (thanks).
I'm a new Unix system user. How can I manage process on a FreeBSD operating systems?
A process is nothing but an executing program on FreeBSD or Unix-like
system. Each process on the system provides the resources needed to run a
program such as vim or firefox. Each process has:
In this quick tutorial, I will write about process management on a FreeBSD operating systems.
View running processes in FreeBSD
The
ps or process status command is a command that lists process
activities. Many people use the top command to interactively list the
processes, but for scripting purpose ps is user friendly. The basic
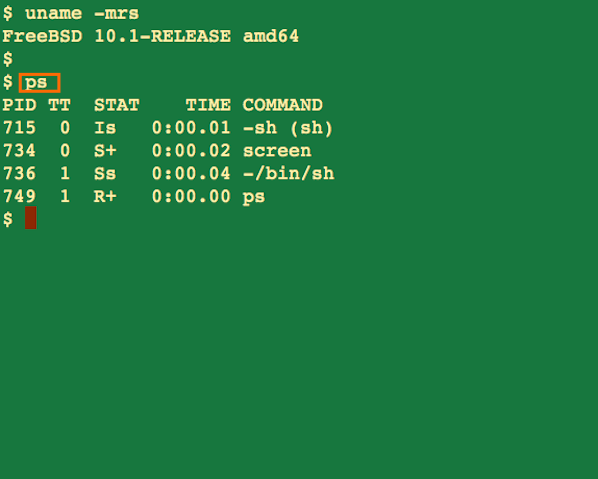
syntax is as follows: $ ps Sample outputs:
Fig.01: FreeBSD ps command output showing process
List process using ps command
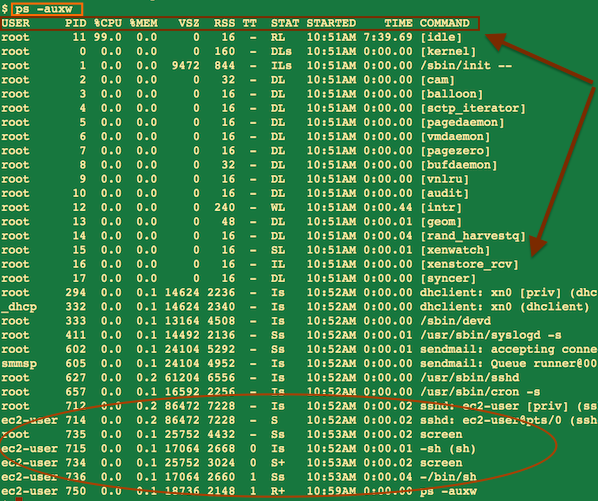
Example using flags: $ ps -auxw
Fig.02 ps command with flags
Where,
a = Display information about other users' processes as well as your own.
u = Display the processes belonging to the specified usernames.
x
= When displaying processes matched by other options, skip any
processes which do not have a controlling terminal. This is the default
behavior.
w = Use 132 columns to display information, instead of the default which is your window size.
How to list process using top command
Another easiest way to find out what processes are running on FreeBSD is to type top command: $ top Sample outputs:
To quit from the top command type (or hit) q and to display help hit h.
Quickly finding the PID of a process on FreeBSD
Use
the pgrep command to search the process table on the running system and
prints the process IDs (PID) of all processes that match the criteria
given on the command line. The syntax is:
pgrep process
pgrep -u user process
pgrep firefox
pgrep -u www-data nginx
A quick way of getting the PID of a process called dhclient is with the pgrep command, type: $ pgrep dhclient Sample outputs:
332
How to send processes signals in FreeBSD Unix system
You can send signals to all processes in FreeBSD. For example, SIGTERM can gracefully kill the process.
Send processes signals by PID
The
kill command kills process by process identification (PID). Note that
the user must have sufficient privileges to kill the process. The basic
syntax is as follows: $ kill $ kill -s signalName For example: $ kill -s SIGTERM 454 $ kill -signalName $ kill -SIGHUP 6765 $ kill -signalNumber $ kill -9 868 To find your PID use pgrep command. It will look like this for example: $ pgrep firefox 23872 From there you can issue the kill command to kill firefox process: $ kill 23872 You can also send multiple kills. $ kill $ kill 3455 79754 3454 If you want to kill without cleaning up you use the -9 signal: $ kill -9 $ kill -9 5858
List signals
Type the following command: $ kill -l Sample output:
Fig.03: List the signal names with the -l option on Unix
Some of the more commonly used signals and meaning
The basic syntax is as follows: $ killall process $ killall firefox $ killall -SIGNAL process $ killall -term firefox $ killall -15 command $ killall -15 firefox To kill user's process: $ killall -u process $ killall -u tom firefox
Depending upon your shell you might need different flags or signals.
Consult your man pages (man signal). The examples are so you get an idea
and not absolute. For example, on my laptop using csh I cannot use the
command killall process. I must use at least one option or argument to
specify process. Note, there is also pkill command which kills the
processes by name, but since it uses pattern matching and not the
precise process name, it can be potentially dangerous compared to
killall. Here is an example of dangerous pkill command which kills
FreeBSD based server or desktop: $ sudo pkill -v firefox The -v
option reverse the sense of the matching; display processes that do not
match the given criteria. See pkill man page for more info.
How to adjust process priorities
The
nice command runs process at a low priority. nice assumes the value of
10. The priority is a value range -20 to 20. The default priority is 0,
priority 20 is the lowest possible. Negative numbers are expressed by -.
You need to be root if you want to change the process prority to
higher priorities. Different shells are different so it's best to
consult your nice manual page. I mainly use csh. nice command is more
useful on servers or workstation where several processes are demanding
more resources than the CPU can provide. Use following commands to set a
larger chunk of the CPU time than a lower priority process on a
FreeBSD.
nice command usage examples
Execute command date at priority 5 assuming the priority of the shell is 0. $ nice -n 5 date This is an example where you need to be superuser or root: # nice -16 nice --35 date
Execute command date`at priority -19 assuming the priority of the shell
is 0. I have never had to use this command because with today's systems
we have such high RAM+CPU and processing power these things aren't a
problem like when first introduced. It's nice to know nice though just
in case.
How to alters the scheduling priority of running processes
The
nice command only works when beginning a new process i.e. start of the
command. Use the renice command to alters the scheduling priority
running processes. The syntax is: $ renice priority pid $ renice -n increment pid $ renice -u user pid To Change the priority of process ID's 4242 and 344, and all processes owned by root, enter: $ sudo renice +1 -u root -p 344 4242
How to see realtime and idle priority of of running processes
A
process with a realtime priority is not subject to priority
degradation, and will only be preempted by another process of equal or
higher realtime priority. A process with an idle priority will run only
when no other process is runnable and then only if its idle priority is
equal or greater than all other runnable idle priority processes.
Priority is an integer between 0 and RTP_PRIO_MAX (usually 31). 0 is
the highest priority. 31 is the lowest priority. To see which realtime
priority the current process is at, just type the following command: $ rtprio Sample outputs:
rtprio: normal priority
To see which realtime priority of process 715: $ rtprio 715 To change the realtime priority of process 715 to 16, enter: # rtprio 16 -1423 To run backup.py script while not disturbing other server usage, enter: # idprio 31 /path/to/my/awesome/backup.py See rtprio command man page for more info.
This quick tutorial was contributed by Wendy Michele. You can too contribute to nixCraft.