Tuesday, April 7, 2015

VPSSIM: A Script To Deploy LEMP Stack Automatically In CentOS

http://www.unixmen.com/vpssim-a-script-to-deploy-lemp-stack-automatically-in-centos

About VPSSIM

VPSSIM, an acronym of VPS is SIMple, is an auto-installer script for LEMP stack setup. Using this script, anyone, even the novice users, can easily deploy LEMP stack, i.e Nginx, MariaDB, and PHP in minutes. VPSSIM will currently work on both CentOS 6 and CentOS 7.

Features

  • Works both on 32 and 64bit systems;
  • Latest and stable Nginx;
  • NginX running PHP via FastCGI is faster and consumes much less RAM memory than Apache + mod_php;
  • PHP-FPM with FastCGI;
  • You can setup different versions of PHP. You can choose PHP 5.4, 5.5 or 5.6 when setup and change PHP version anytime;
  • MariaDB for better performance;
  • Supports SSL;
  • Includes PhpMyAdmin for managing databases;
  • Includes CSF firewall;
  • We can either enable or disable PhpMyAdmin;
  • Optional Zend opcache/Memcached/Google Pagespeed;
  • And many.

Try VPSSIM Demo

Before setup VPSSIM in your server, you can try VPSSIM VPS DEMO and see what it does, and how it works.
Here, We will see how to access and test VPSSIM demo.
  • VPSSIM demo IP address: 168.235.69.220
  • User name: vpssim
  • Password: vpssim
Open your Terminal, an type:
ssh vpssim@168.235.69.220
Type ‘Yes’ to add the host (168.235.69.220) to known list.
The authenticity of host '168.235.69.220 (168.235.69.220)' can't be established.
RSA key fingerprint is 99:6d:40:bc:65:34:c9:e7:75:87:ea:be:39:9b:37:96.
Are you sure you want to continue connecting (yes/no)? yes
Warning: Permanently added '168.235.69.220' (RSA) to the list of known hosts.
vpssim@168.235.69.220's password:  ##password is vpssim
After you login to VPS, SSH auto redirect to VPSSIM demo
sk@sk: ~_013
Okay, I am happy with VPSSIM, now I want to install it on my production server. How do I do it? Well, follow the procedures given below.

VPSSIM Installation

As we mentioned before, VPSSIM will work both on CentOS 6 and CentOS 7. Do not install it in a existing systems that has Nginx, Php, or MariaDB already installed. It may conflict with the existing installations. Use it only on a fresh and minimal servers.
Before setup VPSSIM, you need a VPS at minimum 512 MB RAM with centos 6 or 7. We will install and test VPSSIM in CentOS 6.5 minimal server.
Log in to your server with root privileges, and update your system.
yum update
Then, Enter the following command to start the installation.
yum -y install wget && wget https://vpssim.com/install && chmod +x install && ./install
The above command will start to pull and install all required packages. It will take a while depending upon your Internet connection speed.
After a few moments, you’ll be asked to choose which PHP version you want to install. Here, I go the latest version. So, I entered the choice 1.
root@server1:~_002
Now, the installer will check for the system specifications. Then, It will ask you to enter the domain name, PHP port etc.
root@server1:~_004
Now, it will ask you to confirm the details you have given. Just enter Y and hit Enter key.
root@server1:~_005
Note down or take screenshot of the following URLs that needed after installation completed.
Finally press Enter.
root@server:~_004
This will take some time. The installer will start to download and install all required packages for LEMP stack. Be patient and grab a cup of Coffee!
root@server:~_005
After a few minutes, you’ll be asked to enter the MySQL root user password. Enter the password twice.
root@server1_012
After the installation is over, your server will be automatically reboot in few seconds.
sk@sk: ~_007
Congratulations!! VPSSIM has been successfully installed. Now, you can login to the server as usual.
CentOS 6.5 Minimal (VPSSIM) [Running] - Oracle VM VirtualBox_008
Now, type “vpssim” in the Terminal to see list of menus available.
vpssim
Sample output:
=========================================================================
               VPSSIM - Manage VPS/Server by VPSSIM.COM                
=========================================================================
                             VPSSIM Menu                                
=========================================================================
 1) Add Website & Code          11) Cronjob Manage
 2) Remove website          12) CSF Firewall Manage
 3) Backup code & Config      13) IPtables Firewall Manage
 4) Check & Block IP DOS      14) Setup SSL (https)
 5) Database Manage          15) Download Log file
 6) PhpMyadmin Manage          16) Tools - Addons
 7) Zend OPcache Manage          17) Upgrade / Downgrade PHP
 8) Google pagespeed Manage   18) Server Status
 9) Memcached Manage          19) Update VPSSIM
10) Swap Manage              20) Exit
Type in your choice:
From the menu, you can type any numbers to start installing the corresponding service. For example, I am going to update VPSSIM, so I entered the number “19”.
root@server1:~_015
To view the server status, enter number: 18.
Sample output:
root@server:~_009
Press Enter to return back to VPSSIM menu.
To exit from the VPSSIM menu, type number: 20

Testing Nginx:

To test whether Nginx is properly working, open up the web browser and type: http://IP-address or http://domain-name.
You should see the following nginx test page.
Test Page for the Nginx HTTP Server - Mozilla Firefox_010

Access PhpMyAdmin Console:

Type http://IP-addres:2015 or http://domain-name:2015/ in the address bar of your Browser.
Enter the mysql root user name and it’s password which we created during installation. in my case my database root username/password is root/centos.
phpMyAdmin - Mozilla Firefox_011
PhpMyAdmin Dashboard:
192.168.1.150:2015 - localhost | phpMyAdmin 4.3.12 - Mozilla Firefox_012
From PhpMyAdmin dashboard you can create/delete/edit any number of databases in few Mouse clicks.
That’s it. Your LEMP server is ready to use. Start building your websites.
But, I want to setup LEMP server step by step myself? How do I do it? Well, follow the below links to setup LEMP server step by step manually.
Cheers!

Monday, April 6, 2015

6 operating systems designed just for Docker and other container runtimes

http://www.linuxbsdos.com/2015/04/04/6-operating-systems-designed-just-for-docker-and-other-container-runtimes

If you’re familiar with Unix-like free software operating systems, I’m sure you’ve probably lost count of the number of Linux distributions in active developments. I know, it’s a very long list, and growing.
But get ready for the same trend on the container technology side, because the conditions that made it possible to have hundreds of Linux distributions – freely available source code, hordes of developers with time to spare and an itch to scratch – are also in play in the field of containerization.
So far, I’ve been able to identify just six of such container-native operating systems, as they are called, but trust me, there will be many more to come.
So here are six container-native operating systems that I’m aware of. If you know of any not in the list, please post a comment.
1. Boot2Docker: “Is a lightweight Linux distribution made specifically to run Docker containers”. Weighing in at just 24 MB, it’s truly lightweight and runs completely from RAM, with a boot time in the 5-second range. The current development version features:
  • Linux kernel 3.18.5 with AUFS
  • Docker v1.5.0 – using libcontainer
  • Container persistence via disk automount on /var/lib/docker
  • SSH keys persistence via disk automount
Boot2Docker has not been certified for use in production, but I don’t think that has stopped some intrepid devops from doing just that. More information is available at the project’s GitHub page here.
2. CoreOS: Is a production-ready Linux distribution “that has been rearchitected to provide features needed to run modern infrastructure stacks.” That’s another way of saying that it’s been designed just for running containers. CoreOS is supported by a company of the same name, with commercial support provided by the company. More information about CoreOS is available at https://coreos.com/.
CoreOS
3. OSv: The official description of OSv says that it:
reduces the memory and cpu overhead imposed by a traditional OS. Scheduling is lightweight, the application and the kernel cooperate, and memory pools are shared. OSv provides unparalleled short latencies and constant predictable performance, which translates directly to capex savings by reducing the size and number of OS instances.
OSv is still in private beta, but you may sign up to gain access. Details at http://osv.io/.
4. Project Atomic: Is a Red Hat-sponsored project and, like others in this list, aims to provide a container-native operating system. It is specifically designed for deploying and managing Docker containers. Downloads are available for CentOS Atomic Host, Fedora Atomic Host, and Red Hat Atomic Host. Links to those downloads and detailed project information and documentation are available at http://www.projectatomic.io/.
Project Atomic
5. RancherOS: From the official description:
In RancherOS, the Docker daemon runs as PID 1, the first process the kernel starts. We call this instance of Docker “System Docker,” as it is responsible for initiating system services, such as udev, DHCP and the console. System Docker takes the place of the init system, such as sysvinit or systemd, in other Linux distributions. System Docker manages all of the system services as Docker containers.
RancherOS Docker containers
6. Ubuntu Core: Is a rendition of Ubuntu described as:
a minimal server image with the same libraries as today’s Ubuntu, but applications are provided through a simpler mechanism. The snappy approach is faster, more reliable, and lets us provide stronger security guarantees for apps and users – that’s why we call them “snappy” applications.
Snappy apps and Ubuntu Core itself can be upgraded atomically and rolled back if needed – a bulletproof approach to systems management that is perfect for container deployments. It’s called “transactional” or “image-based” systems management
Ubuntu Core containers
So there you have it folks – six container-native operating systems you can download and install on your machine or run on your Cloud computing provider’s platform.

Sunday, April 5, 2015

How to create document centric apps with concurrent tasks on Android Lollipop

http://xmodulo.com/document-centric-apps-concurrent-tasks-android.html

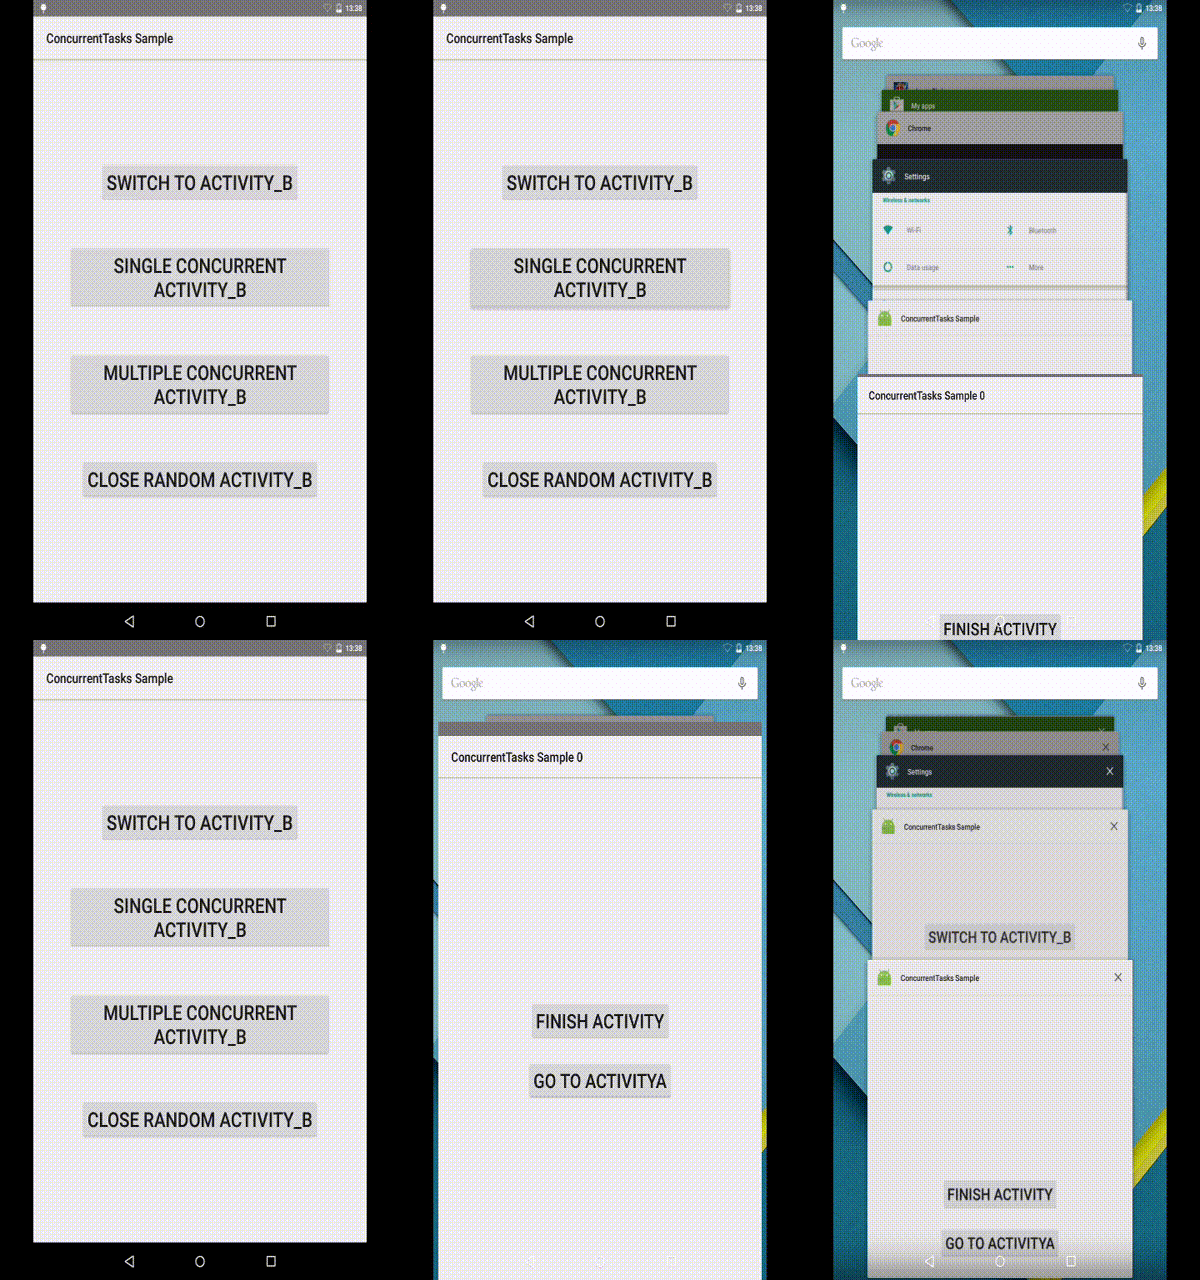
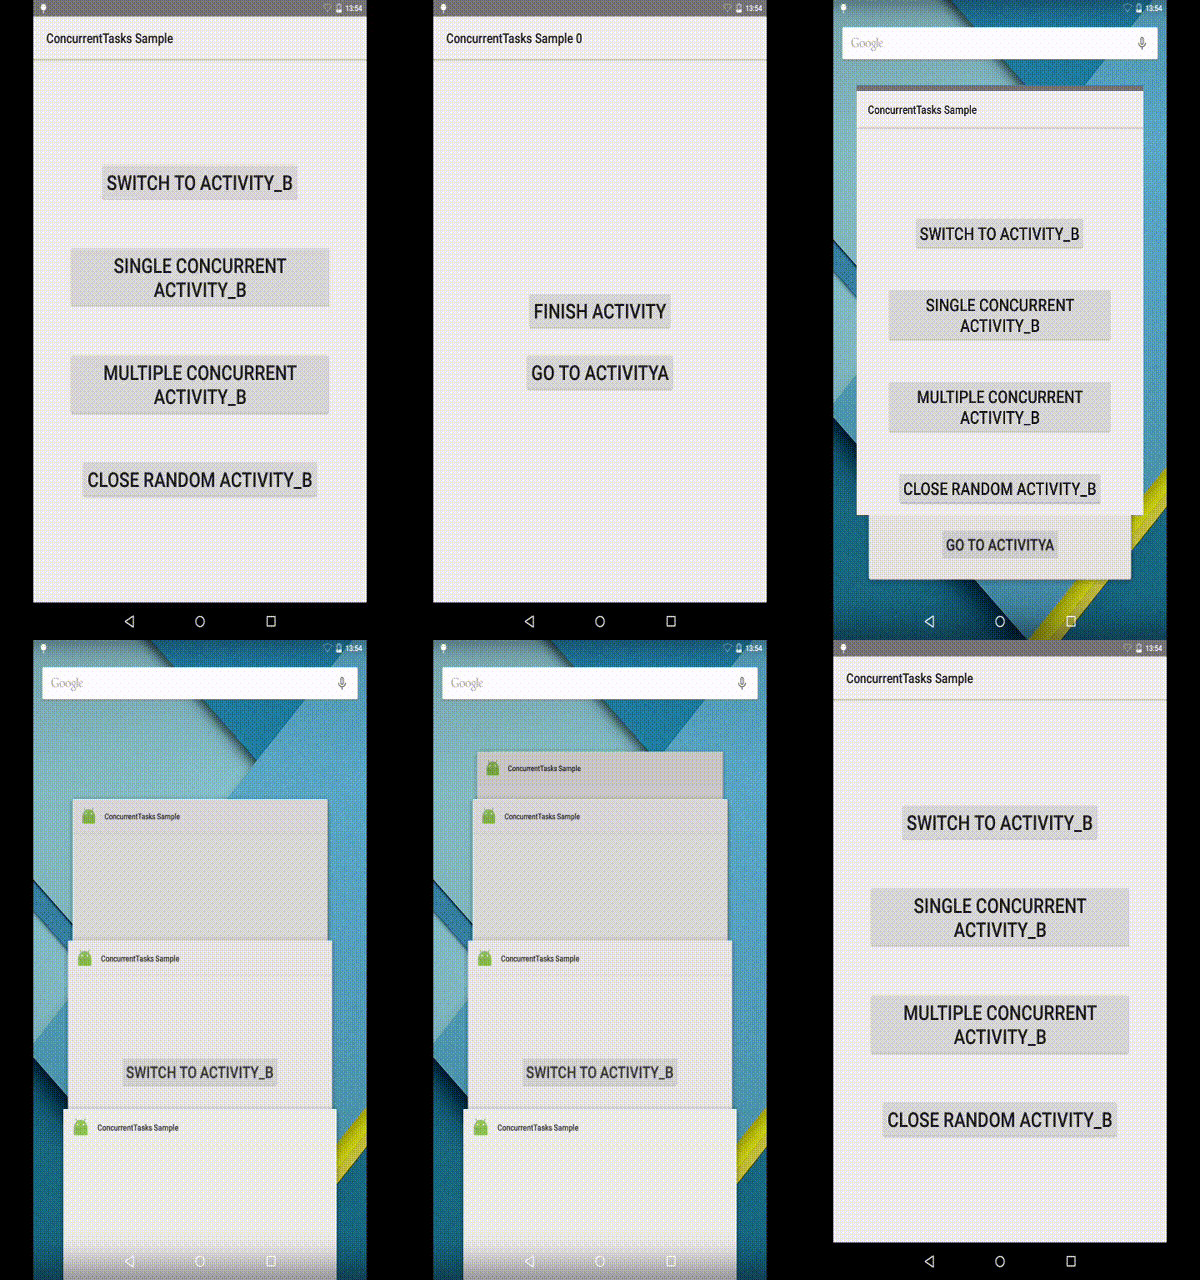
Android L introduced a great new feature: the ability for a single app to have multiple tasks available on the 'Recent Apps' list. This is called Document Centric apps (Concurrent Tasks). In fact, this feature is a rather significant change in multitasking model in Android L, where focus has been shifted from traditional app-centric multitasking to document-centric multitasking.
This easily makes sense for some apps. A prime example is web browsers with tabs. Each tab can be a task, and the user switches tabs the same way he switches apps. In addition, apps where the user has to switch back to a central activity (such as shopping apps) can benefit from this. The checkout activity can be a task of its own, or the user can open multiple shopping items and switch between them till finally making a choice.
In this tutorial, we discuss how to do this correctly with the Android L APIs. Note that the techniques discussed here apply to Android Lollipop (API 21) devices only.

Preparation

With Android Lollipop the default software buttons are now back, home and recent tasks. Obviously, this is not just an aesthetic design choice. With the new ability of a single app to spurn multiple tasks, the Recent Apps list should be more frequently used.
Another new, but highly overlooked, Lollipop feature is the ability for apps to be persisted across device reboots. Previously, after a reboot, all apps are cleared from the Recent Apps list. But with Lollipop, after a reboot, all the apps that were previously opened remain opened, and available via the Recent Apps list. Android L also gives app developers power to determine if and how their apps (and concurrent tasks spurned) should be available on reboot.
Note that if your app targets older versions, be sure to add the standard check for device version around all of the code in this tutorial as follows.
1
2
3
4
5
if (android.os.Build.VERSION.SDK_INT >= android.os.Build.VERSION_CODES.LOLLIPOP){
    // Lollipop and above devices
} else{
    // Devices before Lollipop
}

Implementation

Taking advantage of concurrent tasks is actually pretty straightforward. You add an API 21 flag (Intent.FLAG_ACTIVITY_NEW_DOCUMENT) to the new Activity Intent. Calling startActivity() on an Intent with this flag starts the target activity in a task of its own.
1
2
3
Intent intent = new Intent(this, ActivityB.class);
intent.addFlags(Intent.FLAG_ACTIVITY_NEW_DOCUMENT);
startActivity(intent);
With the above code, ActivityB will be started in a task of its own, available via the Recent Apps list. You can switch between ActivityA and ActivityB by tapping the Recent Apps button. The issue with the above code is that there can only be one instance of ActivityB. Triggering the startActivity() function again will re-open the same running ActivityB instance.

To run multiple instances of ActivityB is not much difficult though. We simply add another API 21 flag (Intent.FLAG_ACTIVITY_MULTIPLE_TASK)
1
2
3
4
Intent intent = new Intent(this, ActivityB.class);
intent.addFlags(Intent.FLAG_ACTIVITY_NEW_DOCUMENT);
intent.addFlags(Intent.FLAG_ACTIVITY_MULTIPLE_TASK);
startActivity(intent);
Voila! Multiple ActivityB instances can now run at the same time. This then introduces a new issue. How do you keep track of the tasks opened? How do you know how many ActivityB instances are running? And if ActivityA also opens an ActivityC with both NEW_DOCUMENT and MULTIPLE_TASK flags, how do you manage them all?
A method of keeping track of opened tasks and activities is to use Intent's putExtra() method which puts an identifier in each opened task.
1
2
3
4
5
Intent intent = new Intent(this, ActivityB.class);
intent.addFlags(Intent.FLAG_ACTIVITY_NEW_DOCUMENT);
intent.addFlags(Intent.FLAG_ACTIVITY_MULTIPLE_TASK);
intent.putExtra(KEY_EXTRA_NEW_DOCUMENT_COUNTER, ++NEW_DOCUMENT_COUNTER);
startActivity(intent);
To get a list of tasks, we get the System's ActivityManager instance, and query getAppTasks(). This returns a list of all tasks associated with the current activity. In the snippet below, we get our app's task list, query each task for its base Intent, and identify the Activity using the getIntExtra() with KEY_EXTRA_NEW_DOCUMENT_COUNTER.
1
2
3
4
5
6
7
8
ActivityManager manager = (ActivityManager) getSystemService(Context.ACTIVITY_SERVICE);
List myTasks = manager.getAppTasks();
 
int counter = 1;
for(ActivityManager.AppTask task : myTasks) {
    Intent baseIntent = task.getTaskInfo().baseIntent;
    Log.e("TASK " + counter++, baseIntent.getIntExtra(KEY_EXTRA_NEW_DOCUMENT_COUNTER, -1) + "");
}
Since your app tasks are now scattered among all tasks from all other apps, it would be nice, for users, if they can close other tasks from the root task, and jump back to the root task with a single tap. Thankfully, the APIs contain methods for that.
For example, to finish a particular task, given that we track the tasks with KEY_EXTRA_NEW_DOCUMENT_COUNTER:
1
2
3
4
5
6
7
ActivityManager manager = (ActivityManager) getSystemService(Context.ACTIVITY_SERVICE);
List myTasks = manager.getAppTasks();
for(ActivityManager.AppTask task : myTasks) {
    Intent baseIntent = task.getTaskInfo().baseIntent;
    if(baseIntent.getIntExtra(KEY_EXTRA_NEW_DOCUMENT_COUNTER, -1) == 3)
          task.finishAndRemoveTask();
}
The preferred and correct way to end a task is by calling finishAndRemoveTask(). Activity also has a similarly named finishAndRemoveTask() method (introduced in API 21), so, the correct way to close an Activity in a new task is to call finishAndRemoveTask(), rather than just finish().
To jump back to the root activity, make sure to add the flag (Intent.FLAG_ACTIVITY_NEW_DOCUMENT) before the startActivity() method. Recall that doing this simply switches to an already opened/running task for that activity.

Persist on Reboot

To persist your tasks across reboots, add this to your activity in the AndroidManifest.xml file:
1
android:persistableMode="persistAcrossReboots"
The persistableMode attribute was added in API 21 (http://developer.android.com/reference/android/R.attr.html#persistableMode). This attribute allows three possible states:
  • persistRootOnly - The default, and it persists only the root activity/task. The root activity/task will not be passed a PersistableBundle to store its state.
  • persistNever - This state indicates that the task/activity should not be persisted.
  • persistAcrossReboots - Activities with this attribute will be provided a PersistableBundle in the new, overloaded, onSaveInstanceState() method. This PersistableBundle will then be provided back to the Activity in its onPostCreate() method.
To save state using a PersistableBundle, override the following method.
1
2
3
4
5
@Override
    public void onSaveInstanceState(Bundle outState, PersistableBundle outPersistentState) {
        // Save data to PersistableBundle
        super.onSaveInstanceState(outState, outPersistentState);
    }
Whereas, to restore state after a reboot, override onPostCreate()
1
2
3
4
5
6
7
8
@Override
    public void onPostCreate(Bundle savedInstanceState, PersistableBundle persistentState) {
        super.onPostCreate(savedInstanceState, persistentState);
        // Restore state from PersistableBundle
        if (persistentState != null) {
            // Read relevant data
        }
    }

Conclusion

While these new APIs provide some possibly exciting uses, there is the potential for misuse, especially with Recent Apps persisting across reboots. Bear in mind that having your app dominating a user's Recent Apps list is possibly going to be annoying. Consider implementing an obvious way for the user to see all tasks for your app, and to selectively close some. Also consider implementing a one touch method to switch to your root task from all other tasks.
As usual, all tips discussed above are implemented in a sample app, and the entire source code is available on Github. Feel free to use and modify as required.