In this tutorial, we’re going to show you how to use the
restart command on Linux and how to restart (reboot) your system via the
command-line interface (CLI).
We previously learned how to shut down Linux using a command.
Now we’ll learn how to restart it. These commands will work on most
Linux distros, including Ubuntu, Linux Mint, Fedora, Debian, Arch Linux,
etc.
You might intuitively think that the command would be “sudo restart” but, it’s not.
How to restart Linux using the “reboot” command
First, open up Terminal (CTRL + ALT + T), or whatever else you’re using to access the CLI on your Linux distro.
The most simple way to do it is to use the “reboot” command, like so:
sudo reboot
This will restart your system. That’s the most simple and basic usage
of the reboot command. For more advanced options, read below.
If you’re using a systemctl-based distro, you might need to use this command instead:
sudo systemctl reboot
How to force restart Linux with the reboot command
You can use the “-f” option with the reboot command to force restart
your Linux system. By using the -f option, the system won’t sync and
unmount filesystems.
sudo reboot -f
How to restart Linux with the shutdown command (with or without a delay)
Aside from shutting your system down, you can also reboot it with the “shutdown” command by using the -r option:
sudo shutdown -r now
This is useful if you want to restart your system after a given
amount of time (instead of now), you can specify a delay. For example,
if you want to reboot the system after 10 minutes, you can run:
sudo shutdown -r +10
And if you want to cancel an already scheduled reboot, you can run:
sudo shutdown -c
How to restart then halt Linux with a command
If you first want to restart your system and then halt it (stops all CPU functions) you can use the “-p” option:
sudo reboot -p
And that’s it! This was a pretty simple and straightforward tutorial.
You can also restart Linux using the “init 6” command, but the reboot
and shutdown commands are enough for most cases.
You can learn more about the commands we featured in our tutorial with:
Use
Linux command line like a pro by mastering these Linux terminal
shortcuts and increase your productivity. It's a must for any power
Linux user.
Table of Contents
You know what sets apart a pro user from a regular user? Mastery over the keyboard shortcuts.
Alright! That’s not the only thing but it is undoubtedly a factor.
Shortcuts
help you to be more productive and efficient with whatever tool you
use. Just think about it. If someone holds the mouse all the way down to
copy entire text instead of Ctrl+A, how would you feel about it?
Linux terminal is not an exception. There are certain Linux terminal shortcuts that every user must know and practice.
Trust me; once you master these shortcuts, you’ll notice how good you are with using the Linux command line.
Must Know Linux Shortcuts
I would like to mention that some of these shortcuts may depend upon the Shell you are using. Bash is the most popular shell, so the list is focused on Bash. If you want, you may call it Bash shortcut list as well.
Do note that I have used the capital letters in the keyboard shortcuts
but this does NOT mean that you have to press the shift key while using
these shortcuts.
1. Tab
This is the Linux shortcut you cannot live without. It will save you so much time in the Linux command line.
Just
start typing a command, filename, directory name or even command
options and hit the tab key. It will either automatically complete what
you were typing or it will show all the possible results for you.
If you could only remember one shortcut, this would be the chosen one.
2. Ctrl + C
These
are the keys you should press in order to break out of a command or
process on a terminal. This will stop a running program immediately.
If you want to stop using a program running in the foreground, just press this key combination.
3. Ctrl + Z
This
shortcut will send a running program in the background. Normally, you
can achieve this before running the program using the & option but
if you forgot to do that, use this key combination.
4. Ctrl + D
This keyboard shortcut will log you out of the current terminal. If you are using an SSH connection, it will be closed. If you are using a terminal directly, the application will be closed immediately.
Consider it equivalent to the ‘exit’ command.
5. Ctrl + L
How do you clear your terminal screen? I guess using the clear command.
Instead of writing C-L-E-A-R, you can simply use Ctrl+L to clear the terminal. Handy, isn’t it?
6. Ctrl + A
This shortcut will move the cursor to the beginning of the line.
Suppose
you typed a long command or path in the terminal and you want to go to
the beginning of it, using the arrow key to move the cursor will take
plenty of time. Do note that you cannot use the mouse to move the cursor
to the beginning of the line.
This is where Ctrl+A saves the day.
7. Ctrl + E
This
shortcut is sort of opposite to Ctrl+A. Ctrl+A sends the cursor to the
beginning of the line whereas Ctrl+E moves the cursor to the end of the
line.
Note: If you have the Home and End keys on your keyboard,
you can also use them. Home is equivalent to Ctrl +A and End is
equivalent to Ctrl + E.
8. Ctrl + U
Typed a
wrong command? Instead of using the backspace to discard the current
command, use Ctrl+U shortcut in the Linux terminal. This shortcut erases
everything from the current cursor position to the beginning of the
line.
9. Ctrl + K
This one is similar to the
Ctrl+U shortcut. The only difference is that instead of the beginning
of the line, it erases everything from the current cursor position to
the end of the line.
10. Ctrl + W
You just
learned about erasing text till the beginning and the end of the line.
But what if you just need to delete a single word? Use the Ctrl+W
shortcut.
Using Ctrl+W shortcut, you can erase the word preceding
to the cursor position. If the cursor is on a word itself, it will erase
all letters from the cursor position to the beginning of the word.
The best way to use it to move the cursor to the next space after the targetted word and then use the Ctrl+W keyboard shortcut.
11. Ctrl + Y
This
will paste the erased text that you saw with Ctrl + W, Ctrl + U and
Ctrl + K shortcuts. Comes handy in case you erased wrong text or if you
need to use the erased text someplace else.
12. Ctrl + P
You
can use this shortcut to view the previous command. You can press it
repeatedly to keep on going back in the command history. In a lot of
terminals, the same can be achieved with PgUp key.
13. Ctrl + N
You
can use this shortcut in conjugation with Ctrl+P. Ctrl+N displays the
next command. If you are viewing previous commands with Ctrl+P, you can
use Ctrl+N to navigate back and forth. Many terminals have this shortcut
mapped to the PgDn key.
Bonus shortcut: Ctrl + R to search in command history
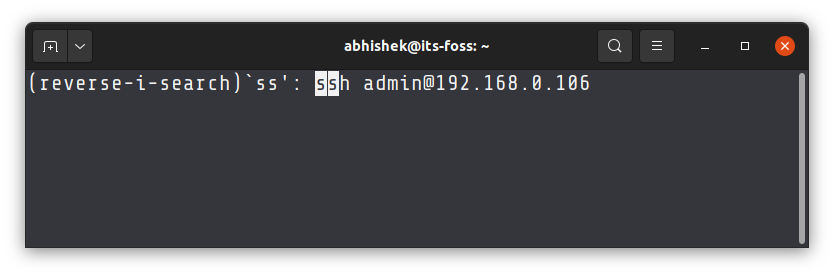
You typed some command but cannot remember what it was exactly? Meet Ctrl + R.
This keyboard shortcut allows you to perform a search in your command history.
Just press Ctrl+R and start typing. It will show the last command that
matches the string you typed. Note that the typed string could be
anywhere in the command. How cool is that?
If you want to see more commands for the same string, just keep pressing Ctrl + R.
You can press enter to run the command selected or press Esc to come out of the search with the last search result.
Try it and be amazed.
What’s your favorite Linux terminal shortcut?
If you would like to learn a few more Linux terminal tricks, you may watch this video to unearth hidden command line gems:
I
have shared my favorite terminal shortcuts. What are some of your
favorite Linux shortcuts? If you have one (or more), why not share it
with the rest of us in the comment section?
In this brief tutorial, we will see what is SSLH, how to install SSLH
and how to configure SSLH to share a same port for https, and ssh in
Linux and Unix-like operating systems.
What is SSLH?
Some
Internet service providers and corporate companies might have blocked
most of the ports, and allowed only a few specific ports such as port 80
and 443 to tighten their security.
In such cases, we have no choice, but use a same port for multiple programs, say the HTTPS Port 443, which is rarely blocked. Here is where SSLH, a SSL/SSH multiplexer, comes in help.
SSLH
will listen for incoming connections on a port 443. To put this more
simply, SSLH allows us to run several programs or services on port 443
on a Linux system. So, you can use both SSL and SSH using a same port at
the same time.
If you ever been in a situation where most ports are blocked by the firewalls, you can use SSLH to access your remote server.
Install SSLH in Linux
SSLH is packaged for most Linux distributions, so you can install it using the default package managers.
On Debian, Ubuntu, Linux Mint and Pop OS, run:
$ sudo apt install sslh
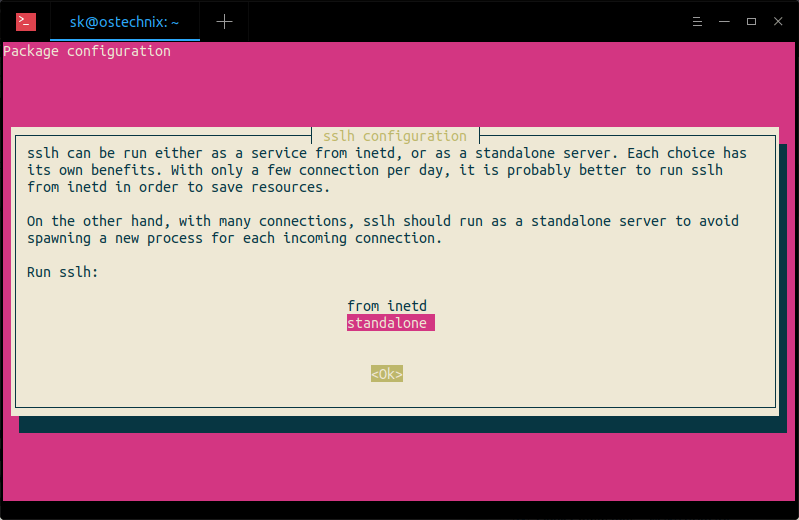
While installing SSLH, you will prompted whether you want to run sslh as a service from inetd, or as a standalone server.
Each
choice has its own benefits. With only a few connection per day, it is
probably better to run sslh from inetd in order to save resources.
On
the other hand, with many connections, sslh should run as a standalone
server to avoid spawning a new process for each incoming connection.
Install sslh
On Arch Linux and derivatives like Antergos, Manjaro Linux, install it using Pacman as shown below.
$ sudo pacman -S sslh
On RHEL, CentOS, AlmaLinux and Rocky Linux, you need to add EPEL repository and then install SSLH as shown below.
$ sudo dnf install epel-release
$ sudo dnf install sslh
On Fedora:
$ sudo dnf install sslh
If it is not available on default repositories, you can manually compile and install SSLH as described here.
Configure Apache or Nginx webservers
As you already know, Apache and Nginx webservers will listen on all network interfaces (i.e 0.0.0.0:443) by default. We need to change this setting to tell the webserver to listen on the localhost interface only (i.e. 127.0.0.1:443or localhost:443).
To do so, edit the webserver (nginx or apache) configuration file and find the following line:
listen 443 ssl;
And, change it to:
listen 127.0.0.1:443 ssl;
If you’re using Virutalhosts in Apache, make sure you have changed that it too.
VirtualHost 127.0.0.1:443
Save and close the config files. Do not restart the services. We haven't finished yet.
Configure SSLH
Once you have made the webservers to listen on local interface only, edit SSLH config file:
$ sudo vi /etc/default/sslh
Find the following line:
Run=no
And, change it to:
Run=yes
Then,
scroll a little bit down and modify the following line to allow SSLH to
listen on port 443 on all available interfaces (Eg. 0.0.0.0:443).
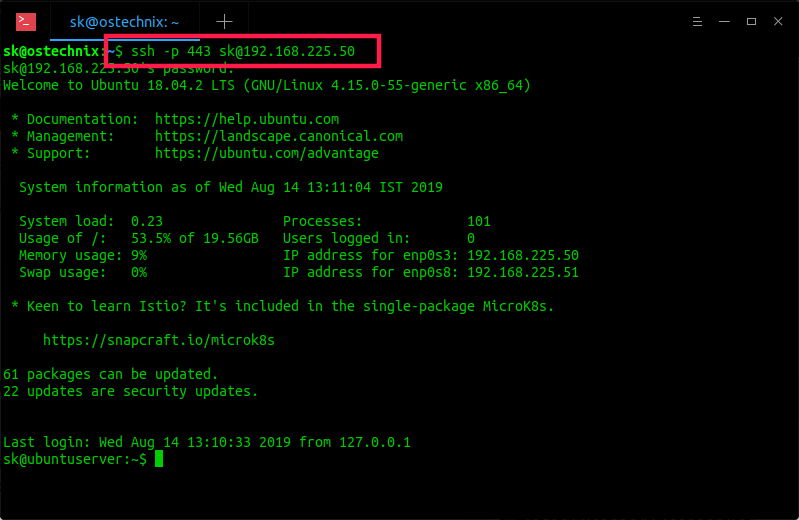
Now, you can access your remote server via SSH using port 443:
$ ssh -p 443 sk@192.168.225.50
Sample output:
sk@192.168.225.50's password:
Welcome to Ubuntu 18.04.2 LTS (GNU/Linux 4.15.0-55-generic x86_64)

* Documentation: https://help.ubuntu.com
* Management: https://landscape.canonical.com
* Support: https://ubuntu.com/advantage

System information as of Wed Aug 14 13:11:04 IST 2019

System load: 0.23 Processes: 101
Usage of /: 53.5% of 19.56GB Users logged in: 0
Memory usage: 9% IP address for enp0s3: 192.168.225.50
Swap usage: 0% IP address for enp0s8: 192.168.225.51

* Keen to learn Istio? It's included in the single-package MicroK8s.

https://snapcraft.io/microk8s

61 packages can be updated.
22 updates are security updates.


Last login: Wed Aug 14 13:10:33 2019 from 127.0.0.1
Access remote systems via SSH using port 443
See? I can now be able to access the remote server via SSH even if the default SSH port 22 is blocked. As you see in the above example, I have used the https port 443 for SSH connection. Also, we can use the same port 443 for openVPN connections too.
I
tested SSLH on my Ubuntu 18.04 LTS server and it worked just fine as
described above. I tested SSLH in a protected local area network, so I
am not aware of the security issues. If you're using it in production,
let us know the advantages and disadvantages of using SSLH in the
comment section below.
For more details, check the official GitHub page given below.