All the popular Linux distributions, such as Ubuntu, Debian, Linux
Mint, Fedora, and Red Hat, keep track of user logins, shutdowns,
restarts, and how long the system is running.
This
information can be very helpful for system administrators when
investigating an incident, troubleshooting problems, or creating a
report of user activity.
In Linux, system and application logs typically reside in the "/var/log/" directory, which can be accessed via the cat or journalctl command. However, there are other commands that use special files managed by the kernel to monitor user activity.
Using Who Command
The who
command in Linux can display user login-related information such as
user account name, user terminal, time when the user logged in, host
name, or IP address from where the user logged in.
$ who
Output:
You can use the -b flag to check the current user login (or last reboot) date and time.
$ who -b
Output:
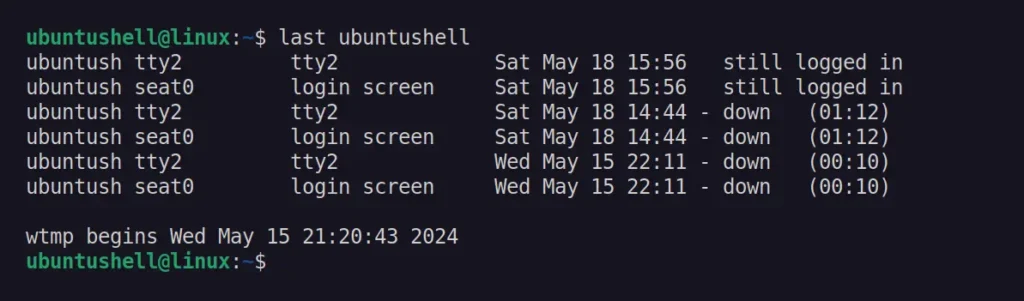
Using Last Command
The last command in Linux can display the list of user last logins, their duration, and other information as read from the "/var/log/wtmp" file.
$ last <username>
Output:
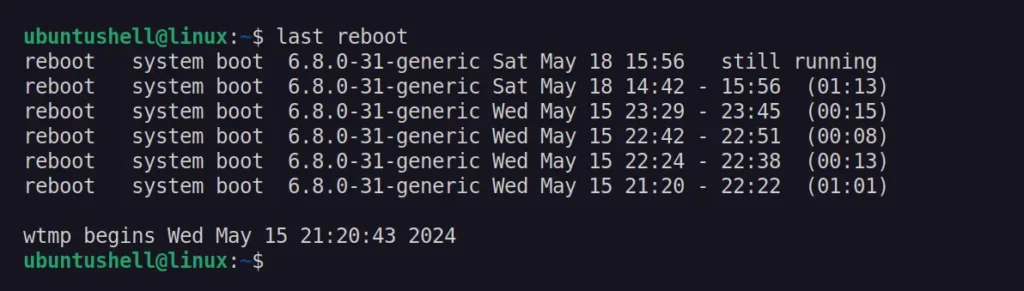
Instead of specifying the username, you can substitute it with the reboot parameter to get the time and date of the last reboot in Linux.
The uptime
command in Linux tells how long the system has been running by
displaying the current time, uptime, number of logged-in users, and
average CPU load for the past 1, 5, and 15 minutes.
$ uptime
Output:
Additionally, you can use the -p flag to show only the amount of time the system has been booted for and the -s flag to print the date and time the system booted up at:
$ uptime -p
$ uptime -s
Output:
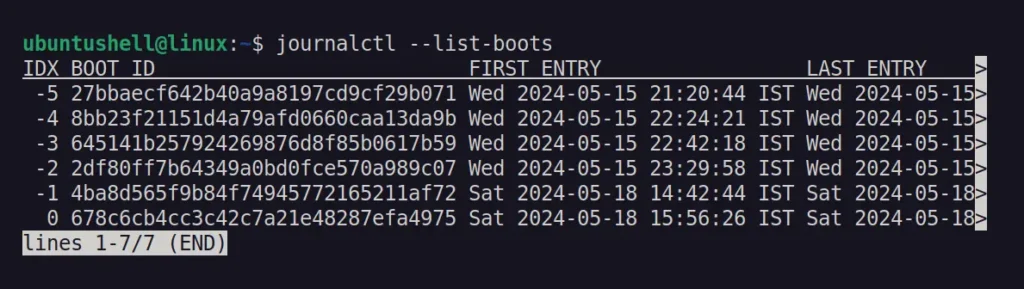
Using Journalctl COmmand
The journalctl
command in Linux is used to query the system journal, which you can use
to display the system logs for more information, such as the number of
times the system has been booted.
$ journalctl --list-boot
Output:
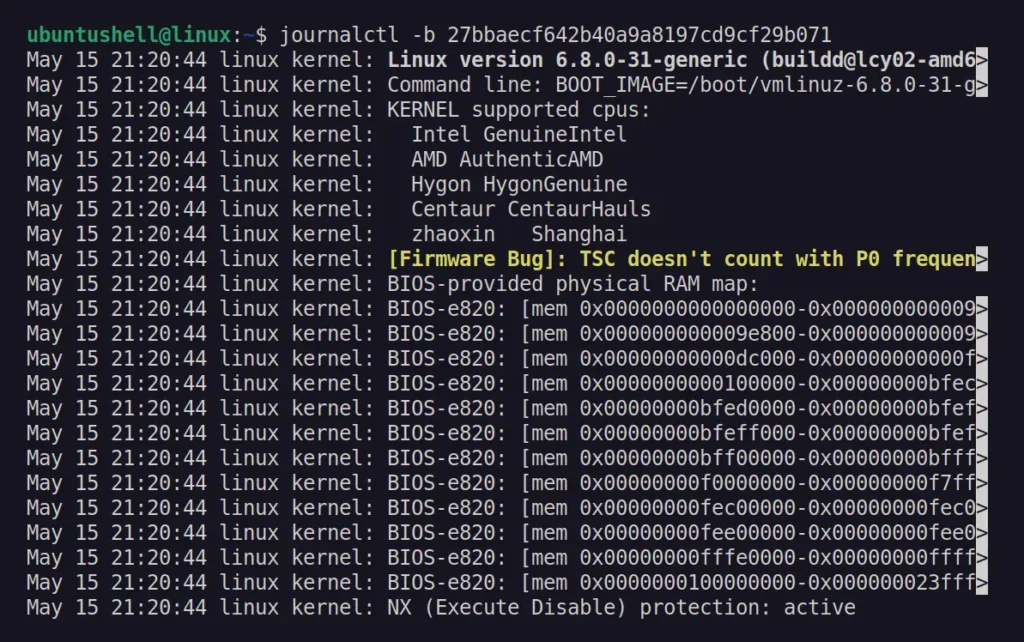
To get more detailed information from the above list of BOOT IDs, you can specify them with the -b flag.
On
a server, it might occur that the desired instance has been shut down
or rebooted unexpectedly. In such cases, you may need to investigate the
cause and find out if anyone is responsible. You can do this using the
following command:
📝 Note
To achieve the same outcome, you can use the last -x command, but I favor this approach as it offers more information.
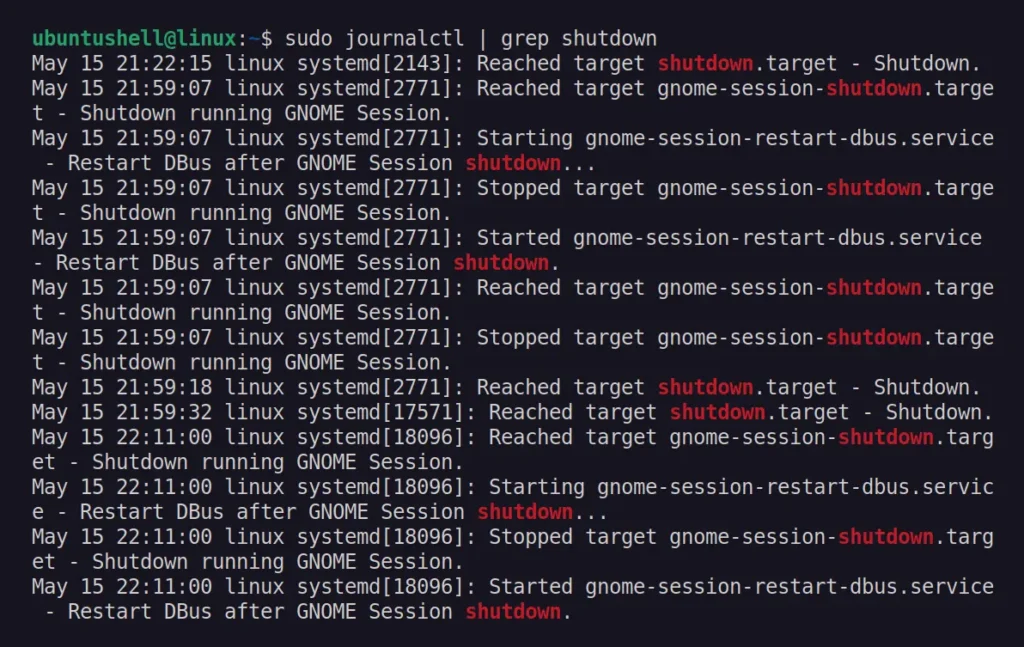
$ sudo journalctl | grep shutdown
Output:
The
first entry in the output above indicates that someone initiated the
shutdown; now you can use the other method explained in this article to
pinpoint the culprit.
Wrap Up
In
this article, you've learned how to check user login, when the system
has been shutdown and rebooted, and who or what is behind it.
direnv is an open-source extension to your current shell for
UNIX-based operating systems like Linux and macOS. It supports hooks for
multiple shell startup files, such as bash, zsh, or fish.
The
main advantage of using direnv is having isolated environment variables
for separate projects. The traditional method was to add all
environment variables inside single shell startup files, which can be ~/.bashrc, ~/.zsh, and config.fish depending upon your Linux shell.
For direnv, you need to create a .envrc
file inside each project directory and populate the project-specific
environment variable. Then it loads and unloads environment variables
depending on the current directory.
Why use Direnv?
Software
developers can use direnv to load 12factor (a methodology for building
software-as-a-service applications) app environment variables such as
your application secrets files for deployment.
How does Direnv work?
Before shell loads a command prompt, direnv checks for the existence of a .envrc or .env
files in your current and parent directories with the appropriate
permissions. Suppose both files are present, then high priority is given
to the .envrc file.
The following file is loaded
into a bash sub-shell, and all variables inside the file are captured by
direnv to make it available to the current Linux shell without user
notice.
Installing Direnv on Linux Systems
The
direnv package is available from the default repositories by installing
it from your current package manager in most Linux distributions, as
shown below.
For Debian, Ubuntu, Mint, PopOS
sudo apt install direnv
For RedHat, Fedora, CentOS
sudo dnf install direnv
For Arch, Manjaro, EndeavourOS
yay -Sy direnv
On other distributions, such as Red Hat or CentOS, you can take advantage of the direnv snaps package, as shown below.
📝 Note
While writing this article, the outdated v2.18.2 of direnv was available on the Snap Store with some issues. #440
sudo snap install direnv
Hook Direnv into your Current Shell
After
the installation, you need to hook up the direnv in your current Linux
shell; it will not work without that. Each shell has its own mechanism
for hooking extensions, such as direnv.
To find out your current shell, execute the following command in your terminal:
echo $0
bash
Follow any of the below-mentioned methods according to your present Linux shell.
For BASH Shell
Append the following line at the end of the ~/.bashrc file:
📝 Note
Make sure it appears above rvm, git-prompt, and other shell extensions that manipulate the prompt.
eval "$(direnv hook bash)"
For ZSH Shell
Append the following line at the end of the ~/.zsh file.
eval "$(direnv hook zsh)"
For Fish Shell
Append the following line at the end of the ~/.config/fish/config.fish file.
eval (direnv hook fish)
Finally, close all the active terminal sessions and source the shell startup files, as shown below.
For BASH Shell
source ~/.bashrc
For ZSH Shell
source ~/.zshrc
For Fish SHELL
source ~/.config/fish/config.fish
How to Use Direnv
Let
us see the practical usage of direnv. First, we will create a new
directory on our current path for demo purposes with the name ubuntushell_project and move into it.
mkdir ubuntushell_project
cd ubuntushell_project/
Let’s check if the $TEST_VARIABLE variable is available on the current project path or not using the echo command as shown below.
echo $TEST_VARIABLE
Nope
Above, instead of a blank space, I replaced it with "nope", which means there is no global or local environment variable available for $TEST_VARIABLE.
Next, we will create a new file in the current project directory (referring to ubuntushell_project) with the .envrc name and add $TEST_VARIABLE inside the file using the echo command, as shown below.
echo export TEST_VARIABLE=ubuntushell > .envrc
direnv: loading ~/etw/.envrc
direnv: export +TEST_VARIABLE
By default, the .envrc file is blocked. Therefore, we need to run the direnv allow . command to unblock and allow to load the .envrc content in our Linux shell, as shown below.
direnv allow .
Let's recheck the $TEST_VARIABLE output as shown below.
echo $TEST_VARIABLE
ubuntushell
Below is the behavior of the above command.
Tada! We have successfully created a .envrc file and loaded the file’s content inside our shell using the direnv command.
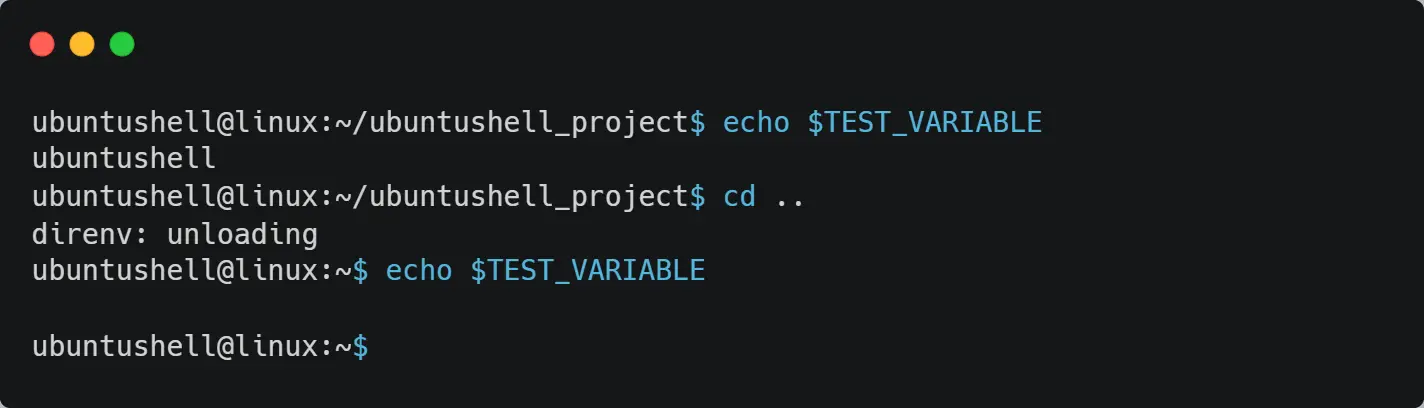
If you take one step back to get out of the current working directory (referring to ubuntushell_project) and execute the echo command for $TEST_VARIABLE, you will find the content is blank.
echo $TEST_VARIABLE
Nope
Below is the behavior of the above command.
Now that you re-enter the ubuntushell_project directory, the .envrc file will be loaded in your bash shell with its contents inside it.
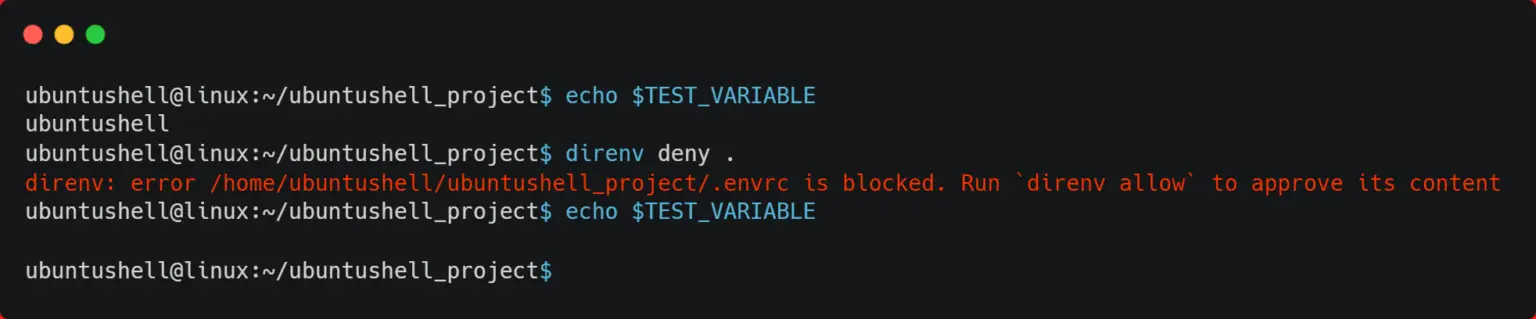
To revoke the authorization of the .envrc file and disallow content to be loaded into your current Linux shell, execute the below command.
direnv deny .
Below is the behavior of the above command.
Remove Direnv
Suppose
you don’t like direnv and want to remove it from your Linux system.
Then use the below command to remove direnv from your system.
For Debian, Ubuntu, Mint, PopOS
sudo apt purge direnv
For RedHat, Fedora, CentOS
sudo dnf remove direnv
For Arch, Manjaro, EndeavourOS
yay -Rs direnv
Final Word
Since you now understand how the direnv command works, you can follow the above steps to create an isolated environment for a specific project on the Linux system.
Jq
is a powerful and highly flexible parser program that can stream and
filter JSON data out of files and UNIX pipes. This article will teach
you the basics of jq, present code examples, as well as some alternative
implementations that you can install today.
The most common use for jq is for processing and manipulating JSON
responses from Software-as-a-Service (SaaS) APIs. For instance, you can
use jq along with cURL to tap into Digitalocean’s API endpoints to get
your account details.
Aside from that, jq is also a powerful utility for managing large
JSON files. Some of the most popular database programs today such as
MongoDB, PostgreSQL, and MySQL support JSON as a way to store data. As
such, learning jq gives you an edge in understanding how those database
systems work.
To start with jq, install its binary package to your system:
sudoaptinstall jq
Find an open API endpoint that you can test jq on. In my case, I’m going to use the ipinfo.io’s IP checker API.
The most basic filter for jq is the dot (.) filter. This will pretty print the JSON response as jq received it from its standard input:
curl https://ipinfo.io/| jq '.'
Another basic filter is the pipe (|) symbol. This is a special filter
that passes the output of one filter as the input of another:
curl https://ipinfo.io/| jq '. | .ip'
The value after the pipe operator is the “Object Identifier-Index.”
This searches your JSON input for any variable that matches its text and
prints its value on the terminal. In this case, I’m looking for the
value of the “ip:” key.
With the basics done and dusted, the following sections will show you some of the tricks that you can do using jq.
Most modern websites today offer open API endpoints for reading data
inside their platforms. For example, every Github repository has its own
API URL for you to retrieve the latest commits and issues for that
project.
You can use an API endpoint like this with jq to create your own
simple “RSS-like” feed. To start, use cURL to test if the endpoint is
working properly:
This will show the different fields that the Github API sends to jq.
You can use these to create your own custom JSON object by piping the
input to the curly braces ({}) filter:
You can also create a small Bash script to display the latest issues
from your favorite Github project. Paste the following block of code
inside an empty shell script file:
Save your file, then run the following command to make it executable:
chmod u+x ./script.sh
Test your new feed reader by listing the latest issue in your favorite Github repo:
./script.sh 0
2. Reading and Searching through a JSON Database
Aside from reading data off of APIs, you can also use jq to manage
JSON files in your local machine. Start by creating a simple JSON
database file using your favorite text editor:
nano ./database.json
Paste the following block of data inside your file, then save it:
Test whether jq reads your JSON file properly by printing the first object in your database array:
jq '.[0]' database.json
Make a query on your JSON database using the “Object
Identifier-Index” filter. In my case, I am searching for the value of
the “.name” key on every entry in my database:
jq '.[] | .name' database.json
You can also use some of jq’s built-in functions to filter your
queries based on certain qualities. For example, you can search for and
print all the JSON objects that have a “.name” value with more than six
characters:
jq '.[] | select((.name|length)>6)' database.json
Operating on JSON Databases with jq
In addition to that, jq can operate on JSON databases similar to a
basic spreadsheet. For instance, the following command prints the sum
total of the “.balance” key for every object in the database:
jq '[.[] | .balance] | add' database.json
You can even extend this by adding a conditional statement to your
query. The following will only add the “.balance” if the “.name” value
of the second object is “Alice”:
jq 'if .[1].name == "Alice" then [ .[] | .balance ] | add else "Second name is not Alice" end' database.json
It’s possible to temporarily remove variables from your JSON
database. This can be useful if you’re testing your filter and you want
to make sure that it can still process your dataset:
jq 'del(.[1].name) | .[]' database.json
You can also insert new variables to your database using the “+”
operator. For example, the following line adds the variable “active:
true” to the first object in the database:
jq '.[0] + {active: true}' database.json
Note: You can make your changes permanent by piping the output of your jq command to your original database file: jq '.[0] + {active: true}' database.json > database.json.
3. Transforming Non-JSON Data in jq
Another brilliant feature of jq is that it can accept and work with
non-JSON data. To achieve that, the program uses an alternative “slurp
mode” where it converts any space and newline delimited data into a JSON
array.
You can enable this feature by piping data into jq with an -s flag:
echo'1 2'| jq -s .
One advantage of converting your raw data into an array is that you
can address them using array index numbers. The following command adds
two values by referring to their converted array location:
echo'1 2'| jq -s'.[0] + .[1]'
You can take this array location further and construct new JSON code
around it. For instance, this code converts the text from the echo
command to a JSON object through the curly braces filter:
Apart from taking in raw data, jq can also return non-JSON data as
its output. This is useful if you’re using jq as part of a larger shell
script and you only need the result from its filters.
To do that, run jq followed by the -r flag. For example, the following command reads all the names from my database file and returns it as plain text data:
jq -r'.[] | .name' database.json
Alternative JSON Parsers to jq
Since the code for jq is open source, various developers have created
their own versions of the JSON parser. Each of these has its own unique
selling point that either improves on or changes a core part of jq.
1. jaq
Jaq is a powerful JSON parser that provides a near identical feature set to jq.
Written in Rust, one of the biggest selling points of Jaq is that it
can run the jq language up to 30 times faster than the original parser
while still retaining backward compatibility. This alone makes it
valuable when you’re running large jq filters and you want to maximize
the performance out of your machine.
That said, one downside of jaq is that it’s not currently available
on Debian, Ubuntu, and Fedora repositories. The only way to obtain it is
to either download Homebrew or compile it from source.
2. gojq
Gojq
is an alternative JSON parser that’s written entirely in Go. It
provides an accessible and easy-to-use version of jq that you can
install on almost any platform.
The original jq program can be incredibly terse in its error
messages. As a result, debugging jq scripts is especially hard for a new
jq user. Gojq solves this issue by showing you where the mistake is in
your script as well as providing detailed messages on the kind of error
that happened.
Another selling point of gojq is that it can read and process both
JSON and YAML files. This can be especially helpful if you’re a Docker
and Docker Compose user and you want to automate your deployment
workflow.
Gojq’s biggest issue is that it removed some of the features that
come by default on the original jq parser. For instance, options such as
--ascii-output, --seq, and --sort-keys doesn’t exist on gojq.
Unlike jaq and gojq, fq
is a comprehensive software toolkit that can parse both text and binary
data. It can work with a variety of popular formats such as JSON, YAML,
HTML, and even FLAC.
The biggest feature of fq is that it contains a built-in hex reader
for files. This makes it trivial to look at a file’s internal structure
to determine how it’s made and whether there’s anything wrong with it.
Aside from that, fq also uses the same syntax for jq when dealing with
text which makes it easy to learn for anyone already familiar with jq.
One downside of this ambitious goal is that fq is still under heavy
development. As such, some of the program’s features and behaviors are
still subject to sweeping changes.
Exploring jq, how it works, and what makes it special is just the
first step in learning how to make programs on your computer. Take a
deep dive into the wonderful world of coding by reading the basics of shell programming.