Monday, March 3, 2025

How to Enter Single User Mode in AlmaLinux 8/9

https://www.tecmint.com/almalinux-single-user-mode

How to Enter Single User Mode in AlmaLinux 8/9

Single user mode, also known as rescue mode, is a minimal environment in Linux that allows system administrators to perform maintenance tasks, troubleshoot issues, and recover from system failures.

The single user mode is particularly useful when you need to reset the root password, fix misconfigured settings, repair a damaged file system, or investigate system errors that prevent normal booting.

AlmaLinux 8 and 9, as RHEL-based distributions, provide an easy way to boot into single user mode through the GRUB bootloader.

In this guide, we will explain step by step how to enter single user mode on AlmaLinux 8 and 9.

What is Single User Mode?

Single user mode is a special boot mode in Linux that allows a system to run with minimal services and only a root shell.

Unlike normal multi-user mode, in single user mode:

  • Only the root user has access.
  • Networking services are disabled.
  • Only essential system processes are started.
  • The system runs in command-line mode without a graphical interface.

Since the system is not fully operational in this mode, it is ideal for troubleshooting critical issues and making system-level changes.

Step 1: Access the GRUB Boot Menu

The first step to boot into single user mode is accessing the GRUB boot menu, which appears before the system starts up fully.

If the system is already powered on, restart it using:

reboot

As soon as the system begins to reboot, press the “Esc” key (on some systems, it might be the Shift key).
AlmaLinux Booting
AlmaLinux Booting

You will see a screen displaying a list of available kernels in the GRUB menu, you can now use the arrow keys to select the kernel version you want to modify boot settings.
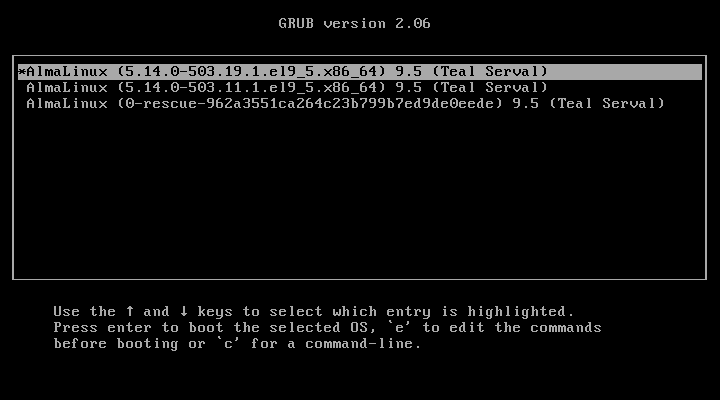
AlmaLinux Grub Menu
AlmaLinux Grub Menu

Once you have selected the kernel version, press 'e' to edit the boot configuration screen where you can modify the kernel parameters.
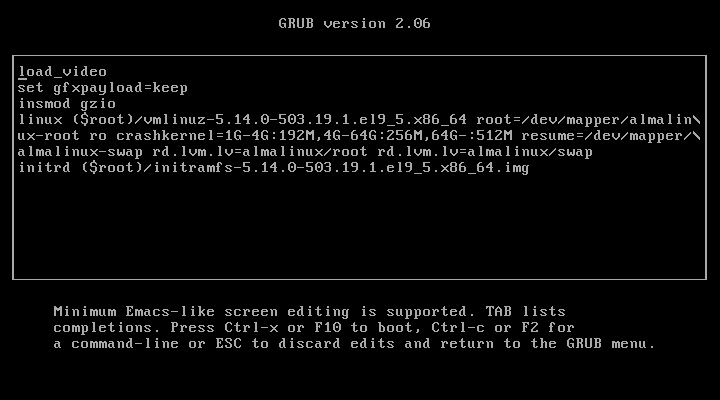
AlmaLinux Kernel Parameters

Step 2: Modify the Kernel Boot Parameters

Now, we need to add a special command to instruct the system to boot into single user mode instead of normal multi-user mode.

Find the line that starts with linux or linuxefi (if your system uses UEFI boot).

linux /vmlinuz-<version> root=/dev/mapper/almalinux-root ro quiet splash

Go to the end of this line and add the following:

systemd.unit=rescue.target
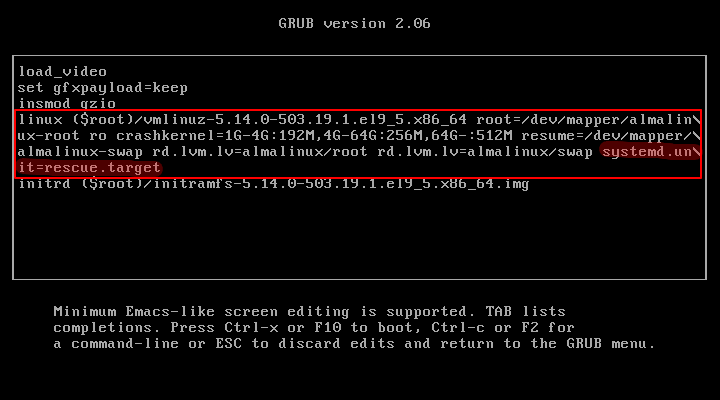
Modify Kernel Parameters

After modification, press Ctrl + X or F10 to boot with the modified settings.

Step 3: Boot into Single User Mode

After you press Ctrl + X or F10, the system will begin booting into single user mode.

  • You will see a command-line interface instead of the normal login screen.
  • The system will prompt you for the root password (on some systems, it might not require one).
  • Once you enter the root password, you will have complete control over the system.
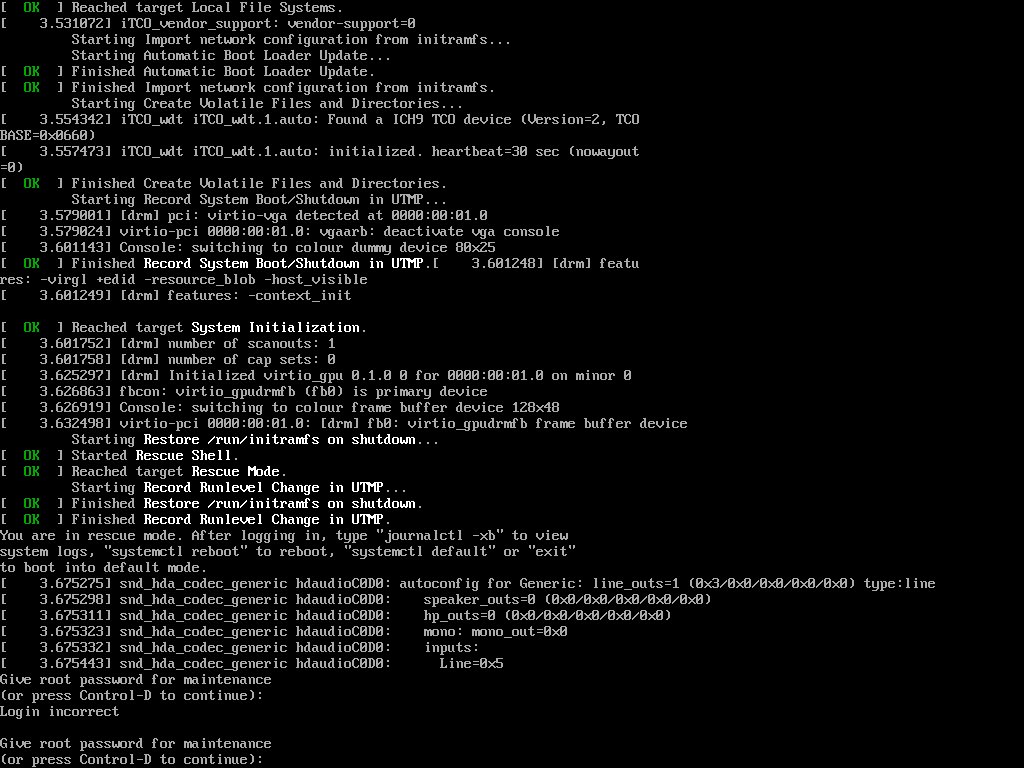
AlmaLinux Single User Mode

Step 4: Perform System Maintenance

Now that you are in single user mode, you can perform various system maintenance tasks.

Here are some common actions you might need to take:

1. Reset the Root Password

If you forgot your root password, you can reset it using:

passwd root

Once changed, make sure to update the SELinux policy (if enabled) by running:

touch /.autorelabel
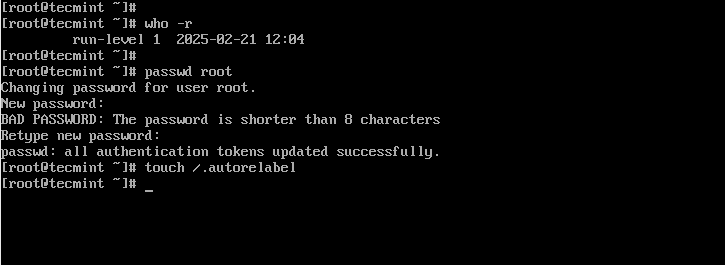
AlmaLinux Root Password Reset

2. Check and Repair the Filesystem

If your system is experiencing boot errors due to filesystem corruption, run:

fsck -y /dev/mapper/almalinux-root

This will check and attempt to fix errors on the root partition.

3. Modify System Configuration Files

If a misconfiguration is preventing normal boot, you can edit configuration files:

vi /etc/fstab

Make the necessary corrections and save the file.

Once you have completed the necessary maintenance tasks, reboot the system to start normally.

reboot

Your system will now boot into its normal operating mode.

Alternative: Boot into Emergency Mode

If single user mode does not work or you need a lower-level troubleshooting environment, you can modify any existing boot parameters with the following:

systemd.unit=emergency.target
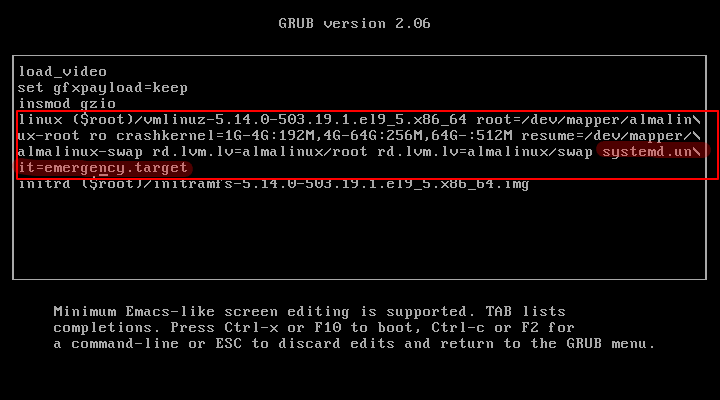
AlmaLinux Emergency Mode

Emergency mode provides even fewer services than single user mode, which is helpful for deep troubleshooting.

Example: Fixing a Corrupted fstab File

If the /etc/fstab file (which controls how filesystems are mounted) is misconfigured or contains an incorrect entry, the system may fail to boot properly.

Let’s say you manually edited /etc/fstab and added a wrong entry like this:

/dev/sdb1 /mnt/data ext4 defaults 0 0

But the partition /dev/sdb1 does not exist.

What Happens?

  • If you boot normally, the system may hang during startup.
  • If you try single user mode, it may not load properly because /etc/fstab is read before reaching the shell.

Solution: Boot into Emergency Mode

Since emergency mode loads only the most essential services, it skips mounting filesystems incorrectly defined in /etc/fstab, allowing you to fix the issue.

Conclusion

Single user mode in AlmaLinux 8/9 is a powerful mode that allows administrators to reset passwords, repair filesystems, and fix configuration errors. By following these steps, you can safely boot into rescue mode and troubleshoot system issues efficiently.

How to Create a Read-Only User in PostgreSQL

https://vishalvyas.com/how-to-create-a-read-only-user-in-postgresql

How to Create a Read-Only User in PostgreSQL

Introduction

When working with PostgreSQL, there are scenarios where you need to provide access to a database without granting modification rights. This is particularly useful for reporting, analytics, or when you want to expose data securely to external users or applications.

In this article, we’ll walk through the process of creating a read-only user in PostgreSQL. We’ll also explain each command to ensure you understand what’s happening at each step.


Steps to Create a Read-Only User in PostgreSQL

1. Create a New User

CREATE USER readonly_user WITH PASSWORD 'securepassword';

This command creates a new PostgreSQL user named readonly_user with a specified password. Replace 'securepassword' with a strong password of your choice.

2. Grant Connection Privileges

GRANT CONNECT ON DATABASE mydatabase TO readonly_user;

This allows the readonly_user to connect to the database named mydatabase. Without this privilege, the user won’t be able to access the database.

3. Switch to the Target Database

\c mydatabase

This command switches to the database where you want to grant permissions. If you’re using a SQL query tool, make sure you’re connected to the correct database.

4. Grant Schema Usage Permission

GRANT USAGE ON SCHEMA public TO readonly_user;

PostgreSQL databases can have multiple schemas. This command grants permission to use the public schema, which is the default schema where tables are stored.

5. Grant Read-Only Access to All Tables

GRANT SELECT ON ALL TABLES IN SCHEMA public TO readonly_user;

This allows the readonly_user to read (SELECT) data from all tables within the public schema. However, it won’t allow modifications such as INSERT, UPDATE, or DELETE.

6. Ensure Future Tables Have Read-Only Access

ALTER DEFAULT PRIVILEGES IN SCHEMA public GRANT SELECT ON TABLES TO readonly_user;

If new tables are added in the future, they will automatically inherit the SELECT permission for the readonly_user. Without this step, the user wouldn’t be able to query newly created tables.


Conclusion

Creating a read-only user in PostgreSQL is a simple yet crucial step for securely granting access to data without allowing modifications. By following the above steps, you ensure that your user has the necessary permissions to query the database while maintaining security and data integrity


Saturday, March 1, 2025

How to Install DeepSeek Locally with Ollama LLM in Ubuntu 24.04

https://www.tecmint.com/run-deepseek-locally-on-linux

How to Install DeepSeek Locally with Ollama LLM in Ubuntu 24.04

Running large language models like DeepSeek locally on your machine is a powerful way to explore AI capabilities without relying on cloud services.

In this guide, we’ll walk you through installing DeepSeek using Ollama on Ubuntu 24.04 and setting up a Web UI for an interactive and user-friendly experience.

What is DeepSeek and Ollama?

  • DeepSeek: An advanced AI model designed for natural language processing tasks like answering questions, generating text, and more. .
  • Ollama: A platform that simplifies running large language models locally by providing tools to manage and interact with models like DeepSeek.
  • Web UI: A graphical interface that allows you to interact with DeepSeek through your browser, making it more accessible and user-friendly.

Prerequisites

Before we begin, make sure you have the following:

  • Ubuntu 24.04 installed on your machine.
  • A stable internet connection.
  • At least 8GB of RAM (16GB or more is recommended for smoother performance).
  • Basic familiarity with the terminal.

Step 1: Install Python and Git

Before installing anything, it’s a good idea to update your system to ensure all existing packages are up to date.

sudo apt update && sudo apt upgrade -y

Ubuntu likely comes with Python pre-installed, but it’s important to ensure you have the correct version (Python 3.8 or higher).

sudo apt install python3
python3 --version

pip is the package manager for Python, and it’s required to install dependencies for DeepSeek and Ollama.

sudo apt install python3-pip
pip3 --version

Git is essential for cloning repositories from GitHub.

sudo apt install git
git --version

Step 2: Install Ollama for DeepSeek

Now that Python and Git are installed, you’re ready to install Ollama to manage DeepSeek.

curl -fsSL https://ollama.com/install.sh | sh
ollama --version

Next, start and enable Ollama to start automatically when your system boots.

sudo systemctl start ollama
sudo systemctl enable ollama

Now that Ollama is installed, we can proceed with installing DeepSeek.

Step 3: Download and Run DeepSeek Model

Now that Ollama is installed, you can download the DeepSeek model.

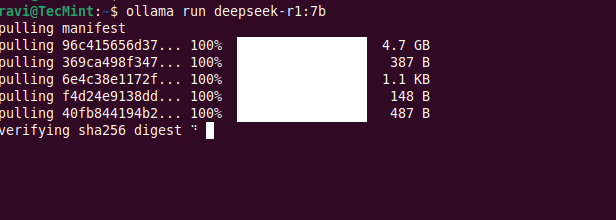
ollama run deepseek-r1:7b

This may take a few minutes depending on your internet speed, as the model is several gigabytes in size.

Install DeepSeek Model Locally

Once the download is complete, you can verify that the model is available by running:

ollama list

You should see deepseek listed as one of the available models.

List DeepSeek Model Locally

Step 4: Run DeepSeek in a Web UI

While Ollama allows you to interact with DeepSeek via the command line, you might prefer a more user-friendly web interface. For this, we’ll use Ollama Web UI, a simple web-based interface for interacting with Ollama models.

First, create a virtual environment that isolates your Python dependencies from the system-wide Python installation.

sudo apt install python3-venv
python3 -m venv ~/open-webui-venv
source ~/open-webui-venv/bin/activate

Now that your virtual environment is active, you can install Open WebUI using pip.

pip install open-webui

Once installed, start the server using.

open-webui serve

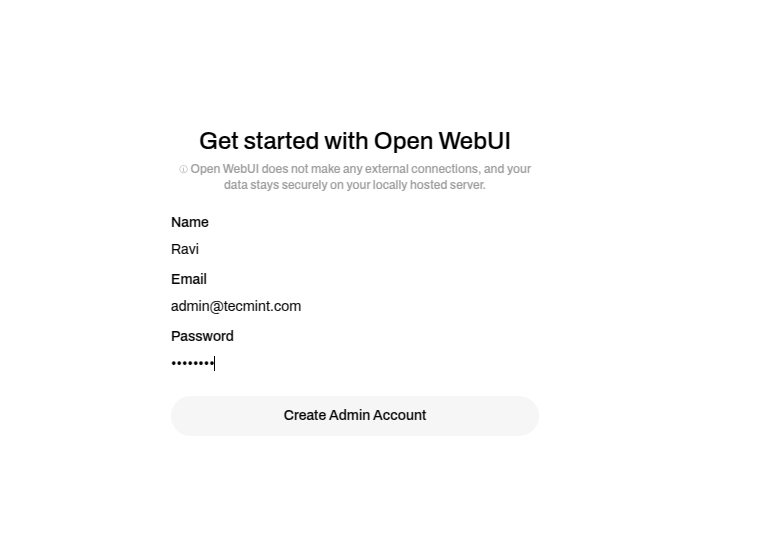
Open your web browser and navigate to http://localhost:8080 – you should see the Ollama Web UI interface.

Open WebUI Admin Account

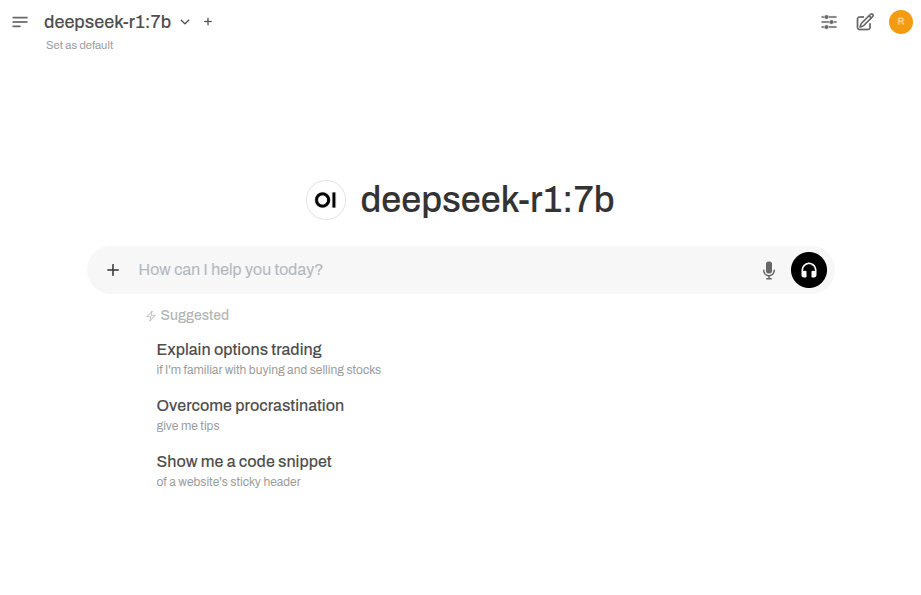
In the Web UI, select the deepseek model from the dropdown menu and start interacting with it. You can ask questions, generate text, or perform other tasks supported by DeepSeek.

Running DeepSeek on Ubuntu

You should now see a chat interface where you can interact with DeepSeek just like ChatGPT.

Step 5: Enable Open-WebUI on System Boot

To make Open-WebUI start on boot, you can create a systemd service that automatically starts the Open-WebUI server when your system boots.

sudo nano /etc/systemd/system/open-webui.service

Add the following content to the file:

[Unit]
Description=Open WebUI Service
After=network.target

[Service]
User=your_username
WorkingDirectory=/home/your_username/open-webui-venv
ExecStart=/home/your_username/open-webui-venv/bin/open-webui serve
Restart=always
Environment="PATH=/home/your_username/open-webui-venv/bin:/usr/local/sbin:/usr/local/bin:/usr/sbin:/usr/bin:/sbin:/bin"

[Install]
WantedBy=multi-user.target

Replace your_username with your actual username.

Now reload the systemd daemon to recognize the new service:

sudo systemctl daemon-reload

Finally, enable and start the service to start on boot:

sudo systemctl enable open-webui.service
sudo systemctl start open-webui.service

Check the status of the service to ensure it’s running correctly:

sudo systemctl status open-webui.service

Running DeepSeek on Cloud Platforms

If you prefer to run DeepSeek on the cloud for better scalability, performance, or ease of use, here are some excellent cloud solutions:

  • Linode – It provides affordable and high-performance cloud hosting, where you can deploy an Ubuntu instance and install DeepSeek using Ollama for a seamless experience.
  • Google Cloud Platform (GCP) – It offers powerful virtual machines (VMs) with GPU support, making it ideal for running large language models like DeepSeek.
Conclusion

You’ve successfully installed Ollama and DeepSeek on Ubuntu 24.04. You can now run DeepSeek in the terminal or use a Web UI for a better experience.