Wednesday, March 25, 2015

How to install and access CentOS remote desktop on VPS

http://ask.xmodulo.com/centos-remote-desktop-vps.html

Question: I want to install CentOS desktop on VPS, and be able to access the desktop GUI remotely from home. What is a recommended way to set up and access CentOS-based remote desktop on VPS? Nowadays teleworking or remote working with flexible hours is increasingly popular in tech industry. One of the enabling technologies behind this trend is remote desktop. Your desktop environment is in the cloud, and you can access the remote desktop anywhere you go, either from home or at your workplace.
This tutorial describes how you can set up CentOS based remote desktop on VPS. Here we are going to demonstrate CentOS 7 based environment.
We assume that you already created a CentOS 7 VPS instance somewhere (e.g., using DigitalOcean or Amazon EC2). Make sure that the VPS instance has at least 1GB memory. Otherwise, CentOS desktop will crash when you try to access remote desktop.

Step One: Install CentOS Desktop

If an available CentOS image is a minimal version of CentOS without desktop, you will need to install desktop (e.g., GNOME) on your CentOS VPS before proceeding. For example, DigitalOcean's CentOS image is such a minimal version, which requires desktop GUI installation as follows.
# yum groupinstall "GNOME Desktop"
Reboot a VPS after finishing installation.

Step Two: Install and Configure VNC Server

The next step is to install and configure VNC server. We are going to use TigerVNC, an open-source VNC server implementation.
# yum install tigervnc-server
Now create a user account (e.g., xmodulo) which will be used to access remote desktop.
# useradd xmodulo
# passwd xmodulo
When a user tries to access remote desktop using VNC, a dedicated VNC server daemon will be launched to handle its requests. This means that you will need to create a separate VNC server configuration for each user.
CentOS 7 relies on systemd to manage and configure system services. So we are going to configure VNC server for xmodulo user using systemd.
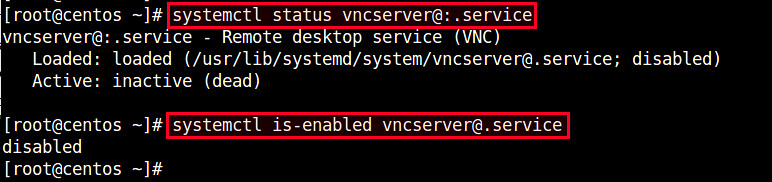
Let's first check the status of VNC server by running either command below:
# systemctl status vncserver@:.service
# systemctl is-enabled vncserver@.service
By default, freshly installed VNC service is not active (disabled).

Now create a VNC service configuration for xmodulo user by copying a generic VNC service unit file as follows.
# cp /lib/systemd/system/vncserver@.service /etc/systemd/system/vncserver@:1.service
Open the configuration file with a text editor, and replace with an actual user name (e.g., xmodulo) under [Service] section. Also, append "-geometry " parameter in ExecStart. In the end, the following two lines with bold font will be modified.
# vi /etc/systemd/system/vncserver@:1.service
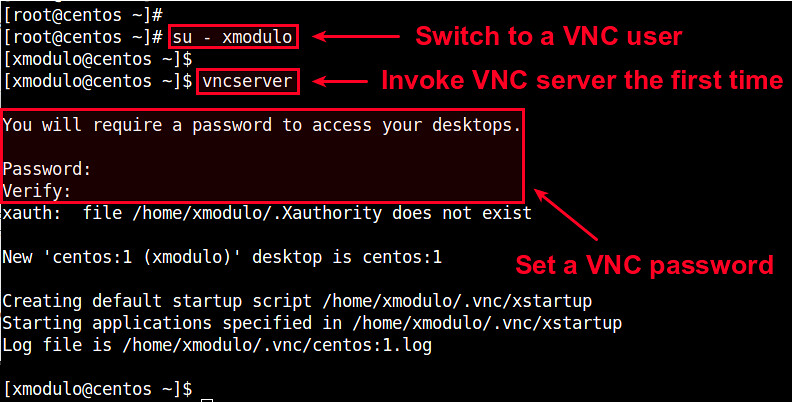
[Service]
Type=forking
# Clean any existing files in /tmp/.X11-unix environment
ExecStartPre=/bin/sh -c '/usr/bin/vncserver -kill %i > /dev/null 2>&1 || :'
ExecStart=/sbin/runuser -l xmodulo -c "/usr/bin/vncserver %i -geometry 1024x768"
PIDFile=/home/xmodulo/.vnc/%H%i.pid
ExecStop=/bin/sh -c '/usr/bin/vncserver -kill %i > /dev/null 2>&1 || :'
Now set up (optional) VNC password for xmodulo user for security. For this, switch to the user, and run vncserver command.
# su - xmodulo
# vncserver
You will be prompted to enter a VNC password for the user. Once the password is set, you will need to use this password to gain access to remote desktop.

Finally, reload services to activate the new VNC configuration:
# systemctl daemon-reload
and enable VNC service to make it start automatically upon boot:
# systemctl enable vncserver@:1.service
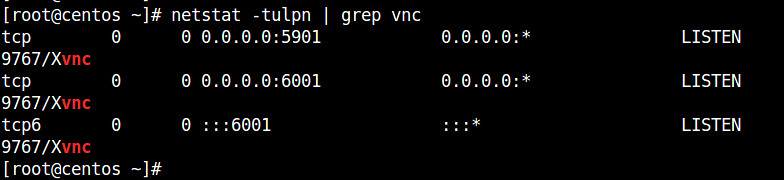
Check the port number that a VNC server is listening on by running:
# netstat -tulpn | grep vnc

Port 5901 is the default port number for VNC client to connect to a VNC server.

Step Three: Connect to Remote Desktop over SSH

By design, Remote Frame Buffer (RFB) protocol used by VNC is not a secure protocol. Thus it is not a good idea to directly connect to a remote VNC server running on VPS using a VNC client. Any sensitive information such as password could easily be leaked from VNC traffic. So instead, I strongly recommend that you tunnel VNC traffic over a secure SSH tunnel, as described here.
On a local host where you want to run VNC client, create an SSH tunnel to a remote VPS using the following command. When prompted for SSH password, type the password of the user.
$ ssh xmodulo@ -L 5901:127.0.0.1:5901
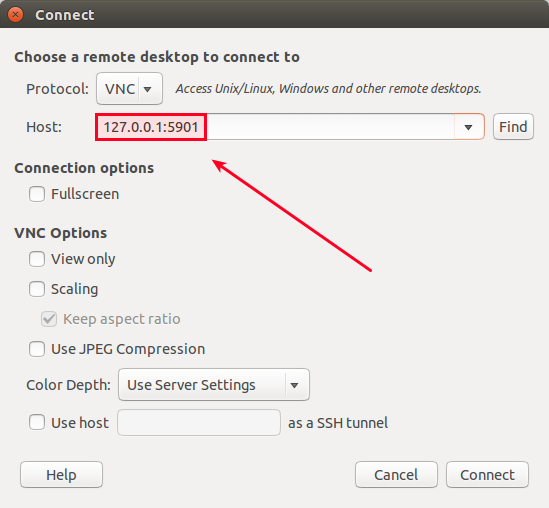
Replace "xmodulo" with your own VNC user, and fill in the IP address of your VPS instance.
Once an SSH tunnel is established, remote VNC traffic will be routed over the SSH tunnel, and be sent to 127.0.0.1:5901.
Now go ahead and launch your favorite VNC client (e.g., vinagre), and connect to 127.0.0.1:5901.

You will be asked to enter a VNC password. When you type a correct VNC password, you will finally be able to CentOS remote desktop on VPS securely.

Installing and Using vnStat and vnStati for monitoring network traffic in Ubuntu

https://www.howtoforge.com/tutorial/vnstat-network-monitoring-ubuntu

1 Introduction

Monitoring Network Traffic or Bandwidth Usage is an important task in an organisational structure or even for developers. It is sometimes required to monitor traffic on various systems which share the internet bandwidth. There might be situations where network statistics are required for decision making in the networking areas or use the logged information on the network traffic for analysis tasks.
vnStat and vnStati are command line utilities which are very useful tools that help a user to monitor, log and view network statistics over various time periods. It provides summaries on various network interfaces, may it be wired like "eth0" or wireless like "wlan0". It allows the user to view hourly, daily, monthly statistics in the form of a detailed table or a command line statistical view. To store the results in a graphical format, we can use the vnStati to obtain and provide visual display of statistics in the form of graphs and store them in the form of images for later use.
This post deals with the procedure to install and use vnStat and vnStati. It also details the options and usage methods required to view and store the type of information you want. vnStat does most of the logging and updating , where as vnStati is used to provide a graphical display of the statistics.

2 Installing vnStat and vnStati

To install the two command line tools use the following two commands:
sudo apt-get install vnstat
sudo apt-get install vnstati
Enter your password and wait for it to install. Once done, test if it has installed correctly by typing "vnstat" and "vnstati" in the terminal. There shouldn't be any error displayed saying, "vnstat not found" or "vnstati not found".

3 vnStat setup and running

Once the installation is complete, vnStat has to be setup or configured as it does not start on its own. vnStat has to be told explicitly which interfaces have to be monitored. We then start the vnStat daemon called "vnstatd", which starts vnStat and monitors for as long as it is not stopped explicitly.
The first thing to do here is tell vnStat the network interfaces to monitor. Here we look at a wired interface "eth0" and a wireless interface "wlan0". Type the following commands in the terminal.
vnstat -u -i eth0
This above command activates monitoring that interface. The first time you run this command on any interface you will get an error saying 'Unable to read database "/var/lib/vnstat/eth0" '. Please ignore this. Refer to the image below.

Similar to above we also set the wireless network interface using the command:
vnstat -u -i wlan0
To view all the network interfaces available in your system, use the command:
vnstat --islist
Once you know all the interfaces that you want to be monitored, use the command above with that interface name to monitor the traffic on it. Below is an image of the available interfaces in my system, Yours might be similar.

Once the above steps are complete, we can now start the vnStat daemon. To do this, we use the following command:
sudo /etc/init.d/vnstat start
You can check to see of the daemon process is running, by using the following command and the image of the output is shown below that:
ps -f | grep vnst

4 Using basic features of vnStat

The most basic usage of vnStat is opening a terminal and executing the command:
vnstat
This gives a month wise summary of total network traffic from all the registered interfaces. I have added an image of my network traffic. You can see below that for the network interface "eth0", it says "Not enough Data available yet". This is because I enabled traffic monitoring for eth0 just while I was writing this post. So, if you have enabled it recently, both eth0 and wlan0 will show that there is not enough data. But soon after using the internet for a while it will change and will look similar to "wlan0" below:

For specific but basic usage you can monitor specific network interfaces by using the "-i" option. So, the command for wlan0, will be like:
vnstat -i wlan0
Replacing the "wlan0" from above command with any other interface like "eth0" will give the statistics for that interface. An example for "wlan0" and "eth0" is shown below. Depending on when you have started vnStat and the usage of your network it might look similar to one or both of the images below.


It can be seen that at the end on each table, vnStat provides an estimated network usage of the month. Sometimes this is very useful and helps the user to control the bandwidth usage. This is one of the many useful features of vnStat.

5 Specific usage of vnStat

Here we will monitor traffic at specific time periods and for one particular interface. Since I have quite a lot of logged statistics for the "wlan0" interface, I will be giving examples for that, but it can be assured that it will work the same way for all the interfaces. so, let's begin:

5.1 Hourly statistics

We can view hourly statistics in the form of a console-based graph followed by a table representing the usage for the last 24 hours. We can use this by using the "-h" option. Use the following command:
vnstat -h -i wlan0
So, you can replace the "wlan0" with say "eth0" and you will get the result for that. The image below shows the wlan0 hourly statistics for my system.

5.2 Monthly statistics

using the "-m" option we can view the monthly statistics. The command followed by a screenshot representing monthly stats is shown below.
vnstat -m -i wlan0

5.3 Weekly statistics

We can use the "-w" option to view the weekly statistics for an interface.
vnstat -w -i wlan0

5.4 Top 10 stats and live monitoring

Live bandwidth usage can be monitored by using the "-l" command and top 10 days with highest traffic can be monitored with the "-t" option. The commands for doing that are:
vnstat -l -i wlan0
vnstat -t -i wlan0

6 Using Vnstati

vnStati is used to produce graphical images representing the network traffic as graphs. It takes the required information to create graphs from vnStat and stores it in the specified location.

6.1 Output of summary for an interface

To take the output of a particular interface, we can use the "-s" option of vnStati. We will also be using "-o" option to specify where the output file will be stored. To get the output and store it as an image called "summary.png" in the home folder, use the following command (the output for my system is below):
vnstati -s -i wlan0 -o ~/summary.png

6.2 Hourly display of stats

We can use the "-h" option to get the output for hourly display. The command and output are shown below. The display is always for the last 24 hours.
vnstati -h -i wlan0 -o ~/summary2.png

6.3 Cumulative output

It is possible to get the total output by combining the traffic analysis of multiple interfaces. For example "eth0+eth1" gives the output for the traffic by summing up the stats from eth0 and eth1. Similarly we can add up any number of interfaces like "eth0+eth1+eth2" or "eth0+wlan0", etc. Below is an example and command:
vnstati -s -i wlan0+eth0 -o ~/summary3.png

7 Conclusion

From the variety of information that we can log and analyse and produce by monitoring network traffic makes the combination of vnStat and vnStati a very powerful and useful toolkit. This can be used in an organisation too as it provides accurate results. The live monitoring can be verified with other tools to prove its accuracy. And since it logs all the information, the analysis can be done for a time period somewhere in the past. Lots more information about the usage and options can be found out in the vnStat man page.

Tuesday, March 24, 2015

11 ways to get involved with Humanitarian FOSS

http://opensource.com/life/15/2/getting-involved-hfoss


Posted 18 Feb 2015 by 
 
Humanitarian open source software, outreached hand
Image credits : 
 This article is part of the HFOSS column coordinated by Jen Wike Huger. To share your projects and stories about how free and open source software is making the world a better place, contact us at osdc-admin@redhat.com.
Lending a digital hand for humanitarian projects is just a click away. Whether you have five minutes or a few hours, you can make a difference with a variety of HFOSS projects. The level of skills required vary from web search, verification, mapping, translation, training, and open source software development. Along the journey of changing the world, you can meet like minds and hone your skills. The key is to ask yourself: What do I want to do? How can I get started? How can I find the right project and community?
Over the years, Opensource.com has featured a number of articles about HFOSS and digital humanitarianism. We are in an unprecedented time of openness for international governmental organizations (INGOs) and non-governmental organizations (NGOs). Citizens and civil society have a place at the table to affect change via digital humanitarian efforts, often using free and open source software.
This primer provides an overview and touches on some amazing projects.
Digital Humanitarian Network interaction diagram of companies

What can I do?

Many of you already contribute to open source projects, or you arrived at Opensource.com to seek a new adventure. When it comes to HFOSS, remember that you can’t break the Internet by trying. There is an element of seriousness and a sense of “matter” which might deter you. Don't worry, we have a sense of humor and camaraderie like many open source communities.
Digital humanitarian communities vary in size, structure, and focus. There are well-established groups like Sahana Foundation or Ushahidi, as well as the growing Digital Humanitarian Network. Each of these organizations, and many more digital communities, seek your expertise. Sometimes theses groups have full blown "get involved" programs complete with "community task" labeled GitHub repositories, while others are just getting started.
Each community needs seasoned open source friendly leadership, mentorship, and development. Digital humanitarian communities also have more diverse opportunities to do small to large tasks. You do not need to develop code to contribute, though many of the HFOSS projects count on open source ethos and software development to thrive.
This is a quick cheat sheet to show you how you can get involved in HFOSS. The list is by no means complete, but it gives you an idea of how you can make a difference. Keep in mind that some of the communities require only small bits of time (less than 5 minutes to crowdsource or microtask), whereas others can evolve to larger tasks. And, if you are a serial volunteer like me, you can join a board or become an advisor. There is simply no shortage of opportunity. We, the HFOSS organizers, just need to find ways to make it easier for you to get involved.

11 ways to start with HFOSS

Task HFOSS community
Learn AIDR, all the projects
Map MapAction, Ushahidi, MicroMappers, Sahana, Standby Task Force, Google Crisis Response, Crisismappers, Esri, Mapbox, Humanitarian OpenStreetMap Team, GIS Corps and many more
Data Statistics without Borders, DataKind many of the listed projects
Technology Disaster Tech Lab, UAViators, Public Lab, Brck
Tell all the projects
Share Humanity Road, Veri.ly, CrisisCommons, Info4Disasters and all the projects
Translate Translators without Borders, all the projects
Reward Open Badges
Lead all the projects
Teach School of Data, all the above projects
Make Peace Geeks, Geeks without Bounds, all the projects need open source contributors
Each of these groups provide value insights, software-driven products, and information management to support humanitarians. The drive to participate openly and to have all the details shared openly is compelling. The key question becomes: what if the time I spent volunteering on humanitarian responses and/or software could make a difference in someone's life?
With the Digital Humanitarian Network providing a direct collaboration avenue, this hypothetical question is becoming a possibility. My colleague at Qatar Computing Research Institute, Patrick Meier, recently published a book, "Digital Humanitarians," all about the rise of these groups. Now is the time to find ways to better connect our efforts with the larger open source and corporate social responsibility programs. If we are collaborating with the official humanitarian groups, how can we better reinforce our partnerships with our big brothers and sisters in open source?
Knowledge staircase

The big dream

This community builders Infogr.am chart should help community managers to think about programs and strategic planning from the point of view of the contributor. It is focused on the types of tasks that people might want to contribute and the suggested time allotment. In reviewing various HFOSS sites, there is not really an up-to-date master index by skills required or types of projects. The onus is really on new upcoming groups and organizations to tap into the larger open source network. There are many established digital humanitarian organizations that need to be added to this wiki. Finding this site has given me homework. If you have any suggestions, please do edit away.
HFOSS organizers need to make is easier to help people get involved. One recommendation that I have is a simple navigator that asks people what they want to do or what they want to give. The aggregator would then help match them to tasks and communities. Think of it as a global Match.com for giving. We would give love to open source organizations, corporations, nonprofits, community-based organizations, and citizens. Truly, this is all hands on deck to make it possible for anyone and any organization to connect. We could tailor it with the code to help people choose their own adventure based on topic, time, location, and their learning/doing/giving path. Really, we need to dream big more and build it.
To find your way in HFOSS, you might hear a talk, see a tweet, then join a mailing list, participate in a working group, or scan a Wiki/website to drill into the types of tasks and contributions you can offer. What if there was a “Hot or Not” or “Ask not” (Mozilla community code) tool that allowed new contributors to find various HFOSS projects based on the contributor’s interests, time available, and skills? This type of user-driven search tool already exists for odesk and LinkedIn, which has the awesome volunteer.linkedin.com.

Now is the time

Humanitarians are at the table with HFOSS. We have a huge opportunity to give back our knowledge and skills to support people around the world. The World Humanitarian Summit is hosting online and in-person consultations to help the traditional organizations move forward. Many INGOs and NGOs are turning to digital humanitarian, civil society, and software organizations to provide input to affect change. There are amazing innovators like Andrej Verity of UN OCHA calling for open humanitarianism. (See the new Open Humanitarianism website for more details.) Your help on these individual HFOSS projects or the larger goals is needed. All you need to do is take the step and ask yourself: "How can I help?" We will welcome you! Every interaction is a gift.