Friday, September 11, 2015

How to Install and run Kali Linux on any Android Smartphone

http://www.techworm.net/2015/09/how-to-install-and-run-kali-linux-on-any-android-smartphone.html

Tutorial for installing and running Kali Linux on Android smartphones and tablets

Kali Linux is one the best love operating system of white hat hackers, security researchers and pentesters. It offers advanced penetration testing tool and its ease of use means that it should be a part of every security professional’s toolbox.
Penetration testing involves using a variety of tools and techniques to test the limits of security policies and procedures. Now a days more and more apps are available on Android operating system for smartphones and tablets so it becomes worthwhile to have Kali Linux on your smartphone as well.
Kali Linux on Android smartphones and tablets allows researchers and pentesters to perform ” security checks” on things like cracking wep Wi-Fi passwords, finding vulnerabilities/bugs or cracking security on websites.  This opens the door to doing this from a mobile device such as a phone or a tablet.
You can also install Kali Linux Distribution in your
Android smartphone by following the instructions below  :
(Rooted Android smartphone/tablet required for this installation)
Keep the following thing ready for the installation :
  • Fully charged Android Phone
  • Good Internet Connection(For Download Kali Linux images)
  • Root Permission (Rooting Guide for Every Phone)
  • Atleast 5GB  Free Space
Step 1. Download Linux Deploy App in Your Android Mobile from Google Play Store.
Tutorial for installing and running Kali Linux on Android smartphones and tablets
Developer: meefik
Price: Free
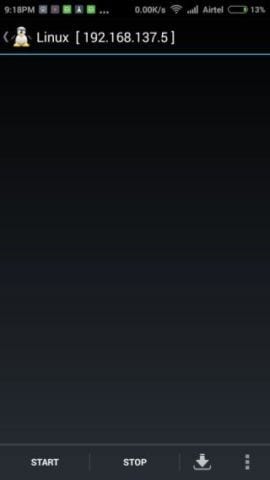
Step 2. Install and open Linux Deploy App in your mobile and click on download Icon.
Tutorial for installing and running Kali Linux on Android smartphones and tablets
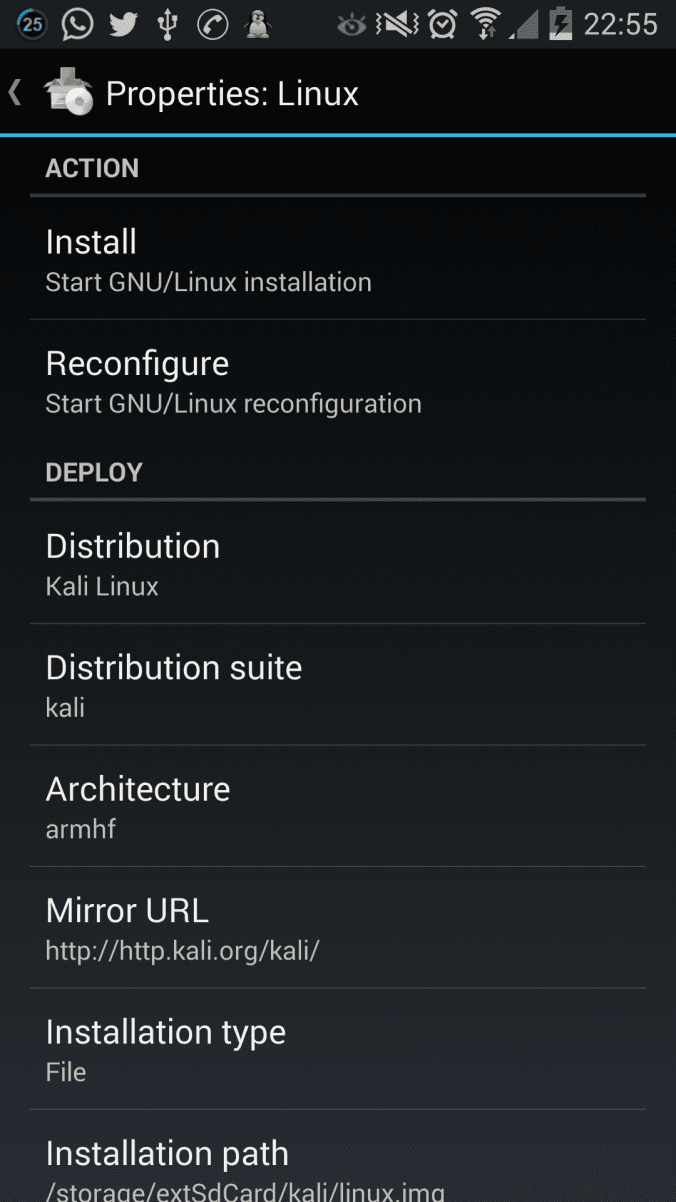
Step 3. Change the Distribution of Your Linux to Kali Linux.
How to Install and run Kali Linux on any Android Smartphone
Step 4.  Go to Top of the screen and hit the Install button. This will take about 5 minutes provided you have a good Internet connection.
How to Install and run Kali Linux on any Android Smartphone
Step 5. Download Android VNC Viewer App from Google Play Store.
Tutorial for installing and running Kali Linux on Android smartphones and tablets
Developer: RealVNC Limited
Price: Free

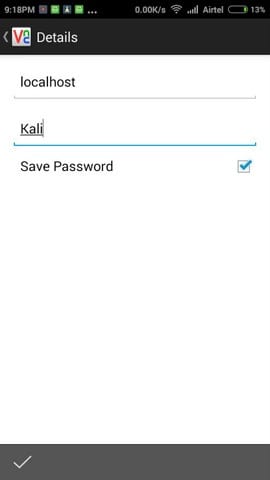
Step 6. After installing, enter below  settings in your VNC Android App.
How to Install and run Kali Linux on any Android Smartphone
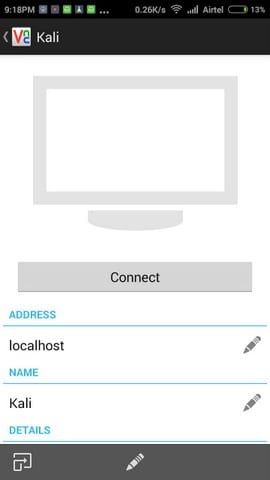
Step 7. Click the Connect Button in VNC Viewer App.
Now you are done and you will be able to run Kali Linux in your Android smartphone or tablet. Check the video tutorial below for a step by step procedure:
https://www.youtube.com/watch?v=VGo0mw-1rWY

How to Run ISO Files Directly From the HDD with GRUB2

https://www.maketecheasier.com/run-iso-files-hdd-grub2


Most Linux distros offer a live environment, which you can boot up from a USB drive, for you to test the system without installing. You can either use it to evaluate the distro or as a disposable OS. While it is easy to copy these onto a USB disk, in certain cases one might want to run the same ISO image often or run different ones regularly. GRUB 2 can be configured so that you do not need to burn the ISOs to disk or use a USB drive, but need to run a live environment directly form the boot menu.
To obtain an ISO image, you should usually visit the website of the desired distribution and download any image that is compatible with your setup. If the image can be started from a USB, it should be able to start from the GRUB menu as well.
Once the image has finished downloading, you should check its integrity by running a simple md5 check on it. This will output a long combination of numbers and alphanumeric characters
rundirectiso-md5
which you can compare against the MD5 checksum provided on the download page. The two should be identical.
ISO images contain full systems. All you need to do is direct GRUB2 to the appropriate file, and tell it where it can find the kernel and the initramdisk or initram filesystem (depending on which one your distribution uses).
In this example, a Kubuntu 15.04 live environment will be set up to run on an Ubuntu 14.04 box as a Grub menu item. It should work for most newer Ubuntu-based systems and derivatives. If you have a different system or want to achieve something else, you can get some ideas on how to do this from one of these files, although it will require a little experience with GRUB.
In this example the file kubuntu-15.04-desktop-amd64.iso
lives in /home/maketecheasier/TempISOs/ on /dev/sda1.
To make GRUB2 look for it in the right place, you need to edit the
/etc/grub.d40-custom
file which allows you to add your own menu entries. The file should already exist and contain a few lines.
rundirectiso-40-custom-empty
To start Kubuntu from the above location, add the following code (after adjusting it to your needs) below the commented section, without modifying the original content.
menuentry "Kubuntu 15.04 ISO" {
set isofile="/home/maketecheasier/TempISOs/kubuntu-15.04-desktop-amd64.iso"
loopback loop (hd0,1)$isofile
echo "Starting $isofile..."
linux (loop)/casper/vmlinuz.efi boot=casper iso-scan/filename=${isofile} quiet splash
initrd (loop)/casper/initrd.lz
}
rundirectiso-40-custom-new
First set up a variable named $menuentry. This is where the ISO file is located. If you want to change to a different ISO, you need to change the bit where it says set isofile="/path/to/file/name-of-iso-file-.iso".
The next line is where you specify the loopback device; you also need to give it the right partition number. This is the bit where it says
loopback loop (hd0,1)$isofile
Note the hd0,1 bit; it is important. This means first HDD, first partition (/dev/sda1).
GRUB’s naming here is slightly confusing. For HDDs, it starts counting from “0”, making the first HDD #0, the second one #1, the third one #2, etc. However, for partitions, it will start counting from 1. First partition is #1, second is #2, etc. There might be a good reason for this but not necessarily a sane one (UX-wise it is a disaster, to be sure)..
This makes fist disk, first partition, which in Linux would usually look something like /dev/sda1 become hd0,1 in GRUB2. The second disk, third partition would be hd1,3, and so on.
The next important line is
linux (loop)/casper/vmlinuz.efi boot=casper iso-scan/filename=${isofile} quiet splash
It will load the kernel image. On newer Ubuntu Live CDs, this would be in the /casper directory and called vmlinuz.efi. If you use a different system, your kernel might be missing the .efi extension or be located somewhere else entirely (You can easily check this by opening the ISO file with an archive manager and looking inside /casper.). The last options, quiet splash, would be your regular GRUB options, if you care to change them.
Finally
initrd (loop)/casper/initrd.lz
will load initrd, which is responsible to load a RAMDisk into memory for bootup.
To make it all work, you will only need to update GRUB2
sudo update-grub
rundirectiso-updare-grub
When you reboot your system, you should be presented with a new GRUB entry which will allow you to load into the ISO image you’ve just set up.
rundirectiso-grub-menu
Selecting the new entry should boot you into the live environment, just like booting from a DVD or USB would.

Tuesday, September 8, 2015

How to Mount a NTFS Drive on CentOS / RHEL / Scientific Linux

https://www.howtoforge.com/tutorial/mount-ntfs-centos

This tutorial will show you how to mount an NTFS drive ina read/write mode on CentOS and other RHEL based Linux operating systems with ntfs-3g driver. NTFS-3G is a stable Open Source NTFS driver that supports reading and writing to NTFS drives on Linux and other operating systems.

The ntfs-3g driver is available in the EPEL repository. The first step is to install and activate EPEL on your Linux system.

Enable the EPEL repository

Run the following command as root user on the shell to enable the EPEL repository.
yum install epel-release
EPEL (Extra Packages for Enterprise Linux) is a Fedora Special Interest Group that creates, maintains, and manages a set of additional high quality packages for Enterprise Linux, including, but not limited to, Red Hat Enterprise Linux (RHEL), CentOS and Scientific Linux (SL), Oracle Linux (OL).

Install ntfs-3g

Then we have to install the ntfs-3g package
yum install ntfs-3g
Once installed, we create a directory where the NTFS drive shall be mounted:
mkdir /mnt/win
And mount the NTFS partition by running this command:
mount -t ntfs-3g /dev/sdb1 /mnt/win
In this example my NTFS partition is the device /dev/sdb1, you have to replace that with the device name of your NTFS partition.
The mount point will exist until reboot or until you unmount it with:
umount /mnt/win
To mount the NTFS partition permanently, add the following line to the /etc/fstab file.
Open /etc/fstab with an editor:
nano /etc/fstab
And add the line:
/dev/sdb1 /mnt/win ntfs-3g defaults 0 0
Again, replace /dev/sdb1 with the device name that matches your setup. Now your Linux system will mount the NTFS drive automatically at boot time.