https://www.linux.com/learn/tutorials/872372-tips-and-tricks-to-get-the-most-out-of-your-linux-wifi

Regardless of your operating system, wireless can sometimes be a headache. Either you drop a signal, your wireless connections flakes out, your connection is slow, or your wireless device winds up MIA. Either way, there are times you’ll wind up having to troubleshoot or tinker to get the most out of that connection.

If you don’t want to set a static address on either side (or you cannot do so because you’re on someone else’s network), your best bet is to have Windows release the IP address before you reboot into Linux. This is done (within Windows), with the command:

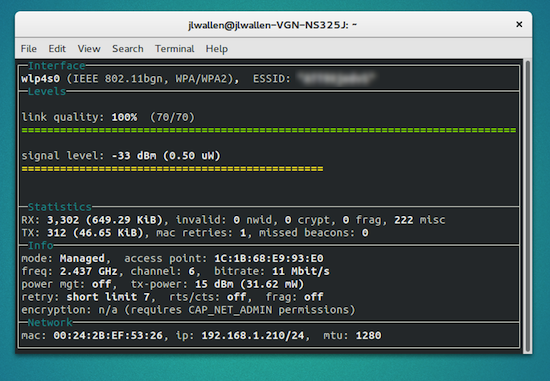
Figure 1: Wireless settings.
Regardless of your operating system, wireless can sometimes be a headache. Either you drop a signal, your wireless connections flakes out, your connection is slow, or your wireless device winds up MIA. Either way, there are times you’ll wind up having to troubleshoot or tinker to get the most out of that connection.
Everyone using Linux knows that wireless problems aren’t
limited to our favorite open source platform. As with printers, all
operating systems can succumb to the woes of wireless. Fortunately, with
Linux, there are plenty of ways to prevent or fix the problems.
For those that like to eke out the most power and
functionality from their system, I will provide a few tips and tricks
specific to wireless connectivity. Hopefully, one of these tips will be
exactly what you need to get the most out of your own wireless
connection (see Figure 1).
I will be demonstrating these tips using Ubuntu GNOME 15.10 and elementary OS Freya.
If you’re using a different distribution, you’ll only need to make
minor alterations to the command structure for this to work (such as, su’ing to root instead of using sudo).
Enable Disabled Wireless Device
You may run into this issue. You’ve done something to your
desktop or laptop (such as, switch off the wireless with the machine's
built-in WiFi adapter on/off switch -- which can save battery) which
causes WiFi to show up as disabled in the Network manager. No matter how
many times you reboot, wireless simply won’t turn on. Why this happens
is the adapter gets hardblocked by rfkill.
If you open a terminal window and issue the command rfkill list
and you see your wireless adapter listed as either hard or soft
blocked, you’ll need to unblock it. To do this, issue the command rfkill unblock all.
This should unblock your wireless adapter from rfkill and allow you to
re-enable it (it might automatically re-enable without your
interaction). If the wireless adapter doesn’t re-enable after this,
reboot the machine and it should be fine.
Force Disable 802.11n
Even though 802.11n offers better data speeds, many older
routers simply don’t support it. One way to gain an increase in speeds
is to disable the 802.11n protocol on your wireless Linux machine —
especially if your machine uses the iwlwifi driver (Intel wireless
chips), because that particular driver does a poor job with the 802.11n
protocol. To do this, you only need to disable the protocol to gain some
speed. Here’s what you need to do:
-
Open up a terminal window
-
Find out what driver your wireless card uses with the command lshw -C network
-
Locate the section driver= and note the name of the driver
-
Change to super user with sudo su
-
Issue the command echo "options DRIVER_NAME 11n_disable=1" >> /etc/modprobe.d/DRIVER_NAME.conf (Where DRIVER_NAME is the name of the driver being used)
Note: The above change is permanent. The only way to change it would be to issue the command echo "options DRIVER_NAME 11n_disable=1" >> /etc/modprobe.d/DRIVER_NAME.conf (Where DRIVER_NAME is the name of the driver being used).
Disable Power Management
Some wireless cards support power management. This feature
can sometimes get in the way of the card’s connection quality (which
also affects connection speeds). If your card happens to support it, you
can turn off the power management feature with a simple command:
iwconfig wlp4s0 power off
The problem with the command is that, as soon as you
reboot, it will reset to the default on setting. To get around this,
you’ll have to create a short script that will run the command at boot.
Here’s how:
Create the script (we’ll call it wifipower) with the
following contents (you will substitute the name of your wireless card
where mine says wlp4s0):
#!/bin/sh
/sbin/iwconfig wlp4s0 power off
Save the script and give it executable permissions with the command chmod u+x wifipower. With the permissions in place, move the file to /etc/init.d and issue the command update-rc.d wifipower defaults.
Now the power management feature will turn off at boot. The only caveat
to this is ensuring your card supports the feature. If it doesn’t, the power off command will report back to you that the feature isn’t supported.
Set the BSSID
Did you know that the Linux Network Manager rescans the
network every two minutes? This can actually cause problems with your
wireless connection. If you happen to work with your wireless in the
same, familiar locations, you can set the BSSID to the MAC address of
your router which will prevent Network Manager from scanning for access
points on that particular wireless connection. Here’s how:
-
Open up the Network Manager (usually found in the system tray of your desktop)
-
Select the wireless connection you want to work with
-
Click Edit
-
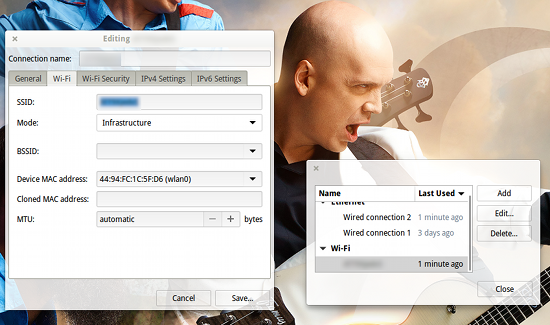
In the Wi-Fi tab, click the drop-down associated with BSSID (Figure 2)
-
Select the MAC address for your router (if it does not appear, you’ll have to locate it on your router and enter it manually)
-
Click Save
 Figure 2: Setting the BSSID for a wireless connection.
Dual-Boot Blues
If your Linux box dual boots with Windows, you may find
that, after booting into Windows, your machine can no longer get an IP
address. This situation is most likely caused by the fact the router
thinks it already handed an IP address out to the MAC address associated
with your network card.
There are a few ways around this issue. What you do will
depend on how you use your machine. If you spend the vast majority of
your time dual booting at home, you can simply set a static IP address
for one of the operating systems. By doing this, the router will not
fail to hand out a dynamically assigned IP address to the other
operating system.
If you want to set the static address on the Linux side, follow these steps:
-
Open up Network Manager
-
Select your wireless connection from the list and click the settings icon (or Edit, depending on your desktop)
-
Go to the IPv4 section
-
Select Manual from the Addresses section
-
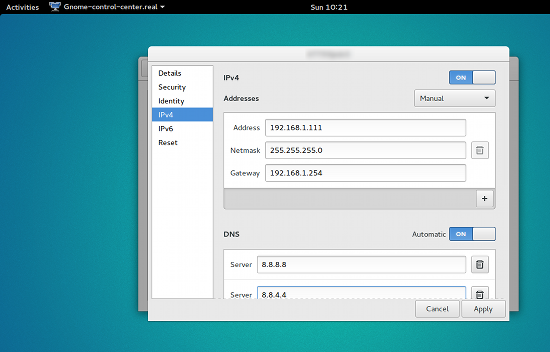
Enter the necessary information (Figure 3)
-
Click Apply
-
Close Network Manager

Figure 3: Setting a static address to avoid dual-booting issues.
If you don’t want to set a static address on either side (or you cannot do so because you’re on someone else’s network), your best bet is to have Windows release the IP address before you reboot into Linux. This is done (within Windows), with the command:
ipconfig /release
Once Windows has released the IP address back to the
router, it will assume the MAC address will need an IP address the next
time it checks in. Reboot, and then Linux shouldn’t have any problems
with wireless.
There are plenty of other wireless situations that call for
other solutions, but what I’ve outlined here should go a long way to
help you get the most out of your wireless connection on Linux.

No comments:
Post a Comment