https://ubuntushell.com/lock-user-accounts-in-linux
In Linux system administration, you will encounter situations where you need to disable, suspend, or reset a user account for various reasons, such as security concerns, incident investigations, temporary suspensions, or transitions to a different system.
To achieve this, you can use various Linux commands, such as locking a user account with the usermod command, locking a user account with the passwd command, expiring a user account with the chage command, or directly modifying the /etc/shadow file to disable a user account.
In this article, I'll guide you on how to disable, lock, or expire a user account on a Linux system without removing it.

Method 1: Lock a User Account Using Usermod
The usermod
command is a robust tool for modifying user account information, such
as the username, user ID, home directory path, or locking a user
account.
You can use its -L option with a username to lock a user account by putting a ! in front of the encrypted password hash in the "/etc/shadow" file.
$ sudo usermod -L <username>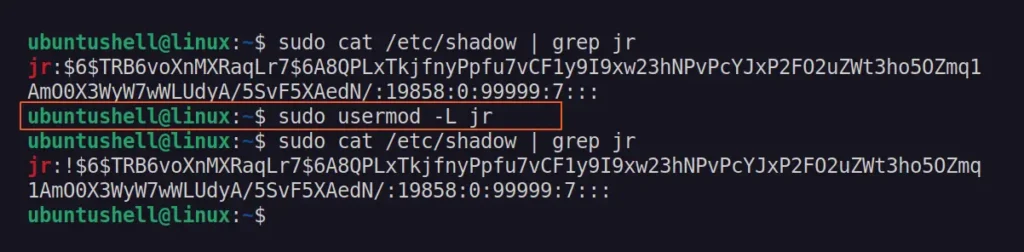
Once
the user account is locked using this method, it can't be accessed
directly, via SSH, or by any method unless the account is released from
the locked state using the -U option.
$ sudo usermod -U <username>
Method 2: Lock a User Account Using Passwd
The passwd
command is another fantastic tool used to manage various properties of a
user password, such as deleting the password, expiring the password, or
locking the password.
The user account locking mechanism using passwd is identical to the previous command that places a ! as a prefix before the encrypted password hash in the "/etc/shadow" file.
If, for any reason, you were unable to use the previous command, you can use the passwd command with the -l option followed by the user account.
$ sudo passwd -l <username>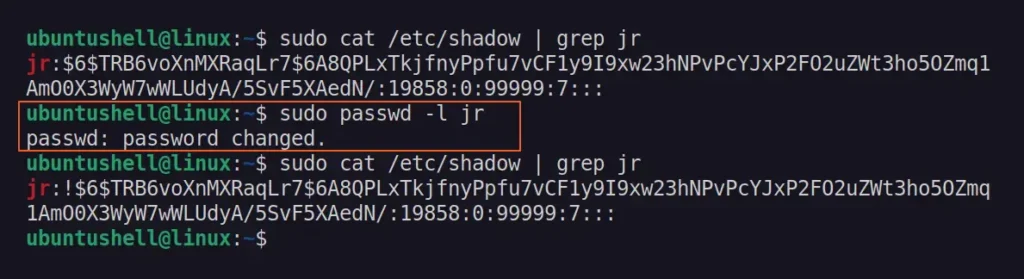
To unlock the user account, you can use the -U option.
$ sudo passwd -u <username>
Method 3: Expire a User Account Using Usermod
The usermod
command we previously used for locking a user account can also be used
to expire a user account password, preventing the target user from
accessing their account with a "Your account has expired" message.
The user account expiry date typically gets set to a future date or no expiry date by default, but when using this command to expire a user account, it sets the expiry date in the past, usually to the Unix epoch (January 1, 1970), making the account inaccessible.
So, to expire a user account using the usermod command, thereby disallowing the user from logging in from any source, you can run.
$ sudo usermod --expiredate 1 <username>
Once the user account expires, attempting to access it, whether by the user or someone else, will result in encountering the "Connection closed" message.

To unlock the user back to the normal state, you can run:
$ sudo usermod --expiredate '' <username>
Method 4: Expire a User Account Using Chage
The chage command is identical to the passwd command for altering user account details, with a specific focus on modifying the user account expiry date.
Let's say you want to set a user account to expire. For that purpose, you can use the -E option with 0 for immediate expiration or provide a future date in "YYYY-MM-DD" format.
$ sudo chage -E 0 <username>

# OR

$ sudo chage -E YYYY-MM-DD <username>
To remove the expiration from the user account, you can run:
$ sudo chage -E '' <username>
Method 5: Modify the /etc/shadow to Disable User Account
This
method is geared towards experienced users who are comfortable with the
command-line and familiar with the Linux filesystem. Thus, most of the
commands previously used to disable a user account involved adding a ! prefix in front of user password hash in the "/etc/shadow" file.
These
commands served as a front-end for the task, but if you lack access to
them and need to manually disable a user account, you can edit the file,
find the user, and prepend a ! to their password hash.
$ sudo nano /etc/shadow
Once you are done, save and close the file. Now, when the user tries to access their account, they encounter the "Permission denied" error. To unlock the user account again, simply remove the exclamation next to their password hash.
Bonus Tip! Set the User's Shell to Nologin
Another
approach to disabling a user account is to set their login shell to
nologin, which allows you to block or deactivate their ability to log
in. Simply execute the following command to change the user shell to nologin:
$ sudo usermod -s /sbin/nologin <username>
Once the user's login shell is set to nologin, attempting direct account access from the system will trigger the "This account is currently not available." message, while SSH attempts result in a "Connection closed" message.
To undo this change, you can set the user login back to the original shell (assuming bash) by running the following command:
$ sudo usermod -s $(which bash) <username>
All the methods mentioned in this article are effective ways to disable, lock, or set an expiration date for a user account using either command-line or manual methods.
Before proceeding with any of these methods, ensure that you understand the implications, as they can affect the user's ability to access their account.
Accidentally deleting a user account could be disastrous, so it's advisable to have a backup in place, especially if you're new to using a Linux system.

No comments:
Post a Comment