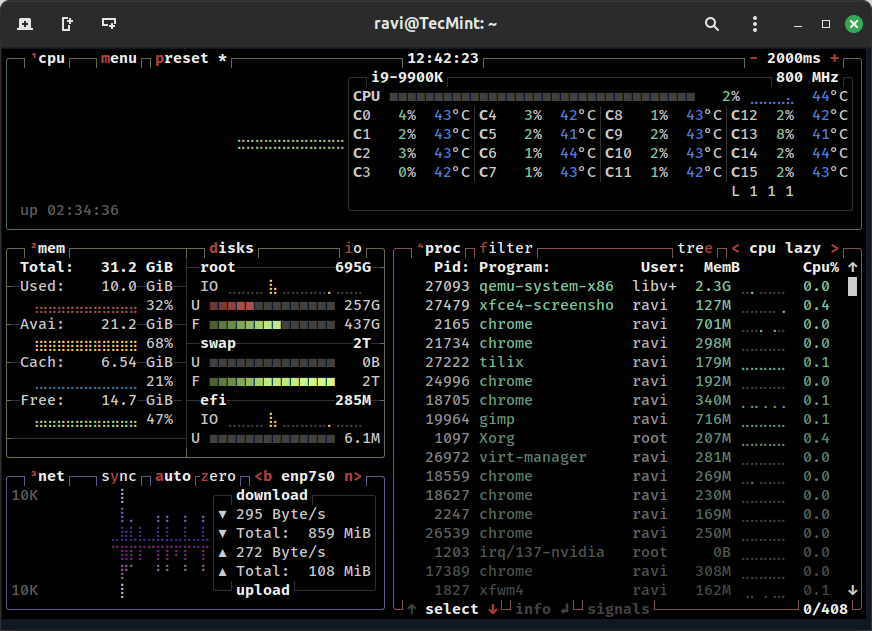
btop is a highly customizable, real-time system
monitor tool that provides users with an intuitive and visually
appealing interface to monitor system resources.
Developed by Aristocratos, btop is written in C++ and aims to provide a more modern alternative to traditional resource monitors like htop, glances, or bashtop (its predecessor).
It offers a comprehensive overview (insights) of your system’s
performance that includes CPU usage, memory consumption, disk activity,
network bandwidth, and processes running on your system.
Key Features of btop
It displays live updates of various system metrics such as CPU load,
memory usage, disk I/O, and network traffic, which makes it ideal for
diagnosing performance bottlenecks or keeping track of resource
utilization during intensive tasks.
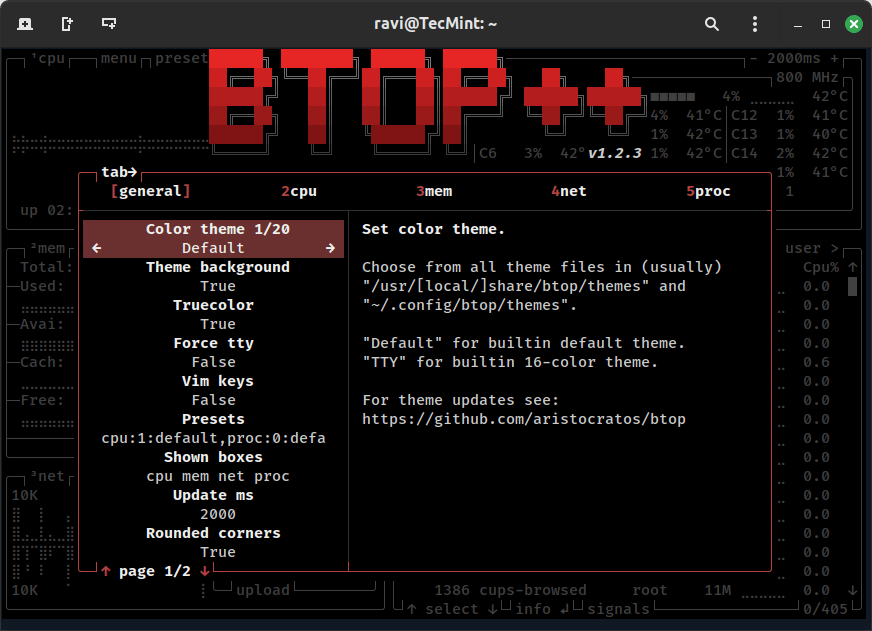
The interface is fully interactive and customizable, where users can
rearrange panels, change color schemes, and configure what information
is displayed based on their preferences.
In addition to monitoring, btop allows users to
manage processes directly from its interface, where you can kill, renice
(change priority), or inspect individual processes without needing to
switch to another terminal window.
One of btop’s standout features is its graphical representation of
data trends over time. For example, CPU usage, memory allocation, and
network throughput are shown using dynamic graphs, making it easier to
spot patterns or anomalies.
Users can choose from multiple built-in themes or create their own
custom color schemes to personalize the appearance of the dashboard.
git clone https://github.com/aristocratos/btop.git
cd btop
make
sudo make install
How to Use btop in Linux
Once installed, simply run the following command in your terminal to launch btop.
btop
Upon starting, you’ll see a clean, tabbed interface divided into
sections for CPU, memory, disks, networks, and processes. Navigation is
done using arrow keys, and actions like killing processes or changing
settings can be performed interactively within the UI.
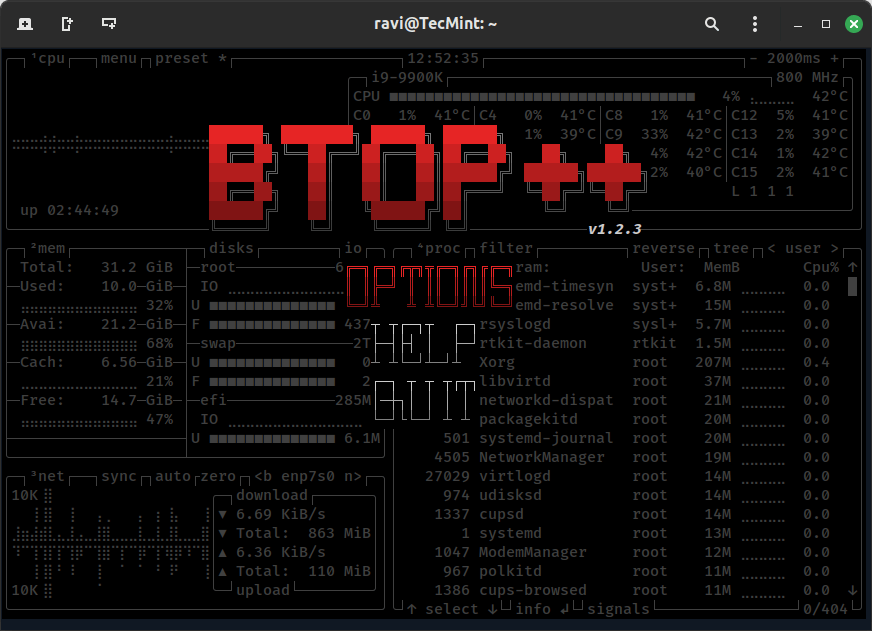
btop – System Monitoring Tool
When you press Esc or q, instead of quitting immediately, btop brings up an exit menu with three options:
Options : Opens the settings menu where you can customize the interface, adjust colors, and configure other preferences.
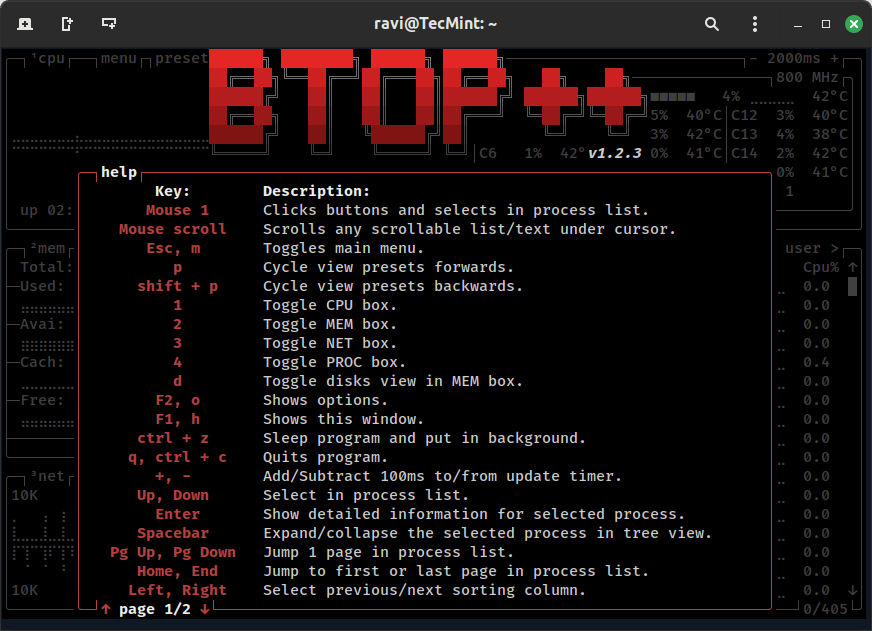
Help : Displays the help section, which includes keybindings and additional information about how to use btop effectively.
Quit : Exits btop entirely.
Quit btop Toolbtop Settings Menubtop Help Section
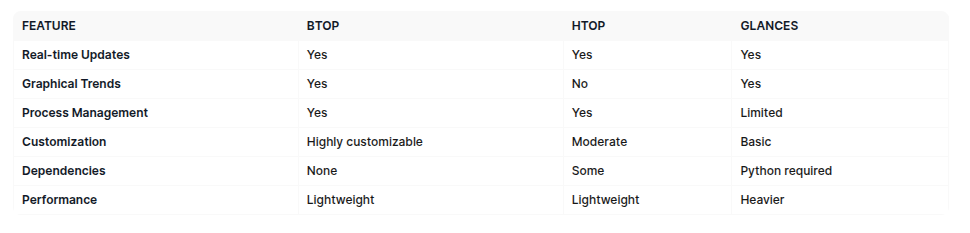
Comparison with Other Tools
While there are many system monitoring tools available, btop stands out due to its balance of aesthetics, efficiency, and ease of use.
Here’s how it compares to similar tools:
btop – Comparison with Other Tools
Conclusion
btop is a versatile and efficient system monitoring tool that combines functionality with a user-friendly design.
Its ability to present complex system data in an easy-to-understand
format, coupled with its lightweight nature, makes it an excellent
choice for developers, system administrators, and power users alike.
With active development and community contributions, btop continues to evolve and improve, solidifying its position as one of the top system monitoring solutions available today.
Top Linux Networking Commands and Troubleshooting Tips
When
I first started working with Linux networking, I was amazed by its
powerful command-line tools. With just a few commands, I could
configure, manage, and troubleshoot network connections effortlessly.
This allows me to easily maintain system stability, monitor traffic, and
ensure seamless communication. In this article, I’ll explore some of
the most important Linux networking commands every administrator should
know.
Basic Network Connectivity Commands
When dealing with computer networks, it’s important to diagnose
connectivity problems and understand how data moves through the network.
Luckily, a few simple commands can help us troubleshoot and gather key
information quickly.
1. Ping command
If you want to check if a website or server is accessible, just use the ping command in your terminal. It sends ICMP echo request packets to the destination and shows response times if it’s reachable.
For example, use the command:
ping google.com
to check the network connectivity to Google’s servers:
It’s a quick way to check network connectivity, but keep in mind that
some servers block ICMP requests, so no response doesn’t always mean
the server is down.
2. Traceroute command
The traceroute command in Linux
shows the path a packet takes to reach its destination. It lists each
hop along the way. By default, it traces up to 30 hops with a packet
size of 60 bytes for IPv4 and 80 bytes for IPv6. The traceroute command is often used to identify slow or failing links in the path:
3. Tracepath command
The tracepath command works like traceroute but is
simpler and doesn’t need superuser privileges. It auto-detects the
Maximum Transmission Unit (MTU) and spots packet size issues that could
lead to fragmentation or transmission failures.
For example, the command tracepath google.com traces packet routes, shows each hop, and detects network issues like latency, packet loss, and MTU size problems:
4. Nslookup command
The nslookup command is a network utility for querying
Domain Name System (DNS) servers. It retrieves information about domain
names, IP addresses, and other DNS records. It checks if a website’s
address is correct and finds issues with DNS settings.
For example, the nslookup google.com command queries the
DNS server to find the IP address of google.com. It checks if the
domain resolves correctly and can be useful for troubleshooting DNS
issues:
Network Configuration and Interface Management Commands
Managing network interfaces and settings is a key task for anyone
working with Linux. There are plenty of commands to help, from modern
tools like ip, nmcli, and ethtool to the older, now-deprecated ifconfig for legacy systems. These commands make it easy to configure and troubleshoot network connections.
5. ip command
The ip command is a common unified networking tool for
managing network interfaces in modern Linux distributions. It replaces
the older ifconfig and route commands and provides a unified way to manage IP addresses, routes, and interfaces.
For example, we can run the ip a or ip addr show command to get all network interfaces along with assigned IP addresses:
Similarly, we can use the ip command
to assign or remove an IP address from an interface, enable or disable a
network interface, display a routing table, and add or remove a route.
6. Ifconfig command
The ifconfig command was once used to manage network interfaces but is now mostly replaced by ip. However, some older Linux versions still support it. With ifconfig
command, you can check active network interfaces, assign an IP address,
bring an interface up or down, and change the MAC address of an
interface.
For example, running ifconfig without any flag returns the active network interfaces along with their configurations:
7. Nmcli command
The nmcli command manages network connections using
NetworkManager. It’s especially useful for Linux systems with a
graphical interface that depends on NetworkManager. Using this command,
we can list available network connections, display network interfaces,
connect to a Wi-Fi network, assign a static IP address, and restart the
NetworkManager service.
For example, the nmcli device status command returns the list of available network connections:
8. Ethtool command
Need to check or modify your network card settings? That’s where ethtool comes in. It lets you view and adjust settings like speed, duplex mode, and driver details.
For example, the ethtool enp0s3 command shows the Ethernet device information:
9. Checking Network Routes and ARP Tables
Ever wondered how your system knows where to send network traffic?
That’s where network routes and ARP tables come in. They help
troubleshoot connectivity issues, optimize performance, and manage
routing.
In Linux, we can check routes with route and ip route commands. The route command was traditionally used to display and manipulate the kernel’s IP routing table. However, it has been replaced by ip route command:
Also, we can view connected devices using arp or ip neigh command. The arp command shows the system’s ARP table, which maps IP addresses to MAC addresses on the local network. The ip neigh
command provides similar details but is a modern alternative. It
supports both IPv4 and IPv6 and lists neighbor entries used for address
resolution and communication:
Monitoring Network Traffic and Performance
Monitoring network traffic helps fix connection issues, track
bandwidth use, and keep the network secure. For this purpose, Linux
offers tools like netstat, ss, tcpdump, and iftop. Some check open connections, while others capture live network data.
10. Netstat command
The netstat command shows network connections, open ports, and routing details. While ss has replaced it, some older systems still use netstat.
You can simply type netstat to get details about network connections, listening ports, and routing information:
Additionally, we can use options like -tulnp to show listening ports with process names, or -r to display routing tables.
11. SS command
The ss (socket statistics) command provides detailed information about sockets (connections). It is faster than netstat
command. It is used to show active TCP connections, listening ports,
processes using network connections, UDP connections, and connections to
a specific port.
For example, ss -ant command returns active TCP connections:
12. Tcpdump command
The tcpdump command captures and analyzes network packets in real time. It is useful for diagnosing network issues and security monitoring.
For example, the sudo tcpdump -i enp0s3 command captures all packets on the enp0s3 interface:
Secure Network Configurations
To secure your Linux network, disable unused interfaces and services, set up strong firewall rules with iptables or nftables, and use SELinux or AppArmor for extra protection. Encrypt traffic with VPNs, SSH, or TLS, and keep your system updated. Control access with hosts.allow and hosts.deny, secure SSH by disabling root login and using key-based authentication, and monitor activity with netstat, ss, or tcpdump. Finally, enforce strong passwords and use Fail2Ban to prevent unauthorized access.
You can also monitor suspicious network activity in Linux using ss or netstat for unusual connections, and tcpdump
for packet analysis. Enable firewall logging, check system logs
(/var/log/syslog and /var/log/auth.log), and use fail2ban to block
unauthorized access. Deploy IDS tools like Snort or Suricata for
real-time threat detection.
Don’t hesitate to experiment and troubleshoot issues. That’s the best way to learn and improve your skills.
How to Expose Localhost to the Internet Using Bore
Bore is a free and open-source command-line utility written in Rust that aims to allow users to expose a local port to the internet without needing port forwarding.
The default bore.pub
address will be given with a dynamic port number referring to your
local port, but you can request a specific static port number only if
it's available.
The best way I find to use Bore is to use the same
command-line tool to self-host your own Bore instance on a VPS or
server, and then assign a domain to that system. Later, you can use that
domain to expose a local port to the internet with any port number you
desire without worrying about port availability.
In
this article, I'll show you how to use and expose localhost to the
internet using Bore with a public instance of the Bore server running at
bore.pub and later learn to setup your own Bore instance in one line of command.
How to Expose Localhost to the Internet Using Bore
1.
The first step is to install the Bore on your system; it's written in
Rust, which allows installation via Cargo (a Rust package manager) or Brew on Linux and macOS.
📝 Note
When you try to install it with Cargo, if a version error occurs, try the same command with the --locked parameter.
Install Bore using Cargo
cargo install bore-cli
Install Bore using Brew
brew install bore-cli
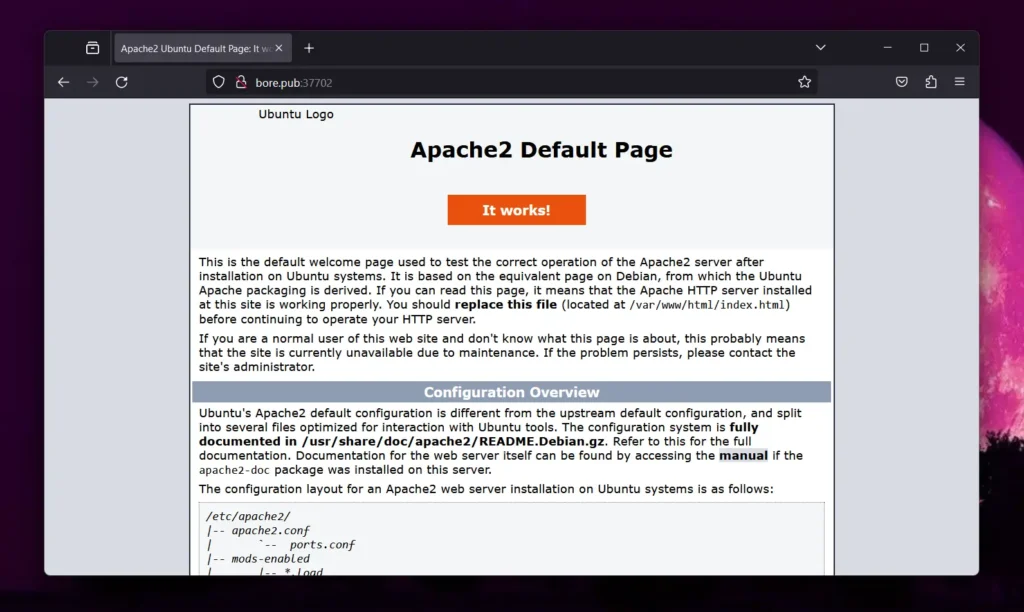
2. Once the installation is complete, you can export a local port to the internet with a bore.pub address. For example, the following command will port forward an 80 Apache port to the internet.
📝 Note
In the following command, the local <port-number> is the local port you want to expose and --to bore.pub is the Bore public instance you want to use.
bore local 80 --to bore.pub
Output:
3. In the previous command, the address with a dynamic port allocated to me is bore.pub:37702, which can be accessed anywhere using any browser as long as the bore command is running.
4. As you've seen, you're assigned to a random port number on the bore.pub instance. However, you can use the -p <port-number> flag to request a desired port number, but only if it's available.
📝 Note
The specified port number should be between 1024-65535.
bore local 80 --to bore.pub -p 8820
Output:
How to Setup Bore Instance on VPS or Server
If
the lack of port availability is annoying you while using the Bore
public instance, you can set up a single self-instance for Bore on your
VPS or server with a single command.
All it takes to install the Bore using the previously mentioned command and then executing the following command:
📝 Note
The -s <secret-key>
is an optional parameter but is recommended to prevent unauthorized
access to your Bore instance via simple secret key authentication.
bore server -s my-secret-key
Output:
Once
the instance is ready, you can use the same system, another system on
the network, or access it from elsewhere to expose your localhost to the
internet by assigning your Bore instance a local IP or global IP (or
domain), depending on the use case.
bore local 80 –-to <local-IP/global-IP/domain> -s my-secret-key
How to Remove Bore
To remove Bore from your system, execute one of the following commands based on the installation method you followed:
How to Permanently Change Docker Directory Permissions on Linux
Docker is a powerful tool that allows you to run applications in isolated environments called containers.
However, sometimes you may need to change the permissions of Docker
folders to ensure that your applications can access the necessary files
and directories.
This article will guide you through the process of permanently changing Docker folder permissions on a Linux system.
Understanding Docker Folder Permissions
By default, Docker stores its data, including
images, containers, and volumes, in specific directories on your Linux
system. The most common directory is /var/lib/docker.
The permissions of these folders determine who can read, write, or
execute files within them. If the permissions are too restrictive, your
applications may not function correctly.
Why Change Docker Folder Permissions?
There are several reasons why you might need to change Docker folder permissions:
You may want to restrict or grant access to specific users or groups.
Some applications require specific permissions to function correctly.
Adjusting permissions can help secure your Docker environment.
Steps to Permanently Change Docker Folder Permissions
Changing Docker folder permissions permanently involves modifying the ownership and permissions of the Docker directories.
Here’s how you can do it:
Step 1: Identify the Docker Directory
First, you need to identify where Docker stores its data, the default location is /var/lib/docker and you can confirm this by running the following command:
docker info | grep "Docker Root Dir"
This command will output the Docker root directory, which is typically /var/lib/docker.
Step 2: Stop the Docker Service
Before making any changes, you need to stop the Docker service to prevent any conflicts or data corruption using the following systemctl command:
sudo systemctl stop docker
Step 3: Change Ownership of the Docker Directory
To change the ownership of the Docker directory, use the chown command. For example, if you want to change the ownership to a user named john and a group named docker, you would run:
sudo chown -R john:docker /var/lib/docker
The -R option ensures that the ownership change is applied recursively to all files and subdirectories within the Docker directory.
Step 4: Change Permissions of the Docker Directory
Next, you need to change the permissions of the Docker directory by using the chmod command. For example, to give the owner full permissions and the group read and execute permissions, you would run:
sudo chmod -R 750 /var/lib/docker
Here, 750 means:
7for the owner: read, write, and execute permissions.
5for the group: read and execute permissions.
0for others: no permissions.
After changing the ownership and permissions, restart the Docker service to apply the changes:
sudo systemctl start docker
Finally, verify that the changes have been applied correctly by
checking the ownership and permissions of the Docker directory using the
following command:
ls -ld /var/lib/docker
This command will display the ownership and permissions of the Docker directory.
Making the Changes Permanent
The changes you made to the Docker folder
permissions will persist across reboots. However, if Docker updates or
reinstalls, the permissions might revert to the default settings.
To ensure that the changes are permanent, you can create a systemd service or a cron job that applies the permissions every time the system starts.
Changing Docker folder permissions on Linux is a
straightforward process that can help you manage access control, meet
application requirements, and enhance security.
By following the steps outlined in this article, you can permanently
change the ownership and permissions of Docker directories, ensuring
that your Docker environment functions smoothly and securely.
Remember to verify the changes and consider using a systemd service or cron job to make the changes permanent.
In this tutorial, we are going to explain what the
ERR_CONNECTION_RESET error is and how to fix it. This issue occurs when
the connection between the browser and the website (server) unexpectedly
closes. The terminated connection is due to the server terminating the
session before completing the data transfer. In other words, the browser
sent a request to the server, and the server retrieved the website but
terminated the session before the data was transmitted completely. Since
the data is incomplete, the browser receives data that is not usable
and displays the error.
In the following paragraphs, we will explain what exactly causes this
error in the Chrome browser and what steps may be applied to fix it.
Let’s get started!
Table of Contents
What causes the ERR_CONNECTION_RESET error?
There are multiple reasons for this error, such as an unstable
internet connection, weak WiFi signal, or damaged ethernet cable that
can interrupt the connection during data transmission. Also, there may
be some DNS issues, such as misconfigured DNS settings, outdated DNS
cache, corrupt cache or cookies, outdated drivers, etc. The following
paragraphs will explain some steps to resolve the issue and make the
website accessible again.
Step 1. Check the Internet Connection
The err_connection_reset is a client-side error. So,
the first thing to check is the Internet connection. Restart the Wi-Fi,
re-plug the Ethernet cable, or try with another Internet provider. If
you can access other websites, such as YouTube or Facebook, and the
website you want to access is still inaccessible, go to the next step.
Step 2. Check the website accessibility from multiple locations
If you are sure everything is OK with your Internet, the next step is
to check if the website is accessible from multiple locations worldwide
using some online tools, like GeoPeeker.
If the website is not accessible, then the issue is related to the
server, and you have to wait for the hosting company to fix it.
Otherwise, you should go to the next step since it relates to your
browser.
Step 3. Check the VPN
Using a VPN sometimes can cause not accessing some websites over the
Internet. This is related to the virtual private network itself, and you
can try to disable it temporarily. If you can access the website, the
issue is related to the VPN, and you can try to use another VPN or not
even use it at all. If the website is still inaccessible, the issue is
related to something else, and you must proceed to the next step.
Step 4. Clear the web browser cache, cookies, and history
Clearing the website browser cache, cookies, and history may solve
the issue because the browser stores a copy of the content in its cache.
Storing the website in the cache improves the website’s performance
when accessed, but outdated cached content may cause these kinds of
issues and throw the err_connection_reset issue. Clearing your browser’s
cache and cookies means that website settings (like usernames and
passwords) will be deleted, and some sites might appear to be a little
slower because all of the images must be loaded again. To clear the web
browser cache in Chrome, follow the next steps:
1. Open Chrome, click on the Three Dots at the top right, select More Tools, then Clear Browsing Data.
2. In the “Clear browsing data” box, click the checkboxes for Cookies and other site data and Cached images and files.
3. Use the menu at the top to select the data you want to delete. Choose the beginning of time to delete everything.
4. Click Clear browsing data.
If you can not access the website, go to the next step.
Step 5. Check the Proxy server
A proxy server bridges the connection between the browser and the
server. If there are some blocking rules, the website won’t be reached,
and the error err_connection_reset will be thrown. You can disable the
proxy server to access the website without bridget connections. You can
proceed to the next step if the website is still inaccessible.
Step 6. Check the Firewall or Antivirus Settings
A too “aggressively” configured firewall or antivirus program may
block the connection to a safe and secure website. Temporarily disabling
the Antivirus program or firewall will tell you if the issue is related
to the blocked connection. If the website is still inaccessible, enable
the Firewall for protection and move on to the next step.
Step 7. Reset the Network Settings
By resetting the network settings, we mean resetting the TCP/IP
settings, which define the routes through which the browser communicates
with other systems, such as the destination server. If something is
wrong with the configuration and you cannot detect it, we recommend
resetting it to the default configuration. Resetting the TCP/IP settings
differs in every OS, which will be explained below.
Windows: Open the cmd as an administrator and type the following commands one by one:
netsh winsock reset

netsh int ip reset

ipconfig /release

ipconfig /renew

ipconfig /flushdns
MacOS: To reset the TCP/IP settings, follow the steps below:
1. Click the Apple icon on the top left corner of your screen, then go to System settings.
3. Select your active internet connection, then Details, and Go to TCP/IP on the side menu.
4. Click Renew DHCP leases and press OK
Linux: In the terminal, execute the following command:
sudo systemctl restart systemd-networkd.service
That’s it. These were some basic steps to solve the err_connection_reset
error. Of course, you can always contact our technical support if you
have an active service with us. We will help you with any aspect of your
website. We are available 24/7.
You’ve fixed the ERR_CONNECTION_RESET Error.
That was all for this tutorial. You’ve learned how to handle the
ERR_CONNECTION_RESET error and should no longer have this issue.
However, if all of this is still above your head or you’re too busy to
mess around, you can simply grab any of our hosting plans and
have our team fix it for you. We’re available 24/7, and you can contact
one of our level 3 Linux support specialists instantly using our live
chat.
If you liked this post, what is the err_connection_reset error, and
how can it be fixed? Please share it with your friends on social
networks or leave a comment in the comments section. Thank you.
DistroBox: Try Out Multiple Linux Distributions via the Terminal
As you all know, Linux is famous for its multiple variants in the
name of distributions, each offering unique software repositories,
package managers, desktop environments, release cycles, stability, and
much more.
The
well-known Linux distributions are Debian, Ubuntu, RedHat, Fedora, and
Arch, with the major difference between them being their target
audience. For example, some distributions are tailored for desktop
systems, some for server systems, and others for technophiles, and so
forth.
If your current system runs on Ubuntu and you want to
utilize a tool or package manager from another system like RedHat, you
either need to set up and use a virtual machine or dual-boot it, which
is precisely the issue that tools like DistroBox solve.
Table of Contents
What is DistroBox?
DistroBox
is a command-line program that allows you to run multiple Linux
distributions within the terminal and run graphical applications from
those distributions on the host system as if they were native
applications.
It uses container-based technologies like Docker or
Podman (whichever you prefer) to build a container using the Linux
distribution of your choice, tightly integrating it with the host to
enable sharing of the user’s HOME directory, external storage, USB
devices, and graphical apps (X11/Wayland), as well as audio.
This
approach of using multiple Linux distributions at once has its own
advantages, some of which are discussed in the next section.
Advantages of DistroBox
The following is a list of the advantages of using DistroBox.
Create a test environment for making changes without affecting your host distribution.
Test a program or application on multiple Linux distributions.
Try out the latest Linux distribution features as they arrive.
Access distribution-specific programs or applications natively on your host distribution.
How to Install DistroBox on Linux
The first thing you have to do is make sure either Docker or Podman
(recommended) is installed on your host distribution. Then, if your
current distribution is one from the below list, then DistroBox is
already packaged in it, and you can install it using your default
package manager.
📝
Check out this full list if the listed distribution is not one that you are currently using.
Alpine Linux 3.19
Arch Linux (AUR)
Debian 13
Fedora 37, 38, and 39
Gentoo
Kali Linux Rolling
openSUSE Tumbleweed
Raspbian Testing
Ubuntu 24.04
If your distribution is not on the list, then you can run the following command to install DistroBox:
$ curl -s https://raw.githubusercontent.com/89luca89/distrobox/main/install | sudo sh
The curl command
above will download the DistroBox installation script and execute it
with superuser privileges. If you’re uncomfortable running an unknown
script with superuser privileges, you can use the following command to
install it:
$ curl -s https://raw.githubusercontent.com/89luca89/distrobox/main/install | sh -s -- --prefix ~/.local
Once the installation is complete, you can move on to the next section, learning usage.
Usage of DistroBox
In
this section, our primary focus is on creating new DistroBox instances,
ways to access CLI and GUI tools and applications inside and outside
the container, and listing, updating, and removing DistroBox instances.
So, let’s begin with…
Creating DistroBox Instances with a Specific Name and Hostname
The
DistroBox container (a complete operating system in itself) can easily
be created using the DistroBox command-line program. For example, if you
issue the following command without any options, it will ask you to
pull the default Fedora 39 image.
$ distrobox create
Output:
If you press the “y”
key, it will start pulling the image from the registry. However, if you
want to pull and use a specific Linux distribution, such as Ubuntu
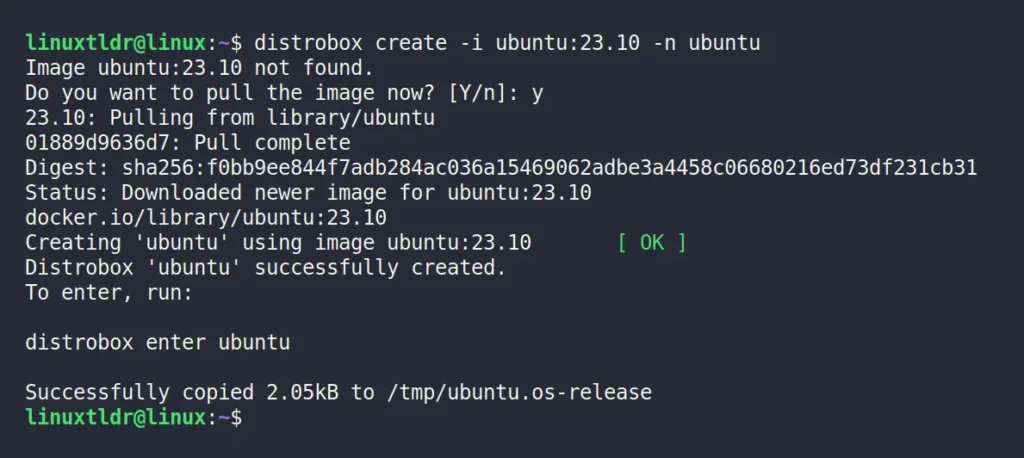
23.10, then run.
💡
If you have an Nvidia GPU and want to expose it to your DistroBox container, use the “--nvidia” option.
$ distrobox create -i ubuntu:23.10 -n ubuntu
Whereas,
The “-i” or “--image” option will specify the container name (the OS name, such as “Ubuntu“) along with its version (e.g., “23.10“), separated by a colon.
The “-n” or “--name” option will be used to give a memorable name to your container that can later be used to access it.
Output:
(Optional) To have a different hostname for your DistroBox container, you can use the “--hostname” option with a name parameter that will be used as the hostname.
Once
your container is created and you enter into it (explained in the next
step), you will find that the hostname is the one you specified while
creating the container.
Accessing a Command Prompt from a DistroBox Container
Once
the image is pulled, you can enter in your container by using the
container name. For example, in our previous example, we pulled an “Ubuntu 23.10” image and named it “ubuntu“, which can be used with the following command to access that container.
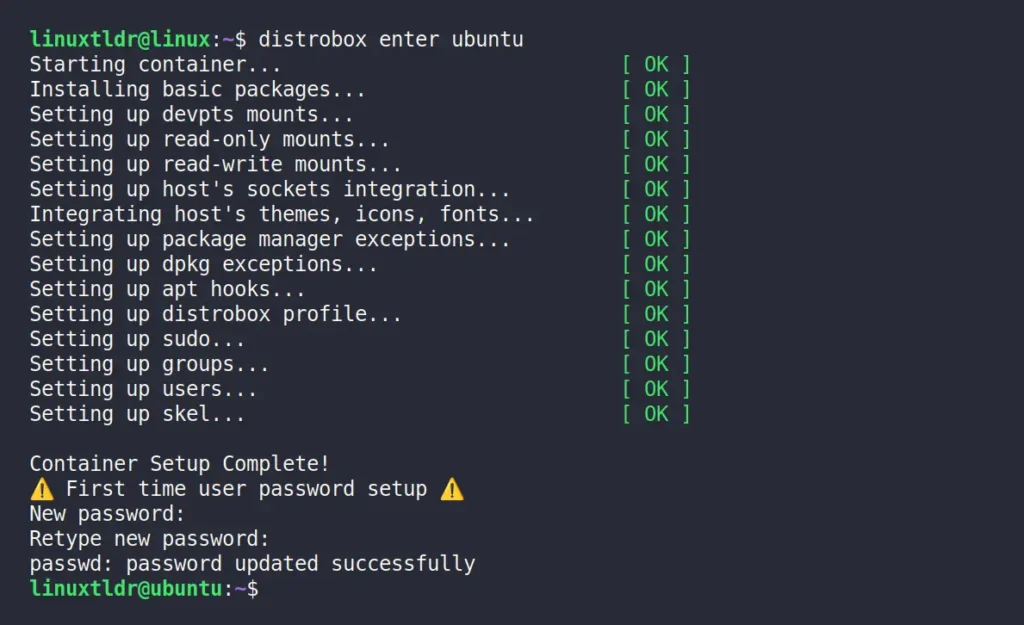
$ distrobox enter ubuntu
Output:
When
you enter the first time, it will take some time only once to download
the necessary files, configure the container, set up a new user
password, and upon completion, you will be in your DistroBox container.
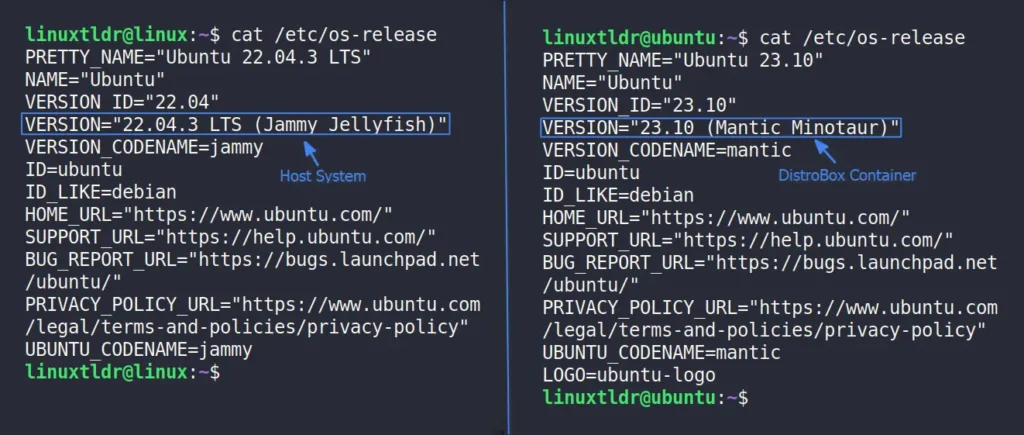
To
demonstrate that we are within the DistroBox container, I’ve displayed
the versions of both the host and the DistroBox container below.
💡
The difference between a host and a container can also be noticed by looking at their hostname.
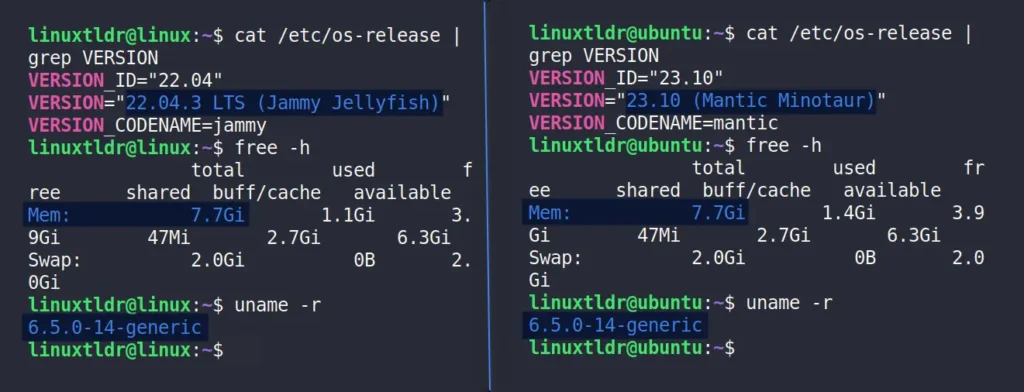
One
more thing to note is that your host distribution and DistroBox
container share the same hardware and even the kernel, as can be seen in
the following picture.
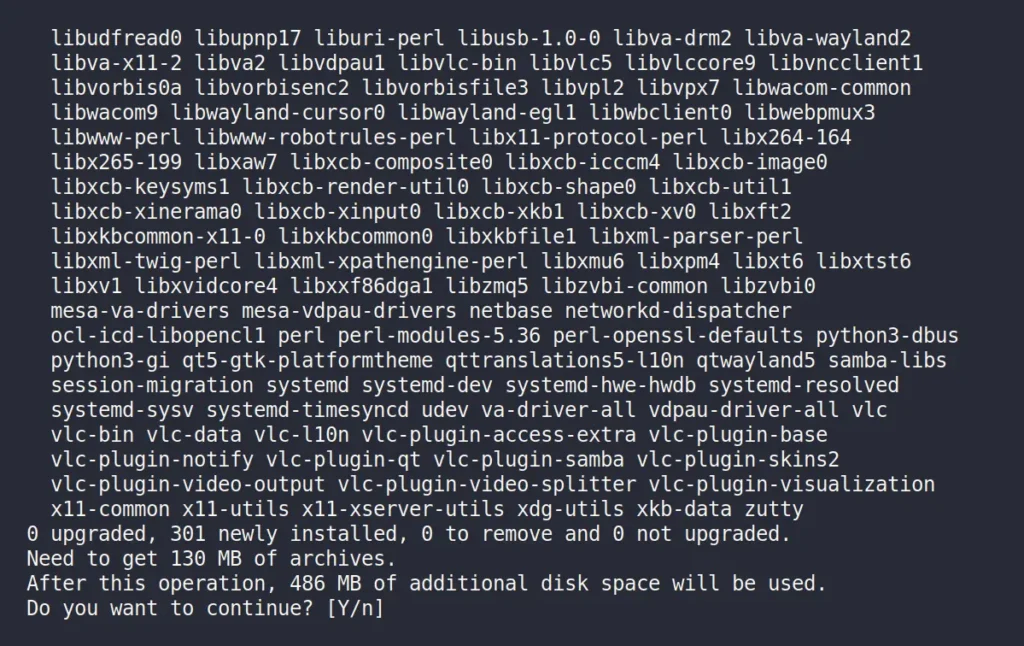
Installing a Non-Native Distro Package with DistroBox
Once
inside the DistroBox container, you can begin installing your favorite
programs and applications using the default package manager specific to
the Linux distribution running inside the DistroBox container.
📝
When
running a command with sudo, enter the password you set up while
configuring the DistroBox container (not the one for your host
distribution) when it asks for it.
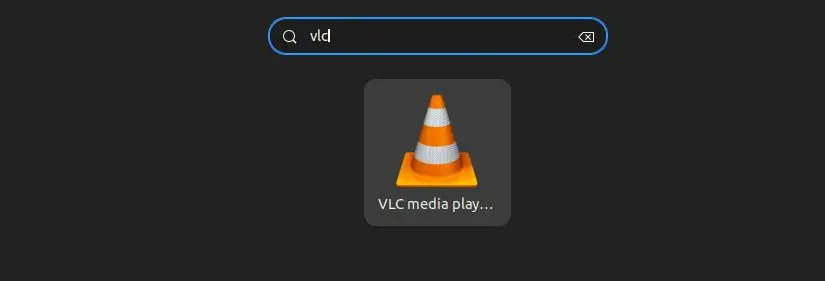
$ sudo apt install vlc
Output:
Creating a Host App Launcher for a DistroBox App
Once
the installation of your favorite application is completed, whether
it’s CLI or GUI, you can access it by executing its command or
application name inside your DistroBox container terminal.
Otherwise,
if it’s a GUI application and you want to access it as a native program
on your host distribution, then run the following command inside your
DistroBox container.
📝
Replace “vlc” with the program you have installed and want to access on the host distribution.
$ distrobox-export --app vlc
Output:
Now, the exported application will be accessible from the host distribution application menu.
This
way, you can easily export numerous apps or binaries to your host
system, and if you forget to keep track of them, simply run the
following command to view the list of all exported apps and binaries.
In
the future, if you wish to remove the exported application from the
host distribution, run the following command within the DistroBox
container:
$ distrobox-export --delete --app vlc
Output:
Listing DistroBox Instances
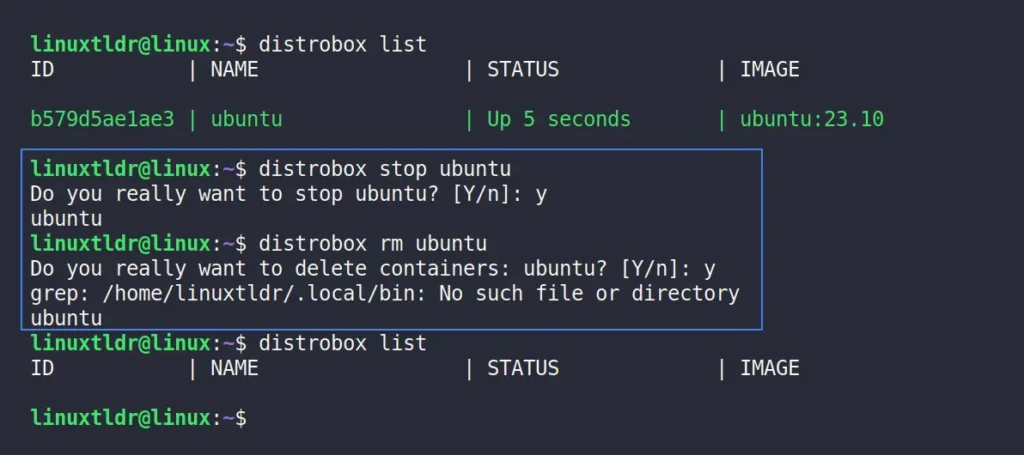
If you are running multiple DistroBox instances, you can monitor their status by running the following command:
$ distrobox list
Output:
Stop and Remove DistroBox Instances
To stop the running DistroBox container, specify its name with the following command:
$ distrobox stop ubuntu
And later, to remove the container image, run.
$ distrobox rm ubuntu
Output:
How to Remove DistroBox from Linux
Finally,
this article would be incomplete without detailing the steps for
removing DistroBox. Therefore, if you have installed it from your
distribution repositories, you can use your default package manager to
uninstall it.
However, if you have installed it using the command
mentioned in this article, then proceed to run the following command if
DistroBox has been installed with superuser privileges.
$ curl -s https://raw.githubusercontent.com/89luca89/distrobox/main/uninstall | sudo sh
Or run the following command if you have installed DistroBox without superuser privileges.
$ curl -s https://raw.githubusercontent.com/89luca89/distrobox/main/uninstall | sh -s -- --prefix ~/.local
Final Word
As
you can see, DistroBox is simple to learn, fun to use, and definitely
helpful in certain scenarios. I’ve been using it for a while to test new
features of upcoming distributions, and to be honest, I love it.
If you have any questions or queries related to the topic, then do let me know in the comment section.