Friday, February 13, 2015

How to filter BGP routes in Quagga BGP router

http://xmodulo.com/filter-bgp-routes-quagga-bgp-router.html

In the previous tutorial, we demonstrated how to turn a CentOS box into a BGP router using Quagga. We also covered basic BGP peering and prefix exchange setup. In this tutorial, we will focus on how we can control incoming and outgoing BGP prefixes by using prefix-list and route-map.
As described in earlier tutorials, BGP routing decisions are made based on the prefixes received/advertised. To ensure error-free routing, it is recommended that you use some sort of filtering mechanism to control these incoming and outgoing prefixes. For example, if one of your BGP neighbors starts advertising prefixes which do not belong to them, and you accept such bogus prefixes by mistake, your traffic can be sent to that wrong neighbor, and end up going nowhere (so-called "getting blackholed"). To make sure that such prefixes are not received or advertised to any neighbor, you can use prefix-list and route-map. The former is a prefix-based filtering mechanism, while the latter is a more general prefix-based policy mechanism used to fine-tune actions.
We will show you how to use prefix-list and route-map in Quagga.
Topology and Requirement

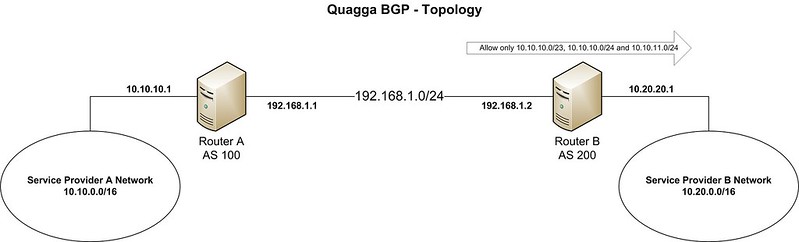
In this tutorial, we assume the following topology.

Service provider A has already established an eBGP peering with service provider B, and they are exchanging routing information between them. The AS and prefix details are as stated below.
  • Peering block: 192.168.1.0/24
  • Service provider A: AS 100, prefix 10.10.0.0/16
  • Service provider B: AS 200, prefix 10.20.0.0/16
In this scenario, service provider B wants to receive only prefixes 10.10.10.0/23, 10.10.10.0/24 and 10.10.11.0/24 from provider A.

Quagga Installation and BGP Peering

In the previous tutorial, we have already covered the method of installing Quagga and setting up BGP peering. So we will not go through the details here. Nonetheless, I am providing a summary of BGP configuration and prefix advertisements:

The above output indicates that the BGP peering is up. Router-A is advertising multiple prefixes towards router-B. Router-B, on the other hand, is advertising a single prefix 10.20.0.0/16 to router-A. Both routers are receiving the prefixes without any problems.

Creating Prefix-List

In a router, a prefix can be blocked with either an ACL or prefix-list. Using prefix-list is often preferred to ACLs since prefix-list is less processor intensive than ACLs. Also, prefix-list is easier to create and maintain.
ip prefix-list DEMO-PRFX permit 192.168.0.0/23
The above command creates prefix-list called 'DEMO-FRFX' that allows only 192.168.0.0/23.
Another great feature of prefix-list is that we can specify a range of subnet mask(s). Take a look at the following example:
ip prefix-list DEMO-PRFX permit 192.168.0.0/23 le 24
The above command creates prefix-list called 'DEMO-PRFX' that permits prefixes between 192.168.0.0/23 and /24, which are 192.168.0.0/23, 192.168.0.0/24 and 192.168.1.0/24. The 'le' operator means less than or equal to. You can also use 'ge' operator for greater than or equal to.
A single prefix-list statement can have multiple permit/deny actions. Each statement is assigned a sequence number which can be determined automatically or specified manually.
Multiple prefix-list statements are parsed one by one in the increasing order of sequence numbers. When configuring prefix-list, we should keep in mind that there is always an implicit deny at the end of all prefix-list statements. This means that anything that is not explicitly allowed will be denied.
To allow everything, we can use the following prefix-list statement which allows any prefix starting from 0.0.0.0/0 up to anything with subnet mask /32.
ip prefix-list DEMO-PRFX permit 0.0.0.0/0 le 32
Now that we know how to create prefix-list statements, we will create prefix-list called 'PRFX-LST' that will allow prefixes required in our scenario.
router-b# conf t
router-b(config)# ip prefix-list PRFX-LST permit 10.10.10.0/23 le 24

Creating Route-Map

Besides prefix-list and ACLs, there is yet another mechanism called route-map, which can control prefixes in a BGP router. In fact, route-map can fine-tune possible actions more flexibly on the prefixes matched with an ACL or prefix-list.
Similar to prefix-list, a route-map statement specifies permit or deny action, followed by a sequence number. Each route-map statement can have multiple permit/deny actions with it. For example:
route-map DEMO-RMAP permit 10
The above statement creates route-map called 'DEMO-RMAP', and adds permit action with sequence 10. Now we will use match command under sequence 10.
router-a(config-route-map)# match (press ? in the keyboard)
  as-path       Match BGP AS path list
  community     Match BGP community list
  extcommunity  Match BGP/VPN extended community list
  interface     match first hop interface of route
  ip            IP information
  ipv6          IPv6 information
  metric        Match metric of route
  origin        BGP origin code
  peer          Match peer address
  probability   Match portion of routes defined by percentage value
  tag           Match tag of route
As we can see, route-map can match many attributes. We will match a prefix in this tutorial.
route-map DEMO-RMAP permit 10
match ip address prefix-list DEMO-PRFX
The match command will match the IP addresses permitted by the prefix-list 'DEMO-PRFX' created earlier (i.e., prefixes 192.168.0.0/23, 192.168.0.0/24 and 192.168.1.0/24).
Next, we can modify the attributes by using the set command. The following example shows possible use cases of set.
route-map DEMO-RMAP permit 10
match ip address prefix-list DEMO-PRFX
set (press ? in keyboard)
  aggregator          BGP aggregator attribute
  as-path             Transform BGP AS-path attribute
  atomic-aggregate    BGP atomic aggregate attribute
  comm-list           set BGP community list (for deletion)
  community           BGP community attribute
  extcommunity        BGP extended community attribute
  forwarding-address  Forwarding Address
  ip                  IP information
  ipv6                IPv6 information
  local-preference    BGP local preference path attribute
  metric              Metric value for destination routing protocol
  metric-type         Type of metric
  origin              BGP origin code
  originator-id       BGP originator ID attribute
  src                 src address for route
  tag                 Tag value for routing protocol
  vpnv4               VPNv4 information
  weight              BGP weight for routing table
As we can see, the set command can be used to change many attributes. For a demonstration purpose, we will set BGP local preference.
route-map DEMO-RMAP permit 10
match ip address prefix-list DEMO-PRFX
set local-preference 500
Just like prefix-list, there is an implicit deny at the end of all route-map statements. So we will add another permit statement in sequence number 20 to permit everything.
route-map DEMO-RMAP permit 10
match ip address prefix-list DEMO-PRFX
set local-preference 500
!
route-map DEMO-RMAP permit 20
The sequence number 20 does not have a specific match command, so it will, by default, match everything. Since the decision is permit, everything will be permitted by this route-map statement.
If you recall, our requirement is to only allow/deny some prefixes. So in our scenario, the set command is not necessary. We will just use one permit statement as follows.
router-b# conf t
router-b(config)# route-map RMAP permit 10
router-b(config-route-map)# match ip address prefix-list PRFX-LST
This route-map statement should do the trick.

Applying Route-Map

Keep in mind that ACLs, prefix-list and route-map are not effective unless they are applied to an interface or a BGP neighbor. Just like ACLs or prefix-list, a single route-map statement can be used with any number of interfaces or neighbors. However, any one interface or a neighbor can support only one route-map statement for inbound, and one for outbound traffic.
We will apply the created route-map to the BGP configuration of router-B for neighbor 192.168.1.1 with incoming prefix advertisement.
router-b# conf terminal
router-b(config)# router bgp 200
router-b(config-router)# neighbor 192.168.1.1 route-map RMAP in
Now, we check the routes advertised and received by using the following commands.
For advertised routes:
show ip bgp neighbor-IP advertised-routes
For received routes:
show ip bgp neighbor-IP routes

You can see that while router-A is advertising four prefixes towards router-B, router-B is accepting only three prefixes. If we check the range, we can see that only the prefixes that are allowed by route-map are visible on router-B. All other prefixes are discarded.
Tip: If there is no change in the received prefixes, try resetting the BGP session using the command: "clear ip bgp neighbor-IP". In our case:
clear ip bgp 192.168.1.1
As we can see, the requirement has been met. We can create similar prefix-list and route-map statements in routers A and B to further control inbound and outbound prefixes.
I am summarizing the configuration in one place so you can see it all at a glance.
router bgp 200
network 10.20.0.0/16
neighbor 192.168.1.1 remote-as 100
neighbor 192.168.1.1 route-map RMAP in
!
ip prefix-list PRFX-LST seq 5 permit 10.10.10.0/23 le 24
!
route-map RMAP permit 10
match ip address prefix-list PRFX-LST

Summary

In this tutorial, we showed how we can filter BGP routes in Quagga by defining prefix-list and route-map. We also demonstrated how we can combine prefix-list with route-map to fine-control incoming prefixes. You can create your own prefix-list and route-map in a similar way to match your network requirements. These tools are one of the most effective ways to protect the production network from route poisoning and advertisement of bogon routes.
Hope this helps.

Monitor MySQL connections and queries with mytop

https://www.howtoforge.com/tutorial/mytop-mysql-database-monitoring

This article will explain the installation and usage of mytop, a handy tool for live monitoring of MySQL queries. Also looking into various operations that a user can perform while monitoring the queries on mytop.

About mytop

Mytop is a commandline tool that resembles the top command but for motoring MySQL. It requires MySQL 3.22 or later, the current MySQL 5.x versions are supported. It works fine with most Linux systems. For this tutorial I will use Ubuntu as basis. It needs Perl, DBI and Term::ReadKey installed on the system. With Term::ANSIColor you can get color in the output displayed if you want. The version 0.7 works even with windows.

Installation

As I have already given the information about other tools and applications required for the functionality of mytop in the Intro, I'll directly start with the installation of mytop:
Debian:
apt-get install mytop
Ubuntu:
sudo apt-get install mytop
Or else, if you are willing to download the tar ball from the website and installing it then:
tar -zxvf mytop-x.x.x.tar.gz (Your version number)
cd mytop-x.x.x. (Your version number)
perl Makefile.PL
make
make test
make install
Type in the above commands to extract the data and finish the installation. For CentOS and RedHat users you will have to download rpmforge repository to install it automatically, or else you can go on with the manual method instead.

Using mytop

After the installation, its time to use mytop:
mytop --prompt (this will give you a password prompt, simply hit enter and you will be through)
Above is the default way, you can also type this :
mytop -u root -p (in here you will have to use your mysql password, because you are specifying a user "root" here)
If the above command returns an error like "root : NO PASS" or anything, try this:
mytop -u root -p xxxx ("xxxx" stands for your password)
Please check if your MySQL server is up and running before typing any of the above commands.
Once you are done, just hit enter and it should return something like this:


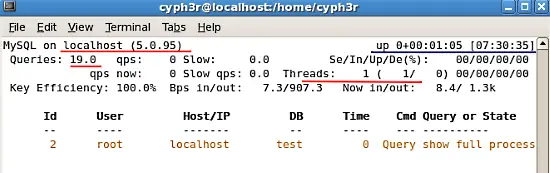
The very first line indicates the name of the server (localhost) and also the version of MySQL running on your system. The line marked with blue indicates the uptime of the MySQL server in days+hours:minutes:seconds format and besides is the current time on the system.
The second line indicates the the nummber of queries the server has handled since uptime.
Third lines displays the number of threads.
And the second part of the image shows the list of threads handled by MySQL. they are sorted according to their idle time least idle first. You can see the information and understand it easily.

There are some arguments that you can pass with mytop such as:
-u or user username: Basically used to definne the username while loginig in to mytop. The default is set to "root".

-p or pass or password password: Passwords used for the user login. The default password is just empty or none or just say leave the password field blank.

-h or host hostname[:port]: To specify ports if MySQL is not using the default port. The deault is set to 3306.

-s or -delay seconds: To specify the time gap for the refreh. The default is 5.
This are some of the arguments of mytop to find out more you may type:
man mytop
The man pages hold more than enough information for anyone to understand anything about mytop.
Just a look at the configuration file you can create for yourself to get easy access and monitoring of your data:
  user=root   #The user you would like to define.
  pass=             #You can define passwords for your user.
  host=localhost     #your hostaname
  db=test            #your database name.
  delay=5             #time gap to refresh the output of monitoring.
  port=3306           #port you would like mytop to use.
  socket=             #if you specify any socket mytop will ignore the port number and hostname given, you may just delet it if you don't find it usefull.
  batchmode=0      #it avoids the clearing of screen and gives you a direct series of queries being used by MySQL.
  header=1         #Sepcify if you want the header to display or not. You can toggle this with the h key while mytop is running.
  color=1    #Specify if you want to use any colors in the display (will only work if you have color support).
  idle=1   #if you want to see idle processes in the process list.


You may create the above file by typing:
nano ~/.mytop (this has to be created in your home folder and you may use any editor you feel like.)

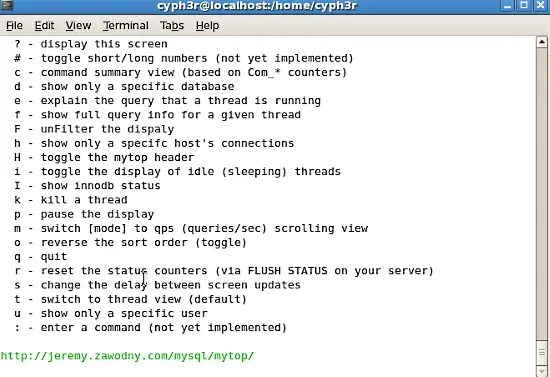
You may just check some other options in mytop by typing: ?. It will give a whole page of keyboard shorcuts that you can use in mytop.


This is all of the tutorial you can go around and check the man page as I specified earlier. You can get each and every information upto date from your man pages after installation...

How To Scan And Check A WordPress Website Security Using WPScan, Nmap, And Nikto

http://www.unixmen.com/scan-check-wordpress-website-security-using-wpscan-nmap-nikto

Introduction

Millions of websites are powered by WordPress software and there’s a reason for that. WordPress is the most developer-friendly content management system out there, so you can essentially do anything you want with it. Unfortunately, every day some scary report about a major site being hacked or a sensitive database being compromised hits the web … and freaks everyone out.
If you haven’t installed WordPress yet, check the following article.

On Debian based systems:

On RPM based systems:

Following on from my previous article How To Secure WordPress Website  show you checklist allows you to secure your WordPress site with as little effort as possible.
In this article, will describe to you  through the installation of wpscan and serve as a guide on how to use wpscan to locate any known vulnerable plugins and themes that may make your site vulnerable to attack. Also, how to install and use nmap the free Security Scanner For Network Exploration & Hacking . And at the end we will show you the steps to use nikto.

WPScan to Test for Vulnerable Plugins and Themes in WordPress

WPScan is a black box WordPress Security Scanner written in Ruby which attempts to find known security weaknesses within WordPress installations. Its intended use it to be for security professionals or WordPress administrators to asses the security posture of their WordPress installations. The code base is Open Source and licensed under the GPLv3.

Download and Install WPScan

Before we get started with the installation, it is important to note that wpscan will not work on Windows systems, so you will need access to a Linux or OSX installation to proceed. If you only have access to a Windows system you can download Virtualbox and install any Linux distro you like as a Virtual Machine.
WPScan is hosted on Github, so if it is not already installed we will need to install the git packages before we can continue.
sudo apt-get install git
Once git is installed, we need to install the dependencies for wpscan.
sudo apt-get install libcurl4-gnutls-dev libopenssl-ruby libxml2 libxml2-dev libxslt1-dev ruby-dev ruby1.9.3
Now we need to clone the wpscan package from github.
git clone https://github.com/wpscanteam/wpscan.git
Now we can move to the newly created wpscan directory and install the necessary ruby gems through bundler.
cd wpscan
sudo gem install bundler && bundle install --without test development
Now that we have wpscan installed, we will walk through using the tool to search for potentially vulnerable files on our WordPress installation. Some of the most important aspects of wpscan are its ability to enumerate not only plugins and themes, but users and timthumb installations as well. WPScan can also perform bruteforce attacks against WordPress– but that is outside of the scope of this article.

Update wpscan

ruby wpscan.rb --update

Enumerate Plugins

To enumerate plugins, all we need to do is launch wpscan with the --enumerate p arguments like so.
ruby wpscan.rb --url http(s)://www.yoursiteurl.com --enumerate p
or to only display vulnerable plugins:
ruby wpscan.rb --url http(s)://www.yoursiteurl.com --enumerate vp
Some example output is posted below:
| Name: akismet
| Location: http://********.com/wp-content/plugins/akismet/

| Name: audio-player
| Location: http://********.com/wp-content/plugins/audio-player/
|
| * Title: Audio Player - player.swf playerID Parameter XSS
| * Reference: http://seclists.org/bugtraq/2013/Feb/35
| * Reference: http://secunia.com/advisories/52083
| * Reference: http://osvdb.org/89963
| * Fixed in: 2.0.4.6

| Name: bbpress - v2.3.2
| Location: http://********.com/wp-content/plugins/bbpress/
| Readme: http://********.com/wp-content/plugins/bbpress/readme.txt
|
| * Title: BBPress - Multiple Script Malformed Input Path Disclosure
| * Reference: http://xforce.iss.net/xforce/xfdb/78244
| * Reference: http://packetstormsecurity.com/files/116123/
| * Reference: http://osvdb.org/86399
| * Reference: http://www.exploit-db.com/exploits/22396/
|
| * Title: BBPress - forum.php page Parameter SQL Injection
| * Reference: http://xforce.iss.net/xforce/xfdb/78244
| * Reference: http://packetstormsecurity.com/files/116123/
| * Reference: http://osvdb.org/86400
| * Reference: http://www.exploit-db.com/exploits/22396/

| Name: contact
| Location: http://********.com/wp-content/plugins/contact/

Enumerate Themes

Enumeration of themes works the same as enumeration of plugins, just with the --enumerate t argument.
ruby wpscan.rb --url http(s)://www.host-name.com --enumerate t
Or to only display vulnerable themes:
ruby wpscan.rb --url http(s)://www.host-name.com --enumerate vt
Sample output:
| Name: path
| Location: http://********.com/wp-content/themes/path/
| Style URL: http://********.com/wp-content/themes/path/style.css
| Description: 

| Name: pub
| Location: http://********.com/wp-content/themes/pub/
| Style URL: http://********.com/wp-content/themes/pub/style.css
| Description: 

| Name: rockstar
| Location: http://********.com/wp-content/themes/rockstar/
| Style URL: http://********.com/wp-content/themes/rockstar/style.css
| Description: 
|
| * Title: WooThemes WooFramework Remote Unauthenticated Shortcode Execution
| * Reference: https://gist.github.com/2523147

| Name: twentyten
| Location: http://********.com/wp-content/themes/twentyten/
| Style URL: http://********.com/wp-content/themes/twentyten/style.css
| Description: 

Enumerate Users

WPScan can also be used to enumerate users with valid logins to the WordPress installation. This is usually performed by attackers in order to get a list of users in preparation for a bruteforce attack.
ruby wpscan.rb --url http(s)://www.host-name.com --enumerate u

Enumerate Timthumb Files

The last function of wpscan we’ll discuss in this article is the ability to enumerate timthumb installations. In recent years, timthumb has become a very common target of attackers due to the numerous vulnerabilities found and posted to online forums, message lists, and advisory boards. Using wpscan to find vulnerable timthumb files is done with the following command.
ruby wpscan.rb --url http(s)://www.host-name.com --enumerate tt

Nmap to Scan for Open Ports on your VPS

Nmap  is an open source tool for network exploration and security auditing. It was designed to rapidly scan large networks, although it works fine against single hosts. Nmap uses raw IP packets in novel ways to determine what hosts are available on the network, what services (application name and version) those hosts are offering, what operating systems (and OS versions) they are running, what type of packet filters/firewalls are in use, and dozens of other characteristics

Download and install nmap on Debian and Ubuntu

To install nmap for Debian and Ubuntu Linux based server systems type the following apt-get command:
sudo apt-get install nmap
Sample outputs:
Reading package lists... Done
Building dependency tree
Reading state information... Done
The following NEW packages will be installed:
  nmap
0 upgraded, 1 newly installed, 0 to remove and 2 not upgraded.
Need to get 1,643 kB of archives.
After this operation, 6,913 kB of additional disk space will be used.
Get:1 http://mirrors.service.networklayer.com/ubuntu/ precise/main nmap amd64 5.21-1.1ubuntu1 [1,643 kB]
Fetched 1,643 kB in 0s (16.4 MB/s)
Selecting previously unselected package nmap.
(Reading database ... 56834 files and directories currently installed.)
Unpacking nmap (from .../nmap_5.21-1.1ubuntu1_amd64.deb) ...
Processing triggers for man-db ...
Setting up nmap (5.21-1.1ubuntu1) ...
Examples
To find the nmap version, enter:
nmap -V
OR
nmap --version
Sample outputs:
Nmap version 5.21 ( http://nmap.org )

Dowonlad and  install nmap on Centos

To install nmap on RHEL based Linux distributions, type the following yum command:
yum install nmap
Sample outputs:
 
Loaded plugins: protectbase, rhnplugin, security
0 packages excluded due to repository protections
Setting up Install Process
Resolving Dependencies
--> Running transaction check
---> Package nmap.x86_64 2:5.51-2.el6 will be installed
--> Finished Dependency Resolution
 
Dependencies Resolved
 
================================================================================
 Package    Arch         Version               Repository                  Size
================================================================================
Installing:
 nmap       x86_64       2:5.51-2.el6          rhel-x86_64-server-6       2.8 M
 
Transaction Summary
================================================================================
Install       1 Package(s)
 
Total download size: 2.8 M
Installed size: 0
Is this ok [y/N]: y
Downloading Packages:
nmap-5.51-2.el6.x86_64.rpm                               | 2.8 MB     00:00
Running rpm_check_debug
Running Transaction Test
Transaction Test Succeeded
Running Transaction
  Installing : 2:nmap-5.51-2.el6.x86_64                                     1/1
  Verifying  : 2:nmap-5.51-2.el6.x86_64                                     1/1
 
Installed:
  nmap.x86_64 2:5.51-2.el6
 
Complete!
Examples
To find the nmap version, enter:
nmap --version
Sample outputs:
Nmap version 5.51 ( http://nmap.org )

Scan Ports with Nmap

You can got a lot of information about your server or host using nmap and it let you to think like someone has malicious intent.
For this reason, only test it on servers that you own or in situations where you’ve notified the owners.
The nmap creators actually provide a test server located at:
scanme.nmap.org
Some commands may take a long while to complete:
To scan an IP address or a host name (FQDN), run:
nmap 192.168.1.1
Sample outputs:
Fig.01: nmap in action
Scan for the host operating system:
sudo nmap -O 192.168.1.1
pecify a range with “-” or “/24″ to scan a number of hosts at once:
sudo nmap -PN xxx.xxx.xxx.xxx-yyy
Scan a network range for available services:
sudo nmap -sP network_address_range
Scan without preforming a reverse DNS lookup on the IP address specified. This should speed up your results in most cases:
sudo nmap -n remote_host
Scan a specific port instead of all common ports:
sudo nmap -p port_number remote_host
Scan a network and find out which servers and devices are up and running
This is known as host discovery or ping scan:
nmap -sP 192.168.1.0/24
Sample outputs:
Host 192.168.1.1 is up (0.00035s latency).
MAC Address: BC:AE:C5:C3:16:93 (Unknown)
Host 192.168.1.2 is up (0.0038s latency).
MAC Address: 74:44:01:40:57:FB (Unknown)
Host 192.168.1.5 is up.
Host nas03 (192.168.1.12) is up (0.0091s latency).
MAC Address: 00:11:32:11:15:FC (Synology Incorporated)
Nmap done: 256 IP addresses (4 hosts up) scanned in 2.80 second
Understanding port configuration and how to discover what the attack vectors are on your server is only one step to securing your information and your VPS.

Nikto to Scan for vulnerabilities in your website

Nikto Web-scanner is a open source web-server scanner which can be used to scan the web-servers for malicious programs and files. Nikto can be used to scan the outdated versions of programs too. Nikto will provide us a quick and easy scan to find out the dangerous files and programs in server, At the end of scan result with a log file.

Download and  install Nikto on Linux server

Perl is pre-installed in linux so all you need to do is download nikto from the project page, unpack it into a directory and start your testing.
wget https://cirt.net/nikto/nikto-2.1.4.tar.gz
You can unpack it with an archive manager tool or use tar and gzip together with this command.
tar zxvf nikto-2.1.4.tar.gz
cd nikto-2.1.4
perl nikto.pl
This should be your results from a working installation:
 - ***** SSL support not available (see docs for SSL install) *****
- Nikto v2.1.4
---------------------------------------------------------------------------
+ ERROR: No host specified

       -config+            Use this config file
       -Cgidirs+           scan these CGI dirs: 'none', 'all', or values like "/cgi/ /cgi-a/"
       -dbcheck            check database and other key files for syntax errors
       -Display+           Turn on/off display outputs
       -evasion+           ids evasion technique
       -Format+            save file (-o) format
       -host+              target host
       -Help               Extended help information
       -id+                Host authentication to use, format is id:pass or id:pass:realm
       -list-plugins       List all available plugins
       -mutate+            Guess additional file names
       -mutate-options+    Provide extra information for mutations
       -output+            Write output to this file
       -nocache            Disables the URI cache
       -nossl              Disables using SSL
       -no404              Disables 404 checks
       -port+              Port to use (default 80)
       -Plugins+           List of plugins to run (default: ALL)
       -root+              Prepend root value to all requests, format is /directory
       -ssl                Force ssl mode on port
       -Single             Single request mode
       -timeout+           Timeout (default 2 seconds)
       -Tuning+            Scan tuning
       -update             Update databases and plugins from CIRT.net
       -vhost+             Virtual host (for Host header)
       -Version            Print plugin and database versions
           + requires a value

    Note: This is the short help output. Use -H for full help.
The error is merely telling us we did not fill in the necessary parameters for a test to run. The SSL support can be enabled by installing the necessary perl ssl module (sudo apt-get install libnet-ssleay-perl).

Update the nikto Database

Before performing any scan we need to update the nikto database packages using.
/usr/local/bin/nikto.pl -update
To list the available Plugins for nikto we can use the below command.
nikto.pl -list-plugins // To list the installed plugins //

Scan for vulnerabilities

For a simple test for  we will use test a single url.
perl nikto.pl -h http://www.host-name.com
Sample outputs:
This will produce fairly verbose output that may be somewhat confusing at first. Take the time to read through the output to understand what each advisory means. Many of the alerts in Nikto will refer to OSVDB numbers. These are Open Source Vulnerability Database (http://osvdb.org/) designations. You can search on OSVDB for further information about any vulnerabilities identified.
$ nikto -h http://www.host-name.com
- Nikto v2.1.4
---------------------------------------------------------------------------
+ Target IP:         1.2.3.4
+ Target Hostname:    host-name.com
+ Target Port:        80
+ Start Time:         2012-08-11 14:27:31
---------------------------------------------------------------------------
+ Server: Apache/2.2.22 (FreeBSD) mod_ssl/2.2.22 OpenSSL/1.0.1c DAV/2
+ robots.txt contains 4 entries which should be manually viewed.
+ mod_ssl/2.2.22 appears to be outdated (current is at least 2.8.31) (may depend on server version)
+ ETag header found on server, inode: 5918348, size: 121, mtime: 0x48fc943691040
+ mod_ssl/2.2.22 OpenSSL/1.0.1c DAV/2 - mod_ssl 2.8.7 and lower are vulnerable to a remote buffer overflow which may allow a remote shell (difficult to exploit). CVE-2002-0082, OSVDB-756.
+ Allowed HTTP Methods: GET, HEAD, POST, OPTIONS, TRACE 
+ OSVDB-877: HTTP TRACE method is active, suggesting the host is vulnerable to XST
+ /lists/admin/: PHPList pre 2.6.4 contains a number of vulnerabilities including remote administrative access, harvesting user info and more. Default login to admin interface is admin/phplist
+ OSVDB-2322: /gallery/search.php?searchstring=: Gallery 1.3.4 and below is vulnerable to Cross Site Scripting (XSS). Upgrade to the latest version. http://www.securityfocus.com/bid/8288.
+ OSVDB-7022: /calendar.php?year=&month=03&day=05: DCP-Portal v5.3.1 is vulnerable to  Cross Site Scripting (XSS). http://www.cert.org/advisories/CA-2000-02.html.
+ OSVDB-3233: /phpinfo.php: Contains PHP configuration information
+ OSVDB-3092: /system/: This might be interesting...
+ OSVDB-3092: /template/: This may be interesting as the directory may hold sensitive files or reveal system information.
+ OSVDB-3092: /updates/: This might be interesting...
+ OSVDB-3092: /README: README file found.
+ 6448 items checked: 1 error(s) and 14 item(s) reported on remote host
+ End Time:           2012-08-11 15:52:57 (5126 seconds)
---------------------------------------------------------------------------
+ 1 host(s) tested
$
Nikto is an extremely lightweight, and versatile tool. Because of the fact that Nikto is written in Perl it can be run on almost any host operating system.
Hope this will will bring you a good idea to scan vulnerbalites for your wordpress website. Following on from my previous article How To Secure WordPress Website  show you checklist allows you to secure your WordPress site with as little effort as possible.
If you have any feedback or comments, feel free to post them in the comment section below.