Sunday, March 29, 2015

Install UFW Firewall In Linux And Secure Computer From Harmful Incoming/Outgoing Connections

http://www.linuxandubuntu.com/home/install-ufw-firewall-in-linux-and-secure-computer-from-harmful-incoming-outgoing-connections


Install UFW firewall in Linux incoming/outgoing connections
UFW stands for Uncomplicated Firewall is a firewall to secure Linux desktop from harmful incoming and outgoing connections. UFW is the easiest firewall in Linux, it has a graphical user interface GUFW with all the features of setting up rules. In this tutorial we will install UFW & GUFW in our Ubuntu/Linux Mint/Debian operating system.


What Is Firewall ?


When you google what is firewall, you get a wikipedia page that tells about firewall. According to Wikipedia firewall is -

In computing, a firewall is a 
  • network security system that controls the incoming and outgoing network traffic based on an applied rule set.
  • establishes a barrier between a trusted, secure internal network and another network (e.g., the Internet) that is assumed not to be secure and trusted.
  • exist both as software to run on general purpose hardware and as a hardware appliance.


Many hardware-based firewalls also offer other functionality to the internal network they protect, such as acting as a DHCP server for that network.
linux free firewall gufw install
Firewall simply acts as a protection in between a computer and network.

Why To Install Firewall ?


Computers are connected to each other and they share data and some personal information with servers. The same way servers are connected with computers and they do share data depending on the request from client computer. But among those millions of connections there are dangerous connections too that steal private data from servers or desktop.

So to recognize and prevent such harmful and dangerous connections we use firewall. We can configure rules manually about the connections or there are also default set up rules in the firewall that stop certain connections to interact with system through network.

How To Install UFW (Uncomplicated Firewall) In Linux ?


In Ubuntu UFW is by default installed but if you doubt then you can check it by the following command -

$ sudo dpkg --get-selections | grep ufw
is ufw firewall installed in linux

Is firewall installed? If not, you can install it from terminal.

$ sudo apt-get install ufw

Once you have installed ufw you can configure this firewall from the terminal. But ufw is known for its simplicity and ease of use. So we will use graphical user interface GUFW instead of terminal. Yeah!

So open up software manager and search for 'gufw' and install it -

install gufw firewall from software center in linux

Here you have installed graphical user interface and just open it up system settings, start menu or dash.
I am using Ubuntu so I'll start firewall from dash.
start gufw firewall from dash or start menu in linux

Here we have a nice, easy to use firewall interface that everyone can understand. The interface has the following easy options -
set firewall profile in linux
Profile - Profile menu has some inbuilt profiles for Home (set by default), Office and Public.

Incoming and Outgoing connections for each profile -

                                     Incoming                     Outgoing
Home                             Deny                               Allow
Office                            Deny                               Allow
Public                            Reject                             Allow

ufw firewall status turn on/off firewall
Status - If you need to turn off firewall, in gufw you only click this button and to turn back on click the button again.

ufw graphical user interface application in linux firewall
gufw firewall connections configuration settings
Connection settings - GUFW allows to change default profile Incoming and Outgoing connections settings.

Now move down side of the application. Here we have some very simple firewall customization tools.

Listening Report - Under listening report we have the the list of services, and applications using incoming or outgoing connections. Each service and application behaving differently and have their own set of rules and rules can be customized also.
ufw linux firewall listening report
gufw add firewall rule preconfigured
Add a Firewall Rule - Select any service or application and click 'plus' sign and it will open window that is in left. The window has three tabs 'Preconfigured' , 'Simple' and 'Advanced'.

Preconfigured - Here you have preconfigured settings for applications.

gufw add rule simple
Simple - Here you can select specify some very simple rules, like rule name, Policy, Direction, Protocol and Port. 

gufw add rule firewall advanced
Advanced - In addition to some simple settings in advanced tab you can set some other rule settings. For example, Insers, Interface, you can also set whether you want to make log, log all or do not log. Advanced tab has one more option to setup range of IP address for a selected application.

gufw created rule

After you have setting up rules click Add. Rules added! You can see your added rules under Rules.

You can edit the rules and delete the rules.  To edit any rule select it and click the setting icono below the list.

To delete any rule select rule and click 'minus'. 

Log

gufw firewall connection log
In last of the application you have log. Under log there are all activities of the applications or services status of incoming and outgoing connections. Log helps in identifying any suspicious activity of any applications. 

A firewall is one of the best security tools. Hackers find an open port and attack through. Firewall restrict any of such malicious connections. UFW is the easiest one there are many others that protect the system Iptables and Shorewall are very good example.

Android on a Stick, or how to install Android-x86 on a USB stick

http://www.linuxbsdos.com/2015/03/26/android-on-a-stick-or-how-to-install-android-x86-on-a-usb-stick

The Android-x86 project provides ISO installation images of Android that can be installed on personal computers, which is cool, because that makes it possible to use the most popular operating system on the planet without buying an Android tablet or smartphone.
The latest stable release is Android-x86 4.4-r2. This tutorial shows how to install it on a USB stick, so you can have an Android device that you can boot and use from any modern computer.
What You’ll Need:
If you want to follow along, you’ll need two USB sticks, one to use as the installation media, the other as the installation target. The ISO installation image is less than 400 MB in size, so a 1 GB USB stick will do as the installation media. You may download the latest ISO installation image from android-x86.org/download.
The target USB stick should also be at least 1 GB, because a fresh installation of Android-x86 takes up about 1 GB of disk space. For this tutorial, I used an 8 GB USB stick.
How To Do What To Do:
1. Transfer the installation image to a USB stick: Assuming that you downloaded the ISO image to a Linux computer, you may transfer it to a USB stick using the dd command like this:

2. Format the target USB stick: To make the installation easier, be sure to format the target USB stick, or just wipe it, if it contains data. Then Insert both USB sticks to free USB ports on the computer and reboot. If you did not set the computer to boot from external media, press the F key that will bring up the computer’s boot menu and select the right one to boot into.
Figure 1 shows the entries in the boot menu of the computer used for this tutorial. The USB: PNY USB 2.0 FD 1100 entry is the USB stick that holds the installation image, while the USB: SanDisk Cruzer Glide 1.26 entry is the target USB stick. The computer has an internal 250 GB hard disk with Linux Mint 17.1, Ubuntu 14.10 and Windows 8 installed in triple-boot fashion.

Linux computer boot menu
Figure 1: Boot menu of computer showing detected storage media
This is the Android-x86 boot menu. You have the option to boot into a live desktop or straight to the installer. The latter option seems to be the most appropriate thing to do here.

Android-x86 4.4-r2 boot menu
Figure 2: Entries on the boot menu of Android-x86 4.4-r2 installation image
You’ll then be shown a window that shows the disks and disk partitions detected by the installer. In this case, sdb1 belongs to the target USB stick. The sdc entries belong to the installation media.

Android-x86 disks
Figure 3: Disks detected by the Android-x86 installer
After selecting the target disk, you’ll be given the option to format it. You definitely want to format it. I chose to format mine using the Ext3 file system.

Android-x86 ext3 file system
Figure 4: File systems supported by the Android-x86 installer
Yes, we are sure.

Android-x86 format USB stick
Figure 5: Options to format the target USB stick.
Yes, install the GRUB boot loader to the USB stick. A plus for the installer is that it does not mess with the contents of the internal hard disk, which is good to know, because in a future tutorial, I’ll show how to dual-boot Android-x86 4.4r2 and another popular Linux distribution.

Android-x86 install GRUB
Figure 6: Install GRUB boot loader to the USB stick
Yes, I think it’s better to install the /system directory read-write.

Android-x86 /system directory
Figure 7: Make the /system directory read-write
This image just shows the writing process. Less than 750 MB of data is written to the USB stick.

Android-x86 /system
Figure 8: Writing to the /system directory.
Installation should take less than two minutes. I did not encounter any problem, so next thing I had to do was reboot.

Reboot Android-x86
Figure 9: Reboot newly installed Android-x86 from a USB stick
On rebooting, you’ll be presented with the GRUB menu. Selecting the default option, I was able to boot into the Android-x86 desktop. My test computer does not have a wireless card, but the system was able to auto-configure the Ethernet card.

Android-x86 4.4-r2 GRUB boot
Figure 10: GRUB boot menu of Android-x86 4.4-r2
So I now have Android 4.4 installed on a USB stick, which I can use from any personal computer. And that’s awesome, because I don’t have any Android device.

Thursday, March 26, 2015

How to set up server monitoring system with Monit

http://xmodulo.com/server-monitoring-system-monit.html

Many Linux admins rely on a centralized remote monitoring system (e.g., Nagios or Cacti) to check the health of their network infrastructure. While centralized monitoring makes an admin's life easy when dealing with many hosts and devices, a dedicated monitoring box obviously becomes a single point of failure; if the monitoring box goes down or becomes unreachable for whatever reason (e.g., bad hardware or network outage), you will lose visibility on your entire infrastructure.
One way to add redundancy to your monitoring system is to install standalone monitoring software (as a fallback) at least on any critical/core servers on your network. In case a centralized monitor is down, you will still be able to maintain visibility on your core servers from their backup monitor.

What is Monit?

Monit is a cross-platform open-source tool for monitoring Unix/Linux systems (e.g., Linux, BSD, OSX, Solaris). Monit is extremely easy to install and reasonably lightweight (with only 500KB in size), and does not require any third-party programs, plugins or libraries. Yet, Monit lends itself to full-blown monitoring, capable of process status monitoring, filesystem change monitoring, email notification, customizable actions for core services, and so on. The combination of ease of setup, lightweight implementation and powerful features makes Monit an ideal candidate for a backup monitoring tool.
I have been using Monit for several years on multiple hosts, and I am very pleased how reliable it has been. Even as a full-blown monitoring system, Monit is very useful and powerful for any Linux admin. In this tutorial, let me demonstrate how to set up Monit on a local server (as a backup monitor) to monitor common services. With this setup, I will only scrach the surface of what Monit can do for us.

Installation of Monit on Linux

Most Linux distributions already include Monit in their repositories.
Debian, Ubuntu or Linux Mint:
$ sudo aptitude install monit
Fedora or CentOS/RHEL:
On CentOS/RHEL, you must enable either EPEL or Repoforge repository first.
# yum install monit
Monit comes with a very well documented configuration file with a lots of examples. The main configuration file is located in /etc/monit.conf in Fedora/CentOS/RHEL, or /etc/monit/monitrc in Debian/Ubuntu/Mint. Monit configuration has two parts: "Global" and "Services" sections.

Global Configuration: Web Status Page

Monit can use several mail servers for notifications, and/or an HTTP/HTTPS status page. Let's start with the web status page with the following requirements.
  • Monit listens on port 1966.
  • Access to the web status page is encrypted with SSL.
  • Login requires monituser/romania as user/password.
  • Login is permitted from localhost, myhost.mydomain.ro, and internal LAN (192.168.0.0/16) only.
  • Monit stores an SSL certificate in a pem format.
For subsequent steps, I will use a Red Hat based system. Similar steps will be applicable on a Debian based system.
First, generate and store a self-signed certificate (monit.pem) in /var/cert.
# mkdir /var/certs
# cd /etc/pki/tls/certs
# ./make-dummy-cert monit.pem
# cp monit.pem /var/certs
# chmod 0400 /var/certs/monit.pem
Now put the following snippet in the Monit's main configuration file. You can start with an empty configuration file or make a copy of the original file.
1
2
3
4
5
6
7
set httpd port 1966 and
     SSL ENABLE
     PEMFILE  /var/certs/monit.pem
     allow monituser:romania
     allow localhost
     allow 192.168.0.0/16
     allow myhost.mydomain.ro

Global Configuration: Email Notification

Next, let's set up email notification in Monit. We need at least one active SMTP server which can send mails from the Monit host. Something like the following will do (adjust it for your case):
  • Mail server hostname: smtp.monit.ro
  • Sender email address used by monit (from): monit@monit.ro
  • Who will receive mail from monit daemon: guletz@monit.ro
  • SMTP port used by mail server: 587 (default is 25)
With the above information, email notification would be configured like this:
1
2
3
4
5
6
7
8
9
10
11
12
set mailserver  smtp.monit.ro port 587
set mail-format {
 from: monit@monit.ro
 subject: $SERVICE $EVENT at $DATE on $HOST
 message: Monit $ACTION $SERVICE $EVENT at $DATE on $HOST : $DESCRIPTION.
     
       Yours sincerely,
          Monit
  
  }
 
set alert guletz@monit.ro
As you can see, Monit offers several built-in variables ($DATE, $EVENT, $HOST, etc.), and you can customize your email message for your needs. If you want to send mails from the Monit host itself, you need a sendmail-compatible program (e.g., postfix or ssmtp) already installed.

Global Configuration: Monit Daemon

The next part is setting up monit daemon. We will set it up as follows.
  • Performs the first check after 120 seconds.
  • Checks services once every 3 minutes.
  • Use syslog for logging.
Place the following snippet to achieve the above setting.
1
2
3
set daemon 120
   with start delay 240
set logfile syslog facility log_daemon
We must also define "idfile", a unique ID used by monit demon, and "eventqueue", a path where mails sent by monit but undelivered due to SMTP/network errors. Verifiy that path (/var/monit) already exists. The following configuration will do.
1
2
3
set idfile /var/monit/id
 set eventqueue
     basedir /var/monit

Test Global Configuration

Now the "Global" section is finished. The Monit configuration file will look like this:
1
2
3
4
5
6
7
8
9
10
11
12
13
14
15
16
17
18
19
20
21
22
23
24
25
26
27
28
29
30
31
32
33
34
35
#  Global Section
 
# status webpage and acl's
set httpd port 1966 and
     SSL ENABLE
     PEMFILE  /var/certs/monit.pem
     allow monituser:romania
     allow localhost
     allow 192.168.0.0/16
     allow myhost.mydomain.ro
 
# mail-server
set mailserver  smtp.monit.ro port 587
# email-format
set mail-format {
 from: monit@monit.ro
 subject: $SERVICE $EVENT at $DATE on $HOST
 message: Monit $ACTION $SERVICE $EVENT at $DATE on $HOST : $DESCRIPTION.
     
       Yours sincerely,
          Monit
  
  }
 
set alert guletz@monit.ro
 
# delay checks
set daemon 120
   with start delay 240
set logfile syslog facility log_daemon
 
# idfile and mail queue path
set idfile /var/monit/id
 set eventqueue
     basedir /var/monit
Now it is time to check what we have done. You can test an existing configuration file (/etc/monit.conf) by running:
# monit -t
Control file syntax OK
If Monit complains about any error, please review the configuration file again. Fortunately, error/warnings messages are informative. For example:
monit: Cannot stat the SSL server PEM file '/var/certs/monit.pem' -- No such file or directory
/etc/monit/monitrc:10: Warning: hostname did not resolve 'smtp.monit.ro'
Once you verify the syntax of configuration, start monit daemon, and wait 2 to 3 minutes:
# service monit start
If you are using systemd, run:
# systemctl start monit
Now open a browser window, and go to https://:1966. Replace & with your Monit hostname or IP address.
Note that if you have a self-signed SSL certificate, you will see a warning message in your browser.

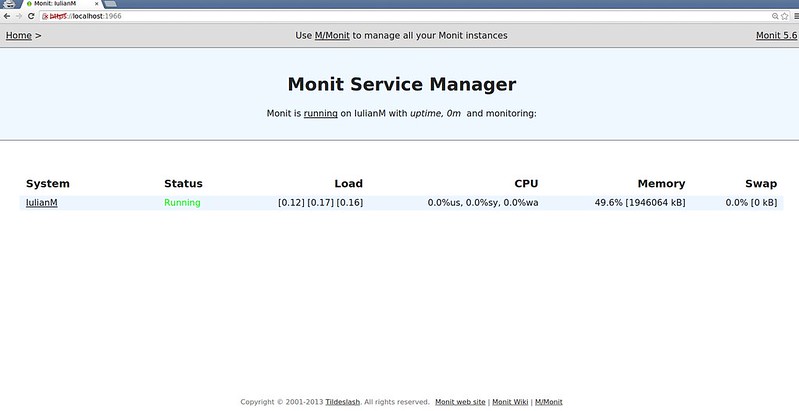
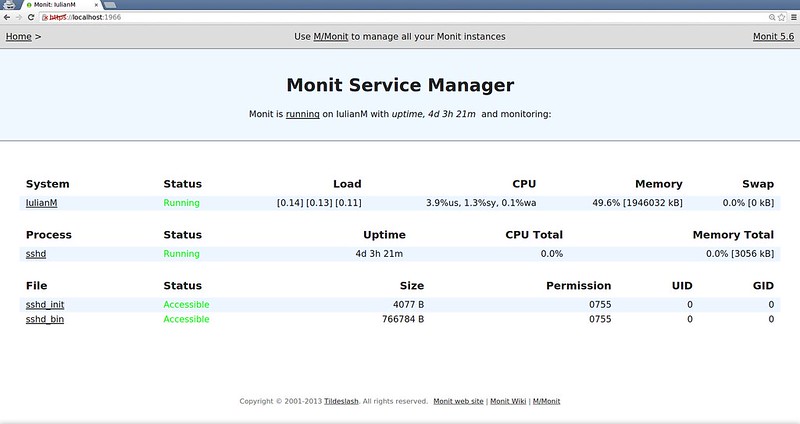
After you have completed login, you must see the following page.

In the rest of the tutorial, let me show how we can monitor a local server and common services. You will see a lot of useful examples on the official wiki page. Most of them are copy-and-pastable!

Service Configuration: CPU/Memory Monitoring

Let start with monitoring a local server's CPU/memory usage. Copy the following snippet in the configuration file.
1
2
3
4
5
6
7
check system localhost
    if loadavg (1min) > 10 then alert
    if loadavg (5min) > 6 then alert
    if memory usage > 75% then alert
    if cpu usage (user) > 70% then alert
    if cpu usage (system) > 60% then alert
    if cpu usage (wait) > 75% then alert
You can easily interpret the above configuration. The above checks are performed on local host for every monitoring cycle (which is set to 120 seconds in the Global section). If any condition is met, monit daemon will send an alert with an email.
If certain properties do not need to be monitored for every cycle, you can use the following format. For example, this will monitor average load every other cycle (i.e., every 240 seconds).
1
if loadavg (1min) > 10 for 2 cycles then alert

Service Configuration: SSH Service Monitoring

Let's check if we have sshd binary installed in /usr/sbin/sshd:
1
check file sshd_bin with path /usr/sbin/sshd
We also want to check if the init script for sshd exist:
1
check file sshd_init with path /etc/init.d/sshd
Finally, we want to check if sshd daemon is up an running, and listens on port 22:
1
2
3
4
5
check process sshd with pidfile /var/run/sshd.pid
   start program  "/etc/init.d/sshd start"
   stop program  "/etc/init.d/sshd stop"
   if failed port 22 protocol ssh then restart
   if 5 restarts within 5 cycles then timeout
More specifically, we can interpret the above configuration as follows. We check if a process named sshd and a pidfile (/var/run/sshd.pid) exist. If either one does not exist, we restart sshd demon using init script. We check if a process listening on port 22 can speak SSH protocol. If not, we restart sshd daemon. If there are at least 5 restarts within the last 5 monitoring cycles (i.e., 5x120 seconds), sshd daemon is declared non-functional, and we do not try to check again.

Service Configuration: SMTP Service Monitoring

Now let's set up a check on a remote SMTP mail server (e.g., 192.168.111.102). Let's assume that the SMTP server is running SMTP, IMAP and SSH on its LAN interface.
1
2
3
4
5
6
check host MAIL with address 192.168.111.102
   if failed icmp type echo within 10 cycles then alert
   if failed port 25  protocol smtp then alert
             else if recovered then exec "/scripts/mail-script"
   if failed port 22  protocol ssh  then alert
   if failed port 143 protocol imap then alert
We check if the remote host responds to ICMP. If we haven't received ICMP response within 10 cycles, we send out an alert. If testing for SMTP protocol on port 25 fails, we send out an alert. If testing succeeds again after a failed test, we run a script (/scripts/mail-script). If testing for SSH and IMAP protocols fail on port 22 and 143, respectively, we send out an alert.

Conclusion

In this tutorial, I demonstrate how to set up Monit on a local server. What I showed here is just the tip of the iceberg, as far as Monit's capabilities are concerned. Take your time and read the man page about Monit (a very good one). Monit can do a lot for any Linux admin with a very nice and easy to understand syntax. If you put together a centralized remote monitor and Monit to work for you, you will have a more reliable monitoring system. What is your thought on Monit?