http://xmodulo.com/2014/09/harden-apache-web-server-mod_security-mod_evasive-centos.html
Web server security is a vast subject, and different people have different preferences and opinions as to what the best tools and techniques are to harden a particular web server. With Apache web server, a great majority of experts -if not all- agree that mod_security and mod_evasive are two very important modules that can protect an Apache web server against common threats.
In this article, we will discuss how to install and configure mod_security and mod_evasive, assuming that Apache HTTP web server is already up and running. We will perform a demo stress test to see how the web server reacts when it is under a denial-of-service (DOS) attack, and show how it fights back with these modules. We will be using CentOS platform in this tutorial.

Now you need to make sure that Apache loads both modules when it starts. Look for the following lines (or add them if they are not present) in mod_security.conf and mod_evasive.conf, respectively:
In the two lines above:

Now restart Apache web server:
To download and install the latest OWASP CRS, use the following commands.

We will copy its contents into a new file named (for convenience) modsecurity_crs_10_setup.conf.
Last, but not least, we will create our own configuration file within the modsecurity.d directory where we will include our chosen directives. We will name this configuration file xmodulo.conf
in this example. It is highly encouraged that you do not edit the CRS
files directly but rather place all necessary directives in this
configuration file. This will allow for easier upgrading as newer CRSs
are released.
Don't forget to restart Apache to apply changes.
The default mod_evasive.conf file has the following directives enabled:
Here are other useful directives for mod_evasive:
1) DOSEmailNotify: Sends an email to the address specified whenever an IP address becomes blacklisted. It needs a valid email address as argument. If SELinux status is set to enforcing, you will need to grant the user apache SELinux permission to send emails. That is, run this command as root:
2. DOSSystemCommand: Executes a custom system command whenever
an IP address becomes blacklisted. It may come in handy to add firewall
rules to block offending IPs altogether.
We will use this directive to add a firewall rule through the following script (/etc/httpd/scripts/ban_ip.sh):
Our DOSSystemCommand directive will then read as follows:
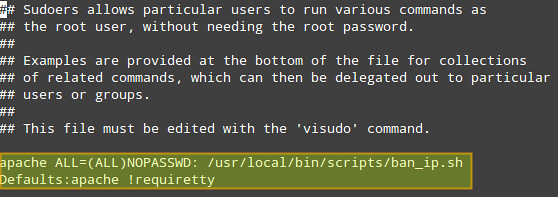
Don't forget to update sudo permissions to run our script as apache user:

Make sure you ONLY perform the following steps in your own test server and NOT against an external, production web site.
In the following examples, replace http://centos.gabrielcanepa.com.ar/index.php with your own domain and a file of your choosing.

On the other hand, if mod_security and mod_evasive are disabled, the three tools mentioned above knock down the server very fast (and keep it in that state throughout the duration of the attack), and of course, the offending IPs are not blacklisted.
Web server security is a vast subject, and different people have different preferences and opinions as to what the best tools and techniques are to harden a particular web server. With Apache web server, a great majority of experts -if not all- agree that mod_security and mod_evasive are two very important modules that can protect an Apache web server against common threats.
In this article, we will discuss how to install and configure mod_security and mod_evasive, assuming that Apache HTTP web server is already up and running. We will perform a demo stress test to see how the web server reacts when it is under a denial-of-service (DOS) attack, and show how it fights back with these modules. We will be using CentOS platform in this tutorial.
Installing mod_security & mod_evasive
If you haven't enabled the EPEL repository in your CentOS/RHEL server, you need to do so before installing these packages.
# yum install mod_security
# yum install mod_evasive
After the installation is complete, you will find the main configuration files inside /etc/httpd/conf.d:# yum install mod_evasive

Now you need to make sure that Apache loads both modules when it starts. Look for the following lines (or add them if they are not present) in mod_security.conf and mod_evasive.conf, respectively:
1
2
| LoadModule security2_module modules/mod_security2.soLoadModule evasive20_module modules/mod_evasive20.so |
- The LoadModule directive tells Apache to link in an object file (*.so), and adds it to the list of active modules.
- security2_module and evasive20_module are the names of the modules.
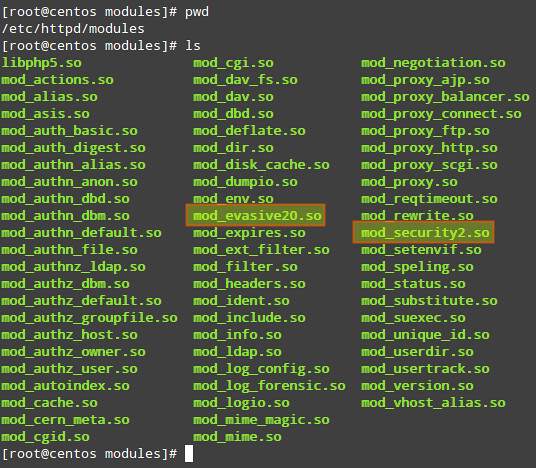
- modules/mod_security2.so and modules/mod_evasive20.so are relative paths from the /etc/httpd directory to the source files of the modules. This can be verified (and changed, if necessary) by checking the contents of the /etc/httpd/modules directory.

Now restart Apache web server:
# service httpd restart
Configuring mod_security
In order to use mod_security, a Core Rule Set (CRS) must be installed first. Basically, a CRS provides a web server with a set of rules on how to behave under certain conditions. Trustwave's SpiderLabs (the firm behind mod_security) provides the OWASP (Open Web Application Security Project) ModSecurity CRS.To download and install the latest OWASP CRS, use the following commands.
# mkdir /etc/httpd/crs
# cd /etc/httpd/crs
# wget https://github.com/SpiderLabs/owasp-modsecurity-crs/tarball/master
# tar xzf master
# mv SpiderLabs-owasp-modsecurity-crs-ebe8790 owasp-modsecurity-crs
Now navigate to the installed OWASP CRS directory.# cd /etc/httpd/crs
# wget https://github.com/SpiderLabs/owasp-modsecurity-crs/tarball/master
# tar xzf master
# mv SpiderLabs-owasp-modsecurity-crs-ebe8790 owasp-modsecurity-crs
# cd /etc/httpd/crs/owasp-modsecurity-crs
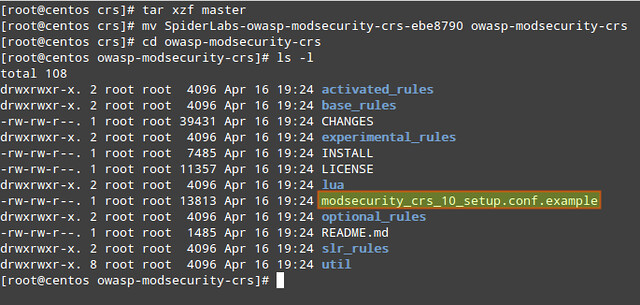
In the OWASP CRS directory, you will find a sample file with rules (modsecurity_crs_10_setup.conf.example).
We will copy its contents into a new file named (for convenience) modsecurity_crs_10_setup.conf.
# cp modsecurity_crs_10_setup.conf.example modsecurity_crs_10_setup.conf
To tell Apache to use this file for mod_security module,
insert the following lines in the /etc/httpd/conf/httpd.conf file. The
exact paths may be different depending on where you unpack the CRS
tarball.
1
2
3
4
| Include crs/owasp-modsecurity-crs/modsecurity_crs_10_setup.conf Include crs/owasp-modsecurity-crs/base_rules/*.conf</IfModule> |
# vi /etc/httpd/modsecurity.d/xmodulo.conf
1
2
3
4
5
6
7
| SecRuleEngine On SecRequestBodyAccess On SecResponseBodyAccess On SecResponseBodyMimeType text/plain text/html text/xml application/octet-stream SecDataDir /tmp</IfModule> |
- SecRuleEngine On: Use the OWASP CRS to detect and block malicious attacks.
- SecRequestBodyAccess On: Enable inspection of data transported request bodies (e.g., POST parameters).
- SecResponseBodyAccess On: Buffer response bodies (only if the response MIME type matches the list configured with SecResponseBodyMimeType).
- SecResponseBodyMimeType text/plain text/html text/xml application/octet-stream: Configures which MIME types are to be considered for response body buffering. If you are unfamiliar with MIME types or unsure about their names or usage, you can check the Internet Assigned Numbers Authority (IANA) web site.
- SecDataDir /tmp: Path where persistent data (e.g., IP address data, session data, and so on) is to be stored. Here persistent means anything that is not stored in memory, but on hard disk.
Don't forget to restart Apache to apply changes.
Configuring mod_evasive
The mod_evasive module reads its configuration from /etc/httpd/conf.d/mod_evasive.conf. As opposed to mod_security, we don't need a separate configuration file because there are no rules to update during a system or package upgrade.
1
2
3
4
5
6
7
8
| DOSHashTableSize 3097 DOSPageCount 2 DOSSiteCount 50 DOSPageInterval 1 DOSSiteInterval 1 DOSBlockingPeriod 10</IfModule> |
- DOSHashTableSize: The size of the hash table that is used to keep track of activity on a per-IP address basis. Increasing this number will provide a faster look up of the sites that the client has visited in the past, but may impact overall performance if it is set too high.
- DOSPageCount: The number of identical requests to a specific URI (for example, a file that is being served by Apache) a visitor can make over the DOSPageInterval interval.
- DOSSiteCount: similar to DOSPageCount, but refers to how many overall requests can be made to the site over the DOSSiteInterval interval.
- DOSBlockingPeriod: If a visitor exceeds the limits set by DOSSPageCount or DOSSiteCount, he/she will be blacklisted for the DOSBlockingPeriod amount of time. During this interval, any requests coming from him/her will return a 403 Forbidden error.
Here are other useful directives for mod_evasive:
1) DOSEmailNotify: Sends an email to the address specified whenever an IP address becomes blacklisted. It needs a valid email address as argument. If SELinux status is set to enforcing, you will need to grant the user apache SELinux permission to send emails. That is, run this command as root:
# setsebool -P httpd_can_sendmail 1
Then add this directive in the mod_evasive.conf file:
1
| DOSEmailNotify you@yourdomain.com |
1
| DOSSystemCommand <command> |
1
2
3
4
5
6
7
8
9
10
11
12
13
| #!/bin/sh# Offending IP as detected by mod_evasiveIP=$1# Path to iptables binary executed by user apache through sudoIPTABLES="/sbin/iptables"# mod_evasive lock directoryMOD_EVASIVE_LOGDIR=/tmp# Add the following firewall rule (block IP)$IPTABLES -I INPUT -s $IP -j DROP# Unblock offending IP after 2 hours through the 'at' command; see 'man at' for further detailsecho "$IPTABLES -D INPUT -s $IP -j DROP" | at now + 2 hours# Remove lock file for future checksrm -f "$MOD_EVASIVE_LOGDIR"/dos-"$IP" |
1
| DOSSystemCommand "sudo /etc/httpd/scripts/ban_ip.sh %s" |
# vi /etc/sudoers
1
2
| apache ALL=NOPASSWD: /usr/local/bin/scripts/ban_ip.shDefaults:apache !requiretty |

Simulating DoS Attacks
We will use three tools to stress test our Apache web server (running on CentOS 6.5 with 512 MB of RAM and a AMD Athlon II X2 250 Processor), with and without mod_security and mod_evasive enabled, and check how the web server behaves in each case.Make sure you ONLY perform the following steps in your own test server and NOT against an external, production web site.
In the following examples, replace http://centos.gabrielcanepa.com.ar/index.php with your own domain and a file of your choosing.
Linux-based tools
1. Apache bench: Apache server benchmarking tool.
# ab -n1000 -c1000 http://centos.gabrielcanepa.com.ar/index.php
- -n: Number of requests to perform for the benchmarking session.
- -c: Number of multiple requests to perform at a time.
1
2
3
4
5
6
7
8
9
10
11
12
13
14
15
16
17
| #!/usr/bin/perl# test.pl: small script to test mod_dosevasive's effectivenessuse IO::Socket;use strict;for(0..100) { my($response); my($SOCKET) = new IO::Socket::INET( Proto => "tcp", PeerAddr=> "192.168.0.16:80"); if (! defined $SOCKET) { die $!; } print $SOCKET "GET /?$_ HTTP/1.0\n\n"; $response = <$SOCKET>; print $response; close($SOCKET);} |
Windows-based tools
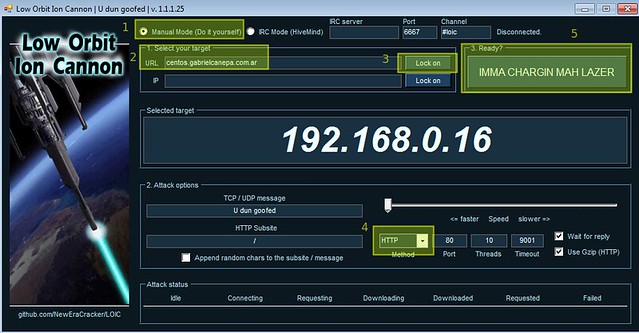
1. Low Orbit Ion Cannon (LOIC): a network stress testing tool. To generate a workload, follow the order shown in the screenshot below and DO NOT touch anything else
Stress Test Results
With mod_security and mod_evasive enabled (and the three tools running at the same time), the CPU and RAM usage peak at a maximum of 60% and 50%, respectively for only 2 seconds before the source IPs are blacklisted, blocked by the firewall, and the attack is stopped.On the other hand, if mod_security and mod_evasive are disabled, the three tools mentioned above knock down the server very fast (and keep it in that state throughout the duration of the attack), and of course, the offending IPs are not blacklisted.

No comments:
Post a Comment