http://xmodulo.com/backuppc-cross-platform-backup-server-linux.html
Just in case you haven't been able to tell from my earlier posts on backupninja and backup-manager, I am a big backup fan. When it comes to backup, I'd rather have too much than not enough, because if the need arises, you will be grateful that you took the time and effort to generate extra copies of your important data.
In this post, I will introduce you to BackupPC, a cross-platform backup server software which can perform pull backup of Linux, Windows and MacOS client hosts over network. BackupPC adds a number of features that make managing backups an almost fun thing to do.

Select your choice by pressing the space bar, and then move to Ok with the tab key and hit ENTER.
You will then be presented with the following screen informing you that an administrative user account 'backuppc', along with its corresponding password (which can be changed later if desired), has been created to manage BackupPC. Note that both a HTTP user account and a regular Linux account of the same name 'backuppc' will be created with an identical password. The former is needed to access BackupPC's protected web interface, while the latter is needed to perform backup using rsync over SSH.

You can change the default password for the HTTP user 'backuppc' with the following command:
/backuppc/. When prompted, enter the default HTTP
user credentials that were supplied to you earlier. If the
authentication succeeds, you will be taken to the main page of the web
interface.
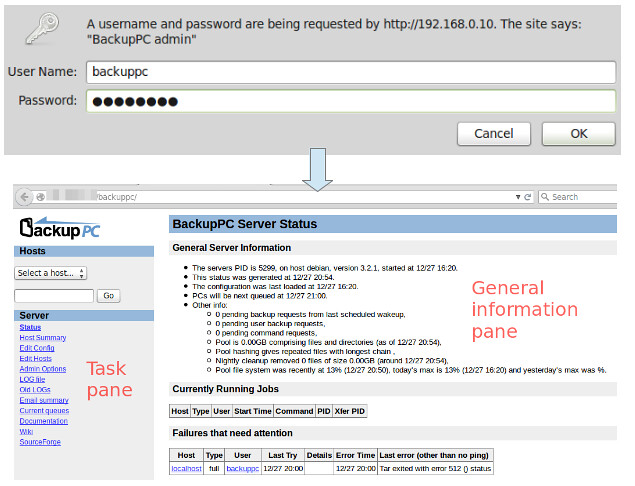
Most likely the first thing that you will want to do is add a new client host to back up. Go to "Edit Hosts" in the Task pane. We will add two client hosts:
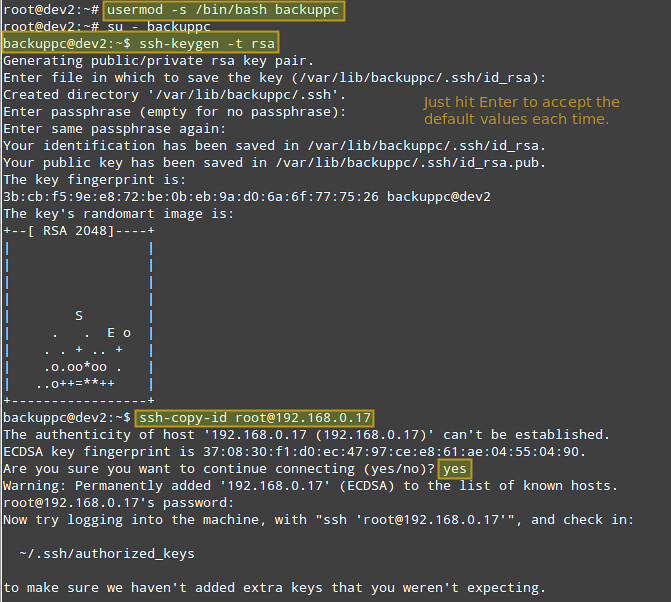
Here are the instructions for setting up key-based authentication for a remote CentOS host. We create the 'backuppc' user's RSA key pair, and transfer its public key to the root account of the CentOS host.
You will need root access for a remote CentOS host to grant write
access to all its file system in case of restoring a backup of files or
directories owned by root.
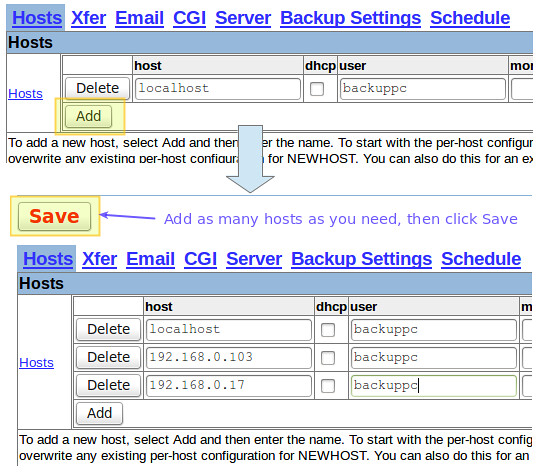
Once the CentOS and Windows hosts are ready, add them to BackupPC using the web interface:
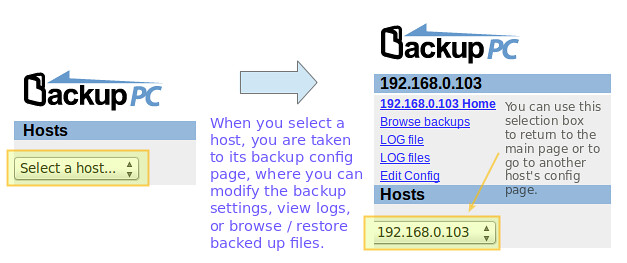
The next step consists of modifying each host's backup settings:
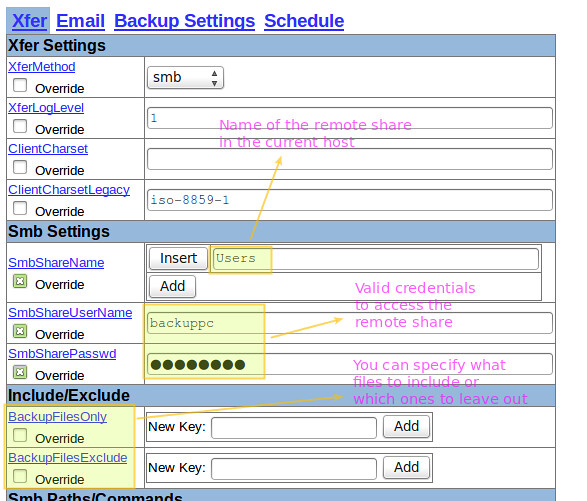
The following image shows the configuration for the backup of the Windows machine:
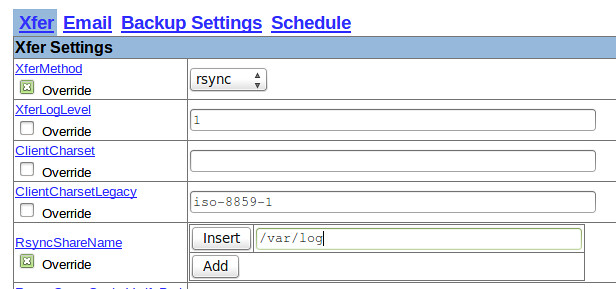
And the following screenshot shows the settings for the backup of the CentOS box:
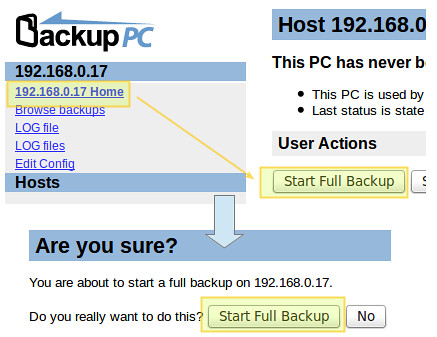
At any time, you can view the status of the process by clicking on the host's home as shown in the image above. If it fails for some reason, a link to a page with the error message(s) will appear in the host menu as well. When a backup completes successfully, a directory with the host's name or IP address is created under /var/lib/backuppc/pc in the server:

Feel free to browse those directories for the files from the command line, but there is an easier way to look for those files and restore them.

If you want, you can download a zip or tar file containing the backup's contents:
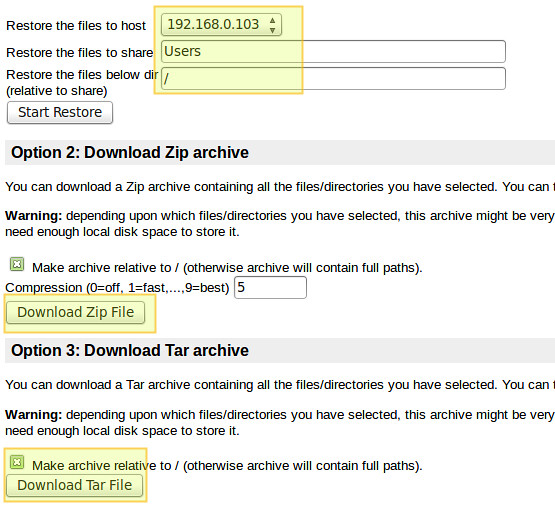
or just restore the file(s):

Feel free to leave your comments and questions, if you have any, using the form below. I am always happy to hear what readers have to say!
Just in case you haven't been able to tell from my earlier posts on backupninja and backup-manager, I am a big backup fan. When it comes to backup, I'd rather have too much than not enough, because if the need arises, you will be grateful that you took the time and effort to generate extra copies of your important data.
In this post, I will introduce you to BackupPC, a cross-platform backup server software which can perform pull backup of Linux, Windows and MacOS client hosts over network. BackupPC adds a number of features that make managing backups an almost fun thing to do.
Features of BackupPC
BackupPC comes with a robust web interface that allows you to collect and manage backups of other remote client hosts in a centralized fashion. Using the web interface, you can examine logs and configuration files, start/cancel/schedule backups of other remote hosts, and visualize current status of backup tasks. You can also browse through archived files and restore individual files or entire jobs from backup archives very easily. To restore individual single files, you can download them from any previous backup directly from the web interface. As if this weren't enough, no special client-side software is needed for client hosts. On Windows clients, the native SMB protocol is used, whereas on *nix clients, you will use rsync or tar over SSH, RSH or NFS.Installing BackupPC
On Debian, Ubuntu and their derivatives, run the following command.
# aptitude install backuppc
On Fedora, use yum command. Note the case sensitive package name.
# yum install BackupPC
On CentOS/RHEL 6, first enable EPEL repository. On CentOS/RHEL 7, enable Nux Dextop repository instead. Then go ahead with yum command:
# yum install BackupPC
As usual, both package management systems will take care of
dependency resolution automatically. In addition, as part of the
installation process, you may be asked to configure, or reconfigure the
web server that will be used for the graphical user interface. The
following screenshot is from a Debian system:
Select your choice by pressing the space bar, and then move to Ok with the tab key and hit ENTER.
You will then be presented with the following screen informing you that an administrative user account 'backuppc', along with its corresponding password (which can be changed later if desired), has been created to manage BackupPC. Note that both a HTTP user account and a regular Linux account of the same name 'backuppc' will be created with an identical password. The former is needed to access BackupPC's protected web interface, while the latter is needed to perform backup using rsync over SSH.

You can change the default password for the HTTP user 'backuppc' with the following command:
# htpasswd /path/to/hash/file backuppc
As for a regular 'backuppc' Linux user account, use passwd command to change its default password.
# passwd backuppc
Note that the installation process creates the web and the program's configuration files automatically.Launching BackupPC and Configuring Backups
To start, open a browser window and point to http://
Most likely the first thing that you will want to do is add a new client host to back up. Go to "Edit Hosts" in the Task pane. We will add two client hosts:
- Host #1: CentOS 7 [IP 192.168.0.17]
- Host #2: Windows 7 [IP 192.168.0.103]
Here are the instructions for setting up key-based authentication for a remote CentOS host. We create the 'backuppc' user's RSA key pair, and transfer its public key to the root account of the CentOS host.
# usermod -s /bin/bash backuppc
# su - backuppc
# ssh-keygen -t rsa
# ssh-copy-id root@192.168.0.17
When prompted, type yes and enter root's password for 192.168.0.17.# su - backuppc
# ssh-keygen -t rsa
# ssh-copy-id root@192.168.0.17

Once the CentOS and Windows hosts are ready, add them to BackupPC using the web interface:

The next step consists of modifying each host's backup settings:

The following image shows the configuration for the backup of the Windows machine:

And the following screenshot shows the settings for the backup of the CentOS box:

Starting a Backup
To start each backup, go to each host's settings, and then click "Start Full Backup":
At any time, you can view the status of the process by clicking on the host's home as shown in the image above. If it fails for some reason, a link to a page with the error message(s) will appear in the host menu as well. When a backup completes successfully, a directory with the host's name or IP address is created under /var/lib/backuppc/pc in the server:

Feel free to browse those directories for the files from the command line, but there is an easier way to look for those files and restore them.
Restoring Backup
To view the files that have been saved, go to "Browse backups" under each host's main menu. You can visualize the directories and files at a glance, and select those that you want to restore. Alternatively, you can click on files to open them with the default program, or right click and choose Save link as to download it to the machine where you're working at the time:
If you want, you can download a zip or tar file containing the backup's contents:

or just restore the file(s):

Conclusion
There is a saying that goes, "the simpler, the better", and that is just what BackupPC has to offer. In BackupPC, you will not only find a backup tool but also a very versatile interface to manage your backups of several operating systems without needing any client-side application. I believe that's more than reason enough for you to give it at least a try.Feel free to leave your comments and questions, if you have any, using the form below. I am always happy to hear what readers have to say!

No comments:
Post a Comment