Wednesday, July 29, 2015

How to Handle Files with Scilab on Ubuntu 15.04

https://www.howtoforge.com/tutorial/scilab-file-handling

Scilab is an OpenSource Linux software for numerical computation similar to Matlab. This tutorial shows how to load data from files into Scilab for later use or processing. Scilab will interpret the code in the file and it's structure and format, etc. To use a file within the Scilab environment, it is necessary to use a number of previous commands that allow both reading and interpretation of the file in question.
You haven't installed scilab yet? Please see our Scilab installation tutorial.

Opening Files with the mopen command

This command opens a file in Scilab. The sequence is:
[fd, err] = mopen(file [, mode, swap ])
The meaning for each argument is:
File: A character string containing the path of the file to open.
Mode: A character string specifying the access mode requested for the file

Swap: A scalar swap is present and swap = 0 then automatic bytes swap is disabled. The default value is 1.

Err:  Returns a value that indicates the following errors:
Error Value Error Message
0 No error
-1 No more logical Units
-2 Cannot open file
-3 No more memory
-4 Invalid value
-5 Invalid Status

Fd: a positive integer, indicates a file descriptor.

Example Opening Files in Ubuntu Using Scilab

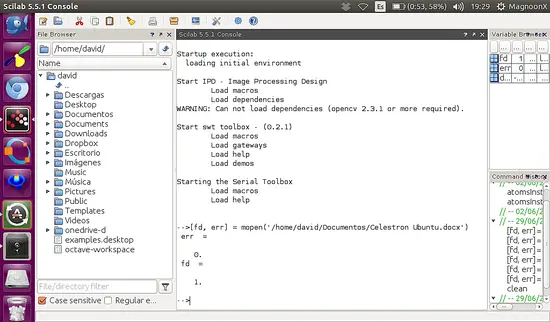
Now, we are going to open a MS Word Document using de mopen command
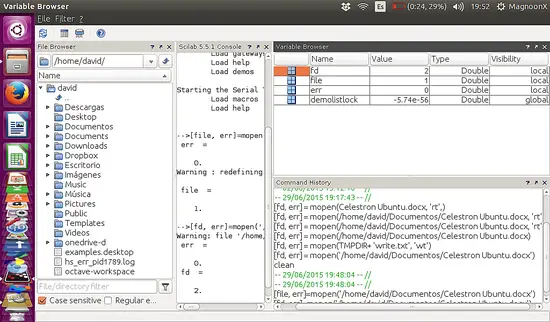
[fd, err] = mopen('/home/david/Documentos/Celestron Ubuntu.docx')
Please note that we didn´t use any additional argument, only for opening purpose.


Note:  In the Variable Browser we can find all the variable created including fd.


Parameters in mode Argument

The parameters are used to control access to the stream. The possible values are:

r: Opens the file for reading purposes.

rb: Opens the binary file for reading.

rt: Opens a text file for reading.

w: Creates a new file for writing. Also truncates the actual file to zero length.

wb:  Creates a new binary file for writing. Also truncates the actual file to zero length.

wt:  Creates a new text binary file for writing. Also truncates the actual file to zero length.

a or ab:  Appends writing to opened file to the end.

r+ or r+b: Opens a file for update.

w+ or w+b:  Truncates to zero length or creates a new file for update.

a+ or a+b: Appends.

Example Opening Files with parameters in Ubuntu Using Scilab


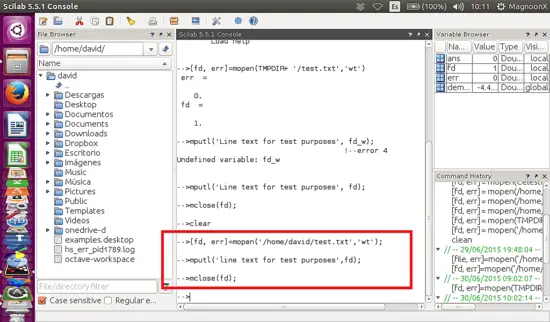
In this example, we are going to create a text file and write a line on it.

Type:
[fd, err] = mopen('/home/your name/test.txt', 'wt' );
mputl('Line text for test purposes', fd);


Note that if we have finished working with the file that we created, we have to close it using the mclose command. Later in this tutorial we try mclose command syntax.
mclose (fd);

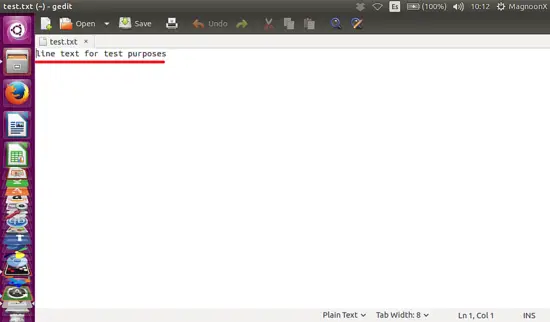
Then we can search for the file in the directory:


Open the file:


This is useful if we are going to retrieve data from an external source, just like a data acquisition interface. We can load data from a txt file and then use this for processing.

Closing Files. mclose command.

Mclose must be used to close a file opened by mopen. If fd is omitted mclose closes the last opend file. mclose('all') closes all files opened by file('open',..) or mopen. Be careful with this use of mclose because when it is used inside a Scilab script file, it also closes the script and Scilab will not execute commands written after mclose('all').

Reading and using a text file content.

Sometimes we need to read and use the content of a txt file, either for reasons of data acquisition or for word processing. For reading purposes, we will use the command mgetl.

The Command mgetl

The command mgetl reads a line or lines from a txt file.

Syntax

txt=mgetl(file_desc [,m])

Arguments


file_desc: A character string giving the file name or a logical unit returned by mopen.

m: An integer scalar. The number of lines to read. The default value is -1.

txt: A column vector of string.

Examples using mgetl

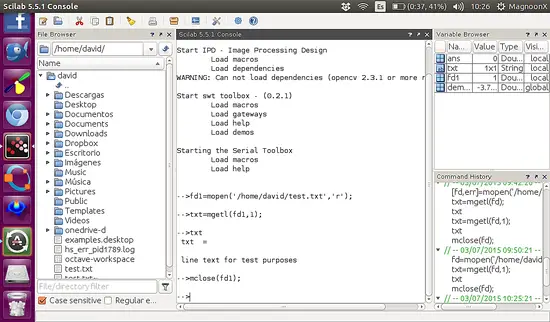
With the file created before we can type:
>fd=mopen(/home/david/test.txt', 'r')
>txt=mgetl(fd,1);
>txt
>mclose(fd);

Note: We used the argument 'r' because we only need to read the file. A file cannot be opened for reading and writing at the same time. We set the argument 1 in mgetl for reading the first line only and don´t forget to close the file with mclose. The content of the first line is stored in a 'txt' string type variable.


There are many advanced commands that will be treated in further tutorials.

References

  1. Scilab Help Online, "https://help.scilab.org/". Retrieved at 06/30/2015.

Monday, July 27, 2015

How to enable logging in Open vSwitch for debugging and troubleshooting

http://ask.xmodulo.com/enable-logging-open-vswitch.html

Question: I am trying to troubleshoot my Open vSwitch deployment. For that I would like to inspect its debug messages generated by its built-in logging mechanism. How can I enable logging in Open vSwitch, and change its logging level (e.g., to INFO/DEBUG level) to check more detailed debug information? Open vSwitch (OVS) is the most popular open-source implementation of virtual switch on the Linux platform. As the today's data centers increasingly rely on the software-defined network (SDN) architecture, OVS is fastly adopted as the de-facto standard network element in data center's SDN deployments.
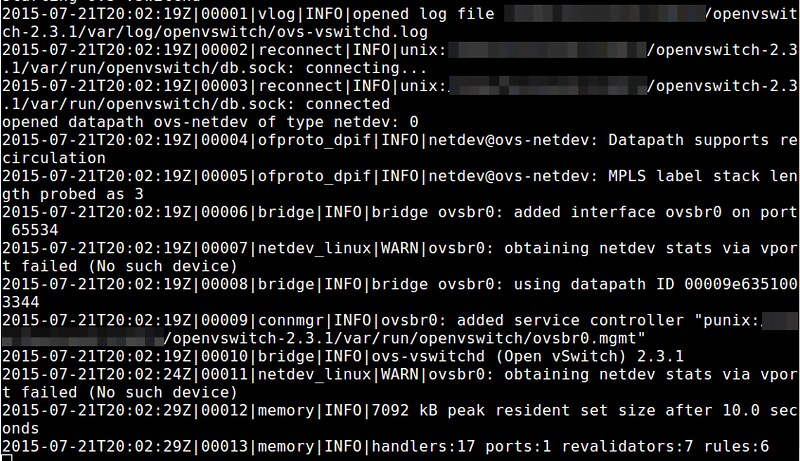
Open vSwitch has a built-in logging mechanism called VLOG. The VLOG facility allows one to enable and customize logging within various components of the switch. The logging information generated by VLOG can be sent to a combination of console, syslog and a separate log file for inspection. You can configure OVS logging dynamically at run-time with a command-line tool called ovs-appctl.

Here is how to enable logging and customize logging levels in Open vSwitch with ovs-appctl.
The syntax of ovs-appctl to customize VLOG is as follows.
$ sudo ovs-appctl vlog/set module[:facility[:level]]
  • Module: name of any valid component in OVS (e.g., netdev, ofproto, dpif, vswitchd, and many others)
  • Facility: destination of logging information (must be: console, syslog or file)
  • Level: verbosity of logging (must be: emer, err, warn, info, or dbg)
In OVS source code, module name is defined in each source file in the form of:
1
VLOG_DEFINE_THIS_MODULE();
For example, in lib/netdev.c, you will see:
1
VLOG_DEFINE_THIS_MODULE(netdev);
which indicates that lib/netdev.c is part of netdev module. Any logging messages generated in lib/netdev.c will belong to netdev module.
Depending on severity, several different kinds of logging messages are used in OVS source code: VLOG_INFO() for informational, VLOG_WARN() for warning, VLOG_ERR() for error, VLOG_DBG() for debugging, VLOG_EMERG for emergency. Logging level and facility determine which logging messages are sent to where.
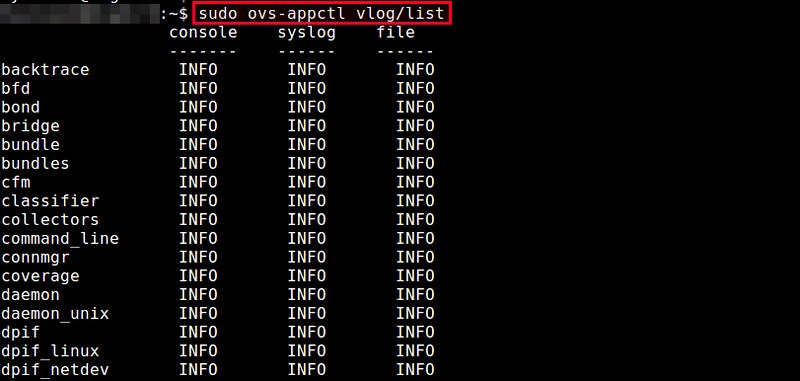
To see a full list of available modules, facilities, and their respective logging levels, run the following commands. This command must be invoked after you have started OVS.
$ sudo ovs-appctl vlog/list

The output shows the debug levels of each module for three different facilities (console, syslog, file). By default, all modules have their logging level set to INFO.
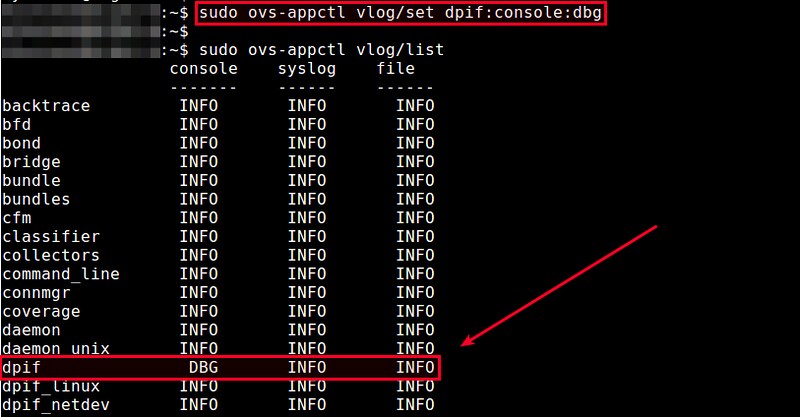
Given any one OVS module, you can selectively change the debug level of any particular facility. For example, if you want to see more detailed debug messages of dpif module at the console screen, run the following command.
$ sudo ovs-appctl vlog/set dpif:console:dbg
You will see that dpif module's console facility has changed its logging level to DBG. The logging level of two other facilities, syslog and file, remains unchanged.

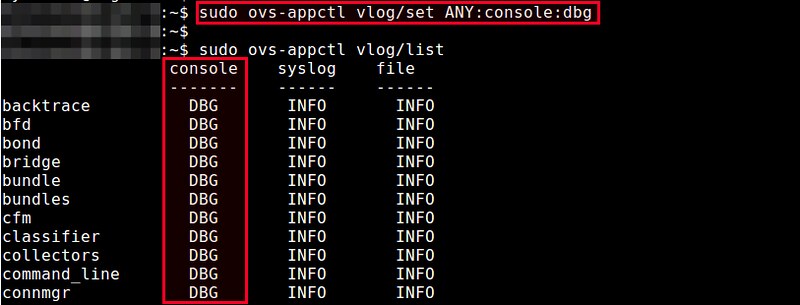
If you want to change the logging level for all modules, you can specify "ANY" as the module name. For example, the following command will change the console logging level of every module to DBG.
$ sudo ovs-appctl vlog/set ANY:console:dbg

Also, if you want to change the logging level of all three facilities at once, you can specify "ANY" as the facility name. For example, the following command will change the logging level of all facilities for every module to DBG.
$ sudo ovs-appctl vlog/set ANY:ANY:dbg

How to run DOS applications in Linux

https://www.howtoforge.com/tutorial/run-dos-application-in-linux

Chances are that most of you reading along those lines have started your “adventure” in computers through DOS. Although this long deprecated operating system is only running in our memories anymore, it will always hold a special place in our hearts. That said, some of you may still want to drink a sip of nostalgia or show your kids what old days were like by running some MS-DOS applications on your Linux distribution. The good news is, you can do it without much effort!
For this tutorial, I will be using a DOS game I was playing when I was a little kid called “UFO Enemy Unknown”. This was the first ever squad turn-based strategy game released by Microprose a bit over twenty years ago. A remake of the game was realized by Firaxis in 2012, clearly highlighting the success of the original title.

Wine

Since DOS executables are .exe files, it would be natural to think that you could run them with wine, but unfortunately you can't. The reason is stated as “DOS memory range unavailability”.
What this means is that the Linux kernel forbids any programs (including wine) from executing 16-bit applications and thus accessing the first 64k of kernel memory. It's a security feature and it won't change, so the terminal prompt to use DOSBox can be the first alternative option.

DOSBox

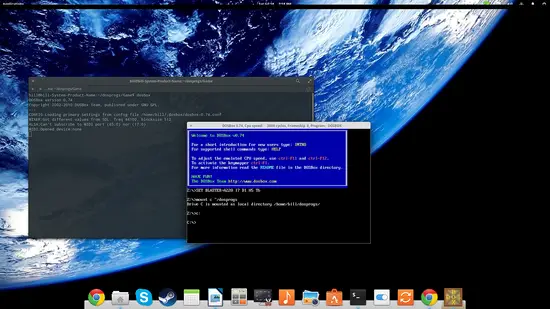
Install DOSBox from your Software Center and then open your file manager and make sure that you create a folder named “dosprogs” located in your home directory. Copy the game files inside this folder and then open dosbox by typing “dosbox” in a terminal. Now what we need to do is to mount the “dosprogs” folder into dosbox. To do this type mount c ~/dosprogs and press enter on the DOSBox console. Then type c: to enter the newly mounted disk as shown in the following screenshot.
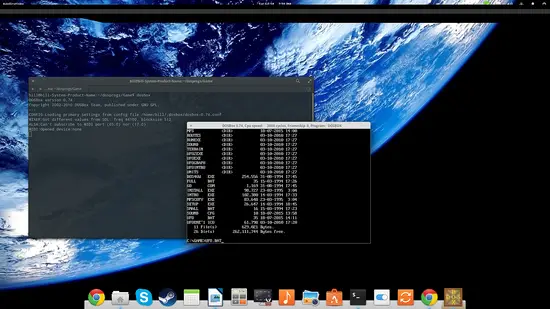
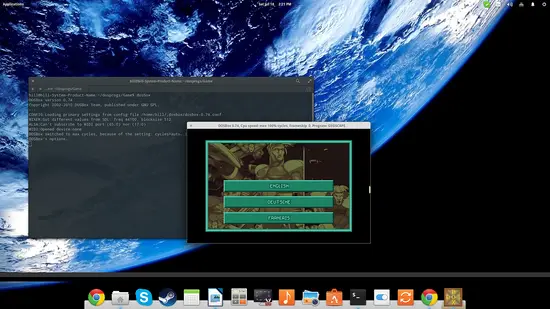
You may then navigate the disk folders by using the “cd” command combined with the “dir” until you locate the game executable. For example, type “cd GAME” to enter the GAME folder and then type “dir” and press enter to see what the folder GAME contains. If the file list is too long to see in a screen, you may also give the “dir /w/p” command a try. In my case, the executable is UFO.bat and so I can run it by typing its name (with the extension) and pressing enter.

DOSemu

Another application that allows you to run DOS executables under Linux is DOS Emulator (also available in the Software Center). It is more straight forward in regards to the mounted partitions as you simply type “D:” and enter on the console interface to access your home directory. From there you can navigate to the folder that contains the DOS executable and run it in the same way we did in DOSBox. The thing is though that while DOSemu is simpler to use, it may not run flawlessly as I found through my testing. You can always give it a try though and see how it goes.

Bash: Find out the exit codes of all piped commands

http://www.cyberciti.biz/faq/unix-linux-bash-find-out-the-exit-codes-of-all-piped-commands

How do I get exit status of process that's piped to another (for e.g. 'netstat -tulpn | grep nginx') on a Linux or Unix-like system using a bash shell?

A shell pipe is a way to connect the output of one program to the input of another program without any temporary file. The syntax is:
Tutorial details
DifficultyEasy (rss)
Root privilegesNo
RequirementsNone
Estimated completion time2m
command1 | command2 | commandN
OR
command1 | filter_data_command > output
OR
get_data_command | verify_data_command | process_data_command | format_data_command > output.data.file

How to use pipes to connect programs

Use the vertical bar (|) between two commands. In this example, send netstat command output to grep command i.e. find out if nginx process exits or not in the system:
# netstat -tulpn | grep nginx
Sample outputs:
Fig.01: Find the exit status of pipe command

How to get exit status of process that's piped to another

The syntax is:
command1 | command2
echo "${PIPESTATUS[@]}"
OR
command1 | command2
echo "${PIPESTATUS[0]} ${PIPESTATUS[1]}"
PIPESTATUS is an array variable containing a list of exit status values from the processes in the most-recently-executed foreground pipeline. Try the following commands:
 
netstat -tulpn | grep nginx
echo "${PIPESTATUS[@]}"
 
true | true
echo "The exit status of first command ${PIPESTATUS[0]}, and the second command ${PIPESTATUS[1]}"
 
true | false
echo "The exit status of first command ${PIPESTATUS[0]}, and the second command ${PIPESTATUS[1]}"
 
false | false | true
echo "The exit status of first command ${PIPESTATUS[0]}, second command ${PIPESTATUS[1]}, and third command ${PIPESTATUS[2]}"
 
Sample outputs:
Fig.02: Use the PIPESTATUS array variable to get the exit status of each element of the pipeline
Fig.02: Use the PIPESTATUS array to get the exit status of each element of the pipeline (click to enlarge)

Putting it all together

Here is a sample script that use ${PIPESTATUS[0]} to find out the exit status of mysqldump command in order to notify user on screen about database backup status:
#!/bin/bash
### Purpose: mysql.backup.sh : Backup database ###
### Author: Vivek Gite , under GPL v2.x+ or above. ###
### Change as per your needs ###
MUSER='USERNAME-here'
MPASS='PASSWORD-here'
MHOST='10.0.3.100'
DEST="/nfs42/backups/mysql"
NOWFORMAT="%m_%d_%Y_%H_%M_%S%P"
MYSQL="/usr/bin/mysql"
MYSQLDUMP="/usr/bin/mysqldump"
MKDIR="/bin/mkdir"
RM="/bin/rm"
GZIP="/bin/gzip"
DATE="/bin/date"
SED="/bin/sed"
 
# Failsafe? Create dir #
[  ! -d "$DEST" ] && $MKDIR -p "$DEST"
 
# Filter db names
DBS="$($MYSQL -u $MUSER -h $MHOST -p$MPASS -Bse 'show databases')"
DBS="$($SED -e 's/performance_schema//' -e 's/information_schema//' <<<$DBS)"
 
 # Okay, let us go
 for db in $DBS
 do
                 tTime=$(date +"${NOWFORMAT}")
                 FILE="$DEST/${db}.${tTime}.gz"
                 $MYSQLDUMP -u $MUSER -h $MHOST -p$MPASS $db | $GZIP -9 > $FILE
    if [ ${PIPESTATUS[0]} -ne "0" ];
    then
        echo "The command $MYSQLDUMP failed with error code ${PIPESTATUS[0]}."
        exit 1
    else
        echo "Database $db dump successfully."
    fi
done
 

A note about zsh user

Use the array called pipestatus as follows:
 
true | true
echo "${pipestatus[1]} ${pipestatus[2]}"
 
Outputs:
0 0

Tuesday, July 21, 2015

Sharing Admin Privileges for Many Hosts Securely

http://www.linuxjournal.com/content/sharing-admin-privileges-many-hosts-securely

The problem: you have a large team of admins, with a substantial turnover rate. Maybe contractors come and go. Maybe you have tiers of access, due to restrictions based on geography, admin level or even citizenship (as with some US government contracts). You need to give these people administrative access to dozens (perhaps hundreds) of hosts, and you can't manage all their accounts on all the hosts.
This problem arose in the large-scale enterprise in which I work, and our team worked out a solution that:
  • Does not require updating accounts on more than one host whenever a team member arrives or leaves.
  • Does not require deletion or replacement of Secure Shell (SSH) keys.
  • Does not require management of individual SSH keys.
  • Does not require distributed sudoers or other privileged-access management tools (which may not be supported by some Linux-based appliances anyway).
  • And most important, does not require sharing of passwords or key passphrases.
It works between any UNIX or Linux platforms that understand SSH key trust relationships. I personally have made use of it on a half-dozen different Linux distros, as well as Solaris, HP-UX, Mac OS X and some BSD variants.
In our case, the hosts to be managed were several dozen Linux-based special-purpose appliances that did not support central account management tools or sudo. They are intended to be used (when using the shell at all) as the root account.
Our environment also (due to a government contract) requires a two-tier access scheme. US citizens on the team may access any host as root. Non-US citizens may access only a subset of the hosts. The techniques described in this article may be extended for N tiers without any real trouble, but I describe the case N == 2 in this article.

The Scenario

I am going to assume you, the reader, know how to set up an SSH trust relationship so that an account on one host can log in directly, with no password prompting, to an account on another. (Basically, you simply create a key pair and copy the public half to the remote host's ~/.ssh/authorized_keys file.) If you don't know how to do this, stop reading now and go learn. A Web search for "ssh trust setup" will yield thousands of links—or, if you're old-school, the AUTHENTICATION section of the ssh(1) man page will do. Also see ssh-copy-id(1), which can greatly simplify the distribution of key files.
Steve Friedl's Web site has an excellent Tech Tip on these basics, plus some material on SSH agent-forwarding, which is a neat trick to centralize SSH authentication for an individual user. The Tech Tip is available at http://www.unixwiz.net/techtips/ssh-agent-forwarding.html.
I describe key-caching below, as it is not very commonly used and is the heart of the technique described herein.
For illustration, I'm assigning names to players (individuals assigned to roles), the tiers of access and "dummy" accounts.
Hosts:
  • darter — the hostname of the central management host on which all the end-user and utility accounts are active, all keys are stored and caching takes place; also, the sudoers file controlling access to utility accounts is here.
  • n1, n2, ... — hostnames of target hosts for which access is to be granted for all team members ("n" for "non-special").
  • s1, s2, ... — hostnames of target hosts for which access is to be granted only to some team members ("s" for "special").
Accounts (on darter only):
  • univ — the name of the utility account holding the SSH keys that all target hosts (u1, u2, ...) will trust.
  • spec — the name of the utility account holding the SSH keys that only special, restricted-access, hosts (s1, s2, ...) will trust.
  • joe — let's say the name of the guy administering the whole scheme is "Joe" and his account is "joe". Joe is a trusted admin with "the keys to the kingdom"—he cannot be a restricted user.
  • andy, amy — these are users who are allowed to log in to all hosts.
  • alice
  • ned, nora — these are users who are allowed to log in only to "n" (non-special) hosts; they never should be allowed to log in to special hosts s1, s2, ...
  • nancy
You will want to create shared, unprivileged utility accounts on darter for use by unrestricted and restricted admins. These (per our convention) will be called "univ" and "rstr", respectively. No one should actually directly log in to univ and rstr, and in fact, these accounts should not have passwords or trusted keys of their own. All logins to the shared utility accounts should be performed with su(1) from an existing individual account on darter.

The Setup

Joe's first act is to log in to darter and "become" the univ account:

$ sudo su - univ
Then, under that shared utility account, Joe creates a .ssh directory and an SSH keypair. This key will be trusted by the root account on every target host (because it's the "univ"-ersal key):

$ mkdir .ssh    # if not already present
$ ssh-keygen -t rsa -b 2048 -C "universal access 
 ↪key gen YYYYMMDD" -f
.ssh/univ_key
   Enter passphrase (empty for no passphrase):
Very important: Joe assigns a strong passphrase to this key. The passphrase to this key will not be generally shared.
(The field after -C is merely a comment; this format reflects my personal preference, but you are of course free to develop your own.)
This will generate two files in .ssh: univ_key (the private key file) and univ_key.pub (the public key file). The private key file is encrypted, protected by the very strong passphrase Joe assigned to it, above.
Joe logs out of the univ account and into rstr. He executes the same steps, but creates a keypair named rstr_key instead of univ_key. He assigns a strong passphrase to the private key file—it can be the same passphrase as assigned to univ, and in fact, that is probably preferable from the standpoint of simplicity.
Joe copies univ_key.pub and rstr_key.pub to a common location for convenience.
For every host to which access is granted for everyone (n1, n2, ...), Joe uses the target hosts' root credentials to copy both univ_key.pub and rstr_key.pub (on separate lines) to the file .ssh/authorized_keys under the root account directory.
For every host to which access is granted for only a few (s1, s2, ...), Joe uses the target hosts' root credentials to copy only rstr_key.pub (on a single line) to the file .ssh/authorized_keys under the root account directory.
So to review, now, when a user uses su to "become" the univ account, he or she can log in to any host, because univ_key.pub exists in the authorized_keys file of n1, n2, ... and s1, s2, ....
However, when a user uses su to "become" the rstr account, he or she can log in only to n1, n2, ..., because those hosts' authorized_keys files contain rstr_key.pub, but not univ_key.pub.
Of course, in order to unlock the access in both cases, the user will need the strong passphrase with which Joe created the keys. That seems to defeat the whole purpose of the scheme, but there's a trick to get around it.

The Trick

First, let's talk about key-caching. Any user who uses SSH keys whose key files are protected by a passphrase may cache those keys using a program called ssh-agent. ssh-agent does not take a key directly upon invocation. It is invoked as a standalone program without any parameters (at least, none useful to us here).
The output of ssh-agent is a couple environment variable/value pairs, plus an echo command, suitable for input to the shell. If you invoke it "straight", these variables will not become part of the environment. For this reason, ssh-agent always is invoked as a parameter of the shell built-in eval:

$ eval $(ssh-agent)
Agent pid 29013
(The output of eval also includes an echo statement to show you the PID of the agent instance you just created.)
Once you have an agent running, and your shell knows how to communicate with it (thanks to the environment variables), you may cache keys with it using the command ssh-add. If you give ssh-add a key file, it will prompt you for the passphrase. Once you provide the correct passphrase, ssh-agent will hold the unencrypted key in memory. Any invocation of SSH will check with ssh-agent before attempting authentication. If the key in memory matches the public key on the remote host, trust is established, and the login simply happens with no entry of passwords or passphrases.
(As an aside: for those of you who use the Windows terminal program PuTTY, that tool provides a key-caching program called Pageant, which performs much the same function. PuTTY's equivalent to ssh-keygen is a utility called PuTTYgen.)
All you need to do now is set it up so the univ and rstr accounts set themselves up on every login to make use of persistent instances of ssh-agent. Normally, a user manually invokes ssh-agent upon login, makes use of it during that session, then kills it, with eval $(ssh-agent -k), before exiting. Instead of manually managing it, let's write into each utility account's .bash_profile some code that does the following:
  1. First, check whether there is a current instance of ssh-agent for the current account.
  2. If not, invoke ssh-agent and capture the environment variables in a special file in /tmp. (It should be in /tmp because the contents of /tmp are cleared between system reboots, which is important for managing cached keys.)
  3. If so, find the file in /tmp that holds the environment variables and source it into the shell's environment. (Also, handle the error case where the agent is running and the /tmp file is not found by killing ssh-agent and starting from scratch.)
All of the above assumes the key already has been unlocked and cached. (I will come back to that.)
Here is what the code in .bash_profile looks like for the univ account:

/usr/bin/pgrep -u univ 'ssh-agent' >/dev/null

RESULT=$?

if [[ $RESULT -eq 0 ]]  # ssh-agent is running
then
    if [[ -f /tmp/.env_ssh.univ ]]   # bring env in to session
    then
        source /tmp/.env_ssh.univ
    else    # error condition
        echo 'WARNING:  univ ssh agent running, no environment 
         ↪file found'
        echo '          ssh-agent being killed and restarted ... '
        /usr/bin/pkill -u univ 'ssh-agent' >/dev/null
        RESULT=1     # due to kill, execute startup code below
    fi

if [[ $RESULT -ne 0 ]] # ssh-agent not running, start 
 ↪it from scratch
then
    echo "WARNING:  ssh-agent being started now; 
     ↪ask Joe to cache key"
    /usr/bin/ssh-agent > /tmp/.env_ssh.univ
    /bin/chmod 600 /tmp/.env_ssh.univ
    source /tmp/.env_ssh.univ
fi
And of course, the code is identical for the rstr account, except s/univ/rstr/ everywhere.
Joe will have to intervene once whenever darter (the central management host on which all the user accounts and the keys reside) is restarted. Joe will have to log on and become univ and execute the command:

$ ssh-add ~/.ssh/univ_key
and then enter the passphrase. Joe then logs in to the rstr account and executes the same command against ~/.ssh/rstr_key. The command ssh-add -l lists cached keys by their fingerprints and filenames, so if there is doubt about whether a key is cached, that's how to find out. A single agent can cache multiple keys, if you have a use for that, but it doesn't come up much in my environment.
Once the keys are cached, they will stay cached. (ssh-add -t may be used to specify a timeout of N seconds, but you won't want to use that option for this shared-access scheme.) The cache must be rebuilt for each account whenever darter is rebooted, but since darter is a Linux host, that will be a rare event. Between reboots, the single instance (one per utility account) of ssh-agent simply runs and holds the key in memory. The last time I entered the passphrases of our utility account keys was more than 500 days ago—and I may go several hundred more before having to do so again.
The last step is setting up sudoers to manage access to the utility accounts. You don't really have to do this. If you like, you can set (different) passwords for univ and rstr and simply let the users hold them. Of course, shared passwords aren't a great idea to begin with. (That's one of the major points of this whole scheme!) Every time one of the users of the univ account leaves the team, you'll have to change that password and distribute the new one (hopefully securely and out-of-band) to all the remaining users.
No, managing access with sudoers is a better idea. This article isn't here to teach you all of—or any of—the ins and outs of sudoers' Extremely Bizarre Nonsensical Frustration (EBNF) syntax. I'll just give you the cheat code.
Recall that Andy, Amy, Alice and so on were all allowed to access all hosts. These users are permitted to use sudo to execute the su - univ command. Ned, Nora, Nancy and so on are permitted to access only the restricted list of hosts. They may log in only to the rstr account using the su - rstr command. The sudoers entries for these might look like:

User_Alias  UNIV_USERS=andy,amy,alice,arthur        # trusted
User_Alias  RSTR_USERS=ned,nora,nancy,nyarlathotep  # not so much

# Note that there is no harm in putting andy, amy, etc. into
# RSTR_USERS as well. But it also accomplishes nothing.

Cmnd_Alias  BECOME_UNIV = /bin/su - univ
Cmnd_Alias  BECOME_RSTR = /bin/su - rstr

UNIV_USERS   ALL= BECOME_UNIV
RSTR_USERS   ALL= BECOME_RSTR
Let's recap. Every host n1, n2, n3 and so on has both univ and rstr key files in authorized_keys.
Every host s1, s2, s3 and so on has only the univ key file in authorized_keys.
When darter is rebooted, Joe logs in to both the univ and rstr accounts and executes the ssh-add command with the private key file as a parameter. He enters the passphrase for these keys when prompted.
Now Andy (for example) can log in to darter, execute:

$ sudo su - univ
and authenticate with his password. He now can log in as root to any of n1, n2, ..., s1, s2, ... without further authentication. If Andy needs to check the functioning of ntp (for example) on each of 20 hosts, he can execute a loop:

$ for H in n1 n2 n3 [...] n10 s1 s2 s3 [...] s10
> do
>    ssh -q root@$H 'ntpdate -q timeserver.domain.tld'
> done
and it will run without further intervention.
Similarly, nancy can log in to darter, execute:

$ sudo su - rstr
and log in to any of n1, n2 and so on, execute similar loops, and so forth.

Benefits and Risks

Suppose Nora leaves the team. You simply would edit sudoers to delete her from RSTR_USERS, then lock or delete her system account.
"But Nora was fired for misconduct! What if she kept a copy of the keypair?"
The beauty of this scheme is that access to the two key files does not matter. Having the public key file isn't important—put the public key file on the Internet if you want. It's public!
Having the encrypted copy of the private key file doesn't matter. Without the passphrase (which only Joe knows), that file may as well be the output of /dev/urandom. Nora never had access to the raw key file—only the caching agent did.
Even if Nora kept a copy of the key files, she cannot use them for access. Removing her access to darter removes her access to every target host.
And the same goes, of course, for the users in UNIV_USERS as well.
There are two caveats to this, and make sure you understand them well.
Caveat the first: it (almost) goes without saying that anyone with root access to darter obviously can just become root, then su - univ at any time. If you give someone root access to darter, you are giving that person full access to all the target hosts as well. That, after all, is the meaning of saying the target hosts "trust" darter. Furthermore, a user with root access who does not know the passphrase to the keys still can recover the raw keys from memory with a little moderately sophisticated black magic. (Linux memory architecture and clever design of the agent prevent non-privileged users from recovering their own agents' memory contents in order to extract keys.)
Caveat the second: obviously, anyone holding the passphrase can make (and keep) an unencrypted copy of the private keys. In our example, only Joe had that passphrase, but in practice, you will want two or three trusted admins to know the passphrase so they can intervene to re-cache the keys after a reboot of darter.
If anyone with root access to your central management host (darter, in this example) or anyone holding private key passphrases should leave the team, you will have to generate new keypairs and replace the contents of authorized_keys on every target host in your enterprise. (Fortunately, if you are careful, you can use the old trust relationship to create the new one.)
For that reason, you will want to entrust the passphrase only to individuals whose positions on your team are at least reasonably stable. The techniques described in this article are probably not suitable for a high-turnover environment with no stable "core" admins.
One more thing about this: you don't need to be managing tiered or any kind of shared access for this basic trick to be useful. As I noted above, the usual way of using an SSH key-caching agent is by invoking it at session start, caching your key, then killing it before ending your session. However, by including the code above in your own .bash_profile, you can create your own file in /tmp, check for it, load it if present and so on. That way, the host always has just one instance of ssh-agent running, and your key is cached in it permanently (or until the next reboot, anyway).
Even if you don't want to cache your key that persistently, you still can make use of a single ssh-agent and cache your key with the timeout (-t) option mentioned earlier; you still will be saving yourself a step.
Note that if you do this, however, anyone with root on that host will have access to any account of yours that trusts your account on that machine— so caveat actor. (I use this trick only on personal boxes that only I administer.)
The trick for personal use is becoming obsolete, as Mac OS X (via SSHKeyChain) and newer versions of GNOME (via Keyring) automatically know the first time you SSH to a host with which you have a key-based authentication set up, then ask you your passphrase and cache the key for the rest of your GUI login session. Given the lack of default timeouts and warnings about root users' access to unlocked keys, I am not sure this is an unmixed technological advance. (It is possible to configure timeouts in both utilities, but it requires that users find out about the option, and take the effort to configure it.)

Acknowledgements

I gratefully acknowledge the technical review and helpful suggestions of David Scheidt and James Richmond in the preparation of this article.
Thursday, July 16, 2015

An Illustrated Guide to SSH Agent Forwarding

http://www.unixwiz.net/techtips/ssh-agent-forwarding.html

The Secure Shell is widely used to provide secure access to remote systems, and everybody who uses it is familiar with routine password access. This is the easiest to set up, is available by default, but suffers from a number of limitations. These include both security and usability issues, and we hope to cover them here.
In this paper, we'll present the various forms of authentication available to the Secure Shell user and contrast the security and usability tradeoffs of each. Then we'll add the extra functionality of agent key forwarding, we hope to make the case that using ssh public key access is a substantial win.
Note - This is not a tutorial on setup or configuration of Secure Shell, but is an overview of technology which underlies this system. We do, however, provide some pointers to information on several packages which may guide the user in the setup process.

Ordinary Password Authentication

SSH supports access with a username and password, and this is little more than an encrypted telnet. Access is, in fact, just like telnet, with the normal username/password exchange.
We'll note that this exchange, and all others in this paper, assume that an initial exchange of host keys has been completed successfully. Though an important part of session security, host validation is not material to the discussion of agent key forwarding.
All examples start from a user on homepc (perhaps a Windows workstation) connecting with PuTTY to a server running OpenSSH. The particular details (program names, mainly) vary from implementation to implementation, but the underlying protocol has been proven to be highly interoperable.
1 The user makes an initial TCP connection and sends a username. We'll note that unlike telnet, where the username is prompted as part of the connected data stream (with no semantic meaning understood by telnet itself), the username exchange is part of the ssh protocol itself. sends username
2 The ssh daemon on the server responds with a demand for a password, and access to the system has not yet been granted in any way. password prompt
3 The ssh client prompts the user for a password, which is relayed through the encrypted connection to the server where it is compared against the local user base. sends password
4 If the user's password matches the local credential, access to the system is granted and a two-way communications path is established, usually to a login shell. access granted
The main advantage of allowing password authentication is that it's simple to set up — usually the default — and is easy to understand. Systems which require access for many users from many varying locations often permit password auth simply to reduce the administrative burden and to maximize access.
Password Authentication
Pro: easy to set up
Con: allows brute-force password guessing
Con: requires password entry every time
The substantial downside is that by allowing a user to enter a password, it means anybody is allowed to enter a password. This opens the door to wholesale password guessing by users or bots alike, and this has been an increasingly common method of system compromise.
Unlike prior-generation ssh worms, which attempted just a few very common passwords with common usernames, modern badware has a very extensive dictionary of both usernames and passwords and has proven to be most effective in penetrating even systems with "good" passwords. Only one compromised account is required to gain entry to a system.
But even putting security issues aside, the other downside of password authentication is that passwords must be remembered and entered separately upon every login. For users with just one system to access, this may not be such a burden, but users connecting to many systems throughout the day may find repeated password entry tedious.
And having to remember a different password for every system is not conducive to choosing strong passwords.

Public Key Access

Note - older versions of OpenSSH stored the v2 keys in authorized_keys2 to distinguish them from v1 keys, but newer versions use either file.
To counteract the shortcomings of password authentication, ssh supports public key access. A user creates a pair of public and private keys, and installs the public key in his $HOME/.ssh/authorized_keys file on the target server. This is nonsensitive information which need not be guarded, but the other half — the private key — is protected on the local machine by a (hopefully) strong passphrase.
A public key is a long string of bits encoded in ASCII, and it's stored on one long line (though represented here on three continued lines for readability). It includes a type (ssh-rsa, or others), the key itself, and a comment:
$HOME/.ssh/authorized_keys
ssh-rsa AzAAB3NzaC1yc2EaaaabiWaaaieaX9AyNR7xWnW0eI3x2NGXrJ4gkQpK/EqpkveGCvvbM \
  oH84zqu3Us8jSaQD392JZAEAhGSoe0dWMBFm9Y41VGZYmncwkfTQPFH1P07vDw49aTAa2RJNFyV \
  QANZCbSocDeuT0Q7usuUj/v8h27+PqsUUl9XVQSDIhXBkWV+bJawc1c= Steve's key
This key must be installed on the target system — one time — where it is used for subsequent remote access by the holder of the private key.
1 The user makes an initial connection and sends a username along with a request to use a key. Sends username and key setup request
2 The ssh daemon on the server looks in the user's authorized_keys file, constructs a challenge based on the public key found there, and sends this challenge back to the user's ssh client. server sends key challenge
3 The ssh client receives the key challenge. It finds the user's private key on the local system, but it's protected by an encrypting passphrase. An RSA key file is named id_rsa on OpenSSH and SecureCRT, keyname.ppk on PuTTY. Other types of keys (DSA, for instance) have similar name formats. client looks up private key file
4 The user is prompted for the passphrase to unlock the private key. This example is from PuTTY. client prompts for private key passphrase
5 ssh uses the private key to construct a key response, and sends it to the waiting sshd on the other end of the connection. It does not send the private key itself! client sends key response
6 sshd validates the key response, and if valid, grants access to the system. access granted
This process involves more steps behind the scenes, but the user experience is mostly the same: you're prompted for a passphrase rather than a password. But, unlike setting up access to multiple computer systems (each of which may have a different password), using public key access means you type the same passphrase no matter which system you're connecting to.
Public Key Authentication
Pro: public keys cannot be easily brute-forced
Pro: the same private key (with passphrase) can be used to access multiple systems: no need to remember many passwords
Con: requires one-time setup of public key on target system
Con: requires unlocking private key with secret passphrase upon each connection
This has a substantial, but non-obvious, security benefit: since you're now responsible for just one secret phrase instead of many passwords, you type it more often. This makes you more likely to remember it, and therefore pick a stronger passphrase to protect the private key than you otherwise might.
Trying to remember many separate passwords for different remote systems is difficult, and does not lend itself to picking strong ones. Public key access solves this problem entirely.
We'll note that though public-key accounts can't generally be cracked remotely, the mere installation of a public key on a target system does not disable the use of passwords systemwide. Instead, the server must be explicitly configured to allow only public key encryption by the use of the PasswordAuthentication no keywords in the sshd_config file.

Public Key Access with Agent support

Now that we've taken the leap into public key access, we'll take the next step to enable agent support. In the previous section, the user's private key was unlocked at every connection request: this is not functionally different from typing a password, and though it's the same passphrase every time (which makes it habitual), it nevertheless gets tedious in the same manner.
Fortunately, the ssh suite provides a broker known as a "key agent" which can hold and manage private keys on your workstations, and responding to requests from remote systems to verify your keys. Agents provide a tremendous productivity benefit, because once you've unlocked your private key (one time when you launch the agent), subsequent access works with the agent without prompting.
This works much like the key access seen previously, but with a twist.
1 The user makes an initial connection and sends a username along with a request to use a key. client sends username and key-setup request
2 The ssh daemon on the server looks [1] in the user's authorized_keys file, constructs a challenge based on the key, and sends it [2] back to the user's ssh client. server sends key challenge
3 The ssh client receives the key challenge, and forwards it to the waiting agent. The agent, rather than ssh itself, opens the user's private key and discovers that it's protected by a passphrase. client passes request to agent
4 The user is prompted for the passphrase to unlock the private key. This example shows the prompt from PuTTY's pageant. agent prompting for passphrase
5 The agent constructs the key response and hands it back [1] to the ssh process, which sends it off [2] to the sshd waiting on the other end. Unlike the previous example, ssh never sees the private key directly, only the key response. agent sends response to client, forwards to server
6 sshd validates the key response, and if valid, grants access to the system. Note: the agent still retains the private keys in memory, though it's not participating in the ongoing conversation. access granted
As far as the user is concerned, this first exchange is little different from key access shown in the previous section: the only difference is which program prompts for the private key (ssh itself versus the agent).
But where agent support shines is at the next connection request made while the agent is still resident. Since it remembers the private keys from the first time it was unlocked with the passphrase, it's able to respond to the key challenge immediately without prompting. The user sees an immediate, direct login without having to type anything.
Public Key with Agent
Pro: Requires unlocking of the private key only once
Pro: Facilitates scripted remote operation to multiple systems
Con: One-time cost to set up the agent
Con: Requires private key on remote client machines if they're to make further outbound connections
Many users only unlock their private keys once in the morning when they launch their ssh client and agent, and they don't have to enter it again for the rest of the day because the resident agent is handling all the key challenges. It's wonderfully convenient, as well as secure.
It's very important to understand that private keys never leave the agent: instead, the clients ask the agent to perform a computation based on the key, and it's done in a way which allows the agent to prove that it has the private key without having to divulge the key itself. We discuss the challenge/response in a later section.
Once agent support is enabled, all prompting has now been bypassed, and one can consider performing scripted updates of remote systems. This contrived example copies a .bashrc login config file to each remote system, then checks for how much disk space is used (via the df command):
# scripted update of several remote systems

for svr in server1 server2 server3 server4
do
 scp .bashrc $svr:~/   # copy up new .bashrc
 ssh $svr df           # ask about disk space
done
Without agent support, each server would require two prompts (first for the copy, then for the remote command execution). With agent support, there is no prompting at all.
However, these benefits only accrue to outbound connections made from the local system to ssh servers elsewhere: once logged into a remote server, connecting from there to yet a third server requires either password access, or setting up the user's private key on the intermediate system to pass to the third.
Having agent support on the local system is certainly an improvement, but many of us working remotely often must copy files from one remote system to another. Without installing and initializing an agent on the first remote system, the scp operation will require a password or passphrase every time. In a sense, this just pushes the tedium back one link down the ssh chain.
Fortunately, there's a great solution which solves all these issues.

Public Key Access with Agent Forwarding

With our Key Agent in place, it's time to enable the final piece of our puzzle: agent forwarding. In short, this allows a chain of ssh connections to forward key challenges back to the original agent, obviating the need for passwords or private keys on any intermediate machines.
1 This all starts with an already established connection to the first server, with the agent now holding the user's private key. The second server plays no part yet. established connection to server
2 The user launches the ssh client on the first server with a request to connect to server2, and this passes the username and a use-key request to the ssh daemon (this could likewise be done with the scp secure copy command as well) user on server connects to server2
3 The ssh daemon consults the user's authorized_keys file [1], constructs a key challenge from the key, and sends it [2] back down the channel to the client which made the request. server2 issues key challenge
4 This is where the magic occurs: the ssh client on server receives the key challenge from the target system, and it forwards [1] that challenge to the sshd server on the same machine acting as a key agent.
sshd in turn relays [2] the key challenge down the first connection to the original ssh client. Once back on homepc, the ssh client takes the final step in the relay process by handing the key challenge off [3] to the resident agent, which knows about the user's private key.
key challenge forwarded back to original agent
5 The agent running on homepc constructs the key response and hands it [1] back to the local ssh client, which in turn passes it [2] down the channel to the sshd running on server.
Since sshd is acting as a key agent, it forwards [3] the key response off to the requesting ssh client, which sends it [4] to the waiting sshd on the target system (server2). This forwarding action is all done automatically and near instantly.
agent sends key response back down the chain
6 The ssh daemon on server2 validates the key response, and if valid, grants access to the system. access granted
This process can be repeated with even more links in the chain (say, if the user wanted to ssh from server2 to server3), and it all happens automatically. It supports the full suite of ssh-related programs, such as ssh, scp (secure copy), and sftp (secure FTP-like file transfer).
Agent Forwarding
Pro: Exceptional convenience
Con: Requires installation of public keys on all target systems
Con: Requires a Tech Tip to understand
Pro: An excellent Tech Tip is available :-)
This does require the one-time installation of the user's public — not private! — keys on all the target machines, but this setup cost is rapidly recouped by the added productivity provided. Those using public keys with agent forwarding rarely go back.

How Key Challenges Work

key challenge generation One of the more clever aspects of the agent is how it can verify a user's identity (or more precisely, possession of a private key) without revealing that private key to anybody. This, like so many other things in modern secure communications, uses public key encryption.
When a user wishes access to an ssh server, he presents his username to the server with a request to set up a key session. This username helps locate the list of public keys allowed access to that server: typically it's found in the $HOME/.ssh/authorized_keys file.
The server creates a "challenge" which can only be answered by one in possession of the corresponding private key: it creates and remembers a large random number, then encrypts it with the user's public key. This creates a buffer of binary data which is sent to the user requesting access. To anybody without the private key, it's just a pile of bits.

key response generation When the agent receives the challenge, it decrypts it with the private key. If this key is the "other half" of the public key on the server, the decryption will be successful, revealing the original random number generated by the server. Only the holder of the private key could ever extract this random number, so this constitutes proof that the user is the holder of the private key.
The agent takes this random number, appends the SSH session ID (which varies from connection to connection), and creates an MD5 hash value of the resultant string: this result is sent back to the server as the key response.
The server computes the same MD5 hash (random number + session ID) and compares it with the key response from the agent: if they match, the user must have been in possession of the private key, and access is granted. If not, the next key in the list (of any) is tried in succession until a valid key is found, or no more authorized keys are available. At that point, access is denied.
Curiously, the actual random number is never exposed in the client/agent exchange - it's sent encrypted to the agent, and included in an MD5 hash from the agent. It's likely that this is a security precaution designed to make it harder to characterize the properties of the random number generator on the server by looking at the the client/agent exchange.
More information on MD5 hashes can be found in An Illustrated Guide to Cryptographic Hashes, also on this server.

Security Issues With Key Agents

Caution! One of the security benefits of agent forwarding is that the user's private key never appears on remote systems or on the wire, even in encrypted form. But the same agent protocol which shields the private key may nevertheless expose a different vulnerability: agent hijacking.
Each ssh implementation has to provide a mechanism for clients to request agent services, and on UNIX/Linux this is typically done with a UNIX domain socket stored under the /tmp/ directory. On our Linux system running OpenSSH, for instance, we find the file /tmp/ssh-CXkd6094/agent.6094 associated with the SSH daemon servicing a SecureCRT remote client.
This socket file is as heavily protected as the operating system allows (restricted to just the user running the process, kept in a protected subdirectory), but nothing can really prevent a root user from accessing any file anywhere.
If a root user is able to convince his ssh client to use another user's agent, root can impersonate that user on any remote system which authorizes the victim user's public key. Of course, root can do this on the local system as well, but he can do this directly anyway without having to resort to ssh tricks.
Several environment variables are used to point a client to an agent, but only SSH_AUTH_SOCK is required in order to use agent forwarding. Setting this variable to a victim's agent socket allows full use of that socket if the underlying file is readable. For root, it always is.
# ls -l /tmp/ssh*      — look for somebody's agent socket
/tmp/ssh-CXkd6094:
total 24
srwxr-xr-x    1 steve    steve           0 Aug 30 08:46 agent.6094=

# export SSH_AUTH_SOCK=/tmp/ssh-CXkd6094/agent.6094

# ssh steve@remotesystem

remote$                  — Gotcha! Logged in as "steve" user on remote system!
One cannot tell just from looking at the socket information which remote systems will accept the user's key, but it doesn't take too much detective work to track it down. Running the ps command periodically on the local system may show the user running ssh remotesystem, and the netstat command may well point to the user's home base.
Furthermore, the user's $HOME/.ssh/known_hosts file contains a list of machines which the user has a connection: though they may not all be configured to trust the user's key, it's certainly a great place to start looking. Modern versions (4.0 and later) of OpenSSH can optionally hash the known_hosts file to forestall this.
There is no technical method which will prevent a root user from hijacking an SSH agent socket if he has the ability to access it, so this suggests that agent forwarding might not be such a good idea when the remote system cannot be entirely trusted. All ssh clients provide a method to disable agent forwarding.

Additional Resources

Up to this point, we've provided essentially no practical how-to information on how to install or configure any particular SSH implementation. Our feeling is that this information is covered better elsewhere, and we're happy to provide some links here to those other resources.
O'Reilly SSH book cover The Secure Shell: The Definitive Guide, 2 Ed (O'Reilly & Associates).
This is clearly the standout book in its class: it covers Secure Shell from A to Z, including many popular implementations. There is no better comprehensive source for nearly all aspects of Secure Shell Usage. A worthy addition to any bookshelf.
PuTTY
This is a very popular Open Source ssh client for Windows, and it's notable for its economy (it will easily fit on a floppy disk). The next resource provides extensive configuration guidance.
Unixwiz.net Tech Tip: Secure Linux/UNIX access with PuTTY and OpenSSH
This is one of our own Tech Tips which is a hands on guide to configurating the excellent open source PuTTY client for Windows. Particular coverage was given to public key generation and usage, with plenty of screenshots to guide the way.
Unixwiz.net Tech Tip: Building and configuring OpenSSH
Though this Tech Tip is mainly concerned with configuration of the server on a UNIX/Linux platform, it also provides coverage of the commercial SecureCRT Windows client from VanDyke Software (which we use ourselves). It specifically details key generation and agent forwarding settings, though briefly.
Unixwiz.net Tech Tip: An Illustrated Guide to Cryptographic Hashes
Though not central to using SSH Agent Forwarding, some coverage cryptographic hashes may help understand the key challenge and response mechanism. This Tech Tip provides a good overview of crypto hashes in a similarly-illustrated format.

Smart API integrations with Python and Zato

http://opensource.com/business/15/5/api-integrations-with-python-and-zato


As the number of applications and APIs connected in a cloud-driven world rises dramatically, it becomes a challenge to integrate them in an elegant way that will scale in terms of the clarity of architecture, run-time performance, complexity of processes the systems take part in, and the level of maintenance required to keep integrated environments operational.
Organizations whose applications grow organically with time tend to get entangled in a cobweb of unmanageable dependencies, unidentified requirements, and hidden flows of information that cannot be touched lest seemingly unrelated parts suddenly stop functioning. This can happen to everyone, and is actually to be expected to some extent.
It's natural to think that one can easily manage just a couple of APIs here and there.
It's natural to think that one can easily manage just a couple of APIs here and there .
Yet, what starts out as just a few calls to one system or another has an intriguing characteristic of inevitably turning into a closely coupled network of actors whose further usage or development becomes next to impossible:
A couple of APIs turns into a closely coupled network of actors
This has become particularly evident in the today's always-connected landscape of online APIs that grow in importance on a huge scale.

Introducing IRA services

To deal with demand and introduce order one can look to software such as the Python-based Zato integration platform, released under LGPL and freely available both from GitHub as well as a set of OS-specific packages.
Zato promotes clear separation of systems and APIs being integrated and emphasizes architecting integrations out of IRA services that substitute point-to-point communication.
An IRA service is a piece of functionality running in a distributed and clustered environment with the attributes of being:
  • Interesting
  • Reusable
  • Atomic
This, in fact, is nothing else than the Unix philosophy taken onto a much higher level of composing processes out of applications and APIs rather than individual system programs.
Different settings three decades after the philosophy has been originally postulated yet the principles stay the same—be composable instead of tying everything into a monolith.
While designing software as reusable and atomic building blocks is understood, being interesting may raise an obvious question—what does it mean to be interesting?
The answer is a two-fold question again:
  • Would you truly accept to use such a service yourself each and every day for the next 10 years or more?
  • Can you fully explain the service's purpose to non-technical stakeholders, the people who ultimately sponsor the development, and have them confirm they can clearly understand what values it brings to the equation?
If the stakeholders happen to be technical people, the second question can be reworded—would you be able to explain the service's goal in a single Tweet and have half of your technically-minded followers retweet or favorite it?
Looking at it through a Unix philosophy's perspective and command line tools, this is interesting:
  • Are you OK with using the ls command? Or do you strongly feel it's a spawn of R'lyeh that needs to be replaced as soon as possible?
  • Would you have any issues with explaining what a purpose of the mkdir command is to a person who understands what directories are?
And now, what is not interesting:
  • Would you be happy if all shell commands had, say, combinations of options expressed in digits only, changed weekly and unique to each host? For instance 'ls -21' instead of 'ls -la' but 'ls -975' for 'ls -latrh'? I know, one could get used to everything, but would you truly condone it with a straight face?
  • How would you explain without any shame the very existence of such a version of ls to a newcomer to Linux?
Same goes for integrating APIs and systems—if you follow the IRA principles you'll be asking yourself the same sort of questions. Add reusability and atomicity on top of it and you've got a recipe for a nice approach to connecting otherwise disconnected participants.
Such a service can also be called a microservice.

Implementing IRA services

Now let's suppose there's an application using OpenStack Swift to store information regarding new customers and it all needs to be distributed to various parties. Here's how to approach it while taking IRA into account:
  • Have the producer store everything in Swift containers
  • Use Zato's notifications to periodically download latest sets of data
  • Have Zato distribute the information to intended recipients using given recipient's chosen protocols
All of the IRA postulates are fulfilled here:
  • Producer simply produces output and is not concerned with who really consumes it—if there are more recipients with time, nothing really changes because it's Zato that will know of it, not the producer
  • Likewise, recipients can conveniently assume the fact they are being invoked means new data is ready. If there's a new producer with time, it's all good, they will just accept the payload from Zato.
  • It's Zato that translates information between various formats or protocols such as XML, JSON, SOAP, REST, AMQP or any other
  • Hence, the service of notifying of new customers is:
    • Interesting—easy to explain
    • Re-usable—can be plugged into various producers or consumers
    • Atomic—it does one thing only and does it well
from zato.server.service import Service

class CreateCustomer(Service):
    def handle(self):

        # Synchronously call REST recipients as defined in Redis
        for conn_name in self.kvdb.conn.smembers('new.customer'):
            conn = self.outgoing.plain_http[conn_name].conn
            conn.send(self.cid, self.request.raw_request)

        # Async notify all pub/sub recipients
        self.pubsub.publish(self.request.raw_request, '/newcust')
This is yet another example of using IRA in practice because Zato's own architecture lets one develop services that are not bothered with details of where their input comes from—most of the code above can be re-used in different contexts as well, the code itself won't change.
The rest is only a matter of filling out a few forms and clicking OK to propagate the changes throughout the whole Zato cluster.
The rest is a matter of filling out forms
Filling out forms
That code + a few GUI clicks alone suffices for Swift notifications be distributed among all the parties interested though on top of it there is also command line interface and the platform's own public admin API.
And here it is, an IRA service confirming to IRA principles:
  • Interesting—strikes as something that will come in handy in multiple situations
  • Reusable—can be used in many situations
  • Atomic—does its own job and excels at it
Such services can now form higher-level business processes, all of them again interesting, reusable and atomic—the approach is scalable from lowest to highest levels.
To get in touch with the Zato project, you can drop by the mailing list, IRC, Twitter or the LinkedIn group.
Everyone is strongly encouraged to share their thoughts, ideas or code on how to best integrate modern APIs in a way that guarantees flexibility and ease of use.

How to Boot a Linux Live USB Drive on Your Mac

http://www.howtogeek.com/213396/how-to-boot-a-linux-live-usb-drive-on-your-mac


Think you can just plug a standard Linux live USB drive into your Mac and boot from it? Think again. You’ll need to go out of your way to create a live Linux USB drive that will boot on a Mac.
This can be quite a headache, but we’ve found a graphical utility that makes this easy. You’ll be able to quickly boot Ubuntu, Linux Mint, Kali Linux, and other mainstream Linux distributions on your Mac.

The Problem

RELATED ARTICLE
How to Create Bootable USB Drives and SD Cards For Every Operating System
Creating installation media for your operating system of choice used to be simple. Just download an ISO and burn it... [Read Article]
Apple’s made it difficult to boot non-Mac OS X operating systems off of USB drives. While you can connect an external CD/DVD drive to your Mac and boot from standard Linux live CDs and USBs, simply connecting a Linux live USB drive created by standard tools like Universal USB Installer and uNetbootin to a Mac won’t work.
There are several ways around this. For example, Ubuntu offers some painstaking instructions that involve converting the USB drive’s file system and making its partitions bootable, but some people report these instructions won’t work for them. There’s a reason Ubuntu recommends just burning a disc.
rEFInd should allow you to boot those USB drives if you install it on your Mac. But you don’t have to install this alternative UEFI boot manager on your Mac. The solution below should allow you to create Linux live USB drives that will boot on modern Macs without any additional fiddling or anything extra — insert, reboot, and go.

Use Mac Linux USB Loader

RELATED ARTICLE
How to Use Your Mac’s Disk Utility to Partition, Wipe, Repair, Restore, and Copy Drives
Your Mac includes a built-in partition manager and disk management tool known as Disk Utility. It’s even accessible from Recovery... [Read Article]
A tool named “Mac Linux USB Loader” by SevenBits worked well for us. This Mac application will allow you to create USB drives with your preferred Linux distro on them from within Mac OS X in just a few clicks. You can then reboot and boot those USB drives to use the Linux distribution from the live system.
Note: Be sure to move the Mac Linux USB Loader application to your Applications folder before running it. This will avoid a missing “Enterprise Source” error later.
First, insert the USB drive into your Mac and open the Disk Utility application. Check that the USB drive is formatted with an MS-DOS (FAT) partition. If it isn’t, delete the partition and create a FAT partition — not an ExFAT partition.

Next, open the Mac Linux USB Loader application you downloaded. Select the “Create Live USB” option if you’ve already downloaded a Linux ISO file. If not, select the “Distribution Downloader” option to easily download Linux distribution ISOs for use with this tool.

Select the Linux distribution’s ISO file you downloaded and choose a connected USB drive to put the Linux system on.

Choose the appropriate options and click “Begin Installation” to continue. Mac Linux USB Loader will create a bootable USB drive that will work on your Mac and boot into that Linux distribution without any problems or hacks.

Before booting the drive, you may want to change some other options here. For example, you can set up “persistence” on the drive and part of the USB drive will be reserved for your files and settings. This only works for Ubuntu-based distributions.
Click “Persistence Manager” on the main screen, choose your drive, select how much of the drive should be reserved for persistent data, and click “Create Persistence” to enable this.

Booting the Drive

RELATED ARTICLE
How to Install and Dual Boot Linux on a Mac
Installing Windows on your Mac is easy with Boot Camp, but Boot Camp won’t help you install Linux. You’ll have... [Read Article]
To actually boot the drive, reboot your Mac and hold down the Option key while it boots. You’ll see the boot options menu appear. Select the connected USB drive. The Mac will boot the Linux system from the connected USB drive.
If your Mac just boots to the login screen and you don’t see the boot options menu, reboot your Mac again and hold down the Option key earlier in the boot process.


This solution will allow you to boot common Linux USB drives on your Mac. You can just boot and use them normally without modifying your system.
Exercise caution before attempting to install a Linux system to your Mac’s internal drive. That’s a more involved process.