Sunday, October 13, 2024

Learn MySQL: Create, Update, and Delete Data in Database

https://www.tecmint.com/basic-mysql-commands

A database is a structured set of data stored electronically. The concept of a database was known to our ancestors even when there were no computers. However, creating and maintaining such databases was a very tedious job. For instance, in a manual database of 100 pages, searching for all employees whose salaries were less than 10,000 would have been quite difficult.

In today’s world, you cannot escape databases. Right now, millions of databases are working around the world to store and fetch data of every kind, whether it be strategic data, employee records, or web technologies.

Databases are often termed as backend processes because they are neither visible to end users nor do end users interact directly with the database. Instead, they work on frontend processes like PHP, VB, ASP.NET, etc., and ask the frontend to deal with the database in the backend.

There are several database servers and clients available, such as Oracle, MySQL, MySQLi, MariaDB, and MongoDB. The syntax for all of these is more or less the same. Mastering one means gaining control over most of them, and learning the queries of a database is both easy and enjoyable.

Let’s start with simple queries on databases. We will use MySQL, which comes bundled with most Linux distributions by default. You can install it manually from the repository if it is not installed by default in your case.

A database query is a simple piece of code sent to the database to obtain custom and refined results as required.

Install MySQL Database in Linux

Use the “yum” or “apt” package manager to install the MySQL database.

sudo yum install mysql mysql-client mysql-server  (on Yum-based systems)
sudo apt install mysql mysql-client mysql-server  (on Apt-based systems)

Once installed, start the MySQL database service with:

sudo systemctl start mysqld
Or
sudo systemctl start mysql

Installing a fresh copy of the MySQL database will take you to a configuration step where you will be asked to set up an root password and answer questions regarding security settings.

sudo mysql_secure_installation

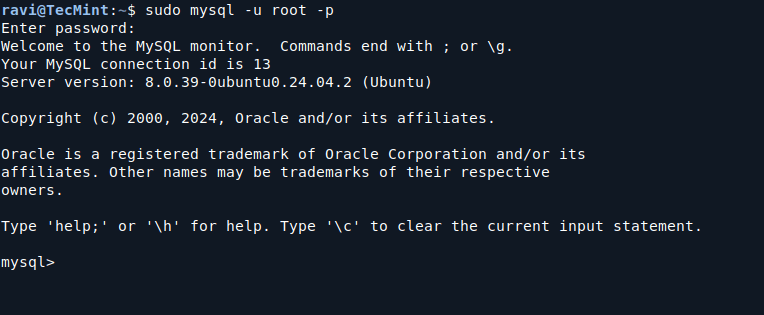
Once you finish installing and securing the server, go to your MySQL prompt.

sudo mysql -u root -p
MySQL Shell Prompt
MySQL Shell Prompt

Now, executing queries at this prompt is both educational and enjoyable.

Create a MySQL Database

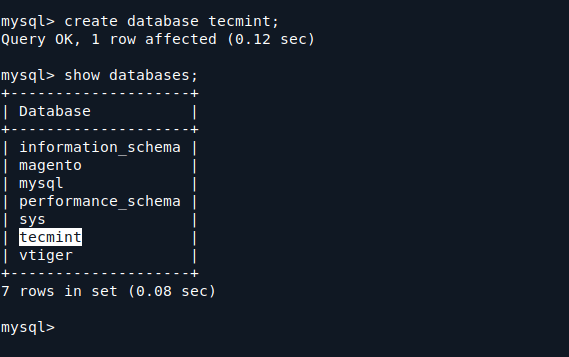
Create a database named “tecmint“.

create database tecmint;

Note: The message indicates that the query was successful, meaning the database is created.

You can verify your newly created database by running:

show databases; 

Notice your database in the output below.

Create a MySQL Database

Create Tables in MySQL Database

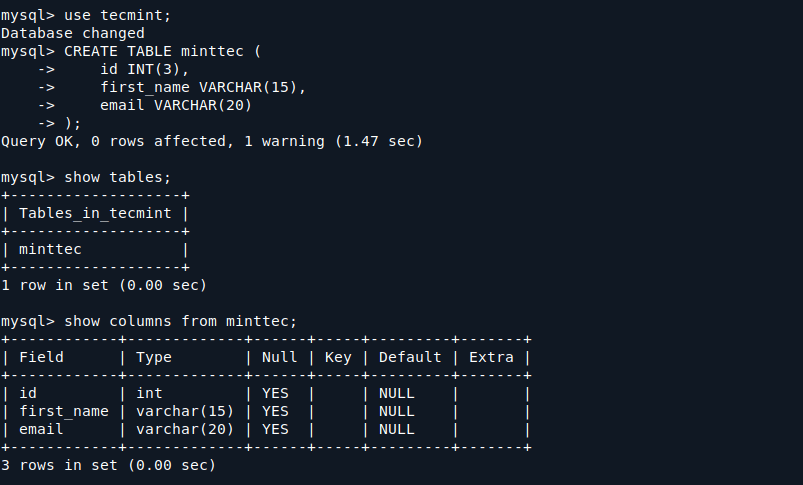
Now you need to select the database to work on:

use tecmint;

Here we will create a table called “minttec” with three fields:

CREATE TABLE minttec (
    id INT(3), 
    first_name VARCHAR(15), 
    email VARCHAR(20)
);

Note: The above query returns “OK“, indicating that the table was created without any errors.

To verify the table, run the following query:

show tables; 

You can view the columns you created in the “minttec” table as follows:

Create Tables in MySQL Database

Anyway, let me explain the types of declarations and their meanings.

  • INT is an Integer.
  • VARCHAR is a character type with a variable length as defined. The value after the type indicates the maximum length of the field in which it can store data.

Add Columns in MySQL Database

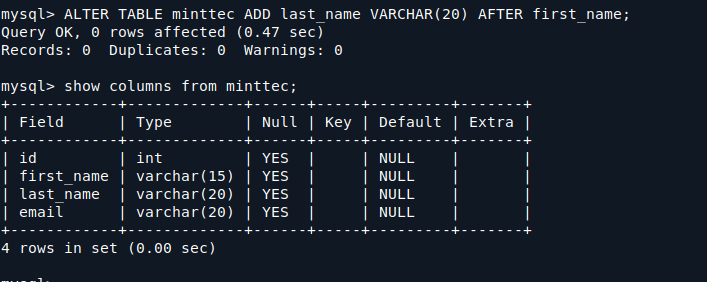
Now, we need to add a column named ‘last_name‘ after the column ‘first_name‘:

ALTER TABLE minttec ADD last_name VARCHAR(20) AFTER first_name;

Verify the change in your table:

show columns from minttec; 
Add Column in MySQL Database

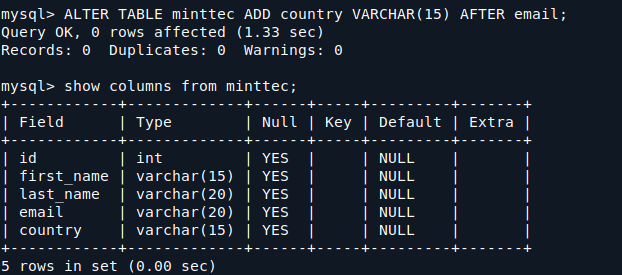
Now we will add a column named ‘country‘ to the right of the email field:

ALTER TABLE minttec ADD country VARCHAR(15) AFTER email; 

Verify the column addition:

show columns from minttec; 
Verify Column in MySQL Database

Insert Values into Fields of MySQL Database

Now let’s insert values into the fields:

INSERT INTO minttec VALUES ('1', 'Ravi', 'Saive', 'raivsaive@xyz.com', 'India');

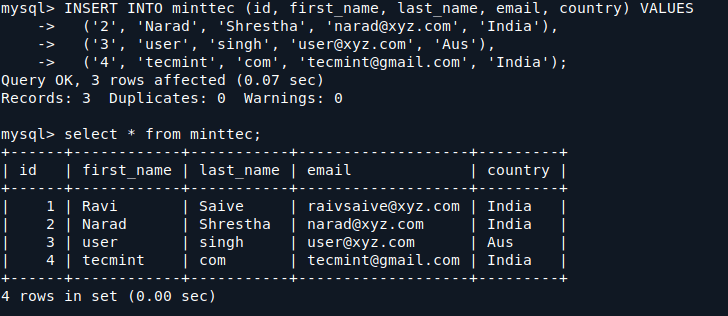
Now let’s insert multiple values at once into the table.

INSERT INTO minttec (id, first_name, last_name, email, country) VALUES 
  ('2', 'Narad', 'Shrestha', 'narad@xyz.com', 'India'), 
  ('3', 'user', 'singh', 'user@xyz.com', 'Aus'), 
  ('4', 'tecmint', 'com', 'tecmint@gmail.com', 'India');

Verify the inserted values:

select * from minttec; 
Verify Values in MySQL Database

The values have been inserted successfully.

Update Values in MySQL Table

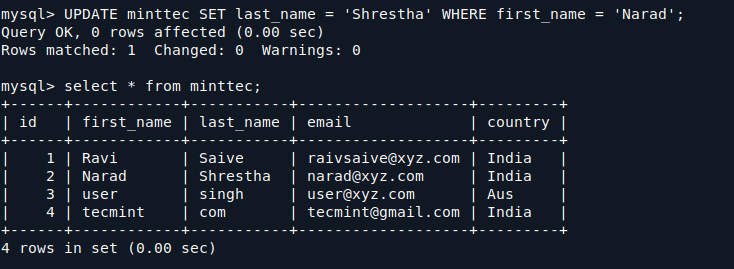
Now, how about changing the last name of the user whose first name is “Narad“?

UPDATE minttec SET last_name = 'Shrestha' WHERE first_name = 'Narad';

Check to verify the changes.

select * from minttec; 
Update Values in Table

Delete Values from MySQL Table

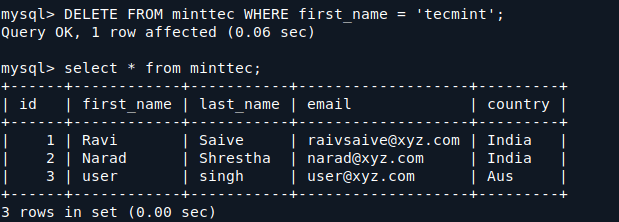
What about deleting a row from the table? For example, let’s delete the last entry of the user whose first name is “tecmint“.

DELETE FROM minttec WHERE first_name = 'tecmint';

Now, check the entries after the deletion.

select * from minttec; 
Delete Values in Table

Now, as you can see, the user “tecmint” has been deleted successfully.

Rename Table in MySQL

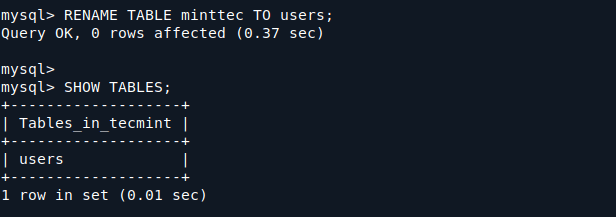
To rename a table in MySQL, you can use the RENAME TABLE statement. Let’s say you want to rename the table minttec to users. You would run the following command.

RENAME TABLE minttec TO users;

After renaming the table, you can verify the change by listing the tables in your current database:

SHOW TABLES;
Rename Table in Database

Backup a Database

To back up a MySQL database, you can use the mysqldump command, which creates a logical backup by generating a SQL script file containing all the commands to recreate the database.

mysqldump -u root -p tecmint > tecmint_backup.sql

You can verify that the backup file was created by listing the files in your current directory:

ls -l tecmint_backup.sql

Restore a Database

To restore a MySQL database from a backup file, you can use the mysql command.

mysql -u root -p tecmint < tecmint_backup.sql

Make sure the database you are trying to restore to already exists. If it doesn’t, you can create it using:

mysql -u root -p -e "CREATE DATABASE tecmint;"
Conclusion

You have now learned the basics of creating and manipulating a MySQL database, including creating a database, creating tables, inserting records, updating records, deleting records, and dropping tables. This foundation is essential for working with databases effectively.


What is Systemctl and How Should You Use It?

https://www.rosehosting.com/blog/what-is-systemctl

What is Systemctl and How Should You Use It?

What is Systemctl and how should you use it

Systemd is a popular init system that serves as a management tool for various systems within the Linux operating environment. Through systemd, we can perform essential administrative and maintenance functions, like managing system resources, controlling startup options, logging, and journaling. At the same time, systemctl is a command used to manage systemd services, which are currently standard on Linux.

Lennart Poettering is the person behind the development of systemd, a software engineer who now works at Microsoft. Lennart Poettering previously also created controversial programs, namely Avahi and PulseAudio.

Conventions

# – given commands should be executed with root privileges either directly as a root user or by use of sudo command
$ – given commands should be executed as a regular user

The init system is the first process after the Linux Kernel comes into action in the boot process. It initializes various device management, logging, and networking service. ‘service’ is a legacy command that is used in older versions of Linux/Unix systems. The tool is used to start, stop, and manage system services. It is still available in many modern systems, but most Linux distributions use systemctl now.

Systemd is indeed controversial for several reasons. Firstly, many people think that systemd doesn’t respect the Unix philosophy. The claim is that systemd is too complex and monolithic, making troubleshooting harder. Secondly, some criticisms of systemd state that systemd is not only an init system but also takes over many functions. For example, systemd tries to manage network, cron, fstab, syslog, etc. This means that systemd is not a program with a singular use but has multiple functions. Finally, systemd is criticized as its logging file isn’t text-based like Unix and Linux logs in common. Instead, it’s a binary log file.

Among the criticisms of systemd mentioned above, some are simply invalid. For example, systemd is not considered modular. Lennart Poettering answers such criticisms on his blog page entitled The Biggest Myths.

Most major Linux distributions like Ubuntu, AlmaLinux, and Gentoo now use systemd as their default init system. Debian was late implementing systemd in their release because many developers rejected it. As a result, several Debian developers who rejected systemd created a new Debian-based distribution, Debian without systemd, called Devuan. Devuan is Debian that still uses sysvinit.

After several years, most would agree that systemd is now a modern system — the opposite of sysvinit. Sysvinit should have disappeared from the init world because managing services through scripts is not easy and complex. Ubuntu once made a replacement for Sysvinit with Upstart but then abandoned it and switched to systemd. Systemd uses a configuration file called a unit. Creating a unit file is also easy because of its ini-style configuration.

systemd Commands

The following are several commands you can use to manage your services using systemd.

To restart a service, use systemctl restart. For example, restart nginx.

# systemctl restart nginx

To start, stop, and reload, replace restart with start, stop, or reload.

Systemctl can also start/stop/restart several services using a single command, for example:

# systemctl restart nginx mysql postfix

To enable service at start-up, use the following command:

# systemctl enable nginx

Alternatively, if instead, you wish to enable the service at start-up and start it right now, you would use:

# systemctl enable --now nginx

To disable service at start-up type

# systemctl disable apache2

If you need to see the systemd file of a service, you can type the following as an example:

# systemctl cat nginx

To restart the server, you should use:

# systemctl reboot

Shutting down the server is using the following command:

# systemctl poweroff

If you wish to view live logs, use:

# journalctl -f

For viewing logs of a service, you can use the following:

# journalctl -u mysql

You can use a command similar to the one below when looking for a specific date range. In this case, we view logs from August 29th to August 31st:

# journalctl --since "2024-08-29" --until "2024-08-31"

Finally, to view the most recent logs, you can use the following command:

# journalctl --since "3 hours ago"

As with the service command, systemctl is a very versatile command. It lets you enable, reload, start, stop, and check the status of services running on your Linux machine. Systemctl serves as an easy-to-use and powerful interface for configuring files in systemd. For example, it only takes one or two commands to disable a service at boot using systemctl.

Service and systemctl mainly have the same purpose. Many of the similarities between the two are intentionally inserted to allow users to make a smoother transition to systemctl. However, there are differences between the two to be aware of when starting work with the initialization system in Linux.

The most significant difference between service and systemctl is that they belong to different initialization systems. Service belongs to the classic Linux initialization process of SysVinit (System V Init). Systemctl belongs to systemd, the successor to SysVinit, and the modern initialization process is used on many Linux systems. Because service and systemctl are part of different initialization processes. They operate on initialization system files in different directories. Service works with the initialization system files found in /etc/init.d. Meanwhile, systemctl works with the initialization system files found in /lib/systemd.

Systemd starts services in parallel rather than serially, so its boot-up time is faster than SysVinit. It also offers slightly more sophisticated control of system daemons via a command-line interface (CLI).

Conclusion

That’s it all! You no longer need to ask what is systemctl and you now know how to use it.

If you have an active service with us, you don’t have to spend your precious time or stress about systemctl. You can contact our expert administrators through chat or by ticket. Our technical support department is available 24×7 and will take care of your request immediately.

If you liked this what is systemctl and how to use it post, please share it with your friends. Thanks.

Tags , , , , ,


How to Reset USB Device Using Command Line in Linux

https://www.tecmint.com/reset-usb-device-linux

How to Reset USB Device Using Command Line in Linux

Resetting a USB device from the Command Line Interface (CLI) can help resolve issues such as unresponsiveness or connection problems. This guide will walk you through the steps to reset a USB device using simple commands.

Step 1: Identify the USB Device in Linux

Before resetting the USB device, you must identify it by using the lsusb command, which lists all USB devices connected to your system.

lsusb

You’ll see a list of connected USB devices, something like this:

Find USB Drive in Linux
Find a USB Drive in Linux

Note the bus and device number of the USB device you want to reset (e.g., Bus 001 Device 004).

Step 2: Unmount the USB Device in Linux

If the USB device is mounted, you need to unmount it before resetting it by using the umount command followed by the device’s mount point.

You can use the df command to see where the USB device is mounted:

df -h

Look for your USB device in the output, which will usually looks like /media/username/device_name.

Find USB Device Mount Point

Now run the command below, replacing /media/username/device_name with the actual mount point:

sudo umount /media/username/device_name

Step 3: Reset the USB Device in Linux

After unmounting the device, you can reset it using the usbreset utility. If you don’t have usbreset installed, you can install it using the following appropriate command for your specific Linux distribution.

sudo apt install usbutils         [On Debian, Ubuntu and Mint]
sudo yum install usbutils         [On RHEL/CentOS/Fedora and Rocky/AlmaLinux]
sudo emerge -a sys-apps/usbutils  [On Gentoo Linux]
sudo apk add usbutils             [On Alpine Linux]
sudo pacman -S usbutils           [On Arch Linux]
sudo zypper install usbutils      [On OpenSUSE]    
sudo pkg install usbutils         [On FreeBSD]

Once installed, you can reset the USB device using the following command by replacing Bus 001 Device 004 with your USB device’s bus and device number:

sudo usbreset /dev/bus/usb/001/004

Alternatively, you can use the following command, where <device_id> is the ID of the USB device (from the lsusb output):

sudo usbreset 090c:1000
Reset USB Device in Linux

Step 4: Remount the USB Device in Linux

After resetting the USB device, you can remount it. If your system does not automatically mount it, you can do it manually by running the following commands.

lsblk
sudo mount /dev/sdX1 /media/username/device_name

Replace /dev/sdX1 with your USB device’s identifier, which you can find using the lsblk command.

Mount USB Device in Linux

Finally, verify that the USB device is functioning properly by running the lsusb command. If it appears in the list, it is successfully reset and ready to use.

lsusb
Verify USB Device in Linux
Conclusion

Resetting a USB device from the Linux terminal is a straightforward process that can help resolve various issues. By following the steps outlined above, you can identify, unmount, reset, and remount your USB device without much hassle.


26 Security Hardening Tips for Modern Linux Servers

 https://www.tecmint.com/linux-server-hardening-security-tips

26 Security Hardening Tips for Modern Linux Servers

Everybody says that Linux is secure by default, and to some extent, this is agreed upon (it’s a debatable topic). However, Linux has an in-built security model in place by default.

You need to tune and customize it according to your needs, which can help in making the system more secure. Linux is more challenging to manage but offers greater flexibility and configuration options.

Securing a system in production from the hands of hackers and crackers is a challenging task for a System Administrator. This is our first article related to “How to Secure Linux box” or “Hardening a Linux Box“.

In this post, we’ll explain 25 useful tips and tricks to secure your Linux system. Hope, below tips and tricks will help you some extend to secure your system.

1. Physical System Security – Setting a GRUB Password

One effective way to enhance security is by setting a GRUB password, which is a boot loader used by most Linux distributions to load the operating system when the computer starts up.

By setting a GRUB password, you add an extra layer of defense against unauthorized users who might attempt to tamper with or gain unauthorized access to your system.

Log into your Linux server and open the GRUB configuration file, which is located in different paths as shown.

  • For Ubuntu/Debian: /etc/default/grub
  • For CentOS/RHEL: /etc/grub2.cfg or /boot/grub/grub.cfg

Next, use a text editor like nano or vi to edit this file with root privileges (sudo).

Look for the line that starts with GRUB_CMDLINE_LINUX or similar and append GRUB_PASSWORD=<password> to the end of this line.

GRUB_CMDLINE_LINUX="quiet splash"
GRUB_PASSWORD=password123

After editing the configuration file, update GRUB to apply the changes.

sudo update-grub   # For Ubuntu/Debian
sudo grub2-mkconfig -o /boot/grub2/grub.cfg    # For CentOS/RHEL 7
sudo grub2-mkconfig -o /boot/grub/grub.cfg     # For CentOS/RHEL 8

Restart your server to apply the GRUB password.

sudo reboot

2. Creating Different Partitions for Higher Data Security

It’s important to have different partitions to obtain higher data security in case any disaster happens. By creating different partitions, data can be separated and grouped.

When an unexpected accident occurs, only data from that partition will be damaged, while the data on other partitions will survive. Make sure you have the following separate partitions and that third-party applications should be installed on separate file systems under /opt.

/
/boot
/usr
/var
/home
/tmp
/opt

Most Linux distributions allow you to create and configure partitions during the installation process using the guided or manual partitioning options.

Post-installation, you can use tools like fdisk, parted, or graphical tools like GParted to create and manage partitions.

Example using fdisk:

sudo fdisk /dev/sda

Follow the prompts to create new partitions and assign them to the appropriate file systems.

3. Minimize Packages to Minimize Vulnerability: Remove Unwanted Services

One of the key strategies in securing a Linux system is to minimize the number of installed packages and running services. Each package and service can potentially introduce vulnerabilities, so keeping your system lean and efficient is a crucial step in hardening your server.

Start by identifying the packages and services that are not needed for your server’s specific function, which can be done using package management tools such as dpkg or rpm and service management utilities.

dpkg --list    # For Debian-based systems
rpm -qa        # For Red Hat-based systems
systemctl list-units --type=service --state=running

Once you have identified the unnecessary packages, you can remove them using your package manager such as apt or yum.

sudo apt remove package_name    # For Debian-based systems
sudo yum remove package_name    # For Red Hat-based systems

After removing the unwanted packages, the next step is to disable and stop services that are not needed.

sudo systemctl stop service_name
sudo systemctl disable service_name

4. Check Listening Network Ports in Linux

Monitoring and managing network ports is a crucial aspect of securing a Linux system and knowing which ports are open and listening can help you identify potential vulnerabilities and ensure that only necessary services are accessible.

To check network ports, we will use netstat or ss command-line tools, which provide various network-related information, including open ports and listening services.

sudo netstat -tuln
OR
sudo ss -tuln

5. Use Secure Shell (SSH) for Enhanced Security

Secure Shell (SSH) is a widely used protocol that offers a secure way to access and manage your Linux servers. However, to maximize security, there are several best practices you should follow, such as disabling root login, allowing only specific users, using SSH protocol 2, and changing the default SSH port.

Disabling root login forces users to log in with their user accounts, providing better accountability and reducing the risk of unauthorized access.

sudo nano /etc/ssh/sshd_config

Find the line that says PermitRootLogin and change its value to no:

PermitRootLogin no

Restricting SSH access to specific users adds a layer of security by ensuring that only authorized users can log in.

Add a line at the end of the file to specify the allowed users:

AllowUsers user1 user2

Changing the default SSH port (22) to a non-standard port can help reduce the number of automated attacks on your server.

Port 2222

Restart the SSH service to apply the changes:

sudo systemctl restart sshd

6. Keep Your System Up-to-Date

Regularly update your Linux distribution and all installed packages to the latest security patches and bug fixes using your system default package manager, such as apt for Debian-based distributions or yum for Red Hat-based systems.

sudo apt update    # For Debian-based systems
sudo yum update    # For Red Hat-based systems

7. Managing Cron Job Permissions

Cron is a powerful utility in Unix-like operating systems that allows users to schedule jobs to run at specific intervals.

However, there might be situations where you need to control who can or cannot create and run cron jobs on your system. Cron has built-in features to manage these permissions using the /etc/cron.allow and /etc/cron.deny files.

To allow specific users to use cron, edit /etc/cron.allow file and the usernames of the users you want to deny, one per line.

user1
user2

To deny specific users to use cron, edit /etc/cron.deny file and the usernames of the users you want to allow, one per line.

user3
user4

To completely disable all users from using cron, you can add the ALL line to the /etc/cron.deny file.

ALL

8. Disable USB Storage Detection

Many times it happens that we want to restrict users from using USB stick in systems to protect and secure data from stealing.

Create a file ‘nano /etc/modprobe.d/no-usb.conf‘ and adding the below line will not detect USB storage.

blacklist usb_storage

After creating the blacklist file, update the initramfs (initial RAM filesystem) to ensure the blacklisted module is not loaded during the boot process:

sudo update-initramfs -u

Reboot your system for the changes to take effect.

9. Turn on SELinux Protection

Security-Enhanced Linux (SELinux) is a compulsory access control security mechanism provided in the kernel. Disabling SELinux means removing the security mechanism from the system. Think twice carefully before removing it, if your system is attached to the internet and accessed by the public, then think some more about it.

SELinux provides three basic modes of operation and they are.

  • Enforcing: This is the default mode that enables and enforces the SELinux security policy on the machine.
  • Permissive: In this mode, SELinux will not enforce the security policy on the system, only warn and log actions. This mode is very useful in terms of troubleshooting SELinux-related issues.
  • Disabled: SELinux is turned off.

You can view the current status of SELinux mode from the command line using ‘system-config-selinux‘, ‘getenforce‘, or ‘sestatus‘ commands.

# sestatus

If it is disabled, enable SELinux using the following command.

# setenforce enforcing

It also can be managed from the ‘/etc/selinux/config‘ file, where you can enable or disable it.

10. Removing X Desktops on a Linux Server

There is no need to run X Window desktops like KDE, GNOME, or XFCE on your dedicated LAMP server. You can remove or disable them to increase the security of the server and performance.

Before removing any desktop environment, identify which one is installed on your server.

dpkg -l | grep desktop
OR
yum grouplist | grep -i desktop

Once identified, you can remove the desktop environment along with any associated packages.

Remove GNOME Desktop Environment:

sudo apt-get purge gnome-shell gnome-session gnome-terminal   # For Debian-based systems
sudo yum groupremove "GNOME Desktop Environment"              # For Red Hat-based systems

Remove KDE Plasma Desktop Environment:

sudo apt-get purge kde-plasma-desktop                       # For Debian-based systems
sudo yum groupremove "KDE Plasma Workspaces"                 # For Red Hat-based systems

Remove Xfce Desktop Environment:

sudo apt-get purge xfce4                                    # For Debian-based systems
sudo yum groupremove "Xfce"                                  # For Red Hat-based systems

If your server also has the X Server installed, which is the display server system for GUIs, you can remove it to further reduce potential security risks.

sudo apt-get purge xserver-xorg-core xserver-xorg              # For Debian-based systems
sudo yum remove xorg-x11-server-Xorg xorg-x11-server-common   # For Red Hat-based systems

Ensure that the server boots into a text-based console rather than starting a graphical desktop environment.

sudo systemctl set-default multi-user.target    # For systemd-based systems
sudo systemctl set-default graphical.target     # To revert back to graphical mode if needed

After removing the desktop environment and optionally the X Server, reboot your server to apply the changes.

11. Disabling IPv6 Protocol on a Linux Server

If you’re not using an IPv6 protocol, then you should disable it because most of the applications or policies do not require IPv6 protocol and currently, it isn’t required on the server.

You need to edit the network configuration file to disable IPv6.

sudo nano /etc/sysctl.conf

Add the following lines to the end of the file:

# Disable IPv6
net.ipv6.conf.all.disable_ipv6 = 1
net.ipv6.conf.default.disable_ipv6 = 1

Next, apply the changes to the running system.

sudo sysctl -p

Verify that IPv6 is disabled by checking the network interfaces and configuration.

ip addr show

You should see only IPv4 addresses assigned to your network interfaces. IPv6 addresses should not be present.

12. Restricting Users from Using Old Passwords on Linux

This is very useful if you want to disallow users to use the same old passwords. The old password file is located at /etc/security/opasswd. This can be achieved by using the PAM module.

Open the ‘/etc/pam.d/system-auth‘ file under RHEL / CentOS / Fedora.

# vi /etc/pam.d/system-auth

Open the ‘/etc/pam.d/common-password‘ file under Ubuntu/Debian/Linux Mint.

# vi /etc/pam.d/common-password

Add the following line to the ‘auth‘ section.

auth        sufficient    pam_unix.so likeauth nullok

Add the following line to the ‘password‘ section to disallow a user from re-using the last 5 passwords of his or her.

password   sufficient    pam_unix.so nullok use_authtok md5 shadow remember=5

Only the last 5 passwords are remembered by the server. If you try to use any of the last 5 old passwords, you will get an error like.

Password has been already used. Choose another.

13. How to Check Password Expiration of User

In Linux, the user’s passwords are stored in a ‘/etc/shadow‘ file in an encrypted format. To check the password expiration of users, you need to use the ‘chage‘ command, which displays information on password expiration details along with the last password change date. These details are used by the system to decide when a user must change his/her password.

To view any existing user’s aging information such as expiry date and time, use the following command.

#chage -l username

To change the password aging of any user, use the following command.

#chage -M 60 username
#chage -M 60 -m 7 -W 7 userName

Break down of the command:

  • -M Set the maximum number of days
  • -m Set the minimum number of days
  • -W Set the number of days of warning

14. Lock and Unlock the Account Manually

The lock and unlock features are very useful, instead of removing an account from the system, you can lock it for a week or a month. To lock a specific user, you can use the following command.

passwd -l accountName

Note : The locked user is still available for the root user only. The locking is performed by replacing the encrypted password with an (!) string. If someone tries to access the system using this account, he will get an error similar to below.

su - accountName
This account is currently not available.

To unlock or enable access to a locked account, use the command as. This will remove the (!) string with an encrypted password.

passwd -u accountName

15. Enforcing Stronger Passwords

Many users use soft or weak passwords and their passwords might be hacked with dictionary-based or brute-force attacks.

The ‘pam_cracklib‘ module is available in the PAM (Pluggable Authentication Modules) module stack which will force users to set strong passwords.

Open the following file with an editor.

vi /etc/pam.d/system-auth

And add a line using credit parameters such as (lcredit, ucredit, dcredit, and/or ocredit respectively lower-case, upper-case, digit, and other)

/lib/security/$ISA/pam_cracklib.so retry=3 minlen=8 lcredit=-1 ucredit=-2 dcredit=-2 ocredit=-1

16. Enabling and Configuring Firewalls: firewalld and ufw

Firewalls are essential for securing Linux servers by controlling incoming and outgoing network traffic based on predetermined security rules. There are two most widely used firewall solutions for Linux are firewalld for RHEL-based distributions and ufw for Debian-based systems.

If firewalld or ufw is not already installed on your system, you can install it using the package manager.

Install Firewalld:

sudo dnf install firewalld
sudo systemctl enable firewalld
sudo systemctl start firewalld

Install Ufw:

sudo apt-get install ufw
sudo ufw enable
sudo ufw status

17. Disabling Ctrl+Alt+Delete on Linux

In most Linux distributions, pressing ‘CTRL-ALT-DELETE’ will take your system to the reboot process. So, it’s not a good idea to have this option enabled at least on production servers, if someone mistakenly does this.

To disable Ctrl+Alt+Delete, create or edit the override file for the Ctrl+Alt+Delete key combination.

sudo systemctl edit ctrl-alt-del.target

Add the following lines to the override file to disable the key combination:

[Service]
ExecStart=

After making changes, reload the systemd configuration and mask the ctrl-alt-del.target ensures that it cannot be triggered:

sudo systemctl daemon-reload
sudo systemctl mask ctrl-alt-del.target

18. Checking Accounts for Empty Passwords on Linux

Any account having an empty password means it’s opened for unauthorized access to anyone on the web and it’s a part of security within a Linux server. So, you must make sure all accounts have strong passwords and no one has any authorized access. Empty password accounts are security risks and that can be easily hackable.

To check if there were any accounts with empty passwords, use the following command.

sudo cat /etc/shadow | awk -F: '($2==""){print $1}'

19. Display SSH Banner Before Login

Displaying a banner message before the SSH login prompt can be a useful way to provide legal notices, warnings, or information to users attempting to access your Linux server.

To set such banners, you need to create a text file that contains the message you want to display.

sudo nano /etc/ssh/ssh-banner

Add your banner message:

***********************************************************************
WARNING: Unauthorized access to this system is prohibited.

All activities on this system are logged and monitored. By logging in,
you acknowledge that you are authorized to access this system and agree
to abide by all relevant policies and regulations.

Unauthorized users will be prosecuted to the fullest extent of the law.
***********************************************************************

Next, you need to configure the SSH server to display the banner before the login prompt.

sudo nano /etc/ssh/sshd_config

Find and modify the Banner directive:

Banner /etc/ssh/ssh-banner

After making these changes, restart the SSH service to apply the new configuration.

sudo systemctl restart sshd

20. Monitor User Activities on Linux

If you are dealing with lots of users, then it is important to collect the information of each user’s activities and processes consumed by them and analyze them at a later time or in case of any kind of performance, or security issues. But how we can monitor and collect user activity information.

There are two useful tools called ‘psacct‘ and ‘acct‘ are used for monitoring user activities and processes on a system. These tools run in a system background and continuously track each user activity on a system and resources consumed by services such as Apache, MySQL, SSH, FTP, etc.

For more information about installation, configuration, and usage, visit the below url.

21. Monitor Linux Logs Regularly

Reviewing logs on a regular basis is an important part of managing and securing a Linux system, as logs provide detailed records of system events, user activities, and potential security incidents.

By regularly checking these logs (usually stored in the /var/log directory), you can identify issues early, respond to security threats, and ensure the system runs smoothly.

  • /var/log/message – Where whole system logs or current activity logs are available.
  • /var/log/auth.log – Authentication logs.
  • /var/log/kern.log – Kernel logs.
  • /var/log/cron.log – Crond logs (cron job).
  • /var/log/maillog – Mail server logs.
  • /var/log/boot.log – System boot log.
  • /var/log/mysqld.log – MySQL database server log file.
  • /var/log/secure – Authentication log.
  • /var/log/utmp or /var/log/wtmp : Login records file.
  • /var/log/yum.log: Yum log files.

22. Backup Files in Linux Using rsync

Backing up files in Linux using rsync is an efficient and reliable method, as it synchronizes files and directories between two locations, making it perfect for backups.

To back up files on the local system, use the following command:

rsync -av --delete /source/directory/ /backup/directory/

To back up files on the remote system, use the following command:

rsync -avz -e ssh /source/directory/ user@remote_host:/backup/directory/

23. NIC Bonding

In Linux, NIC Bonding is a feature that allows you to combine multiple network interfaces into a single bonded interface to improve network reliability, redundancy, and performance.

Below guides, you’ll find a simple explanation of how NIC Bonding works in Linux, including configuration details for the two common modes.

24. Keeping /boot as Read-Only in Linux

The /boot directory in Linux contains essential files needed to boot the operating system, such as the kernel, initial ramdisk (initrd), and bootloader configuration files.

Ensuring that /boot is mounted as read-only can enhance system security and integrity by preventing unauthorized modifications to these critical files.

To do this, open “/etc/fstab” file.

vi /etc/fstab

Add the following line at the bottom, save, and close it.

LABEL=/boot     /boot     ext4     defaults,ro     1 2

Please note that you need to reset the change to read-write if you need to upgrade the kernel in the future.

25. Ignoring ICMP or Broadcast Requests in Linux

In Linux, you can configure your system to ignore ICMP (Internet Control Message Protocol) or broadcast requests to enhance security and reduce unwanted network traffic.

Open the /etc/sysctl.conf file using a text editor:

sudo nano /etc/sysctl.conf

Add or modify the following line to set the ICMP echo ignore flag:

net.ipv4.icmp_echo_ignore_all=1

Apply the changes:

sysctl -p

26. Implement Intrusion Detection and Prevention

To enhance network security, install and configure an Intrusion Detection System (IDS) or Intrusion Prevention System (IPS) to monitor traffic and detect potential attacks.

IDS options like Snort and Suricata analyze network packets for suspicious activity and provide alerts. Snort offers flexible, rule-based detection, while Suricata supports multi-threaded processing and advanced protocols.

For a proactive defense, consider Fail2ban, which detects and responds to suspicious behavior by blocking offending IPs. Each tool can be configured to suit your specific security needs, providing robust protection against intrusions and helping maintain network integrity.

If you’ve missed any important security or hardening tip in the above list, or you’ve any other tip that needs to be included in the list. Please drop your comments in our comment box. TecMint is always interested in receiving comments, suggestions as well as discussions for improvement.


How to Increase Network TCP/IP Connections in Linux

 https://www.tecmint.com/increase-tcp-ip-connections-linux

How to Increase Network TCP/IP Connections in Linux

Linux is widely used for servers and networking applications. One common issue administrators face is reaching the maximum number of TCP/IP connections. When this limit is reached, users may encounter connection errors.

This article will explain how to increase the maximum number of TCP/IP connections in Linux.

Understanding TCP/IP Connections

TCP/IP (Transmission Control Protocol/Internet Protocol) is the fundamental communication protocol used on the internet. Each TCP connection requires system resources. When too many connections are active, the system may refuse new connections or slow down.

By increasing the maximum number of allowed connections, you can improve server performance and handle more simultaneous users.

Checking Current Connection Limits in Linux

Before changing the settings, it’s good to know the maximum number of TCP connections allowed on your system using the following sysctl command:

sysctl net.ipv4.tcp_max_syn_backlog

This command shows the number of incomplete connections allowed. Additionally, to view the total number of file descriptors available (which affects the maximum number of connections), use:

ulimit -n
Check Linux TCP Connection Limits

The output of this command indicates the current limit of open files, which includes TCP connections.

Increasing TCP Connection Limits in Linux

To increase the maximum number of TCP/IP connections, you need to change a few settings in the system configuration files.

1. Increase TCP Connections in Linux

The tcp_max_syn_backlog parameter controls how many half-open connections can be queued.

To change this value, use a text editor to edit the /etc/sysctl.conf file:

sudo nano /etc/sysctl.conf

Add or modify the following line.

net.ipv4.tcp_max_syn_backlog = 4096

You can replace 4096 with a higher value based on your needs.

To apply the changes, run the following command.

sudo sysctl -p

2. Increase the Number of File Descriptors

The number of file descriptors determines how many connections your system can handle.

To increase this limit, open the /etc/security/limits.conf file.

sudo nano /etc/security/limits.conf

Add the following lines at the end of the file.

*          soft    nofile     100000
*          hard    nofile     100000

This sets the soft and hard limits for the maximum number of open files to 100,000. You can adjust this number based on your requirements.

3. Update the System-Wide File Descriptor Limit

In addition to the user-specific limits, you can also increase the system-wide limit for file descriptors in the /etc/sysctl.conf file.

sudo nano /etc/sysctl.conf

Add or modify the following line.

fs.file-max = 100000

Save and close the file, then apply the changes:

sudo sysctl -p

Verify TCP Connection Limits in Linux

To ensure that the changes have been applied successfully, use the following commands.

sysctl net.ipv4.tcp_max_syn_backlog
cat /proc/sys/fs/file-max
ulimit -n

Additional Configuration (Optional)

If you want to fine-tune your network settings further, you can adjust additional parameters in the /etc/sysctl.conf file.

Here are some useful settings:

tcp_fin_timeout: Reduce the time the connection stays in the FIN-WAIT-2 state, allowing for faster reuse of connections.

net.ipv4.tcp_fin_timeout = 15

tcp_tw_reuse: Reuse TIME-WAIT sockets for new connections, which can improve connection handling.

net.ipv4.tcp_tw_reuse = 1

tcp_max_orphans: Increase the maximum number of orphaned TCP sockets. This is helpful for high-load systems.

net.ipv4.tcp_max_orphans = 8192

After making any additional changes, remember to apply them using:

sudo sysctl -p
Conclusion

By following these steps, you can successfully increase the maximum number of TCP/IP connections in your Linux system, which will help your server handle more simultaneous connections, improving performance and user experience.

Always monitor your server’s performance and adjust these settings as necessary to maintain optimal operation.

4 Ways to Disable or Lock Package Updates in Yum and DNF

 https://www.tecmint.com/disable-package-updates-in-yum-and-dnf

A package manager is software that allows a user to install new software, upgrade the system, or update specific software, among other tasks. On Linux-based systems, where software often has many dependencies that must be present on the system for complete installation, tools like package managers become essential on every system.

Each Linux distribution ships with its default package manager for the above-mentioned functionalities, but the most commonly found ones are: Yum on RHEL and Fedora systems (where it is being replaced by DNF from Fedora 22+ onwards) and Apt on Debian-based systems.

If you’re looking for an APT tool to block or disable certain specific package updates on Ubuntu/Debian systems, then you should read this article.

DNF (Dandified YUM) is replacing YUM on Fedora systems, which is another one on our list. If explored properly, these package managers can be used for the following functionalities:

  • Installing new software from the repository.
  • Resolving dependencies of the software by installing those dependencies before installing the software.
  • Maintaining a database of dependencies for each software.
  • Downgrading the version of any existing software.
  • Upgrading the kernel version.
  • Listing packages available for installation.

In this guide, we’ll explore four simple methods to disable or lock certain package updates using Yum and DNF commands.

1. Permanently Disable Package Updates Using exclude Option

One of the easiest ways to stop specific packages from being updated is by using the exclude option in the Yum or DNF configuration file, which tells the package manager to avoid updating certain packages.

Open the Yum or DNF configuration file.

sudo nano /etc/yum.conf        #Yum Configuration File
sudo nano /etc/dnf/dnf.conf    #DNF Configuration File

Add the exclude line at the bottom of the file, followed by the package names you want to block.

exclude=kernel* httpd

This prevents the system from updating all kernel-related packages and the Apache web server (httpd).

Exclude Package Updates in DNF

Now let’s try to install or update the specified package and see that the Yum or DNF command will disable it from being installed or updated.

sudo dnf install httpd
Preventing Package Installation in Linux

2. Temporarily Disable Package Updates Using exclude Option

If you don’t want to modify the configuration file permanently, you can exclude specific packages temporarily by using the --exclude option in the command line when running the Yum or DNF update.

sudo yum update --exclude=nginx php
sudo dnf update --exclude=nginx php

3. Excluding Specific Packages in Repositories

For any package installed from any external source via adding a repository, there is another way to stop its up-gradation in the future. This can be done by editing its repo-name.repo configuration file which is created in /etc/yum/repos.d/ or /etc/yum.repos.d directory.

Open the repository configuration file.

sudo nano /etc/yum.repos.d/repo-name.repo

Add the exclude line under the [repository] section:

exclude=package1 package2

For example, if you want to exclude the mysql package from being updated from the epel repository, open /etc/yum.repos.d/epel.repo and add:

exclude=mysql*

This will block updates for mysql from this specific repository.

4. Disable Package Updates Using versionlock Option

Both Yum and DNF offer plugins that can lock specific versions of packages, preventing them from being updated and this is done using the versionlock plugin.

For Yum:

  • Install versionlock package: sudo yum install yum-plugin-versionlock
  • Lock a specific package version: sudo yum versionlock add httpd
  • To view all locked packages: sudo yum versionlock list
  • To remove a package from the version lock: sudo yum versionlock delete httpd

For Dnf:

  • Install versionlock package: sudo dnf install dnf-plugins-core
  • Lock a specific package version: sudo dnf versionlock add httpd
  • To view all locked packages: sudo dnf versionlock list
  • To remove a package from the version lock: sudo dnf versionlock delete httpd
Conclusion

By using these four methods-modifying the Yum or DNF configuration file, using the --exclude option in commands, utilizing the versionlock plugin, or configuring repository exclusions – you can easily disable or lock package updates in your RPM-based Linux system.


Monday, October 7, 2024

How to Start and Stop Monitor Mode in Linux

https://trendoceans.com/start-and-stop-monitor-mode-in-linux

How to Start and Stop Monitor Mode in Linux

It’s a no-brainer to start and stop monitor mode in Linux when you know what command to use.

The WiFi module comes with multiple modes, and one of them is monitor mode, which you have commonly heard from security enthusiasts sniffing the network using Wireshark.

Not only that, you can do much more when you activate monitor mode in Linux, like analyze network traffic, detect rogue access points, troubleshoot connectivity issues, and much more.

Ezoic

So let’s start the article by explaining to you what monitor mode is, the kind of hardware that supports monitor mode, and finally the command to start and stop promiscuous mode.

What is Monitor Mode?

Monitor Mode allows a wireless NIC card to passively capture and analyze the network without associating with or connecting to any specific network, which makes it useful for network troubleshooting, monitoring network traffic, and performing security analysis.

In wireless networking, there are multiple modes that can be used to handle connections and monitor packets:

Ezoic
  • Managed Mode
  • Monitor Mode

Managed mode is the default mode through which you are now connected to the WiFi to read this article, and when you switch to NIC Monitor mode, it starts listening and capturing all wireless traffic in the surrounding area.

All NIC hardware doesn’t support monitor mode, so to check whether your hardware supports monitor mode, execute the below code on your terminal screen and note down the chipset name.

$ lspci | grep Wireless					# PCI Based Wi-Fi Hardware
$ lsusb | grep Wireless					# External Wi-fi Hardware

After that, you can search on the internet to see whether your chipset supports monitor mode or not.

List of WiFi Chipsets That Support Monitor Mode

As I said above, monitor mode is not supported on all WiFi chipsets.

If your system hardware doesn’t support monitor mode, then you cannot use that hardware for monitoring purposes, and you need to buy external wifi hardware that supports monitor mode.

Ezoic

We have listed some of the chipsets that you can consider buying.

To check out more recommendations, you can refer to this link.

Ezoic

Three Different Ways to Enable and Disable Monitor Mode in Linux

Here, you will learn three different ways to start and stop monitor mode in Linux with the following commands:

Use iw Command to Set Monitor Mode in Linux

One of the simplest and most commonly used commands to set the monitor mode is iw command.

Before the iw command, we used iwconfig command to set the monitor mode. But now it is deprecated, and you can still find iwconfig preinstalled in some Linux distributions.

If you want to know more about network commands that are deprecated in 2022, then you can refer to the List of Deprecated Linux Commands.

You can use the iw command to find out information about your attached Wi-Fi adapter, which is attached to your PCI or via USB, and when you invoke the below command, it will show you details like interface, ifindex, mac address, SSID, mode type, channel, and txpower.

To get the network adapter details, type the following command into the terminal:

$ iw dev

But before that, make sure to attach an external Wi-Fi adapter in case you’re following this guide on your virtual machine or if your system’s NIC doesn’t support Monitor Mode.

Ezoic

From the list of information, you need to take note of the network interface name and mode type.

As you can see, I do have multiple Wi-Fi adapters attached to my system.

One is a Realtek RTl8723be, which doesn’t support monitor mode, and the second one is an Atheros AR9271, which is capable of monitor mode.

Check WI-fi hardware
Check WI-FI hardware

Once you get the network interface name, you need to execute the following commands in sequence to enable monitor mode in your Kali Linux system:

Ezoic

Just make sure to replace [INTERFACE] with the actual one.

$ sudo ip link set [INTERFACE] down
$ sudo iw [INTERFACE] set monitor control
$ sudo ip link set [INTERFACE] up

It is necessary to turn down the network interface before putting your WiFi hardware into monitor mode. Otherwise, you will not be able to change the mode of your WiFi adapter.

To get the real essence of it, let me try on my machine.

$ sudo ip link set wlx485d60577a77 down
$ sudo iw wlx485d60577a77 set monitor control
$ sudo ip link set wlx485d60577a77 up

Once you are done with the above steps, verify that the changes were made successfully.

$ iw dev

The result of the above command:

Wi-fi adapter change from managed into monitor
Managed to Monitor mode

That’s all there is to setting the network adapter in monitor mode using the iw command.

Disable Monitor Mode in Kali Linux

When you are done monitoring with sniffing or network packets, you can restore your hardware mode to the default “managed” state.

Ezoic

To do this, you need to execute the following command:

$ sudo ip link set [INTERFACE] down
$ sudo iw [INTERFACE] set type managed
$ sudo ip link set [INTERFACE] up

Use airmon-ng Command to Set Monitor Mode in Linux

Alternatively, you can use the airmon-ng command to set monitor mode if the above method didn’t work out for you.

Airmon-ng is equally capable of putting wireless network adapters into monitor mode from managed mode or vice versa.

Install Airmon-ng

If you are following this guide on Ubuntu, then you will not find airmon-ng installed on your system, so to install it, run the below command:

Ezoic
$ sudo apt install aircrack-ng

When you execute the airmon-ng command without any arguments or parameters, it will show you the status of the attached network device, which includes PHY, Interface, Driver, and Chipset information.

Airmon-ng Command Usage to Start and Stop Monitor Mode

To find information about the wireless network adapter type, run the below code:

$ sudo airmon-ng

The output of the following command is shown below:

Wireless network information

Prior to putting the wireless network adapter into monitor mode, you need to kill the application or utility to perform the next steps without any issue.

Ezoic

So, first use the below command, which will list out the utilities that can cause problems, and once you find the utility, kill it with the second line of code.

$ sudo airmong-ng check
$ sudo airmon-ng check kill

The output of the following:

Check utility which can cause problem
Check utility, which can cause problem

After performing the above step, you need to run the below command to activate monitor mode.

$ sudo airmon-ng start [INTERFACE]

But before putting the interface into monitor mode, you should know the interface name because tab-completion will not work here, and second, after invoking the command, the internet will go down.

$ sudo airmon-ng start wlx485d60577a77

From the below image, you are able to see that the monitored mode is activated on the “wlx485d60577a77” network interface, which is now changed to “wlan0mon”.

Monitor mode activated

Let’s verify the changes with the iw command.

$ iw dev

From the below output, you can say that changes have been successfully implemented on the network adapter, which is capable of monitoring mode.

Verify changes using iw command

As I said above, the internet will not work in monitor mode.

If you have multiple network adapters like mine, then you can use another piece of hardware to connect to the internet and one for monitor mode.

To start the internet, execute the below code, which will activate internet connectivity.

$ sudo systemctl start NetworkManager

Disable Monitor Mode using airmon-ng Command

When you want to revert a wireless network adapter to managed mode, you need to execute the following line of code, which restores the connection:

$ sudo airmon-ng stop wlan0mon
$ sudo systemctl start NetworkManager

The output of the following command:

Disable monitor mode using airmon-ng command in Linux

Deprecated iwconfig Command

If you still want to use the deprecated iwconfig command to start monitor mode, then you can follow the below steps, which are similar to the iw command, but I can be sure you will find iwconfig installed on your distribution.

To enable monitor mode using the iwconfig command, type the commands in the following sequence:

$ sudo ifconfig [INTERFACE] down
$ sudo iwconfig [INTERFACE] mode monitor
$ sudo ifconfig [INTERFACE] up

To disable monitor mode, you can execute the following command:

$ sudo ifconfig [INTERFACE] down
$ sudo iwconfig [INTERFACE] mode managed
$ sudo ifconfig [INTERFACE] up

Also Read: Sniffnet: Application to Comfortably Monitor your Network Traffic

Wrap up

That’s all there is to enabling and disabling monitor mode in Linux.

And I hope you are able to successfully enable monitor mode on your Linux machine with the command that I shared in the following article.

  • $ sudo iw [INTERFACE] set monitor control
  • $ sudo airmon-ng start [INTERFACE]
  • $ sudo iwconfig [INTERFACE] mode monitor

If anything needs to be added or want to thank me, please pass your message in a comment box.