Tuesday, March 31, 2015

Nginx Reverse Proxy. Multiple Applications on One Domain

http://www.garron.me/en/linux/nginx-reverse-proxy.html

Usually when you install a Web Application you assign its own domain for it, but there are a handful times when you want to install two or even more applications under the same domain. For example, let’s say you have a Wordpress blog, and you want to use ZenPhoto for your photo album, and just to complicate it a little more you want to have a forum managed by Discourse. Sure you can just use Wordpress plugins to make Wordpress manage all of these, or use Drupal or any other thing, but for this example let’s suppose you want to do it this way.
Let’s suppose the structure will have this form:
/wordpress/ -> Wordpress /photoblog/ -> ZenPhoto /forum/ -> Discourse
This post will not cover how to install ZenPhoto, Wordpress or Discourse.

Installing applications

I have seen two ways the web applications are installed, PHP/MySQL applications that usually are powered by Apache or Nginx, and you can just install them in different folders and run as virtual servers, and those that are build with Ruby on rails or Node.js, like Discourse or the blogging platform Ghost, that have their own web server and usually run on a non-standart port.
In our example we are going to install Wordpress and ZenPhoto in their own folders or you can even install them on their own servers, just make sure they “know” they are running on a sub-folder. Discourse will be installed as adviced using Docker and responding on an specific port. This is going to be our scenario.
Wordpress, running on 192.168.1.2 port 8080 ZenPhoto, running on 192.168.1.3 port 8080 Discourse, running on 192.168.1.4 port 8080

Installing and configuring Nginx

Our Nginx and front server will be running on 192.168.1.1 and responding to port 80, it will act as a reverse proxy, it can have micro-cache enabled, which configuration is different for each application of the example, here will not be used, in future posts I will be showing different specific combinations.
sudo apt-get install nginx
Once installed we will configure the default virtual server to serve as our reverse proxy.
server {
    listen 80 default_server;
    listen [::]:80 default_server ipv6only=on;

    root /usr/share/nginx/html;
    index index.html index.htm;

    server_name www.example.com;

    location / {
        try_files $uri $uri/ =404;
    }

    location /wordpress/ {
       proxy_set_header X-Real-IP  $remote_addr;
       proxy_set_header X-Forwarded-For $remote_addr;
       proxy_set_header Host $host;
       proxy_pass http://192.168.1.2:8080;
       }

    location /photoblog/ {
       proxy_set_header X-Real-IP  $remote_addr;
       proxy_set_header X-Forwarded-For $remote_addr;
       proxy_set_header Host $host;
       proxy_pass http://192.168.1.3:8080;
    }

       location /forum/ {
       proxy_set_header X-Real-IP  $remote_addr;
       proxy_set_header X-Forwarded-For $remote_addr;
       proxy_set_header Host $host;
       proxy_pass http://192.168.1.4:8080;
       }
}
As it can be seen, Nginx is forwarding the everything back to the appropriate application depending on the folder, behind the scenes each application working to serve the users, the frontpage might be any other application or just a static web page with links to the applications behind.

How to secure SSH login with one-time passwords on Linux

http://xmodulo.com/secure-ssh-login-one-time-passwords-linux.html

As someone says, security is a not a product, but a process. While SSH protocol itself is cryptographically secure by design, someone can wreak havoc on your SSH service if it is not administered properly, be it weak passwords, compromised keys or outdated SSH client.
As far as SSH authentication is concerned, public key authentication is in general considered more secure than password authentication. However, key authentication is actually not desirable or even less secure if you are logging in from a public or shared computer, where things like stealth keylogger or memory scraper can always a possibility. If you cannot trust the local computer, it is better to use something else. This is when "one-time passwords" come in handy. As the name implies, each one-time password is for single-use only. Such disposable passwords can be safely used in untrusted environments as they cannot be re-used even when they are stolen.
One way to generate disposable passwords is via Google Authenticator. In this tutorial, I am going to demonstrate another way to create one-time passwords for SSH login: OTPW, a one-time password login package. Unlike Google Authenticator, you do not rely on any third party for one-time password generation and verification.

What is OTPW?

OTPW consists of one-time password generator and PAM-integrated verification routines. In OTPW, one-time passwords are generated apriori with the generator, and carried by a user securely (e.g., printed in a paper sheet). Cryptographic hash of the generated passwords are then stored in the SSH server host. When a user logs in with a one-time password, OTPW's PAM module verifies the password, and invalidates it to prevent re-use.

Step One: Install and Configure OTPW on Linux

Debian, Ubuntu or Linux Mint:

Install OTPW packages with apt-get.
$ sudo apt-get install libpam-otpw otpw-bin
Open a PAM configuration file for SSH (/etc/pam.d/sshd) with a text editor, and comment out the following line (to disable password authentication).
#@include common-auth
and add the following two lines (to enable one-time password authentication):
auth       required     pam_otpw.so
session    optional     pam_otpw.so

Fedora or CentOS/RHEL:

OTPW is not available as a prebuilt package on Red Hat based systems. So let's install OTPW by building it from the source.
First, install prerequites:
$ sudo yum git gcc pam-devel
$ git clone https://www.cl.cam.ac.uk/~mgk25/git/otpw
$ cd otpw
Open Makefile with a text editor, and edit a line that starts with "PAMLIB=" as follows.
On 64-bit system:
PAMLIB=/usr/lib64/security
On 32-bit system:
PAMLIB=/usr/lib/security
Compile and install it. Note that installation will automatically restart an SSH server. So be ready to be disconnected if you are on an SSH connection.
$ make
$ sudo make install
Now you need to update SELinux policy since /usr/sbin/sshd tries to write to user's home directory, which is not allowed by default SELinux policy. The following commands will do. If you are not using SELinux, skip this step.
$ sudo grep sshd /var/log/audit/audit.log | audit2allow -M mypol
$ sudo semodule -i mypol.pp
Next, open a PAM configuration file for SSH (/etc/pam.d/sshd) with a text editor, and comment out the following line (to disable password authentication).
#auth       substack     password-auth
and add the following two lines (to enable one-time password authentication):
auth       required     pam_otpw.so
session    optional     pam_otpw.so

Step Two: Configure SSH Server for One-time Passwords

The next step is to configure an SSH server to accept one-time passwords.
Open /etc/ssh/sshd_config with a text editor, and set the following three parameters. Make sure that you do not add these lines more than once, because that will cause an SSH server to fail.
UsePrivilegeSeparation yes
ChallengeResponseAuthentication yes
UsePAM yes
You also need to disable default password authentication. Optionally, enable public key authentication, so that you can fall back to key-based authentication in case you do not have one-time passwords.
PubkeyAuthentication yes
PasswordAuthentication no
Now restart SSH server.
Debian, Ubuntu or Linux Mint:
$ sudo service ssh restart
Fedora or CentOS/RHEL 7:
$ sudo systemctl restart sshd

Step Three: Generate One-time Passwords with OTPW

As mentioned earlier, you need to create one-time passwords beforehand, and have them stored on the remote SSH server host. For this, run otpw-gen tool as the user you will be logging in as.
$ cd ~
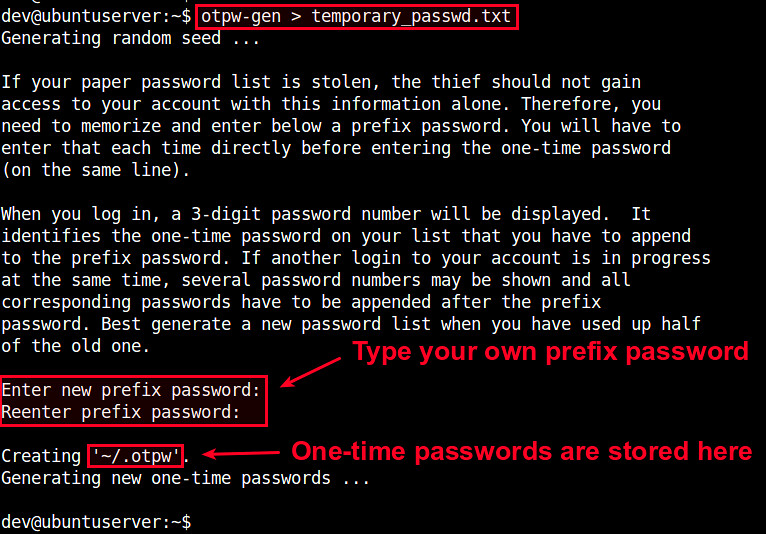
$ otpw-gen > temporary_password.txt

It will ask you to set a prefix password. When you later log in, you need to type this prefix password AND one-time password. Essentially the prefix password is another layer of protection. Even if the password sheet falls into the wrong hands, the prefix password forces them to brute-force.
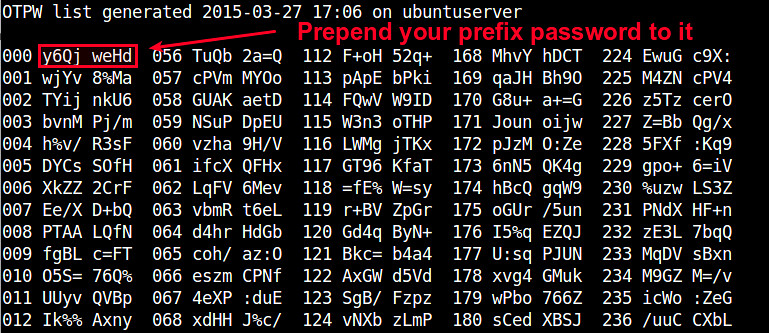
Once the prefix password is set, the command will generate 280 one-time passwords, and store them in the output text file (e.g., temporary_password.txt). Each password (length of 8 characters by default) is preceded by a three-digit index number. You are supposed to print the file in a sheet and carry it with you.

You will also see ~/.otpw file created, where cryptographic hashs of these passwords are stored. The first three digits in each line indicate the index number of the password that will be used for SSH login.
$ more ~/.otpw
OTPW1
280 3 12 8
191ai+:ENwmMqwn
218tYRZc%PIY27a
241ve8ns%NsHFmf
055W4/YCauQJkr:
102ZnJ4VWLFrk5N
2273Xww55hteJ8Y
1509d4b5=A64jBT
168FWBXY%ztm9j%
000rWUSdBYr%8UE
037NvyryzcI+YRX
122rEwA3GXvOk=z

Test One-time Passwords for SSH Login

Now let's login to an SSH server in a usual way:
$ ssh user@remote_host
If OTPW is successfully set up, you will see a slightly different password prompt:
Password 191:
Now open up your password sheet, and look for index number "191" in the sheet.
023 kBvp tq/G  079 jKEw /HRM  135 oW/c /UeB  191 fOO+ PeiD  247 vAnZ EgUt
According to sheet above, the one-time password for number "191" is "fOO+PeiD". You need to prepend your prefix password to it. For example, if your prefix password is "000", the actual one-time password you need to type is "000fOO+PeiD".
Once you successfully log in, the password used is automatically invalidated. If you check ~/.otpw, you will notice that the first line is replaced with "---------------", meaning that password "191" has been voided.
OTPW1
280 3 12 8
---------------
218tYRZc%PIY27a
241ve8ns%NsHFmf
055W4/YCauQJkr:
102ZnJ4VWLFrk5N
2273Xww55hteJ8Y
1509d4b5=A64jBT
168FWBXY%ztm9j%
000rWUSdBYr%8UE
037NvyryzcI+YRX
122rEwA3GXvOk=z

Conclusion

In this tutorial, I demonstrated how to set up one-time password login for SSH using OTPW package. You may realize that a print sheet can be considered a less fancy version of security token in two-factor authentication. Yet, it is simpler and you do not rely on any third-party for its implementation. Whatever mechanism you are using to create disposable passwords, they can be helpful when you need to log in to an SSH server from an untrusted public computer. Feel free to share your experience or opinion on this topic.

Monday, March 30, 2015

Flexible Access Control with Squid Proxy

http://www.linuxjournal.com/content/flexible-access-control-squid-proxy

Large enterprises and nuclear laboratories aren't the only organizations that need an Internet access policy and a means of enforcing it. My household has an Internet access policy, and the technique I've used to enforce it is applicable to almost any organization. In our case, I'm not too concerned about outside security threats. Our network is is behind a NAT router, and our Wi-Fi has a ridiculously ugly password. Our workstations are either Linux or properly patched Windows machines (if there is such a thing). No, our concerns come from inside our network: our kids like to play Web-based games, and that often gets in the way of chores and homework.

We're also concerned they might stumble upon Web content that we'd rather they not access. So no, we're not protecting nuclear secrets or intellectual property, but we are enabling the household to run smoothly without undue distractions.

In general, my wife and I don't care if our kids play games on-line or stream media. But, if their homework or chores don't get completed, we want a means of "grounding" them from this content.

The problem is that we also home school, and much of their educational content is also on-line. So, we can't simply block their access. We need something a bit more flexible.

When I set out to solve this problem, I made a list of the goals I wanted to accomplish:
  1. I don't want managing my kid's Internet access to become a full-time job. I want to be able to set a policy and have it implemented.
  2. My wife doesn't want to know how to log in, modify a configuration file and restart a proxy dæmon. She needs to be able to point her browser, check a few boxes and get on with her life.
  3. I don't want to write too much code. I'm willing to write a little bit of code, but I'm not interested in re-inventing the wheel if it already exists.
  4. I want to be able to enforce almost any policy that makes sense for our household.
  5. I don't want anything I do to break their Internet access when they take their laptops outside the house.
I'm sure my household isn't the only organization interested in these results. However, I made an assumption that may not make sense in other organizations: my kids won't be taking any sophisticated measures to circumvent our policy. However, I do reserve the right to participate in the arms race if they do.

For the purpose of this article, anytime this assumption leads to a configuration that may not make sense in more sophisticated environments, I'll try to discuss a few options that will allow you to strengthen your configuration.

I wasn't able to find any single software package that was flexible enough to do what I wanted and also easy enough to use, so that it wouldn't take considerable effort on the part of my wife and me to employ it. I was able to see that the Squid proxy server had the potential of doing what I wanted with just a little bit of coding on my part. My code will tell the proxy server how to handle each request as it comes in. The proxy either will complete the request for the user or send the user a Web page indicating that the site the user is trying to access has been blocked. This is how the proxy will implement whatever policy we choose.

I've decided that I want to be able to give my family members one of four levels of Internet access. At the two extremes, family members with "open" access can go just about anywhere they want, whereas family members with "blocked" access can't go anywhere on the Internet. My wife and I will have open access, for example. If one of the boys is grounded from the Internet, we'll simply set him as blocked.

However, it might be nice to be able to allow our kids to go to only a predetermined list of sites, say for educational purposes. In this case, we need a "whitelist-only" access level. Finally, I'm planning on a "filtered" access level where we can be a bit more granular and block things like music download, Flash games and Java applets. This is the access level the boys generally will have. We then can say "no more games" and have the proxy enforce that policy.

Because I don't want to write an actual interface for all of this, I simply use phpMyAdmin to update a database and set policy (Figure 1). In order to grant a particular access level, I simply update the corresponding cell in the grid, with 1 being on, and 0 being off.
Figure 1. phpMyAdmin Interface for Changing Access Policy

Policy enforcement also will require some client configuration, which I'll discuss in a moment.

However, I'm also going to discuss using OpenDNS as a means of filtering out things that I'd rather not spend my time testing and filtering. This is a good example of a security-in-depth posture.

I've configured OpenDNS to filter out the content that I don't anticipate ever changing my mind about. I don't think there's any reason for my family to be able to access dating sites, gambling sites or porn sites (Figure 2). Although not perfect, the OpenDNS people do a pretty good job of filtering this content without me having to do any testing myself. When that kind of testing fails, it has the potential for some really awkward moments—I'd just assume pass.
Figure 2. OpenDNS filters out the easy stuff.

Earlier in this article, I mentioned that this would require some client configuration. Most Web browsers allow you to configure them to use a proxy server to access the Internet. The naïve approach is simply to turn on proxy access by checking the check box. However, if my kids take their laptops to the library, where our proxy isn't available, they won't be able to access the Internet, and that violates goal number five. So, I've opted to use the automatic proxy configuration that most modern browsers support. This requires that I write a JavaScript function that determines how Web sites are to be accessed, either directly or via a proxy (Listing 1).

Listing 1. Automatic Proxy Configuration Script


 1  function FindProxyForURL(url, host) {
 2
 3      if (!isResolvable("proxy.example.com") {
 4              return "DIRECT";
 5      }
 6
 7      if (shExpMatch(host, "*.example.com")) {
 8              return "DIRECT";
 9      }
10
11      if (isInNet(host, "10.0.0.0", "255.0.0.0")) {
12              return "DIRECT";
13      }
14
15      return "PROXY 10.1.1.158:3128; DIRECT";
16  }

Every time your browser accesses a Web site, it calls the FindProxyForURL() function to see what method it should use to access the site: directly or via a proxy. The function shown in Listing 1 is just an example, but it demonstrates a few use cases that are worth mentioning. As you can see from line 15, you can return a semicolon-delimited list of methods to use. Your browser will try them in turn.

In this case, if the proxy happens to be inaccessible, you will fall back to DIRECT access to the Web site in question. In a more strict environment, that may not be the correct policy.

On line 11, you can see that I'm ensuring that Web sites on our local network are accessed directly.

On line 7, I'm demonstrating how to test for particular hostnames. There are a few Web sites that I access through a VPN tunnel on my workstation, so I cannot use the proxy. Finally, on line 3, you see something interesting. Here, I'm testing to see if a particular hostname is resolvable to an IP address.

I've configured our LAN's DNS server to resolve that name, but no other DNS server would be able to. This way, when our kids take their laptops out of our network, their browser doesn't try to use our proxy. Sure, we simply could fail over to direct access like we did on line 15, but fail over takes time.

The automatic proxy configuration is something that a more sophisticated user could circumvent.

There are add-ins for various browsers that would prevent the user from changing this configuration.

However, that wouldn't prevent the user from installing a new browser or starting a new Firefox profile. The fool-proof method to enforce this policy is at the gateway router: simply set a firewall rule that prevents access to the Web coming from any IP address except the proxy. This even could be done for specific client-host combinations, if needed.

While you're adding firewall rules to your gateway router, you might be tempted to configure the router to forward all Web traffic through the proxy, forming what often is called a transparent proxy.

However, according to RFC 3143, this isn't a recommended configuration, because it often breaks things like browser cache and history.

So now that I've discussed client, DNS and possible router configuration, it's time to look at the Squid proxy server configuration. The installation itself was pretty straightforward. I just used my distribution's package management system, so I won't discuss that here. The Squid proxy provides a lot of knobs that you can turn in order to optimize its cache and your Internet connection. Even though performance improvements are a nice ancillary benefit from implementing the proxy server, those configuration options are beyond the scope of this discussion. That leaves the single configuration change that is necessary in order plug my code into the system. All that was needed was to edit the /etc/squid/squid.conf file and add a single line:

redirect_program /etc/squid/redirector.pl

This one directive essentially tells the Squid proxy to "ask" my program how to handle every request that clients make. The program logic is pretty simple:
  1. Listen on STDIN for requests.
  2. Parse the request.
  3. Make a decision based on policy.
  4. Return the answer to the proxy.

Let's look at the sample code in Listing 2.

Listing 2. The Proxy Redirector


 1  #!/usr/bin/perl
 2
 3  use DBI;
 4
 5  $blocked = "http://192.168.1.10/blocked.html";
 6
 7  my $dbh = DBI->connect("dbi:mysql:authentication:host=
↪192.168.1.10", "user", "password") || die("Can\'t 
 ↪connect to database.\n");
 8
 9  $|=1;
10
11  while () {
12          my($sth, $r, $c);
13          my($url, $client, $d, $method, $proxy_ip, $proxy_port);
14
15          chomp($r = $_);
16
17          if ($r !~ m/\S+/) { next; }
18
19          ($url, $client, $d, $method, $proxy_ip, $proxy_port) 
             ↪= split(/\s/, $r);
20
21          $client =~ s/\/-//;
22          $proxy_ip =~ s/myip=//;
23          $proxy_port =~ s/myport=//;
24
25          $sth = $dbh->prepare("select * from web_clients 
             ↪where ip=\'$client\'");
26          $sth->execute();
27          $c = $sth->fetchrow_hashref();
28
29          if ($c->{blocked} eq "1") {
30                  send_answer($blocked);
31                  next;
32          }
33
34          if ($c->{whitelist_only} eq "1") {
35                  if (!is_on_list("dom_whitelist", $url)) {
36                          send_answer($blocked);
37                          next;
38                  }
39          }
40
41          if ($c->{filtered} eq "1") {
42                  if ($c->{games} eq "0") {
43                          # Check URL to see if it's 
                             ↪on our games list
44                  }
45
46                  if ($c->{flash} eq "0") {
47                          # Check URL to see if it looks 
                              ↪like flash
48                  }
49
50                  send_answer($url);
51                  next;
52          }
53
54          if ($c->{open} eq "1") {
55                  send_answer($url);
56                  next;
57          }
58
59          send_answer($url);
60          next;
61  }
62
63  exit 0;
64
65  #############################################################
66
67  sub     send_answer {
68          my($a) = @_;
69          print "$a\n";
70  }
71
72  sub     is_on_list {
73          my($list, $url) = @_;
74          my($o, @a, $i, @b, $b, $sth, $c);
75
76          $url =~ s/^https*:\/\///;
77          $url =~ s/^.+\@//;
78          $url =~ s/[:\/].*//;
79
80          @a = reverse(split(/\./, $url));
81
82          foreach $i (0 .. $#a) {
83                  push(@b, $a[$i]);
84                  $b = join(".", reverse(@b));
85
86                  $sth = $dbh->prepare("select count(*) from 
                     ↪$list where name=\'$b\'");
87                  $sth->execute();
88                  ($c) = $sth->fetchrow_array();
89
90                  if ($c > 0) { return $c; }
91          }
92
93          return $c+0;
94  }
95

The main loop begins on line 11, where it reads from STDIN. Lines 11–24 mostly are concerned with parsing the request from the Squid proxy. Lines 25–28 are where the program queries the database to see what the particular client's permissions are. Lines 29–57 check to see what permissions were read in from the database and return appropriately. In the case where the client is allowed "filtered" access to the Internet, I have a skeleton of the logic that I have in mind. I didn't want to bog this article down with trivial code. It was more important to demonstrate the structure and general logic of a Squid proxy redirector than it was to supply complete code. But you can see that I could implement just about any conceivable access policy in just a few lines of code and regular expressions.

The send_answer() function starting on line 67 really doesn't do much at this point, but in the future, I could add some logging capability here pretty easily.

The is_on_list() function starting on line 72 is perhaps a bit interesting. This function takes the hostname that the client is trying to access and breaks it up into a list of subdomains. Then it checks if those subdomains are listed in the database, whose name was passed in as a parameter. This way, I simply can put example.com in the database, and it will match example.com, www.example.com or webmail.example.com, for example.

By passing in different table names, I can use the same matching algorithm to match any number of different access control lists.

As you can see, the code really isn't very complex. But, by adding a bit more complexity, I should be able to enforce just about any access policy I can imagine. There is, however, one area that needs to be improved. As written, the program accesses the database several times for each access request that it handles. This is extremely inefficient, and by the time you read this, I probably will have implemented some sort of caching mechanism.

However, caching also will make the system less responsive either to changes to access policy or access control lists, as I will have to wait for the cached information to expire or restart the proxy dæmon.

In practice, I've seen something that is worth mentioning. Most Web browsers have their own caching mechanism. Because of this cache, if you change an access policy at the proxy, your clients aren't always aware of the change. In the case where you "open up" access, customers will need to refresh their cache in order to access previously blocked content. In the case where you restrict access, that content still may be available until the cache expires. One solution is to set the local cache size to 0 and simply rely upon the proxy server's cache.

Also, once the clients have been configured to talk to a proxy on the local network, it becomes possible to swap in different proxies or even to daisy-chain proxies without the client needing to do anything. This opens up the possibility of using Dan's Guardian, for example, to do content filtering in addition to access control.

By this time, many of you might think I'm some kind of uber-strict control freak. However, my family spends a lot of time on the Internet—sometimes to a fault. Most of the time, my family members use the Internet in an appropriate manner, but when they don't, my wife and I need a means of enforcing household rules without having to keep a constant watch over our kids.

Users, Permissions and Multitenant Sites

http://www.linuxjournal.com/content/users-permissions-and-multitenant-sites

In my last article, I started to look at multitenant Web applications. These are applications that run a single time, but that can be retrieved via a variety of hostnames. As I explained in that article, even a simple application can be made multitenant by having it check the hostname used to connect to the HTTP server, and then by displaying a different set of content based on that.
For a simple set of sites, that technique can work well. But if you are working on a multitenant system, you more likely will need a more sophisticated set of techniques.
For example, I recently have been working on a set of sites that help people practice their language skills. Each site uses the same software but displays a different interface, as well as (obviously) a different set of words. Similarly, one of my clients has long operated a set of several dozen geographically targeted sites. Each site uses the same software and database, but appears to the outside world to be completely separate. Yet another reason to use a multitenant architecture is if you allow users to create their own sites—and, perhaps, add users to those private sites.
In this article, I describe how to set up all of the above types of sites. I hope you will see that creating such a multitenant system doesn't have to be too complex, and that, on the contrary, it can be a relatively easy way to provide a single software service to a variety of audiences.

Identifying the Site

In my last article, I explained how to modify /etc/passwd such that more than one hostname would be associated with the same IP address. Every multitenant site uses this same idea. A limited set of IP addresses (and sometimes only a single IP address) can be mapped to a larger number of hostnames and/or domain names. When a request comes in, the application first checks to see which site has been requested, and then decides what to do based on it.
The examples in last month's article used Sinatra, a lightweight framework for Web development. It's true that you can do sophisticated things with Sinatra, but when it comes to working with databases and large-scale projects, I prefer to use Ruby on Rails. So here I'm using Rails, along with a back end in PostgreSQL.
In order to do that, you first need to create a simple Rails application:

rails new -d postgresql multiatf
Then create a "multiatf" user in your PostgreSQL installation:

createuser multiatf
Finally, go into the multiatf directory, and create the database:

rake db:create
With this in place, you now have a working (if trivially simple) Rails application. Make sure you still have the following two lines in your /etc/hosts file:

127.0.0.1 atf1
127.0.0.1 atf2
And when you start up the Rails application:

rails s
you can go to http://atf1:3000 or http://atf2:3000, and you should see the same results—namely, the basic "hello" that you get from a Rails application before you have done anything.
The next step then is to create a default controller, which will provide actual content for your users. You can do this by saying:

rails g controller welcome
Now that you have a "welcome" controller, you should uncomment the appropriate route in config/routes.rb:

root 'welcome#index'
If you start your server again and go to http://atf1:3000, you'll now get an error message, because Rails knows to go to the "welcome" controller and invoke the "index" action, but no such action exists. So, you'll have to go into your controller and add an action:

def index
  render text: "Hello!"
end
With that in place, going to your home page gives you the text.
So far, that's not very exciting, and it doesn't add to what I explored in my last article. You can, of course, take advantage of the fact that your "index" method is rendering text, and that you can interpolate values into your text dynamically:

def index
  render text: "Hello, visitor to #{request.host}!"
end
But again, this is not what you're likely to want. You will want to use the hostname in multiple places in your application, which means that you'll repeatedly end up calling "request.host" in your application. A better solution is to assign a @hostname variable in a before_action declaration, which will ensure that it takes place for everyone in the system. You could create this "before" filter in your welcome controller, but given that this is something you'll want for all controllers and all actions, I think it would be wiser to put it in the application controller.
Thus, you should open app/controllers/application_controller.rb, and add the following:

before_action :get_hostname

def get_hostname
  @hostname = request.host
end
Then, in your welcome controller, you can change the "index" action to be:

def index
  render text: "Hello, visitor to #{@hostname}!"
end
Sure enough, your hostname now will be available as @hostname and can be used anywhere on your site.

Moving to the Database

In most cases, you'll want to move beyond this simple scheme. In order to do that, you should create a "hosts" table in the database. The idea is that the "hosts" table will contain a list of hostnames and IDs. It also might contain additional configuration information (I discuss that below). But for now, you can just add a new resource to the system. I even would suggest using the built-in scaffolding mechanism that Rails provides:

rails g scaffold hosts name:string
Why use a scaffold? I know that it's very popular among Rails developers to hate scaffolds, but I actually love them when I start a simple project. True, I'll eventually need to remove and rewrite parts, but I like being able to move ahead quickly and being able to poke and prod at my application from the very first moments.
Creating a scaffold in Rails means creating a resource (that is, a model, a controller that handles the seven basic RESTful actions and views for each of them), as well as the basic tests needed to ensure that the actions work correctly. Now, it's true that on a production system, you probably won't want to allow anyone and everyone with an Internet connection to create and modify existing hosts. And indeed, you'll fix this in a little bit. But for now, this is a good and easy way to set things up.
You will need to run the new migration that was created:

rake db:migrate
And then you will want to add your two sites into the database. One way to do this is to modify db/seeds.rb, which contains the initial data that you'll want in the database. You can use plain-old Active Record method calls in there, such as:

Host.create([{name: 'atf1'}, {name: 'atf2'}])
Before you add the seeded data, make sure the model will enforce some constraints. For example, in app/models/host.rb, I add the following:

validates :name, {:uniqueness => true}
This ensures that each hostname will appear only once in the "hosts" table. Moreover, it ensures that when you run rake db:seed, only new hosts will be added; errors (including attempts to enter the same data twice) will be ignored.
With the above in place, you can add the seeded data:

rake db:seed
Now, you should have two records in your "hosts" table:

[local]/multiatf_development=# select name from hosts;
--------
| name |
--------
| atf1 |
--------
| atf2 |
--------
(2 rows)
With this in place, you now can change your application controller:

before_action :get_host

def get_host
  @requested_host = Host.where(name: request.host).first

  if @requested_host.nil?
    render text: "No such host '#{request.host}'.", status: 500
    return false
  end

end
(By the way, I use @requested_host here, so as not to collide with the @host variable that will be set in hosts_controller.)
@requested_host is no longer a string, but rather an object. It, like @requested_host before, is an instance variable set in a before filter, so it is available in all of your controllers and views. Notice that it is now potentially possible for someone to access your site via a hostname that is not in your "hosts" table. If and when that happens, @requested_host will be nil, and you give an appropriate error message.
This also means that you now have to change your "welcome" controller, ever so slightly:

def index
  render text: "Hello, visitor to #{@requested_host.name}!"
end
This change, from the string @requested_host to the object @requested_host, is about much more than just textual strings. For one, you now can restrict access to your site, such that only those hosts that are active can now be seen. For example, let's add a new boolean column, is_active, to the "hosts" table:

rails g migration add_is_active_to_hosts
On my machine, I then edit the new migration:

class AddIsActiveToHosts < ActiveRecord::Migration
  def change
    add_column :hosts, :is_active, :boolean, default: true, 
     ↪null: false
  end
end 
According to this definition, sites are active by default, and every site must have a value for is_active. You now can change your application controller's get_host method:
def get_host @requested_host = Host.where(name: request.host).first if @requested_host.nil? render text: "No such host '#{request.host}'.", status: 500 return false end if !@requested_host.is_active? render text: "Sorry, but '#{@requested_host.name}' ↪is not active.", status: 500 return false end end Notice how even a simple database now allows you to check two conditions that were not previously possible. You want to restrict the hostnames that can be used on your system, and you want to be able to turn hosts on and off via the database. If I change is_active to false for the "atf1" site:
UPDATE Hosts SET is_active = 'f' WHERE name = 'atf1'; immediately, I'm unable to access the "atf1" site, but the "atf2" site works just fine.
This also means that you now can add any number of sites—without regard to host or domain—so long as they all have DNS entries that point to your IP addresses. Adding a new site is as simple as registering the domain (if it hasn't been registered already), configuring its DNS entries such that the hostname points to your IP address, and then adding a new entry in your Hosts table.

Users and Permissions

Things become truly interesting when you use this technique to allow users to create and manage their own sites. Suddenly, it is not just a matter of displaying different text to different users, but allowing different users to log in to different sites. The above shows how you can have a set of top-level administrators and users who can log in to each site. However, there often are times when you will want to restrict users to be on a particular site.
There are a variety of ways to handle this. No matter what, you need to create a "users" table and a model that will handle your users and their ability to register and log in. I used to make the foolish mistake of implementing such login systems on my own; nowadays, I just use "Devise", the amazing Ruby gem that handles nearly anything you can imagine having to do with registration and authentication.
I add the following line to my project's Gemfile:
gem 'devise' Next, I run bundle install, and then:
rails g devise:install on the command line. Now that I have Devise installed, I'll create a user model:
rails g devise user This creates a new "user" model, with all of the Devise goodies in it. But before running the migrations that Devise has provided, let's make a quick change to the Devise migration.
In the migration, you're going to add an is_admin column, which indicates whether the user in question is an administrator. This line should go just before the t.timestamps line at the bottom, and it indicates that users are not administrators by default:
t.boolean :is_admin, default: false, null: false With this in place, you now can run the migrations. This means that users can log in to your system, but they don't have to. It also means that you can designate users as administrators. Devise provides a method that you can use to restrict access to particular areas of a site to logged-in users. This is not generally something you want to put in the application controller, since that would restrict people from logging in. However, you can say that your "welcome" and "host" controllers are open only to registered and logged-in users by putting the following at the top of these controllers:
before_action :authenticate_user! With the above, you already have made it such that only registered and logged-in users are able to see your "welcome" controller. You could argue that this is a foolish decision, but it's one that I'm comfortable with for now, and its wisdom depends on the type of application you're running. (SaaS applications, such as Basecamp and Harvest, do this, for example.) Thanks to Devise, I can register and log in, and then...well, I can do anything I want, including adding and removing hosts.
It's probably a good idea to restrict your users, such that only administrators can see or modify the hosts controller. You can do that with another before_action at the top of that controller:
before_action :authenticate_user! before_action :only_allow_admins before_action :set_host, only: [:show, :edit, :update, :destroy] Then you can define only_allow_admins:
def only_allow_admins if !current_user.is_admin? render text: "Sorry, but you aren't allowed there", ↪status: 403 return false end end Notice that the above before_action filter assumes that current_user already has been set, and that it contains a user object. You can be sure that this is true, because your call to only_allow_admins will take place only if authenticate_user! has fired and has allowed the execution to continue.
That's actually not much of a problem. You can create a "memberships" table that joins "users" and "hosts" in a many-to-many relationship. Each user thus can be a member of any number of hosts. You then can create a before_action routine that checks to be sure not only whether users are logged in, but also whether they are a member of the host they're currently trying to access. If you want to provide administrative rights to users within their site only, you can put such a column (for example, "is_host_admin") on the memberships table. This allows users to be a member of as many sites as they might want, but to administer only those that have been specifically approved.

Additional Considerations

Multitenant sites raise a number of additional questions and possibilities. Perhaps you want to have a different style for each site. That's fine. You can add a new "styles" table, which has two columns: "host_id" (a number, pointing to a row in the host table) and "style", text containing CSS, which you can read into your program at runtime. In this way, you can let users style and restyle things to their heart's content.
In the architecture described here, the assumption is that all data is in the same database. I tend to prefer to use this architecture, because I believe that it makes life easier for the administrators. But if you're particularly worried about data security, or if you are being crushed by a great load, you might want to consider a different approach, such as firing up a new cloud server for each new tenant site.
Also note that with this system, a user has to register only once on the entire site. In some cases, it's not desirable for end users to share logins across different sites. Moreover, there are cases (such as with medical records) that might require separating information into different databases. In such situations, you might be able to get away with a single database anyway, but use different "schemas", or namespaces, within it. PostgreSQL has long offered this capability, and it's something that more sites might be able to exploit.

Conclusion

Creating a multitenant site, including separate administrators and permissions, can be a quick-and-easy process. I have created several such sites for my clients through the years, and it has only gotten easier during that time. However, at the end of the day, the combination of HTTP, IP addresses and a database is truly what allows me to create such flexible SaaS applications.

Resources

The Devise home page is at https://github.com/plataformatec/devise.
For information and ideas about multitenant sites in Ruby on Rails, you might want to read Multitenancy with Rails, an e-book written by Ryan Bigg and available at https://leanpub.com/multi-tenancy-rails. While the book specifically addresses multitenancy with Rails, it offers many ideas and approaches that are appropriate for other software systems.

Now Available: Practice Makes Python by Reuven M. Lerner

My new e-book, Practice Makes Python, is now available for purchase. The book is aimed at people who have taken a Python course or learned it on their own, but want to feel more comfortable with the "Pythonic" way of doing things—using built-in data structures, writing functions, using functional techniques, such as comprehensions, and working with objects.
Practice Makes Python contains 50 exercises that I have used in nearly a decade of on-site training classes in the US, Europe, Israel and China. Each exercise comes with a solution, as well as a detailed description of why the solution works, often along with alternatives. All are aimed at improving your proficiency with Python, so that you can use it effectively in your work.
You can read more about the book at http://lerner.co.il/practice-makes-python.
 

Sunday, March 29, 2015

Red Hat clears up its software-defined storage options

http://www.zdnet.com/article/red-hat-clears-up-its-software-defined-storage-options

Summary:Red Hat clarifies where Ceph and Gluster fit into your big data storage plans.

If you were a little confused about Red Hat's open-source, software-defined storage options in the past, no one could blame you. On one side there was Inktank Ceph Enterprise, a distributed object store and file system. On the other was Red Hat Storage Server which deployed the Gluster, a multi-protocol, scale-out file-system that can deal with petabytes of data. So, how do you decide which one is for you? Red Hat's trying to make its storage portfolio a little clearer.
redhat-storage-plans.png
First, the company is renaming Inktank Ceph Enterprise to Red Hat Ceph Storage and Red Hat Storage Server to Red Hat Gluster Storage. This isn't just a rebranding. In the case of Red Hat Ceph Storage, Red Hat claims that the program has now gone through Red Hat's quality engineering processes and is now a fully-supported Red Hat solution. Both programs are open-source, scale-out software-defined storage solutions that run on commodity hardware and have durable, programmable architectures. Each is optimized for different enterprise workloads. Red Hat Gluster Storage is well suited for enterprise virtualization, analytics and enterprise sync and share workloads. Red Hat Ceph Storage is better suited for cloud infrastructure workloads, such as OpenStack and Amazon Web Services. You can use either for archival and rich media workloads.
Both are also still works-in-progress. While Gluster is more mature, its developers are getting ready to release Gluster 3.7 with better small-file performance, SELinux integration, and a much needed common framework for managing Gluster's many daemons.
As for Ceph, while its block and object store system works well, its POSIX file-system interface, CephFS, needs a lot more polishing before it's really deployment-ready. Mind you, as John Spray, a Red Hat senior software engineer recently said at Vault, the Linux Foundation storage summit, "Some people are already using it in production; we're terrified of this. It's really not ready yet." Still, Spray continued, this "is a mixed blessing because while it's a bit scary, we get really useful feedback and testing from those users."
In particular, as the development site states, "CephFS currently lacks a robust 'fsck' check and repair function. Please use caution when storing important data as the disaster recovery tools are still under development."
So, will Red Hat eventually merge the two? That doesn't seem to be in the works.
As Henry Baltazar, a senior analyst at Forrester Research, told Carol Sliwa of SearchStorage last fall, Red Hat's "going to have two platforms in the foreseeable future. Those aren't going to merge. Gluster is definitely the file storage type. There are ways they could use it that can complement Ceph. It still remains to be seen where it will wind up 10 years from now."
Growing pains and all, with our data storage demands doubling every two years, software-defined storage programs are going to be a corporate necessity. If you don't want to get buried by big data, Red Hat, with its twin data-storage options should be on your technology evaluation list.

Install UFW Firewall In Linux And Secure Computer From Harmful Incoming/Outgoing Connections

http://www.linuxandubuntu.com/home/install-ufw-firewall-in-linux-and-secure-computer-from-harmful-incoming-outgoing-connections


Install UFW firewall in Linux incoming/outgoing connections
UFW stands for Uncomplicated Firewall is a firewall to secure Linux desktop from harmful incoming and outgoing connections. UFW is the easiest firewall in Linux, it has a graphical user interface GUFW with all the features of setting up rules. In this tutorial we will install UFW & GUFW in our Ubuntu/Linux Mint/Debian operating system.


What Is Firewall ?


When you google what is firewall, you get a wikipedia page that tells about firewall. According to Wikipedia firewall is -

In computing, a firewall is a 
  • network security system that controls the incoming and outgoing network traffic based on an applied rule set.
  • establishes a barrier between a trusted, secure internal network and another network (e.g., the Internet) that is assumed not to be secure and trusted.
  • exist both as software to run on general purpose hardware and as a hardware appliance.


Many hardware-based firewalls also offer other functionality to the internal network they protect, such as acting as a DHCP server for that network.
linux free firewall gufw install
Firewall simply acts as a protection in between a computer and network.

Why To Install Firewall ?


Computers are connected to each other and they share data and some personal information with servers. The same way servers are connected with computers and they do share data depending on the request from client computer. But among those millions of connections there are dangerous connections too that steal private data from servers or desktop.

So to recognize and prevent such harmful and dangerous connections we use firewall. We can configure rules manually about the connections or there are also default set up rules in the firewall that stop certain connections to interact with system through network.

How To Install UFW (Uncomplicated Firewall) In Linux ?


In Ubuntu UFW is by default installed but if you doubt then you can check it by the following command -

$ sudo dpkg --get-selections | grep ufw
is ufw firewall installed in linux

Is firewall installed? If not, you can install it from terminal.

$ sudo apt-get install ufw

Once you have installed ufw you can configure this firewall from the terminal. But ufw is known for its simplicity and ease of use. So we will use graphical user interface GUFW instead of terminal. Yeah!

So open up software manager and search for 'gufw' and install it -

install gufw firewall from software center in linux

Here you have installed graphical user interface and just open it up system settings, start menu or dash.
I am using Ubuntu so I'll start firewall from dash.
start gufw firewall from dash or start menu in linux

Here we have a nice, easy to use firewall interface that everyone can understand. The interface has the following easy options -
set firewall profile in linux
Profile - Profile menu has some inbuilt profiles for Home (set by default), Office and Public.

Incoming and Outgoing connections for each profile -

                                     Incoming                     Outgoing
Home                             Deny                               Allow
Office                            Deny                               Allow
Public                            Reject                             Allow

ufw firewall status turn on/off firewall
Status - If you need to turn off firewall, in gufw you only click this button and to turn back on click the button again.

ufw graphical user interface application in linux firewall
gufw firewall connections configuration settings
Connection settings - GUFW allows to change default profile Incoming and Outgoing connections settings.

Now move down side of the application. Here we have some very simple firewall customization tools.

Listening Report - Under listening report we have the the list of services, and applications using incoming or outgoing connections. Each service and application behaving differently and have their own set of rules and rules can be customized also.
ufw linux firewall listening report
gufw add firewall rule preconfigured
Add a Firewall Rule - Select any service or application and click 'plus' sign and it will open window that is in left. The window has three tabs 'Preconfigured' , 'Simple' and 'Advanced'.

Preconfigured - Here you have preconfigured settings for applications.

gufw add rule simple
Simple - Here you can select specify some very simple rules, like rule name, Policy, Direction, Protocol and Port. 

gufw add rule firewall advanced
Advanced - In addition to some simple settings in advanced tab you can set some other rule settings. For example, Insers, Interface, you can also set whether you want to make log, log all or do not log. Advanced tab has one more option to setup range of IP address for a selected application.

gufw created rule

After you have setting up rules click Add. Rules added! You can see your added rules under Rules.

You can edit the rules and delete the rules.  To edit any rule select it and click the setting icono below the list.

To delete any rule select rule and click 'minus'. 

Log

gufw firewall connection log
In last of the application you have log. Under log there are all activities of the applications or services status of incoming and outgoing connections. Log helps in identifying any suspicious activity of any applications. 

A firewall is one of the best security tools. Hackers find an open port and attack through. Firewall restrict any of such malicious connections. UFW is the easiest one there are many others that protect the system Iptables and Shorewall are very good example.

Android on a Stick, or how to install Android-x86 on a USB stick

http://www.linuxbsdos.com/2015/03/26/android-on-a-stick-or-how-to-install-android-x86-on-a-usb-stick

The Android-x86 project provides ISO installation images of Android that can be installed on personal computers, which is cool, because that makes it possible to use the most popular operating system on the planet without buying an Android tablet or smartphone.
The latest stable release is Android-x86 4.4-r2. This tutorial shows how to install it on a USB stick, so you can have an Android device that you can boot and use from any modern computer.
What You’ll Need:
If you want to follow along, you’ll need two USB sticks, one to use as the installation media, the other as the installation target. The ISO installation image is less than 400 MB in size, so a 1 GB USB stick will do as the installation media. You may download the latest ISO installation image from android-x86.org/download.
The target USB stick should also be at least 1 GB, because a fresh installation of Android-x86 takes up about 1 GB of disk space. For this tutorial, I used an 8 GB USB stick.
How To Do What To Do:
1. Transfer the installation image to a USB stick: Assuming that you downloaded the ISO image to a Linux computer, you may transfer it to a USB stick using the dd command like this:

2. Format the target USB stick: To make the installation easier, be sure to format the target USB stick, or just wipe it, if it contains data. Then Insert both USB sticks to free USB ports on the computer and reboot. If you did not set the computer to boot from external media, press the F key that will bring up the computer’s boot menu and select the right one to boot into.
Figure 1 shows the entries in the boot menu of the computer used for this tutorial. The USB: PNY USB 2.0 FD 1100 entry is the USB stick that holds the installation image, while the USB: SanDisk Cruzer Glide 1.26 entry is the target USB stick. The computer has an internal 250 GB hard disk with Linux Mint 17.1, Ubuntu 14.10 and Windows 8 installed in triple-boot fashion.

Linux computer boot menu
Figure 1: Boot menu of computer showing detected storage media
This is the Android-x86 boot menu. You have the option to boot into a live desktop or straight to the installer. The latter option seems to be the most appropriate thing to do here.

Android-x86 4.4-r2 boot menu
Figure 2: Entries on the boot menu of Android-x86 4.4-r2 installation image
You’ll then be shown a window that shows the disks and disk partitions detected by the installer. In this case, sdb1 belongs to the target USB stick. The sdc entries belong to the installation media.

Android-x86 disks
Figure 3: Disks detected by the Android-x86 installer
After selecting the target disk, you’ll be given the option to format it. You definitely want to format it. I chose to format mine using the Ext3 file system.

Android-x86 ext3 file system
Figure 4: File systems supported by the Android-x86 installer
Yes, we are sure.

Android-x86 format USB stick
Figure 5: Options to format the target USB stick.
Yes, install the GRUB boot loader to the USB stick. A plus for the installer is that it does not mess with the contents of the internal hard disk, which is good to know, because in a future tutorial, I’ll show how to dual-boot Android-x86 4.4r2 and another popular Linux distribution.

Android-x86 install GRUB
Figure 6: Install GRUB boot loader to the USB stick
Yes, I think it’s better to install the /system directory read-write.

Android-x86 /system directory
Figure 7: Make the /system directory read-write
This image just shows the writing process. Less than 750 MB of data is written to the USB stick.

Android-x86 /system
Figure 8: Writing to the /system directory.
Installation should take less than two minutes. I did not encounter any problem, so next thing I had to do was reboot.

Reboot Android-x86
Figure 9: Reboot newly installed Android-x86 from a USB stick
On rebooting, you’ll be presented with the GRUB menu. Selecting the default option, I was able to boot into the Android-x86 desktop. My test computer does not have a wireless card, but the system was able to auto-configure the Ethernet card.

Android-x86 4.4-r2 GRUB boot
Figure 10: GRUB boot menu of Android-x86 4.4-r2
So I now have Android 4.4 installed on a USB stick, which I can use from any personal computer. And that’s awesome, because I don’t have any Android device.

Thursday, March 26, 2015

How to set up server monitoring system with Monit

http://xmodulo.com/server-monitoring-system-monit.html

Many Linux admins rely on a centralized remote monitoring system (e.g., Nagios or Cacti) to check the health of their network infrastructure. While centralized monitoring makes an admin's life easy when dealing with many hosts and devices, a dedicated monitoring box obviously becomes a single point of failure; if the monitoring box goes down or becomes unreachable for whatever reason (e.g., bad hardware or network outage), you will lose visibility on your entire infrastructure.
One way to add redundancy to your monitoring system is to install standalone monitoring software (as a fallback) at least on any critical/core servers on your network. In case a centralized monitor is down, you will still be able to maintain visibility on your core servers from their backup monitor.

What is Monit?

Monit is a cross-platform open-source tool for monitoring Unix/Linux systems (e.g., Linux, BSD, OSX, Solaris). Monit is extremely easy to install and reasonably lightweight (with only 500KB in size), and does not require any third-party programs, plugins or libraries. Yet, Monit lends itself to full-blown monitoring, capable of process status monitoring, filesystem change monitoring, email notification, customizable actions for core services, and so on. The combination of ease of setup, lightweight implementation and powerful features makes Monit an ideal candidate for a backup monitoring tool.
I have been using Monit for several years on multiple hosts, and I am very pleased how reliable it has been. Even as a full-blown monitoring system, Monit is very useful and powerful for any Linux admin. In this tutorial, let me demonstrate how to set up Monit on a local server (as a backup monitor) to monitor common services. With this setup, I will only scrach the surface of what Monit can do for us.

Installation of Monit on Linux

Most Linux distributions already include Monit in their repositories.
Debian, Ubuntu or Linux Mint:
$ sudo aptitude install monit
Fedora or CentOS/RHEL:
On CentOS/RHEL, you must enable either EPEL or Repoforge repository first.
# yum install monit
Monit comes with a very well documented configuration file with a lots of examples. The main configuration file is located in /etc/monit.conf in Fedora/CentOS/RHEL, or /etc/monit/monitrc in Debian/Ubuntu/Mint. Monit configuration has two parts: "Global" and "Services" sections.

Global Configuration: Web Status Page

Monit can use several mail servers for notifications, and/or an HTTP/HTTPS status page. Let's start with the web status page with the following requirements.
  • Monit listens on port 1966.
  • Access to the web status page is encrypted with SSL.
  • Login requires monituser/romania as user/password.
  • Login is permitted from localhost, myhost.mydomain.ro, and internal LAN (192.168.0.0/16) only.
  • Monit stores an SSL certificate in a pem format.
For subsequent steps, I will use a Red Hat based system. Similar steps will be applicable on a Debian based system.
First, generate and store a self-signed certificate (monit.pem) in /var/cert.
# mkdir /var/certs
# cd /etc/pki/tls/certs
# ./make-dummy-cert monit.pem
# cp monit.pem /var/certs
# chmod 0400 /var/certs/monit.pem
Now put the following snippet in the Monit's main configuration file. You can start with an empty configuration file or make a copy of the original file.
1
2
3
4
5
6
7
set httpd port 1966 and
     SSL ENABLE
     PEMFILE  /var/certs/monit.pem
     allow monituser:romania
     allow localhost
     allow 192.168.0.0/16
     allow myhost.mydomain.ro

Global Configuration: Email Notification

Next, let's set up email notification in Monit. We need at least one active SMTP server which can send mails from the Monit host. Something like the following will do (adjust it for your case):
  • Mail server hostname: smtp.monit.ro
  • Sender email address used by monit (from): monit@monit.ro
  • Who will receive mail from monit daemon: guletz@monit.ro
  • SMTP port used by mail server: 587 (default is 25)
With the above information, email notification would be configured like this:
1
2
3
4
5
6
7
8
9
10
11
12
set mailserver  smtp.monit.ro port 587
set mail-format {
 from: monit@monit.ro
 subject: $SERVICE $EVENT at $DATE on $HOST
 message: Monit $ACTION $SERVICE $EVENT at $DATE on $HOST : $DESCRIPTION.
     
       Yours sincerely,
          Monit
  
  }
 
set alert guletz@monit.ro
As you can see, Monit offers several built-in variables ($DATE, $EVENT, $HOST, etc.), and you can customize your email message for your needs. If you want to send mails from the Monit host itself, you need a sendmail-compatible program (e.g., postfix or ssmtp) already installed.

Global Configuration: Monit Daemon

The next part is setting up monit daemon. We will set it up as follows.
  • Performs the first check after 120 seconds.
  • Checks services once every 3 minutes.
  • Use syslog for logging.
Place the following snippet to achieve the above setting.
1
2
3
set daemon 120
   with start delay 240
set logfile syslog facility log_daemon
We must also define "idfile", a unique ID used by monit demon, and "eventqueue", a path where mails sent by monit but undelivered due to SMTP/network errors. Verifiy that path (/var/monit) already exists. The following configuration will do.
1
2
3
set idfile /var/monit/id
 set eventqueue
     basedir /var/monit

Test Global Configuration

Now the "Global" section is finished. The Monit configuration file will look like this:
1
2
3
4
5
6
7
8
9
10
11
12
13
14
15
16
17
18
19
20
21
22
23
24
25
26
27
28
29
30
31
32
33
34
35
#  Global Section
 
# status webpage and acl's
set httpd port 1966 and
     SSL ENABLE
     PEMFILE  /var/certs/monit.pem
     allow monituser:romania
     allow localhost
     allow 192.168.0.0/16
     allow myhost.mydomain.ro
 
# mail-server
set mailserver  smtp.monit.ro port 587
# email-format
set mail-format {
 from: monit@monit.ro
 subject: $SERVICE $EVENT at $DATE on $HOST
 message: Monit $ACTION $SERVICE $EVENT at $DATE on $HOST : $DESCRIPTION.
     
       Yours sincerely,
          Monit
  
  }
 
set alert guletz@monit.ro
 
# delay checks
set daemon 120
   with start delay 240
set logfile syslog facility log_daemon
 
# idfile and mail queue path
set idfile /var/monit/id
 set eventqueue
     basedir /var/monit
Now it is time to check what we have done. You can test an existing configuration file (/etc/monit.conf) by running:
# monit -t
Control file syntax OK
If Monit complains about any error, please review the configuration file again. Fortunately, error/warnings messages are informative. For example:
monit: Cannot stat the SSL server PEM file '/var/certs/monit.pem' -- No such file or directory
/etc/monit/monitrc:10: Warning: hostname did not resolve 'smtp.monit.ro'
Once you verify the syntax of configuration, start monit daemon, and wait 2 to 3 minutes:
# service monit start
If you are using systemd, run:
# systemctl start monit
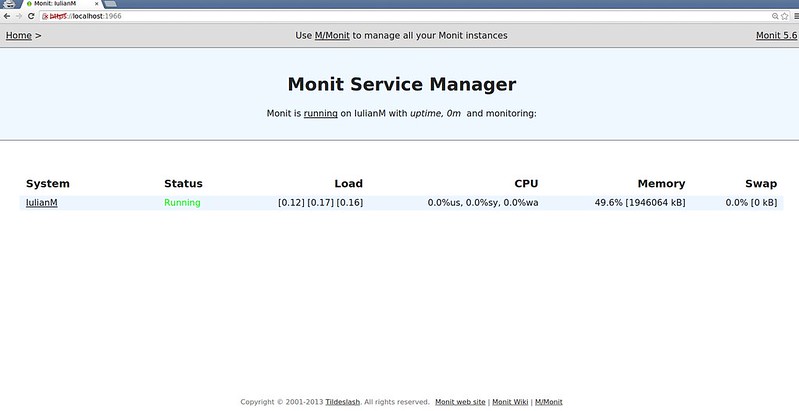
Now open a browser window, and go to https://:1966. Replace & with your Monit hostname or IP address.
Note that if you have a self-signed SSL certificate, you will see a warning message in your browser.

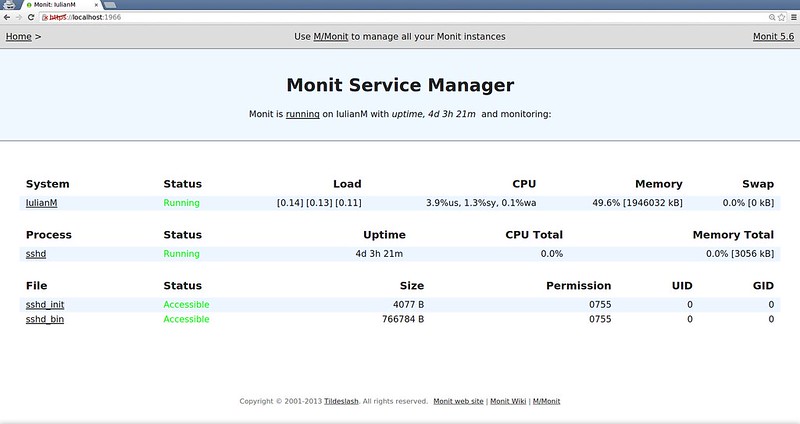
After you have completed login, you must see the following page.

In the rest of the tutorial, let me show how we can monitor a local server and common services. You will see a lot of useful examples on the official wiki page. Most of them are copy-and-pastable!

Service Configuration: CPU/Memory Monitoring

Let start with monitoring a local server's CPU/memory usage. Copy the following snippet in the configuration file.
1
2
3
4
5
6
7
check system localhost
    if loadavg (1min) > 10 then alert
    if loadavg (5min) > 6 then alert
    if memory usage > 75% then alert
    if cpu usage (user) > 70% then alert
    if cpu usage (system) > 60% then alert
    if cpu usage (wait) > 75% then alert
You can easily interpret the above configuration. The above checks are performed on local host for every monitoring cycle (which is set to 120 seconds in the Global section). If any condition is met, monit daemon will send an alert with an email.
If certain properties do not need to be monitored for every cycle, you can use the following format. For example, this will monitor average load every other cycle (i.e., every 240 seconds).
1
if loadavg (1min) > 10 for 2 cycles then alert

Service Configuration: SSH Service Monitoring

Let's check if we have sshd binary installed in /usr/sbin/sshd:
1
check file sshd_bin with path /usr/sbin/sshd
We also want to check if the init script for sshd exist:
1
check file sshd_init with path /etc/init.d/sshd
Finally, we want to check if sshd daemon is up an running, and listens on port 22:
1
2
3
4
5
check process sshd with pidfile /var/run/sshd.pid
   start program  "/etc/init.d/sshd start"
   stop program  "/etc/init.d/sshd stop"
   if failed port 22 protocol ssh then restart
   if 5 restarts within 5 cycles then timeout
More specifically, we can interpret the above configuration as follows. We check if a process named sshd and a pidfile (/var/run/sshd.pid) exist. If either one does not exist, we restart sshd demon using init script. We check if a process listening on port 22 can speak SSH protocol. If not, we restart sshd daemon. If there are at least 5 restarts within the last 5 monitoring cycles (i.e., 5x120 seconds), sshd daemon is declared non-functional, and we do not try to check again.

Service Configuration: SMTP Service Monitoring

Now let's set up a check on a remote SMTP mail server (e.g., 192.168.111.102). Let's assume that the SMTP server is running SMTP, IMAP and SSH on its LAN interface.
1
2
3
4
5
6
check host MAIL with address 192.168.111.102
   if failed icmp type echo within 10 cycles then alert
   if failed port 25  protocol smtp then alert
             else if recovered then exec "/scripts/mail-script"
   if failed port 22  protocol ssh  then alert
   if failed port 143 protocol imap then alert
We check if the remote host responds to ICMP. If we haven't received ICMP response within 10 cycles, we send out an alert. If testing for SMTP protocol on port 25 fails, we send out an alert. If testing succeeds again after a failed test, we run a script (/scripts/mail-script). If testing for SSH and IMAP protocols fail on port 22 and 143, respectively, we send out an alert.

Conclusion

In this tutorial, I demonstrate how to set up Monit on a local server. What I showed here is just the tip of the iceberg, as far as Monit's capabilities are concerned. Take your time and read the man page about Monit (a very good one). Monit can do a lot for any Linux admin with a very nice and easy to understand syntax. If you put together a centralized remote monitor and Monit to work for you, you will have a more reliable monitoring system. What is your thought on Monit?