https://opensource.com/article/18/7/network-attached-storage-Raspberry-Pi

Follow these step-by-step instructions to build your own Raspberry Pi-based network attached storage system.

Image by :
In
this three-part series, I'll explain how to set up a simple, useful NAS
(network attached storage) system. I use this kind of setup to store my
files on a central system, creating incremental backups automatically
every night. To mount the disk on devices that are located in the same
network, NFS is installed. To access files offline and share them with
friends, I use Nextcloud.
This article will cover the basic setup of software and hardware to mount the data disk on a remote device. In the second article, I will discuss a backup strategy and set up a cron job to create daily backups. In the third and last article, we will install Nextcloud, a tool for easy file access to devices synced offline as well as online using a web interface. It supports multiple users and public file-sharing so you can share pictures with friends, for example, by sending a password-protected link.
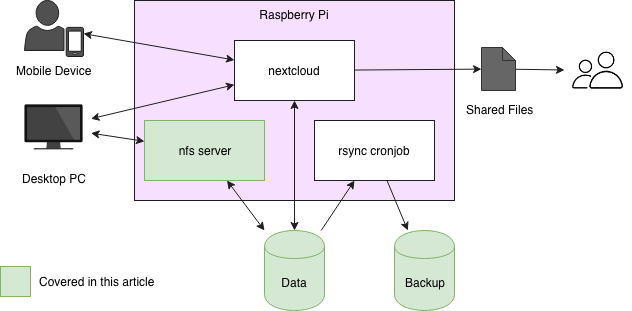
The target architecture of our system looks like this:
The computing power is delivered by a Raspberry Pi 3, which comes with a quad-core CPU, a gigabyte of RAM, and (somewhat) fast ethernet. Data will be stored on two USB hard drives (I use 1-TB disks); one is used for the everyday traffic, the other is used to store backups. Be sure to use either active USB hard drives or a USB hub with an additional power supply, as the Raspberry Pi will not be able to power two USB drives.
First, delete the partition table of the disk and create a new one containing only one partition. In
First install autofs and create the mount point for the storage:
Setting up autofs is a bit fault-prone, so do not get frustrated if mounting doesn't work on the first try. Give it another chance, search for more detailed resources (there is plenty of documentation online), or leave a comment.
To mount the storage on a Linux computer, run the commands:
Now you are able to access files stored on your own RaspberryPi-powered NAS from remote devices using the NFS mount. In the next part of this series, I will cover how to automatically back up your data to the second hard drive using
This article will cover the basic setup of software and hardware to mount the data disk on a remote device. In the second article, I will discuss a backup strategy and set up a cron job to create daily backups. In the third and last article, we will install Nextcloud, a tool for easy file access to devices synced offline as well as online using a web interface. It supports multiple users and public file-sharing so you can share pictures with friends, for example, by sending a password-protected link.
The target architecture of our system looks like this:
Hardware
Let's get started with the hardware you need. You might come up with a different shopping list, so consider this one an example.The computing power is delivered by a Raspberry Pi 3, which comes with a quad-core CPU, a gigabyte of RAM, and (somewhat) fast ethernet. Data will be stored on two USB hard drives (I use 1-TB disks); one is used for the everyday traffic, the other is used to store backups. Be sure to use either active USB hard drives or a USB hub with an additional power supply, as the Raspberry Pi will not be able to power two USB drives.
Software
The operating system with the highest visibility in the community is Raspbian, which is excellent for custom projects. There are plenty of guides that explain how to install Raspbian on a Raspberry Pi, so I won't go into details here. The latest official supported version at the time of this writing is Raspbian Stretch, which worked fine for me. At this point, I will assume you have configured your basic Raspbian and are able to connect to the Raspberry Pi byssh.Prepare the USB drives
To achieve good performance reading from and writing to the USB hard drives, I recommend formatting them with ext4. To do so, you must first find out which disks are attached to the Raspberry Pi. You can find the disk devices in/dev/sd/. Using the command fdisk -l, you can find out which two USB drives you just attached. Please note that all data on the USB drives will be lost as soon as you follow these steps.As those devices are the only 1TB disks attached to the Raspberry Pi, we can easily see thatpi@raspberrypi:~ $ sudo fdisk -l <...> Disk /dev/sda: 931.5 GiB, 1000204886016 bytes, 1953525168 sectors Units: sectors of 1 * 512 = 512 bytes Sector size (logical/physical): 512 bytes / 512 bytes I/O size (minimum/optimal): 512 bytes / 512 bytes Disklabel type: dos Disk identifier: 0xe8900690 Device Boot Start End Sectors Size Id Type /dev/sda1 2048 1953525167 1953523120 931.5G 83 Linux Disk /dev/sdb: 931.5 GiB, 1000204886016 bytes, 1953525168 sectors Units: sectors of 1 * 512 = 512 bytes Sector size (logical/physical): 512 bytes / 512 bytes I/O size (minimum/optimal): 512 bytes / 512 bytes Disklabel type: dos Disk identifier: 0x6aa4f598 Device Boot Start End Sectors Size Id Type /dev/sdb1 * 2048 1953521663 1953519616 931.5G 83 Linux
/dev/sda and /dev/sdb
are the two USB drives. The partition table at the end of each disk
shows how it should look after the following steps, which create the
partition table and format the disks. To do this, repeat the following
steps for each of the two devices by replacing sda with sdb the second time (assuming your devices are also listed as /dev/sda and /dev/sdb in fdisk).First, delete the partition table of the disk and create a new one containing only one partition. In
fdisk, you can use interactive one-letter commands to tell the program what to do. Simply insert them after the prompt Command (m for help): as follows (you can also use the m command anytime to get more information):Now we will format the newly created partitionpi@raspberrypi:~ $ sudo fdisk /dev/sda Welcome to fdisk (util-linux 2.29.2). Changes will remain in memory only, until you decide to write them. Be careful before using the write command. Command (m for help): o Created a new DOS disklabel with disk identifier 0x9c310964. Command (m for help): n Partition type p primary (0 primary, 0 extended, 4 free) e extended (container for logical partitions) Select (default p): p Partition number (1-4, default 1): First sector (2048-1953525167, default 2048): Last sector, +sectors or +size{K,M,G,T,P} (2048-1953525167, default 1953525167): Created a new partition 1 of type 'Linux' and of size 931.5 GiB. Command (m for help): p Disk /dev/sda: 931.5 GiB, 1000204886016 bytes, 1953525168 sectors Units: sectors of 1 * 512 = 512 bytes Sector size (logical/physical): 512 bytes / 512 bytes I/O size (minimum/optimal): 512 bytes / 512 bytes Disklabel type: dos Disk identifier: 0x9c310964 Device Boot Start End Sectors Size Id Type /dev/sda1 2048 1953525167 1953523120 931.5G 83 Linux Command (m for help): w The partition table has been altered. Syncing disks.
/dev/sda1 using the ext4 filesystem:After repeating the above steps, let's label the new partitions according to their usage in your system:pi@raspberrypi:~ $ sudo mkfs.ext4 /dev/sda1 mke2fs 1.43.4 (31-Jan-2017) Discarding device blocks: done <...> Allocating group tables: done Writing inode tables: done Creating journal (1024 blocks): done Writing superblocks and filesystem accounting information: done
Now let's get those disks mounted to store some data. My experience, based on running this setup for over a year now, is that USB drives are not always available to get mounted when the Raspberry Pi boots up (for example, after a power outage), so I recommend using autofs to mount them when needed.pi@raspberrypi:~ $ sudo e2label /dev/sda1 data pi@raspberrypi:~ $ sudo e2label /dev/sdb1 backup
First install autofs and create the mount point for the storage:
Then mount the devices by adding the following line topi@raspberrypi:~ $ sudo apt install autofs pi@raspberrypi:~ $ sudo mkdir /nas
/etc/auto.master:/nas /etc/auto.usb/etc/auto.usb if not existing with the following content, and restart the autofs service:data -fstype=ext4,rw :/dev/disk/by-label/data backup -fstype=ext4,rw :/dev/disk/by-label/backup
pi@raspberrypi3:~ $ sudo service autofs restart/nas/data and /nas/backup,
respectively. Clearly, the content will not be too thrilling, as you
just erased all the data from the disks. Nevertheless, you should be
able to verify the devices are mounted by executing the following
commands:First move into the directories to make sure autofs mounts the devices. Autofs tracks access to the filesystems and mounts the needed devices on the go. Then thepi@raspberrypi3:~ $ cd /nas/data pi@raspberrypi3:/nas/data $ cd /nas/backup pi@raspberrypi3:/nas/backup $ mount <...> /etc/auto.usb on /nas type autofs (rw,relatime,fd=6,pgrp=463,timeout=300,minproto=5,maxproto=5,indirect) <...> /dev/sda1 on /nas/data type ext4 (rw,relatime,data=ordered) /dev/sdb1 on /nas/backup type ext4 (rw,relatime,data=ordered)
mount command shows that the two devices are actually mounted where we wanted them.Setting up autofs is a bit fault-prone, so do not get frustrated if mounting doesn't work on the first try. Give it another chance, search for more detailed resources (there is plenty of documentation online), or leave a comment.
Mount network storage
Now that you have set up the basic network storage, we want it to be mounted on a remote Linux machine. We will use the network file system (NFS) for this. First, install the NFS server on the Raspberry Pi:pi@raspberrypi:~ $ sudo apt install nfs-kernel-server/nas/data
directory, which will be the only device accessible from outside the
Raspberry Pi (the other one will be used for backups only). To export
the directory, edit the file /etc/exports and add the following line to allow all devices with access to the NAS to mount your storage:/nas/data *(rw,sync,no_subtree_check)man exports. In the configuration above, anyone will be able to mount your data as long as they have access to the ports needed by NFS: 111 and 2049.
I use the configuration above and allow access to my home network only
for ports 22 and 443 using the routers firewall. That way, only devices
in the home network can reach the NFS server.To mount the storage on a Linux computer, run the commands:
Again, I recommend using autofs to mount this network device. For extra help, check out How to use autofs to mount NFS shares.you@desktop:~ $ sudo mkdir /nas/data you@desktop:~ $ sudo mount -t nfs <raspberry-pi-hostname-or-ip>:/nas/data /nas/data
Now you are able to access files stored on your own RaspberryPi-powered NAS from remote devices using the NFS mount. In the next part of this series, I will cover how to automatically back up your data to the second hard drive using
rsync. To save space on the device while still doing daily backups, you will learn how to create incremental backups with rsync.

No comments:
Post a Comment