https://linuxconfig.org/set-up-a-headless-deluge-server-on-linux
Deluge relies on a client-server model. The Deluge daemon runs on a designated server machine that handles the download and upload of files. Then, you can connect to your server using the Deluge client on any computer on the same network to add, remove, and manage your torrents.
It doesn't hurt that it's very simple to control your torrents with Deluge either. It lets you easily add torrents from a variety of sources and even control their priority and place in the download queue.
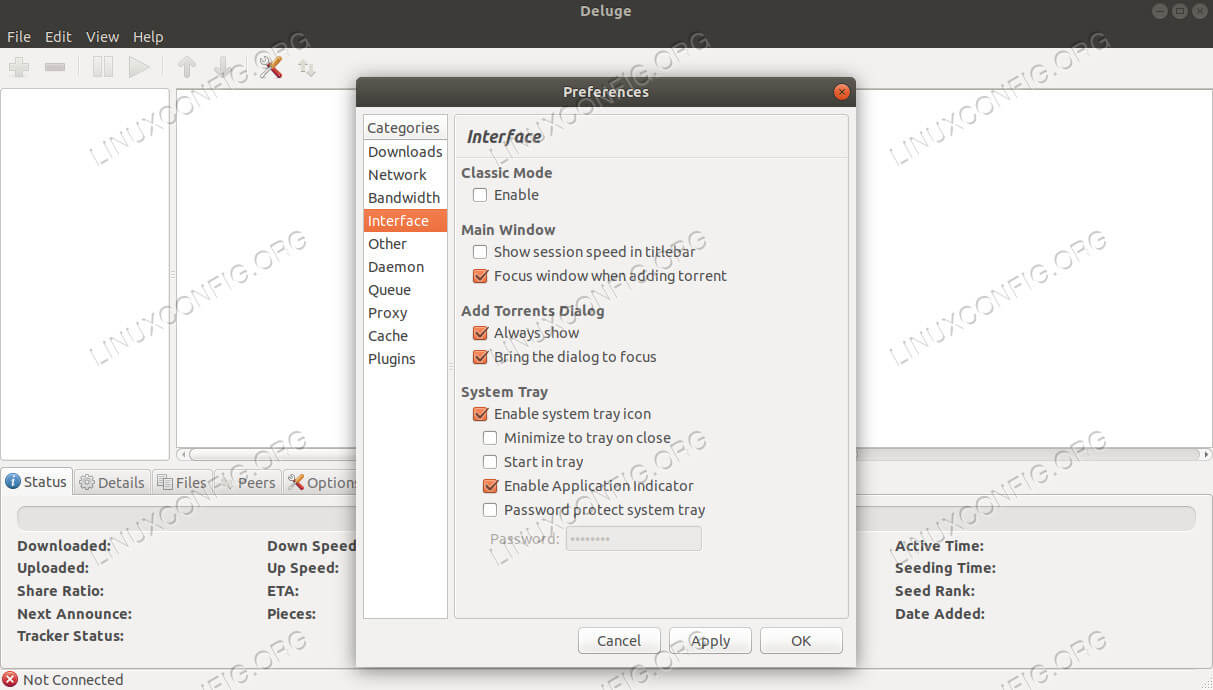
Open
up the Deluge client. Click on "Edit" at the top. Then, select
"Preferences." On the left side of the window, click the "Interface"
tab. You'll see that the top heading is "Classic Mode." Uncheck that box
to disable it.
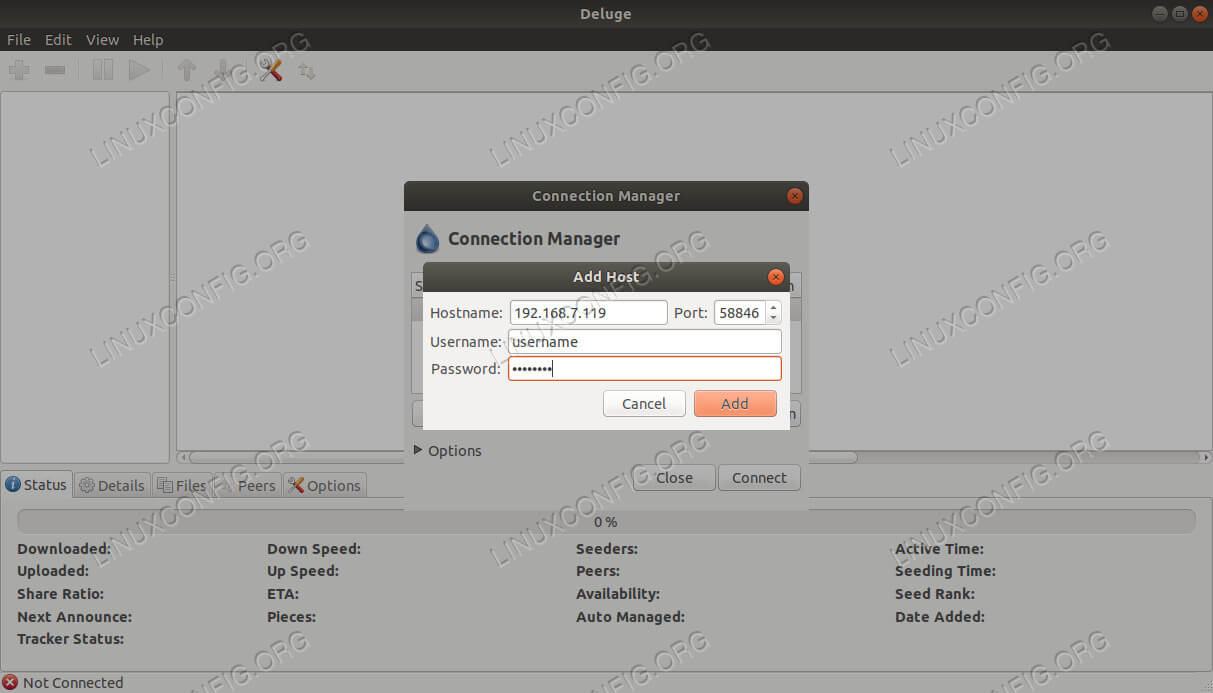
Return
to the main menu. Click on "Edit" again. This time, select "Connection
Manager." In the new window, click the "Add" button. Punch in your
server's IP as the server name. Then, use the username and password that
you set up for Deluge on your server. When everything's right, add your
server and connect.
You're ready to start using your torrents.
Objective
Install and configure a headless Deluge server, and connect to it with the Deluge client.Distributions
This guide is tailored towards Debian, Ubuntu, Fedora, OpenSUSE, and Arch Linux.Requirements
A working install of one of the supported distributions with root privileges.Difficulty
EasyConventions
- # - requires given linux command to be executed with root privileges either directly as a root user or by use of
sudocommand - $ - given linux command to be executed as a regular non-privileged user
Introduction
There are tons of ways to manage torrents on Linux. Many of the available clients are excellent, but some have distinct advantages. If you're looking to manage large numbers of torrents and manage them over your network, Deluge is easily the best option.Deluge relies on a client-server model. The Deluge daemon runs on a designated server machine that handles the download and upload of files. Then, you can connect to your server using the Deluge client on any computer on the same network to add, remove, and manage your torrents.
It doesn't hurt that it's very simple to control your torrents with Deluge either. It lets you easily add torrents from a variety of sources and even control their priority and place in the download queue.
Install the Deluge Server
Deluge is open source and well-supported across most distributions. You can install everything that you need from your distribution's package manager.Ubuntu/Debian
$ sudo apt install deluged deluge-console
Fedora
# dnf install deluge-daemon deluge-console
OpenSUSE
# zypper in deluged deluge-console
Arch Linux
# pacman -S deluge
Configure Your Server
You're going to need to do some setup on your server before you can take full advantage of it. The first thing that you're going to need is a user to run the Deluge daemon. Using a separate user is both more secure and lets the daemon run autonomously more easily. Start by setting up a group for Deluge.# groupadd delugeThen, create the Deluge user as a system user with their home directory as the main Deluge one.
# adduser -r –home-dir /var/lib/deluge -g deluge delugeMake that Deluge directory and give your new user ownership.
# mkdir /var/lib/deluge
# chown -R deluge:deluge /var/lib/deluge
Next, you're going to need to log in to your new user, and start up Deluge temporarily to configure it. In order to do that, you'll need to sign in as your Deluge user.
# su delugeStart up the daemon, and open the console client.
$ deluged
$ deluge-console
Once you're in the console, you can change the setting you need to. Enable remote access.
config -s allow_remote TrueExit the console, and log out as your Deluge user. You're going to have to stop the daemon too.
# ps aux | grep -i deluge
# kill 12345
You're going to need to set up your users next. Find the file at
/var/lib/deluge/.config/deluge/auth. Open it with your text editor and add in new entries for your users. The look something like this: username:password:10The number at the end dictates the privilege level of the user.
10 lets you do anything. Create A Systemd Service
In order to run Deluge as a service when your server starts up, you're going to need to create a systemd service. The Deluge developers actually provide one on their website for you to use. Create a file at/etc/systemd/system/deluged.service. Paste in the following configuration.[Unit]
Description=Deluge Bittorrent Client Daemon
Documentation=man:deluged
After=network-online.target
[Service]
Type=simple
User=deluge
Group=deluge
UMask=007
ExecStart=/usr/bin/deluged -d
Restart=on-failure
# Time to wait before forcefully stopped.
TimeoutStopSec=300
[Install]
WantedBy=multi-user.target# systemctl start deluged # systemctl enable deluged
Install the Deluge Client
You're now ready to start setting up your Deluge client. The Deluge client is GTK based, and serves as the control center for your server. Once again, it's available in your distribution's repositories.Ubuntu/Debian
$ sudo apt install deluge-gtk
Fedora
# dnf install deluge-gtk
OpenSUSE
# zypper in deluge-gtk
Arch Linux
# pacman -S deluge


No comments:
Post a Comment