https://www.ostechnix.com/how-to-mount-google-drive-locally-as-virtual-file-system-in-linux
 Google Drive
is the one of the popular cloud storage provider on the planet. As of
2017, over 800 million users are actively using this service worldwide.
Even though the number of users have dramatically increased, Google
haven’t released a Google drive client for Linux yet. But it didn’t stop
the Linux community. Every now and then, some developers had brought
few google drive clients for Linux operating system. In this guide, we
will see three unofficial google drive clients for Linux. Using these
clients, you can mount Google drive locally as a virtual file system and
access your drive files in your Linux box. Read on.
Google Drive
is the one of the popular cloud storage provider on the planet. As of
2017, over 800 million users are actively using this service worldwide.
Even though the number of users have dramatically increased, Google
haven’t released a Google drive client for Linux yet. But it didn’t stop
the Linux community. Every now and then, some developers had brought
few google drive clients for Linux operating system. In this guide, we
will see three unofficial google drive clients for Linux. Using these
clients, you can mount Google drive locally as a virtual file system and
access your drive files in your Linux box. Read on.

After successful authentication, you will see the following message in your Terminal.
From Terminal:

If you have more than one account, use label option to distinguish different accounts like below.
Make sure you have installed Rust on your system.
Make sure pkg-config and the fuse packages are installed. They are available in the default repositories of most Linux distributions. For example, on Ubuntu and derivatives, you can install them using command:

Just copy and navigate to the above URL from your browser and click allow to give permission to access your google drive contents. Once you gave the authentication you will see an output like below.
Next, create a directory to mount your google drive contents.
Finally, mount your google drive using command:
From Terminal:

If you don’t know where your Google drive is mounted, use df or mount command as shown below.
Of course, there were few other unofficial google drive clients available in the past, such as Grive2, Syncdrive. But it seems that they are discontinued now. I will keep updating this list when I come across any active google drive clients.
And, that’s all for now, folks. Hope this was useful. More good stuffs to come. Stay tuned!
Cheers!
1. Google-drive-ocamlfuse
The google-drive-ocamlfuse is a FUSE filesystem for Google Drive, written in OCaml. For those wondering, FUSE, stands for Filesystem in Userspace, is a project that allows the users to create virtual file systems in user level. google-drive-ocamlfuse allows you to mount your Google Drive on Linux system. It features read/write access to ordinary files and folders, read-only access to Google docks, sheets, and slides, support for multiple google drive accounts, duplicate file handling, access to your drive trash directory, and more.Installing google-drive-ocamlfuse
google-drive-ocamlfuse is available in the AUR, so you can install it using any AUR helper programs, for example Yay.$ yay -S google-drive-ocamlfuseOn Ubuntu:
$ sudo add-apt-repository ppa:alessandro-strada/ppa
$ sudo apt-get update
$ sudo apt-get install google-drive-ocamlfuse
To install latest beta version, do:
$ sudo add-apt-repository ppa:alessandro-strada/google-drive-ocamlfuse-beta
$ sudo apt-get update
$ sudo apt-get install google-drive-ocamlfuse
Usage
Once installed, run the following command to launch google-drive-ocamlfuse utility from your Terminal:$ google-drive-ocamlfuseWhen you run this first time, the utility will open your web browser and ask your permission to authorize your google drive files. Once you gave authorization, all necessary config files and folders it needs to mount your google drive will be automatically created.

After successful authentication, you will see the following message in your Terminal.
Access token retrieved correctly.You’re good to go now. Close the web browser and then create a mount point to mount your google drive files.
$ mkdir ~/mygoogledriveFinally, mount your google drive using command:
$ google-drive-ocamlfuse ~/mygoogledriveCongratulations! You can access access your files either from Terminal or file manager.
From Terminal:
$ ls ~/mygoogledriveFrom File manager:

If you have more than one account, use label option to distinguish different accounts like below.
$ google-drive-ocamlfuse -label label [mountpoint]Once you’re done, unmount the FUSE flesystem using command:
$ fusermount -u ~/mygoogledriveFor more details, refer man pages.
$ google-drive-ocamlfuse --helpAlso, do check the official wiki and the project GitHub repository for more details.
2. GCSF
GCSF is a FUSE filesystem based on Google Drive, written using Rust programming language. The name GCSF has come from the Romanian word “Google Conduce Sistem de Fișiere”, which means “Google Drive Filesystem” in English. Using GCSF, you can mount your Google drive as a local virtual file system and access the contents from the Terminal or file manager. You might wonder how it differ from other Google Drive FUSE projects, for example google-drive-ocamlfuse. The developer of GCSF replied to a similar comment on Reddit “GCSF tends to be faster in several cases (listing files recursively, reading large files from Drive). The caching strategy it uses also leads to very fast reads (x4-7 improvement compared to google-drive-ocamlfuse) for files that have been cached, at the cost of using more RAM“.Installing GCSF
GCSF is available in the AUR, so the Arch Linux users can install it using any AUR helper, for example Yay.$ yay -S gcsf-gitFor other distributions, do the following.
Make sure you have installed Rust on your system.
Make sure pkg-config and the fuse packages are installed. They are available in the default repositories of most Linux distributions. For example, on Ubuntu and derivatives, you can install them using command:
$ sudo apt-get install -y libfuse-dev pkg-configOnce all dependencies installed, run the following command to install GCSF:
$ cargo install gcsf
Usage
First, we need to authorize our google drive. To do so, simply run:$ gcsf login ostechnixYou must specify a session name. Replace ostechnix with your own session name. You will see an output something like below with an URL to authorize your google drive account.
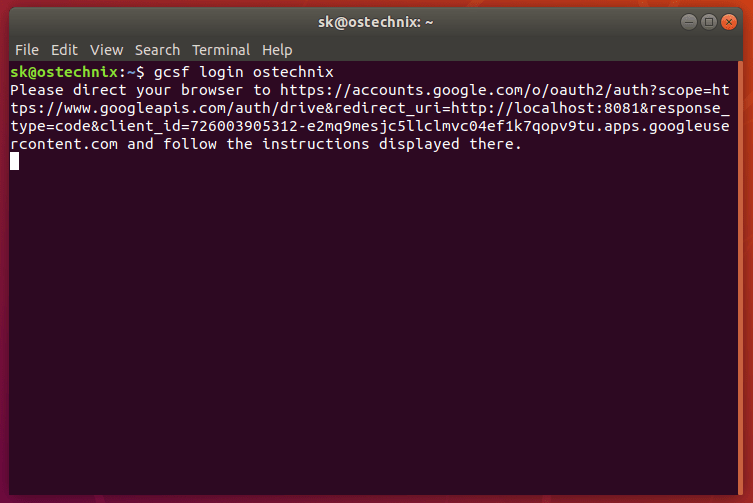
Just copy and navigate to the above URL from your browser and click allow to give permission to access your google drive contents. Once you gave the authentication you will see an output like below.
Successfully logged in. Credentials saved to "/home/sk/.config/gcsf/ostechnix".GCSF will create a configuration file in $XDG_CONFIG_HOME/gcsf/gcsf.toml, which is usually defined as $HOME/.config/gcsf/gcsf.toml. Credentials are stored in the same directory.
Next, create a directory to mount your google drive contents.
$ mkdir ~/mygoogledriveThen, edit /etc/fuse.conf file:
$ sudo vi /etc/fuse.confUncomment the following line to allow non-root users to specify the allow_other or allow_root mount options.
user_allow_otherSave and close the file.
Finally, mount your google drive using command:
$ gcsf mount ~/mygoogledrive -s ostechnixSample output:
INFO gcsf > Creating and populating file system...
INFO gcsf > File sytem created.
INFO gcsf > Mounting to /home/sk/mygoogledrive
INFO gcsf > Mounted to /home/sk/mygoogledrive
INFO gcsf::gcsf::file_manager > Checking for changes and possibly applying them.
INFO gcsf::gcsf::file_manager > Checking for changes and possibly applying them.
Again, replace ostechnix with your session name. You can view the existing sessions using command:
$ gcsf list
Sessions:
- ostechnix
You can now access your google drive contents either from the Terminal or from File manager.
From Terminal:
$ ls ~/mygoogledriveFrom File manager:

If you don’t know where your Google drive is mounted, use df or mount command as shown below.
$ df -h
Filesystem Size Used Avail Use% Mounted on
udev 968M 0 968M 0% /dev
tmpfs 200M 1.6M 198M 1% /run
/dev/sda1 20G 7.5G 12G 41% /
tmpfs 997M 0 997M 0% /dev/shm
tmpfs 5.0M 4.0K 5.0M 1% /run/lock
tmpfs 997M 0 997M 0% /sys/fs/cgroup
tmpfs 200M 40K 200M 1% /run/user/1000
GCSF 15G 857M 15G 6% /home/sk/mygoogledrive
$ mount | grep GCSF
GCSF on /home/sk/mygoogledrive type fuse (rw,nosuid,nodev,relatime,user_id=1000,group_id=1000,allow_other)
Once done, unmount the google drive using command:
$ fusermount -u ~/mygoogledriveCheck the GCSF GitHub repository for more details.
3. Tuxdrive
Tuxdrive is yet another unofficial google drive client for Linux. We have written a detailed guide about Tuxdrive a while ago. Please check the following link.Of course, there were few other unofficial google drive clients available in the past, such as Grive2, Syncdrive. But it seems that they are discontinued now. I will keep updating this list when I come across any active google drive clients.
And, that’s all for now, folks. Hope this was useful. More good stuffs to come. Stay tuned!
Cheers!

No comments:
Post a Comment