http://xmodulo.com/incremental-file-sync-many-users.html
Suppose you as a software developer has set up daily builds of your software for testing purposes. Every day you make a new build, users have to re-download the updated build to evaluate it. In this case you may want to enable differential downloads, so that users can download only difference between two builds, thereby saving on the server's bandwidth. Users will also be happy as they don't have to wait to re-download the whole thing. Similar situations are encountered when you want to set up a download archive which allows incremental sync for users.
In these cases, how would you distribute incrementally updated files efficiently for multiple users? In fact, there are open-source storage solutions that come with "delta sync" capability built-in, such as ownCloud or Syncthing. These kinds of full-blown solutions with built-in GUI require users to install a dedicated client, and thus may be an overkill for simple file distribution that you are looking for.
Barring full-blown third-party software like these, perhaps rsync may come to mind, which can do bandwidth-efficient file sync. The problem with rsync, however, is that all the heavy duty computations is done at the server side. That is, when a client requests for a file sync, the server needs to perform block-by-block checksum computation and search for blocks not available on the client. Obviously this procedure can place a significant strain on the server's resources if the server needs to handle many users, and thus is not scalable.
Well, in zsync, the server maintains a separate .zsync metadata file for a file to distribute, which contains a list of "precomputed" checksums for individual blocks of the file. When zsync client requests for a file sync, the client downloads .zsync metadata file first, and performs block-by-block checksum calculation to find missing blocks on its own. The client then requests for missing blocks using HTTP range requests. As you can see, the server is totally out of the loop from the sync algorithm, and simply serves requested file blocks over HTTP, which makes it ideal when incremental file sync is needed for many users.
Here is a quick rundown on the server-side overhead difference between rsync and zsync. In the plot below, I compare rsync and zsync in terms of the server's CPU usage when 200 users are downloading a tarball file with 2.5% discrepancy of a previous version. For fair comparison, SSH is not used for rsync.
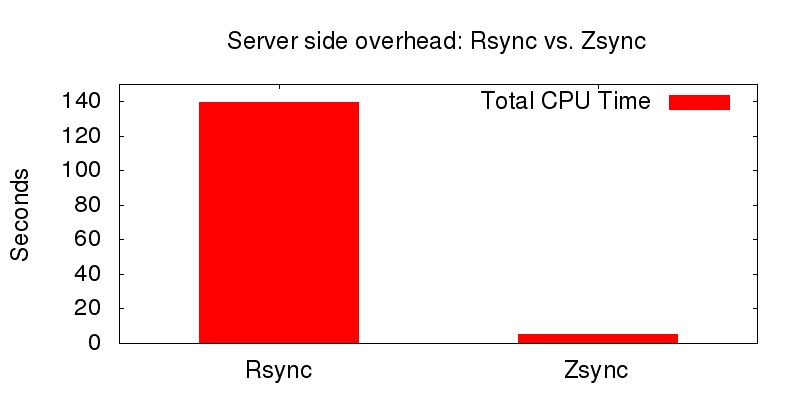
With zsync, since all checksum computation overhead has shifted from the server to individual clients, the server overhead is reduced dramatically. A small neat idea makes zsync a real winner!
In the rest of the tutorial, I will show how to distribute a file incrementally using zsync under the Linux environment.
You can create a .zsync file using zsyncmake command-line tool which comes with zsync package. Below are the steps to create a .zsync metadata file. Follow these steps on any Linux computer where zsync is installed.
Assume that you want to distribute a file custom.tar.gz which is already compressed with gzip.
First, uncompress custom.tar.gz. If the file is not compressed, you can skip this step.

The reason why we compress it with zsyncmake, not with gzip is that zsyncmake-compression makes a compressed file incrementally updatable.
Finally, upload custom.tar.gz and custom.tar.zsync to a host where a web server is running. Make sure that upload both files to the same directory.
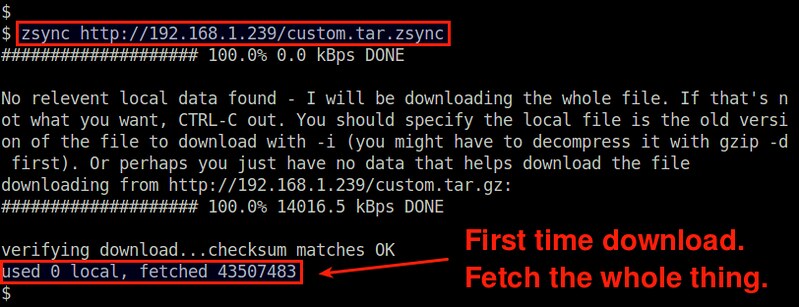
The first time download will fetch the whole tarball from the server.
Over time if the remote tarball gets updated, you can use the same command to re-download the updated file. zsync will automatically detect the change, and perform delta download.
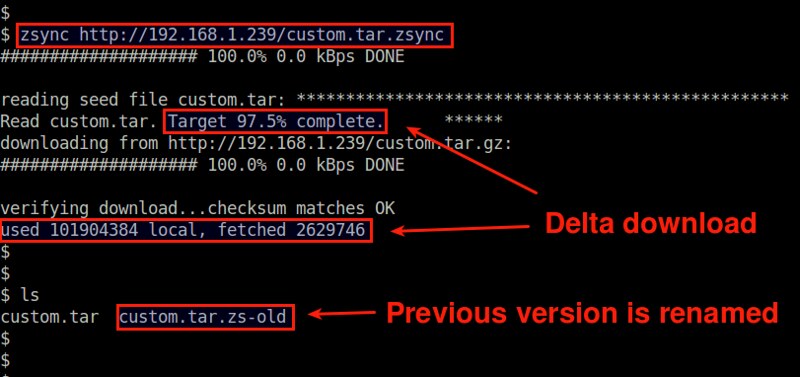
Obviously you need to re-run zsync in the same directory where the previously downloaded tarball resides. The old tarball will be renamed (with .zs-old extension), and the newer tarball will be constructed in the current directory.
If the previously downloaded tarball is somewhere else, you can use "-i" option to specify the location explicitly.
Suppose you as a software developer has set up daily builds of your software for testing purposes. Every day you make a new build, users have to re-download the updated build to evaluate it. In this case you may want to enable differential downloads, so that users can download only difference between two builds, thereby saving on the server's bandwidth. Users will also be happy as they don't have to wait to re-download the whole thing. Similar situations are encountered when you want to set up a download archive which allows incremental sync for users.
In these cases, how would you distribute incrementally updated files efficiently for multiple users? In fact, there are open-source storage solutions that come with "delta sync" capability built-in, such as ownCloud or Syncthing. These kinds of full-blown solutions with built-in GUI require users to install a dedicated client, and thus may be an overkill for simple file distribution that you are looking for.
Barring full-blown third-party software like these, perhaps rsync may come to mind, which can do bandwidth-efficient file sync. The problem with rsync, however, is that all the heavy duty computations is done at the server side. That is, when a client requests for a file sync, the server needs to perform block-by-block checksum computation and search for blocks not available on the client. Obviously this procedure can place a significant strain on the server's resources if the server needs to handle many users, and thus is not scalable.
What is Zsync?
This is when a command-line tool called zsync comes in handy. While zsync uses the same delta-encoding based sync algorithm as rsync does, it moves the heavy duty computation away from the server and onto the clients. What do I mean by that?Well, in zsync, the server maintains a separate .zsync metadata file for a file to distribute, which contains a list of "precomputed" checksums for individual blocks of the file. When zsync client requests for a file sync, the client downloads .zsync metadata file first, and performs block-by-block checksum calculation to find missing blocks on its own. The client then requests for missing blocks using HTTP range requests. As you can see, the server is totally out of the loop from the sync algorithm, and simply serves requested file blocks over HTTP, which makes it ideal when incremental file sync is needed for many users.
Here is a quick rundown on the server-side overhead difference between rsync and zsync. In the plot below, I compare rsync and zsync in terms of the server's CPU usage when 200 users are downloading a tarball file with 2.5% discrepancy of a previous version. For fair comparison, SSH is not used for rsync.
With zsync, since all checksum computation overhead has shifted from the server to individual clients, the server overhead is reduced dramatically. A small neat idea makes zsync a real winner!
In the rest of the tutorial, I will show how to distribute a file incrementally using zsync under the Linux environment.
Zsync: Client Side Setup
On the client side, you need to install zsync to initiate file transfer from a remote web server. zsync is extremely lightweight, and is included in the most Linux distros. Here is how to install zsync on various distros.Debian, Ubuntu or Linux Mint:
$ sudo apt-get install zsync
Fedora:
$ sudo yum install zsync
CentOS or RHEL:
First, enable Repoforge repository, and then run:
$ sudo yum install zsync
Arch Linux:
$ sudo pacman -S zsync
Zsync: Server Side Setup
On the server side, pretty much all you need an HTTP/1.1-capable web server. Any commodity web server will do. For each file you want to distribute with zsync, you then need to prepare a .zsync metadata file.You can create a .zsync file using zsyncmake command-line tool which comes with zsync package. Below are the steps to create a .zsync metadata file. Follow these steps on any Linux computer where zsync is installed.
Assume that you want to distribute a file custom.tar.gz which is already compressed with gzip.
$ gunzip custom.tar.gz
Next, compress the file with zsyncmake with "-z" option.
$ zsyncmake -z custom.tar
It will compress the input file in gzip format (custom.tar.gz), and create a corresponding .zsync metadata file (custom.tar.zsync).The reason why we compress it with zsyncmake, not with gzip is that zsyncmake-compression makes a compressed file incrementally updatable.
Finally, upload custom.tar.gz and custom.tar.zsync to a host where a web server is running. Make sure that upload both files to the same directory.
Incrementally Downloads a File with Zsync
Once both the server and the client are ready, you can go ahead and run zsync on the client as follows.
$ zsync http://192.168.1.239/custom.tar.zsync
Note that you should point to the URL of the .zsync metadata file, not the tarball to download.The first time download will fetch the whole tarball from the server.
Over time if the remote tarball gets updated, you can use the same command to re-download the updated file. zsync will automatically detect the change, and perform delta download.
Obviously you need to re-run zsync in the same directory where the previously downloaded tarball resides. The old tarball will be renamed (with .zs-old extension), and the newer tarball will be constructed in the current directory.
If the previously downloaded tarball is somewhere else, you can use "-i" option to specify the location explicitly.
$ zsync -i /backup/custom.tar http://192.168.1.239/custom.tar.zsync

No comments:
Post a Comment