http://xmodulo.com/zimbra-mail-server-centos.html
In this tutorial, we will examine the process of installing Zimbra mail server in CentOS Linux environment. Zimbra is my personal favorite when it comes to open-source mail servers as it comes with a number of useful features such as built-in calendar support, email filtering rules, a modern interface for both users and admins, spam and malware scanners, etc. Besides server-side components, Zimbra also boasts of a full-featured web-based email client by which users can access emails, group calendars and document sharing in collaboration mode.
Zimbra is available in two flavors: an open-source version and a commercial version. The latter comes with paid support plans and additional proprietary components for Outlook calendar/contact synchronization. But even the open-source version alone provides pretty much all the features that an enterprise may need.
Installing Zimbra is a straightforward process as we will see in this tutorial. We are going to use CentOS 7 (more specifically AWS CentOS 7 image) as the target platform to install Zimbra server.
At the very minimum, you would need MX and A records for the mail server. For example:
Zimbra needs a number of ports opened in the firewall. I have used the following set of iptables rules as AWS CentOS 7 image comes pre-built with iptables, but feel free to use firewalld (the default firewall configuration tool for stock CentOS 7) to open all necessary Zimbra ports. Always double check that your firewall rules are in compliance with your organization policies.
First of all, be aware that Zimbra comes with its own customized version of Postfix as a mail transfer agent (MTA). So if your CentOS system has stock Postfix pre-installed (which is the case for CentOS 7), you need to remove it. Otherwise, Zimbra installer will fail when it tries to bind its own version of Postfix to port 25, which is already occupied by pre-installed Postfix.
The best method is to stop the default Postfix service and remove it altogether, so that port 25 is free to use.
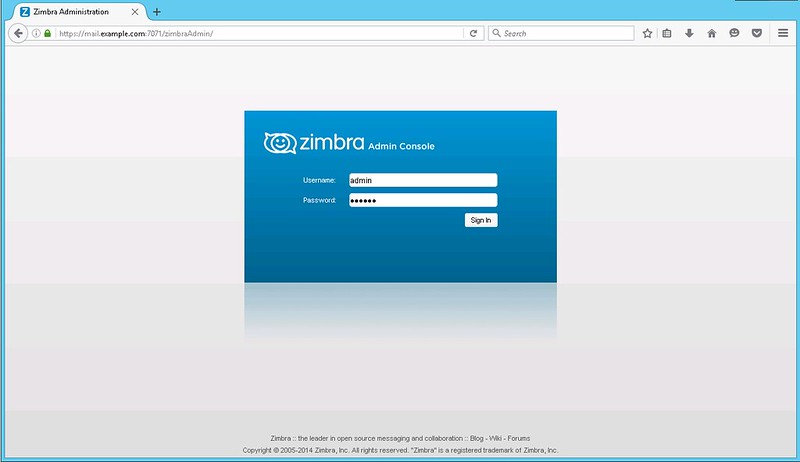
The Zimbra admin console can be reached at:


After new users have been created, we can log in as one of these users at https://mail.example.com. Again, as the server has a self-signed certificate, you might need to add the certificate as an exception in your browser.
In the rest of the tutorial, I am going to test the Zimbra mail server using these users.
As you can see, Zimbra uses Postfix under the hood to deliver email messages. So if you have experience wit Postfix, it will come in handy because a lot of Postfix commands also work with the customized version of Postfix used by Zimbra.
Hope this helps.
In this tutorial, we will examine the process of installing Zimbra mail server in CentOS Linux environment. Zimbra is my personal favorite when it comes to open-source mail servers as it comes with a number of useful features such as built-in calendar support, email filtering rules, a modern interface for both users and admins, spam and malware scanners, etc. Besides server-side components, Zimbra also boasts of a full-featured web-based email client by which users can access emails, group calendars and document sharing in collaboration mode.
Zimbra is available in two flavors: an open-source version and a commercial version. The latter comes with paid support plans and additional proprietary components for Outlook calendar/contact synchronization. But even the open-source version alone provides pretty much all the features that an enterprise may need.
Installing Zimbra is a straightforward process as we will see in this tutorial. We are going to use CentOS 7 (more specifically AWS CentOS 7 image) as the target platform to install Zimbra server.
System Requirements for Zimbra Installation
The official website recommends the following hardware specification for Zimbra open-source edition.- Intel/AMD 2.0 GHz 64-bit CPU
- A minimum of 8GB of RAM for a single server installation
- 10 GB disk space for software and logs, and additional disk space for mail storage and temporary files
Preparing the DNS Records
Before we start doing anything with the mail server itself, it is essential that the DNS records for the mail server be in place. This is because the Zimbra installer will check the DNS records for your domain and will abort if the DNS is not resolvable.At the very minimum, you would need MX and A records for the mail server. For example:
example.com.         IN    MX   10 mail.example.com.
mail.example.com.    IN    A    IP-Address-of-your-server
Configuring SELinux and Firewall
Before starting the installation, I have disabled SELinux. Tuning SELinux for Zimbra is beyond the scope of this article.Zimbra needs a number of ports opened in the firewall. I have used the following set of iptables rules as AWS CentOS 7 image comes pre-built with iptables, but feel free to use firewalld (the default firewall configuration tool for stock CentOS 7) to open all necessary Zimbra ports. Always double check that your firewall rules are in compliance with your organization policies.
iptables -F
iptables -P INPUT DROP
iptables -P OUTPUT ACCEPT

iptables -A INPUT -i lo -j ACCEPT
iptables -A INPUT -s IP-Address-of-your-server/32 -j ACCEPT
iptables -A INPUT -m state --state ESTABLISHED,RELATED -j ACCEPT
iptables -A INPUT -p tcp --dport 22 -j ACCEPT
iptables -A INPUT -p icmp -j ACCEPT

## Zimbra rules for external access ##
iptables -A INPUT -p tcp --dport 25  -j ACCEPT
iptables -A INPUT -p tcp --dport 80  -j ACCEPT
iptables -A INPUT -p tcp --dport 110  -j ACCEPT
iptables -A INPUT -p tcp --dport 143 -j ACCEPT
iptables -A INPUT -p tcp --dport 443  -j ACCEPT
iptables -A INPUT -p tcp --dport 465  -j ACCEPT
iptables -A INPUT -p tcp --dport 587  -j ACCEPT
iptables -A INPUT -p tcp --dport 993  -j ACCEPT
iptables -A INPUT -p tcp --dport 995  -j ACCEPT
iptables -A INPUT -p tcp --dport 3443  -j ACCEPT
iptables -A INPUT -p tcp --dport 9071  -j ACCEPT
iptables -A INPUT -p tcp --dport 7071  -j ACCEPT
Setting Hostnames and NTP
Next, we will configure the hostname of the mail server.
# hostnamectl set-hostname mail.example.com
This will set CentOS hostname to mail.example.com immediately, and
the hostname will remain persistent across reboots. You can check the
status by using the following command.
# hostnamectl status
Static hostname: mail.example.comIn case you are using a cloud based VM (e.g., from Amazon AWS), you also need to change the file /etc/cloud/cloud.cfg.
# vim /etc/cloud/cloud.cfg
## Add the following line at the end of the file ##
preserve_hostname: true
We also need to add the server's IP address and its fully qualified domain Name (FQDN) to /etc/hosts.
# vim /etc/hosts
IP-Address-of-your-server mail.example.com mailThe NTP service must be installed and enabled on any server system where security and compliance is desired, and that includes Zimbra mail server. Accurate timestamp is also helpful for troubleshooting and testing with mail server logs. We will install and enable NTP as follows.
# yum install ntp
# systemctl start ntpd
# systemctl enable ntpd
# systemctl start ntpd
# systemctl enable ntpd
Installing Zimbra on CentOS
Before installing Zimbra, we need to do some cleanup and install required dependencies.First of all, be aware that Zimbra comes with its own customized version of Postfix as a mail transfer agent (MTA). So if your CentOS system has stock Postfix pre-installed (which is the case for CentOS 7), you need to remove it. Otherwise, Zimbra installer will fail when it tries to bind its own version of Postfix to port 25, which is already occupied by pre-installed Postfix.
The best method is to stop the default Postfix service and remove it altogether, so that port 25 is free to use.
# systemctl stop postfix
# yum erase postfix
Also if sendmail MTA is installed on your CentOS, disable it as well.# yum erase postfix
# systemctl stop sendmail
# systemctl disable sendmail
Next, install necessary dependencies with Yum:# systemctl disable sendmail
# yum install wget nmap-ncat libaio unzip perl-core sysstat
Now download the open-source edition of Zimbra from their site, and extract the tar file.
# wget https://files.zimbra.com/downloads/8.6.0_GA/zcs-8.6.0_GA_1153.RHEL7_64.20141215151110.tgz
# tar zxvf zcs-8.6.0_GA_1153.RHEL7_64.20141215151110.tgz
Start the installation using a installer script (installer.sh) contained in the tar file.# tar zxvf zcs-8.6.0_GA_1153.RHEL7_64.20141215151110.tgz
# cd zcs-8.6.0_GA_1153.RHEL7_64.20141215151110
# ./install.sh
The installer script will first check for all required prerequisites.
If it complains about some required packages not being available, use
Yum to install them. The installer will then prompt you to choose among
available packages. You can install all available packages or choose
the ones that you need.# ./install.sh
Do you agree with the terms of the software license agreement? [N] y

Checking for prerequisites...
     FOUND: NPTL
     FOUND: nmap-ncat-6.40-7
     FOUND: sudo-1.8.6p7-16
     FOUND: libidn-1.28-4
     FOUND: gmp-6.0.0-12
     FOUND: libaio-0.3.109-13
     FOUND: libstdc++-4.8.5-4
     FOUND: unzip-6.0-15
     FOUND: perl-core-5.16.3-286

Checking for suggested prerequisites...
     FOUND: perl-5.16.3
     FOUND: sysstat
     FOUND: sqlite
Prerequisite check complete.

Checking for installable packages

Found zimbra-core
Found zimbra-ldap
Found zimbra-logger
Found zimbra-mta
Found zimbra-dnscache
Found zimbra-snmp
Found zimbra-store
Found zimbra-apache
Found zimbra-spell
Found zimbra-memcached
Found zimbra-proxy
Proceed with domain name configuration and admin password setup.DNS ERROR resolving MX for mail.example.com
It is suggested that the domain name have an MX record configured in DNS
Change domain name? [Yes] yes
Create domain: [mail.example.com] example.com
MX: mail.example.com (IP-Address-of-your-server)
Interface: 127.0.0.1
Interface: ::1
Interface: IP-Address-of-your-server
Main menu
1) Common Configuration:
2) zimbra-ldap: Enabled
3) zimbra-logger: Enabled
4) zimbra-mta: Enabled
5) zimbra-dnscache: Enabled
6) zimbra-snmp: Enabled
7) zimbra-store: Enabled
+Create Admin User: yes
+Admin user to create: admin@example.com
******* +Admin Password UNSET
Finally, Zimbra will create a self-signed SSL certificate, and start services as necessary.Accessing Zimbra Admin Console
Now that Zimbra is installed and running, we will use the web admin console to login. As the server is configured to use a self-signed certificate, you might need to add that certificate as an exception on your web browser.The Zimbra admin console can be reached at:
- URL: https://mail.example.com:7071
- User: admin
- Password: password set during installation

Creating Test Users on Zimbra Server
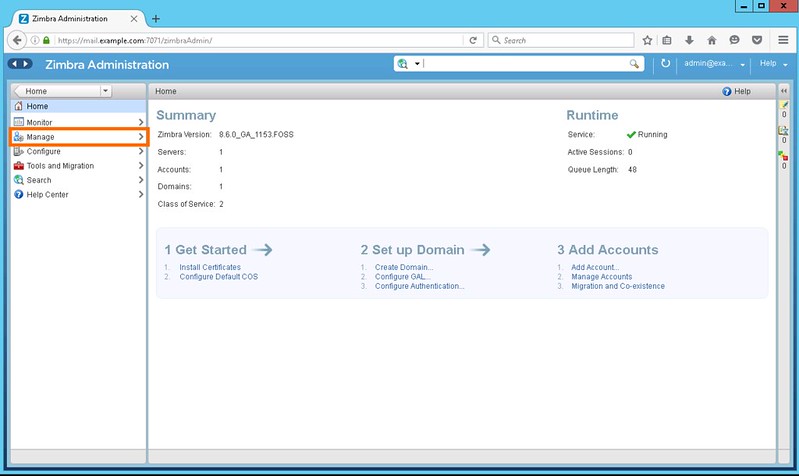
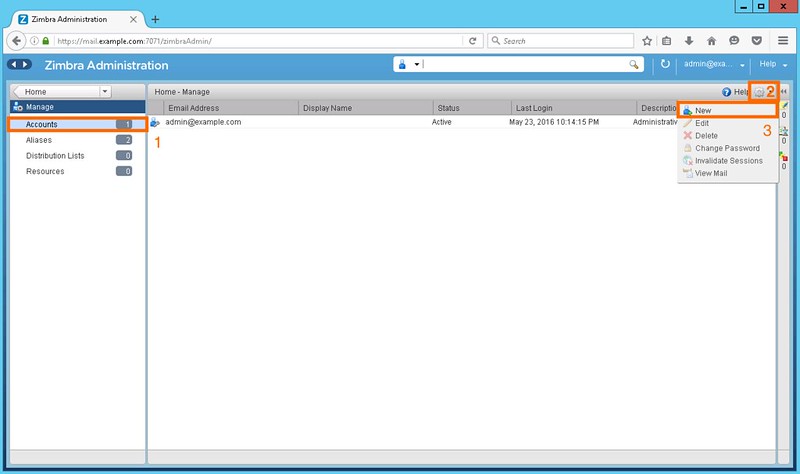
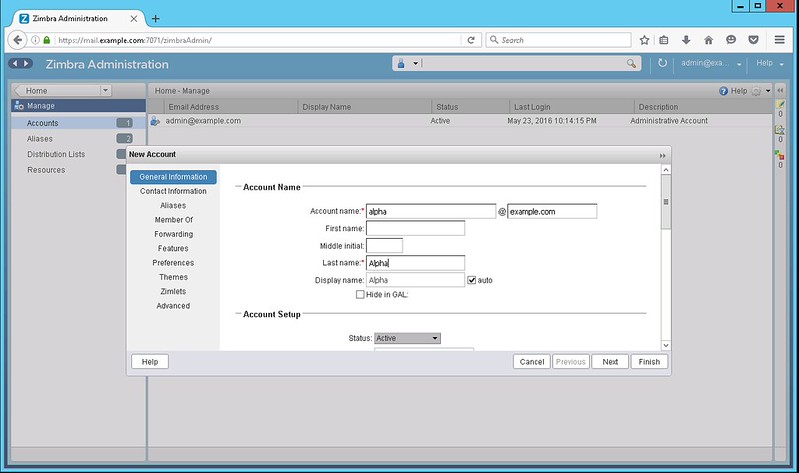
After logging in to the server as an admin, create users who will send and receive emails using the Zimbra server. For this tutorial, we will create two users: alpha@example.com and beta@example.com. Users can be created under 'Manage' section of the console.


After new users have been created, we can log in as one of these users at https://mail.example.com. Again, as the server has a self-signed certificate, you might need to add the certificate as an exception in your browser.
In the rest of the tutorial, I am going to test the Zimbra mail server using these users.
Testing and Troubleshooting with Zimbra Mail Logs
When you test or troubleshoot the Zimbra mail server, the server logs are a useful source of information. While Zimbra logs can be inspected from the web-based Zimbra admin console, the server's mail log file (/var/log/maillog) contains more detailed information. I am old school and prefer checking the server log file directly. In the following let me show how to inspect the server log in various test scenarios.Scenario #1: Zimbra user sends an email to another Zimbra user
In this test, we first log in as user alpha, and try sending a test mail to user beta. After sending the mail, we can check the server log to see what went on under the hood. The following is a snippet of the mail log in this scenario.mail postfix/smtpd[24045]: connect from mail.example.com[IP-Address-of-your-server] mail postfix/smtpd[24045]: NOQUEUE: filter: RCPT from mail.example.com[IP-Address-of-your-server]: : Sender address triggers FILTER smtp-amavis:[127.0.0.1]:10026; from= to= proto=ESMTP helo= . . . . . mail postfix/qmgr[21753]: 2C5A558274AC: from=The above log indicates that the mail sent by user alpha was first scanned by spam and virus filter, and then processed for delivery to user beta. If you look at the last line, it shows that Zimbra uses TCP Port 7025 for local mail delivery i.e., delivery for users in the same domain., size=2172, nrcpt=1 (queue active) mail postfix/smtp[24054]: EE394582F095: to= , relay=127.0.0.1[127.0.0.1]:10032, delay=0.22, delays=0.04/0.01/0.01/0.16, dsn=2.0.0, status=sent (250 2.0.0 from MTA(smtp:[127.0.0.1]:10025): 250 2.0.0 Ok: queued as 2C5A558274AC) mail postfix/qmgr[21753]: EE394582F095: removed mail postfix/lmtp[24057]: 2C5A558274AC: to= , relay=mail.example.com[IP-Address-of-your-server]:7025 , delay=0.55, delays=0/0.01/0.09/0.44, dsn=2.1.5, status=sent (250 2.1.5 Delivery OK) mail postfix/qmgr[21753]: 2C5A558274AC: removed
Scenario #2: Zimbra user sends an email to an external mail server
In the next scenario, we will try sending a mail to Google. Note that this will not work if the domain is not globally resolvable. Nonetheless, we will look at the logs for better understanding on the background process.May 24 22:07:19 mail postfix/smtpd[1315]: connect from mail.example.com[IP-Address-of-your-server] May 24 22:07:19 mail postfix/smtpd[1315]: NOQUEUE: filter: RCPT from mail.example.com[IP-Address-of-your-server]: : Sender address triggers FILTER smtp-amavis:[127.0.0.1]:10026; from=Here Zimbra used the standard port 25 for outbound email delivery for an external mail server.to= proto=ESMTP helo= . . . . . May 24 22:07:19 mail postfix/qmgr[21753]: 91FFF58274AB: from= , size=1984, nrcpt=1 (queue active) May 24 22:07:19 mail postfix/smtp[1319]: 5B65B58274AC: to= , relay=127.0.0.1[127.0.0.1]:10032, delay=0.23, delays=0.04/0.01/0.01/0.17, dsn=2.0.0, status=sent (250 2.0.0 from MTA(smtp:[127.0.0.1]:10025): 250 2.0.0 Ok: queued as 91FFF58274AB) May 24 22:07:19 mail postfix/qmgr[21753]: 5B65B58274AC: removed May 24 22:07:22 mail postfix/smtp[1327]: 91FFF58274AB: to= , relay=gmail-smtp-in.l.google.com[74.125.203.27]:25 , delay=2.4, delays=0/0.02/1.7/0.75, dsn=2.0.0, status=sent (250 2.0.0 OK 1464127641 y96si6653701ioi.55 - gsmtp) May 24 22:07:22 mail postfix/qmgr[21753]: 91FFF58274AB: removed
Scenario #3: Zimbra user receives an email from an external mail server
In this scenario, let's take a look at what happens when we are receiving an incoming mail. For this I have set up another Zimbra mail server as mail.example2.com. The following is the log when I sent a mail from gamma@example2.com to alpha@example.com.mail postfix/smtpd[22110]: connect from mail.example2.com[IP-Address-of-example2-server] mail postfix/smtpd[22110]: Anonymous TLS connection established from mail.example2.com[IP-Address-of-example2-server]: TLSv1.2 with cipher AECDH-AES256-SHA (256/256 bits) . . . . . mail postfix/smtpd[22110]: NOQUEUE: filter: RCPT from mail.example2.com[IP-Address-of-example2-server]:According to the log, Zimbra tries to establish an SSL connection (if possible) when sending out emails. After an incoming mail arrived at our server, it was first scanned for spam and malware, and then delivered to user alpha. Also, note that Zimbra used TCP port 7025 for local mail delivery.: Sender address triggers FILTER smtp-amavis:[127.0.0.1]:10026; from= to= proto=ESMTP helo= mail postfix/smtpd[22110]: disconnect from mail.example2.com[IP-Address-of-example2-server] mail postfix/qmgr[15878]: B8EBA58274A9: from= , size=4842, nrcpt=1 (queue active) mail postfix/lmtp[22118]: B8EBA58274A9: to= , relay=mail.example.com[52.64.25.164]:7025 , delay=0.22, delays=0/0.01/0.08/0.12, dsn=2.1.5, status=sent (250 2.1.5 Delivery OK) mail postfix/qmgr[15878]: B8EBA58274A9: removed
As you can see, Zimbra uses Postfix under the hood to deliver email messages. So if you have experience wit Postfix, it will come in handy because a lot of Postfix commands also work with the customized version of Postfix used by Zimbra.
Conclusion
In this tutorial, we have examined how we can install and set up Zimbra on a CentOS 7 server. While you can create a feature-rich enterprise-class email service by setting up individual components separately (e.g., Postfix, antivirus and spam filters, webmail clients), and make them work together, I would suggest giving Zimbra a try. As Zimbra comes with all necessary components already integrated into one package, it is a great time saver for system admins.Hope this helps.

No comments:
Post a Comment