http://techarena51.com/index.php/linux-memory-usage

Linux memory management has always intrigued me. While learning Linux, many concepts are confusing at first, but after a lot of reading, googling, understanding and determination, I learned that the kernel is not only efficient at memory
management but also on par with artificial intelligence in making memory distribution decisions..
This post will hopefully show you how to troubleshoot or at least find out the
amount of memory used by Linux and an application running on it. If you have any
doubts, do let me know by commenting.
Finding Linux System Memory usage
One of the simplest way to check Linux system memory usage is with the “free”
command.
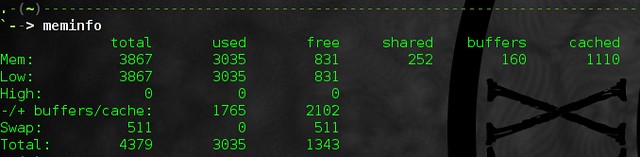
Below is my “free -m” command output.

The first line shows you that my free memory is only 111MB but the trick here is to
look at the second line for free memory.
The first line calculates caches and buffers along with the used memory.
Now linux does cache data to speed up the process of loading content.
But, that cached memory is also available for a new process to use at any time and
can be freed by the kernel immediately, in case any of your processes need it.
Buffers on the other hand, store metadata like file permissions or memory location of the cached data. Since this physical memory is availble for our process to use, we can subtract this information from the used memory to give us a free memory of 305MB as seen in the figure above.
Memory caching or Page cache
Linux divides memory into blocks called pages and hence the term page cache.
I will be using page cache from now on, but don’t get confused just replace page with memory if you do.
How page cache works.
Any time you do a read() from a file on disk, that data is read into memory, and
goes into the page cache. After this read() completes, the kernel has the option to
discard the page, since it is not being used. However, if you do a second read of
the same area in a file, the data will be read directly out of memory and no trip to
the disk will be taken. This is an incredible speedup. And is the reason why Linux
uses its page cache so extensively, is because it knows that once you access a
page on disk the first time, you will surely access it again.
Similarly when you save data to a file it is not immediately written to the disk, it is
cached and written periodically to reduce I/O. The name for this type of cache is
Dirty.You can see it’s output by running “cat /proc/meminfo”.

You can flush the cache with the following command.
Here is my HTOP output.

You need to look at the VIRT, RSS and SHR columns to get an idea of memory
consumption.
VIRT : Stands for Virtual Memory and displays the amount of memory requested
by an application. Applications often request more memory than required, however
they may not be actually using that memory and hence we can ignore this column.
RSS : Stands for Resident Set Size and displays the amount of memory used by
the process.
SHR : Stands for Shared memory and displays the memory shared with other
processes.
The last two columns are what we need look at to find out how much memory our
process is using.
For simple linux applications this information should suffice for you to know which
process is taking too much of your memory. But if you need to debug advance
issues like a memory leak then you need to go a step further.
The only problem with the HTOP output is that the RSS column displays used memory as Process memory + Total shared memory, even though the process is
using only a part of the shared memory.
Let’s take an analogy to understand this better.
I am a sensible spender ( I am married :) ), so sometimes I like to carpool to work.
Let’s say it takes 4$ worth of fuel from home to office.
When I go to work alone, I spend 4$ on fuel. The next day I car pool with 3 of my
friends, we pay a dollar each on fuel. So my total expenditure for the two days
would be 5$, however RSS would display it as $8.
Therefore, in order to find the exact memory usage you can you use a tool called
ps_mem.py.

There you go phpfpm is hogging my memory.
Troubleshooting slow application issues in Linux.
If you look at the free output again you will see that the swap memory is used even
though we have ram free
The Linux kernel moves out pages which are not active or being used at the
moment to swap space on the disk. This process is known as
swappiness. Since swap space is on the hard drive fetching
data will be slower as compared to your ram, This may cause your application to take a hit in
terms of speed. You have the option to turn off swaping by changing the value in
“/proc/sys/vm/swappiness” to 0. The value ranges from 0 to 100 where 100
means aggressive swapping.
Update: A good tip from karthik in comments
“I would recommend 1 more step, before changing the swappiness value. Try “vmstat -n 1″ and check the “si”, “so” field. If “si” and “so” (stands for swapin and swapout) fields are always 0, then the system is currently not swapping. Some application, has used the swap but somehow its not cleaned the swap space. At such situation a “swapoff/swapon” command would be handy.”
Update 2: Another good tool and page cache advice from reddit user zeroshiftsl
“I would add one more section though, the slab. I recently ran into an issue where a system was consuming more and more memory over time. I thought it was a leak, but no process seemed to own any of the missing memory. Htop showed the memory as allocated but it didn’t add up in the processes. This was NOT disk cached memory. Using “slabtop“, I found that a bunch of memory was stuck in dentry and inode_cache. This memory was not being freed when dropping caches like it should, and upping the vfs_cache_pressure had no effect. Had to kill the parent process (SSH session) that created all of these to reclaim the memory.”
Update: The ps_mem.py script runs only once, you may want to run it periodically to get real time memory usage, hence I recommend you read How to display a changing output like top
I tried to keep this post as simple as possible and this data should give you enough
information to troubleshoot any memory usage issues you might face on your linux
vps or server.
If there is anything I missed please do share your experiences troubleshooting linux memory usage issues in the comments below.
https://www.kernel.org/doc/Documentation/sysctl/vm.txt
http://www.linuxhowtos.org/System/Linux%20Memory%20Management.htm
http://www.redhat.com/advice/tips/meminfo.html
http://www.thomaskrenn.com/en/wiki/Linux_Page_Cache_Basics
Linux memory management has always intrigued me. While learning Linux, many concepts are confusing at first, but after a lot of reading, googling, understanding and determination, I learned that the kernel is not only efficient at memory
management but also on par with artificial intelligence in making memory distribution decisions..
This post will hopefully show you how to troubleshoot or at least find out the
amount of memory used by Linux and an application running on it. If you have any
doubts, do let me know by commenting.
Finding Linux System Memory usage
One of the simplest way to check Linux system memory usage is with the “free”
command.
Below is my “free -m” command output.
The first line shows you that my free memory is only 111MB but the trick here is to
look at the second line for free memory.
The first line calculates caches and buffers along with the used memory.
Now linux does cache data to speed up the process of loading content.
But, that cached memory is also available for a new process to use at any time and
can be freed by the kernel immediately, in case any of your processes need it.
Buffers on the other hand, store metadata like file permissions or memory location of the cached data. Since this physical memory is availble for our process to use, we can subtract this information from the used memory to give us a free memory of 305MB as seen in the figure above.
Memory caching or Page cache
Linux divides memory into blocks called pages and hence the term page cache.
I will be using page cache from now on, but don’t get confused just replace page with memory if you do.
How page cache works.
Any time you do a read() from a file on disk, that data is read into memory, and
goes into the page cache. After this read() completes, the kernel has the option to
discard the page, since it is not being used. However, if you do a second read of
the same area in a file, the data will be read directly out of memory and no trip to
the disk will be taken. This is an incredible speedup. And is the reason why Linux
uses its page cache so extensively, is because it knows that once you access a
page on disk the first time, you will surely access it again.
Similarly when you save data to a file it is not immediately written to the disk, it is
cached and written periodically to reduce I/O. The name for this type of cache is
Dirty.You can see it’s output by running “cat /proc/meminfo”.
You can flush the cache with the following command.
echo 1 > /proc/sys/vm/drop_cachesTo write cache to disk you can use the sync command
syncFinding linux process memory usage
Here is my HTOP output.
You need to look at the VIRT, RSS and SHR columns to get an idea of memory
consumption.
VIRT : Stands for Virtual Memory and displays the amount of memory requested
by an application. Applications often request more memory than required, however
they may not be actually using that memory and hence we can ignore this column.
RSS : Stands for Resident Set Size and displays the amount of memory used by
the process.
SHR : Stands for Shared memory and displays the memory shared with other
processes.
The last two columns are what we need look at to find out how much memory our
process is using.
For simple linux applications this information should suffice for you to know which
process is taking too much of your memory. But if you need to debug advance
issues like a memory leak then you need to go a step further.
The only problem with the HTOP output is that the RSS column displays used memory as Process memory + Total shared memory, even though the process is
using only a part of the shared memory.
Let’s take an analogy to understand this better.
I am a sensible spender ( I am married :) ), so sometimes I like to carpool to work.
Let’s say it takes 4$ worth of fuel from home to office.
When I go to work alone, I spend 4$ on fuel. The next day I car pool with 3 of my
friends, we pay a dollar each on fuel. So my total expenditure for the two days
would be 5$, however RSS would display it as $8.
Therefore, in order to find the exact memory usage you can you use a tool called
ps_mem.py.
git clone https://github.com/pixelb/ps_mem.git

cd ps_mem

sudo ./ps_mem.py
There you go phpfpm is hogging my memory.
If you look at the free output again you will see that the swap memory is used even
though we have ram free
The Linux kernel moves out pages which are not active or being used at the
moment to swap space on the disk. This process is known as
swappiness. Since swap space is on the hard drive fetching
data will be slower as compared to your ram, This may cause your application to take a hit in
terms of speed. You have the option to turn off swaping by changing the value in
“/proc/sys/vm/swappiness” to 0. The value ranges from 0 to 100 where 100
means aggressive swapping.
Update: A good tip from karthik in comments
“I would recommend 1 more step, before changing the swappiness value. Try “vmstat -n 1″ and check the “si”, “so” field. If “si” and “so” (stands for swapin and swapout) fields are always 0, then the system is currently not swapping. Some application, has used the swap but somehow its not cleaned the swap space. At such situation a “swapoff/swapon” command would be handy.”
Update 2: Another good tool and page cache advice from reddit user zeroshiftsl
“I would add one more section though, the slab. I recently ran into an issue where a system was consuming more and more memory over time. I thought it was a leak, but no process seemed to own any of the missing memory. Htop showed the memory as allocated but it didn’t add up in the processes. This was NOT disk cached memory. Using “slabtop“, I found that a bunch of memory was stuck in dentry and inode_cache. This memory was not being freed when dropping caches like it should, and upping the vfs_cache_pressure had no effect. Had to kill the parent process (SSH session) that created all of these to reclaim the memory.”
Update: The ps_mem.py script runs only once, you may want to run it periodically to get real time memory usage, hence I recommend you read How to display a changing output like top
I tried to keep this post as simple as possible and this data should give you enough
information to troubleshoot any memory usage issues you might face on your linux
vps or server.
If there is anything I missed please do share your experiences troubleshooting linux memory usage issues in the comments below.
https://www.kernel.org/doc/Documentation/sysctl/vm.txt
http://www.linuxhowtos.org/System/Linux%20Memory%20Management.htm
http://www.redhat.com/advice/tips/meminfo.html
http://www.thomaskrenn.com/en/wiki/Linux_Page_Cache_Basics