Wednesday, January 31, 2018

Check Linux filesystem for errors: FSCK command with examples

http://linuxtechlab.com/linux-filesystem-errors-fsck-command-with-examples

FSCK is a very important Linux/Unix utility, it is used to check & repair the errors in the file system. It is similar to ‘chkdsk’ utility in Windows operating systems. It is available for Linux, MacOS, FreeBSD operating systems.
FSCK stands for File System Consistency Check & most of the times, it runs at boot time but can also be started manually by super user, if need arises.
It can be used with 3 modes of operation,
1- Check for errors & let the user decide what should be done with each error,
2- Check for errors & make repairs automatically, or,
3- Check for errors & display the error but does not perform any repairs.
(Recommended Read: Learn to use TCPDUMP command with examples)

Syntax for using FSCK

We can use the FSCK command manually with the following syntax,
$ fsck options drives
The options that can be used with fsck command are,
-p      Automatic repair (no questions)
-n      Make no changes to the filesystem
-y      Assume “yes” to all questions
-c      Check for bad blocks and add them to the badblock list
-f      Force checking even if filesystem is marked clean
-v     Be verbose
-b     superblock Use alternative superblock
-B     blocksize Force blocksize when looking for superblock
-j      external_journal Set location of the external journal
-l      bad_blocks_file Add to badblocks list
-L     bad_blocks_file Set badblocks list
We can use any of the following options, depending on the operation we need to perform. Let’s discuss some of the options of fsck command with examples.

Fsck command with examples

Note:- Before we discuss any examples, please read this. We should not be using FSCK on mounted drives, as there will be high chances that fsck on mounted drive wll damage the drive permanently. So before performing fsck, we must un-mount the drive with the following command,
$ umount drivename
For example,
$ umount /dev/sdb1
You can check the partition number with the following command,
$ fdisk -l
Also while running the fsck, we might get some error codes. Below mentioned is the list of error codes that we might get along with their meanings,
0 – No errors
1 – Filesystem errors corrected
2 – System should be rebooted
4 – Filesystem errors left uncorrected
8 – Operational error
16 – Usage or syntax error
32 – Fsck canceled by user request
128 – Shared-library error
Now let’s discuss usage of fsck command with examples,

Perform an error check on a single partition

To perform a file check on a single partition, run the following command from the terminal,
$ umount /dev/sdb1
$ fsck /dev/sdb1

Check filesystem for errors & repair them automatically

Run the fsck command with ‘a’ option to perform consistency check & to repair them automatically, execute the following command. We can also use ‘y’ option in place of option ‘a’.
$ fsck -a /dev/sdb1

Check filesystem for errors but don’t repait them

In case we only need to see the error that are occurring on our file system & dont need to repair them, than we should run fsck with option ‘n’,
$ fsck -n /dev/sdb1

Perform an error check on all partitions

To perform a filesystem check for all partitions in single go, use fsck with ‘A’ option,
$ fsck -A
To disable the root file system check, we will use the option ‘R’
$ fsck -AR

Check only partition with mentioned filesystem

In order to run fsck on all the partitions with mentioned filesystem type, for example ‘ext4’, use fsck with option ‘t’ followed by filesystem type,
$ fsck -t ext4 /dev/sdb1
or
$ fsck -t -A ext4

Perform consistency check only on unmounted drives

To make sure that the fsck is performed only on unmounted drives, we will use option ‘M’ while running fsck,
$ fsck -AM
This was our tutorial on fsck command with examples. Please feel free to send in your questions or queries to us, using the comment box below.

Tuesday, January 30, 2018

How To Resume Partially Transferred Files Over SSH Using Rsync

https://www.ostechnix.com/how-to-resume-partially-downloaded-or-transferred-files-using-rsync

Resume Partially Transferred Files Over SSH Using Rsync
There are chances that the large files which are being copied over SSH using SCP command might be interrupted or cancelled or broken due to various reasons such as power failure or network failure or user intervention. The other day I was copying the Ubuntu 16.04 ISO file to my remote system. Unfortunately, the power is gone, and the network connection is dropped immediately. The result? The copy process is terminated! This is just a simple example. The Ubuntu ISO is not so big, and I could restart the copy process as soon as the power is restored. But in production environment, you might not want to do it while you’re transferring large files.
Also, you can’t always resume the aborted process using scp command. Because, If you do, It will simply overwrite the existing files. What would you do in such situations? No worries! This is where Rsync utility comes in handy! Rsync can help you to resume the interrupted copy or download process where you left it off. For those wondering, Rsync is a fast, versatile file copying utility that can be used to copy and transfer files or folders to and from remote and local systems.
It offers a large number of options that control every aspect of its behavior and permit very flexible specification of the set of files to be copied. It is famous for its delta-transfer algorithm, which reduces the amount of data sent over the network by sending only the differences between the source files and the existing files in the destination. Rsync is widely used for backups and mirroring and as an improved copy command for everyday use.
Just like SCP, rsync will also copy files over SSH. In case you wanted to download or transfer a big files and folders over SSH, I recommend you to use rsync utility. Be mindful that the rsync utility should be installed on both sides (remote and local systems) in order to resume partially transferred files.

Resume Partially Transferred Files Using Rsync

Well, let me show you an example. I am going to copy Ubuntu 16.04 ISO from my local system to remote system with command:
$ scp Soft_Backup/OS\ Images/Linux/ubuntu-16.04-desktop-amd64.iso sk@192.168.43.2:/home/sk/
Here,
  • sk is my remote system’s username
  • 192.168.43.2 is the IP address of the remote machine.
Now, I terminated it by pressing CTRL+c.
Sample output:
sk@192.168.43.2's password: 
ubuntu-16.04-desktop-amd64.iso 26% 372MB 26.2MB/s 00:39 ETA^c

As you see in the above output, I terminated the copy process when it reached 26%.
If I re-run the above command, it will simply overwrite the existing file. In other words, the copy process will not resume where I left it off.
In order to resume the copy process, we can use rsync command as shown below.
$ rsync -P -rsh=ssh Soft_Backup/OS\ Images/Linux/ubuntu-16.04-desktop-amd64.iso sk@192.168.43.2:/home/sk/
Sample output:
sk@192.168.1.103's password: 
sending incremental file list
ubuntu-16.04-desktop-amd64.iso
                   380.56M 26% 41.05MB/s 0:00:25

See? Now, the copying process is resumed where we left it off earlier. You also can use “–partial” instead of parameter “-P” like below.
$ rsync --partial -rsh=ssh Soft_Backup/OS\ Images/Linux/ubuntu-16.04-desktop-amd64.iso sk@192.168.43.2:/home/sk/
Here, the parameter “–partial” or “-P” tells the rsync command to keep the partial downloaded file and resumes the process.
Alternatively, we can use the following commands as well to resume partially transferred files over SSH.
$ rsync -avP Soft_Backup/OS\ Images/Linux/ubuntu-16.04-desktop-amd64.iso sk@192.168.43.2:/home/sk/
Or,
$ rsync -av --partial Soft_Backup/OS\ Images/Linux/ubuntu-16.04-desktop-amd64.iso sk@192.168.43.2:/home/sk/
That’s it. You know now how to resume the cancelled, interrupted, and partially downloaded files using rsync command. As you can see, it is not so difficult either. If rsync is installed on both systems, we can easily resume the copy process as described above.
If you find this tutorial helpful, please share it on your social, professional networks and support OSTechNix. More good stuffs to come. Stay tuned!
Cheers!

How to Increase the size of a Linux LVM by expanding the virtual machine disk

https://www.rootusers.com/how-to-increase-the-size-of-a-linux-lvm-by-expanding-the-virtual-machine-disk

This post will cover how to increase the disk space for a VMware virtual machine running Linux that is using logical volume manager (LVM). Firstly we will be increasing the size of the actual disk on the VMware virtual machine, so at the hardware level – this is the VM’s .vmdk file. Once this is complete we will get into the virtual machine and make the necessary changes through the operating system in order to take advantage of the additional space that has been provided by the hard drive being extended. This will involve creating a new partition with the new space, expanding the volume group and logical group, then finally resizing the file system.
As there are a number of different ways to increase disk space I have also posted some different methods here:
Update 18/04/2015: I have created a video guide of this post in CentOS 7 shown below.
Important Note: Be very careful when working with the commands in this article as they have the potential to cause a lot of damage to your data. If you are working with virtual machines make sure you take a snapshot of your virtual machine beforehand, or otherwise have some other form of up to date backup before proceeding. Note that a snapshot must not be taken until after the virtual disk has been increased, otherwise you will not be able to increase it. It could also be worth cloning the virtual machine first and testing out this method on the clone.
Prerequisites: As this method uses the additional space to create a primary partition, you must not already have 4 partitions as you will not be able to create more than 4. If you do not have space for another partition then you will need to consider a different method, there are some others in the above list.
Throughout my examples I will be working with a VMware virtual machine running Debian 6, this was set up with a 20gb disk and we will be increasing it by 10gb for a total final size of 30gb.

Identifying the partition type

As this method focuses on working with LVM, we will first confirm that our partition type is actually Linux LVM by running the below command.
fdisk -l
fdisk
As you can see in the above image /dev/sda5 is listed as “Linux LVM” and it has the ID of 8e. The 8e hex code shows that it is a Linux LVM, while 83 shows a Linux native partition. Now that we have confirmed we are working with an LVM we can continue. For increasing the size of a Linux native partition (hex code 83) see this article.
Below is the disk information showing that our initial setup only has the one 20gb disk currently, which is under the logical volume named /dev/mapper/Mega-root – this is what we will be expanding with the new disk.
disk free
Note that /dev/mapper/Mega-root is the volume made up from /dev/sda5 currently – this is what we will be expanding.

Increasing the virtual hard disk

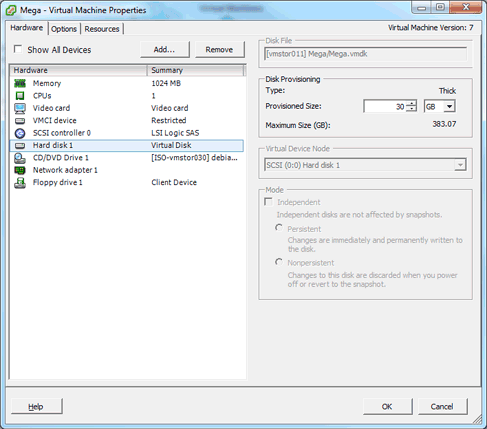
First off we increase the allocated disk space on the virtual machine itself. This is done by right clicking the virtual machine in vSphere, selecting edit settings, and then selecting the hard disk. In the below image I have changed the previously set hard disk of 20gb to 30gb while the virtual machine is up and running. Once complete click OK, this is all that needs to be done in VMware for this process.
vSphere settings
If you are not able to modify the size of the disk, the provisioned size setting is greyed out. This can happen if the virtual machine has a snapshot in place, these will need to be removed prior to making the changes to the disk. Alternatively you may need to shut down the virtual machine if it does not allow you to add or increase disks on the fly, if this is the case make the change then power it back on.

Detect the new disk space

Once the physical disk has been increased at the hardware level, we need to get into the operating system and create a new partition that makes use of this space to proceed.
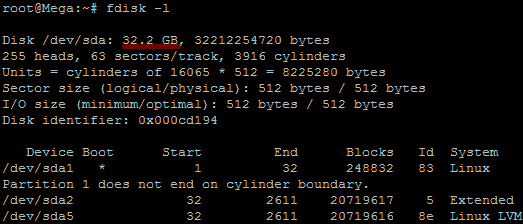
Before we can do this we need to check that the new unallocated disk space is detected by the server, you can use “fdisk -l” to list the primary disk. You will most likely see that the disk space is still showing as the same original size, at this point you can either reboot the server and it will detect the changes on boot or you can rescan your devices to avoid rebooting by running the below command. Note you may need to change host0 depending on your setup.
echo "- - -" > /sys/class/scsi_host/host0/scan
Below is an image after performing this and confirming that the new space is displaying.
fdisk

Partition the new disk space

As outlined in my previous images the disk in my example that I am working with is /dev/sda, so we use fdisk to create a new primary partition to make use of the new expanded disk space. Note that we do not have 4 primary partitions already in place, making this method possible.
fdisk /dev/sda
We are now using fdisk to create a new partition, the inputs I have entered in are shown below in bold. Note that you can press ‘m’ to get a full listing of the fdisk commands.
‘n’ was selected for adding a new partition.
WARNING: DOS-compatible mode is deprecated. It's strongly recommended to
         switch off the mode (command 'c') and change display units to
         sectors (command 'u').

Command (m for help): n
‘p’ is then selected as we are making a primary partition.
Command action
   l   logical (5 or over)
   p   primary partition (1-4)
p
As I already have /dev/sda1 and /dev/sda2 as shown in previous images, I have gone with using ‘3’ for this new partition which will be created as /dev/sda3
Partition number (1-4): 3
We just press enter twice above as by default the first and last cylinders of the unallocated space should be correct. After this the partition is then ready.
First cylinder (2611-3916, default 2611): "enter"
Using default value 2611
Last cylinder, +cylinders or +size{K,M,G} (2611-3916, default 3916): "enter"
Using default value 3916
‘t’ is selected to change to a partition’s system ID, in this case we change to ‘3’ which is the one we just created.
Command (m for help): t
Partition number (1-5): 3
The hex code ‘8e’ was entered as this is the code for a Linux LVM which is what we want this partition to be, as we will be joining it with the original /dev/sda5 Linux LVM.
Hex code (type L to list codes): 8e
Changed system type of partition 3 to 8e (Linux LVM)
‘w’ is used to write the table to disk and exit, basically all the changes that have been done will be saved and then you will be exited from fdisk.
Command (m for help): w
The partition table has been altered!

Calling ioctl() to re-read partition table.

WARNING: Re-reading the partition table failed with error 16: Device or resource busy.
The kernel still uses the old table. The new table will be used at
the next reboot or after you run partprobe(8) or kpartx(8)
Syncing disks.
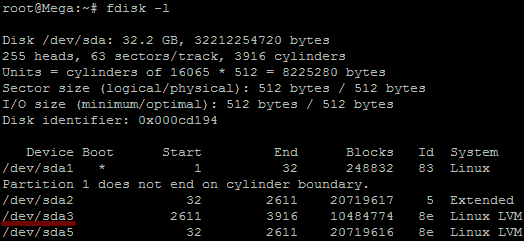
You will see a warning which basically means in order to use the new table with the changes a system reboot is required. If you can not see the new partition using “fdisk -l” you may be able to run “partprobe -s” to rescan the partitions. In my test I did not require either of those things at this stage (I do a reboot later on), straight after pressing ‘w’ in fdisk I was able to see the new /dev/sda3 partition of my 10gb of space as displayed in the below image.
For CentOS/RHEL run a “partx -a /dev/sda3” to avoid rebooting later on.
fdisk
That’s all for partitioning, we now have a new partition which is making use of the previously unallocated disk space from the increase in VMware.

Increasing the logical volume

We use the pvcreate command which creates a physical volume for later use by the logical volume manager (LVM). In this case the physical volume will be our new /dev/sda3 partition.
root@Mega:~# pvcreate /dev/sda3
  Device /dev/sda3 not found (or ignored by filtering).
In order to get around this you can either reboot, or use partprobe/partx as previously mentioned to avoid a reboot, as in this instance the disk does not appear to be there correctly despite showing in “fdisk -l”. After a reboot or partprobe/partx use the same command which will succeed.
root@Mega:~# pvcreate /dev/sda3
  Physical volume "/dev/sda3" successfully created
Next we need to confirm the name of the current volume group using the vgdisplay command. The name will vary depending on your setup, for me it is the name of my test server. vgdisplay provides lots of information on the volume group, I have only shown the name and the current size of it for this example.
root@Mega:~# vgdisplay
  --- Volume group ---
  VG Name               Mega
...
VG Size               19.76 GiB
Now we extend the ‘Mega’ volume group by adding in the physical volume of /dev/sda3 which we created using the pvcreate command earlier.
root@Mega:~# vgextend Mega /dev/sda3
  Volume group "Mega" successfully extended
Using the pvscan command we scan all disks for physical volumes, this should confirm the original /dev/sda5 partition and the newly created physical volume /dev/sda3
root@Mega:~# pvscan
  PV /dev/sda5   VG Mega   lvm2 [19.76 GiB / 0    free]
  PV /dev/sda3   VG Mega   lvm2 [10.00 GiB / 10.00 GiB free]
  Total: 2 [29.75 GiB] / in use: 2 [29.75 GiB] / in no VG: 0 [0   ]
Next we need to increase the logical volume (rather than the physical volume) which basically means we will be taking our original logical volume and extending it over our new partition/physical volume of /dev/sda3.
Firstly confirm the path of the logical volume using lvdisplay. This path name will vary depending on your setup.
root@Mega:~# lvdisplay
  --- Logical volume ---
  LV Path                /dev/Mega/root
The logical volume is then extended using the lvextend command.
root@Mega:~# lvextend /dev/Mega/root /dev/sda3
  Extending logical volume root to 28.90 GiB
  Logical volume root successfully resized
There is then one final step which is to resize the file system so that it can take advantage of this additional space, this is done using the resize2fs command for ext based file systems. Note that this may take some time to complete, it took about 30 seconds for my additional space.
root@Mega:~# resize2fs /dev/Mega/root
resize2fs 1.41.12 (17-May-2010)
Filesystem at /dev/Mega/root is mounted on /; on-line resizing required
old desc_blocks = 2, new_desc_blocks = 2
Performing an on-line resize of /dev/Mega/root to 7576576 (4k) blocks.
The filesystem on /dev/Mega/root is now 7576576 blocks long.
Alternatively if you’re running the XFS file system (default as of RedHat/CentOS 7) you can grow the file system with “xfs_growfs /dev/Mega/root”.
That’s it, now with the ‘df’ command we can see that the total available disk space has been increased.
disk free after expansion

Summary

With this method we have increased the virtual disk drive through VMware, created a new partition out of this newly unallocated space within the guest OS, turned it into a physical volume, extended the volume group, and then finally extended the original logical volume over the newer physical volume resulting in overall disk space being increased successfully.

How to install KVM on CentOS 7 / RHEL 7 Headless Server

https://www.cyberciti.biz/faq/how-to-install-kvm-on-centos-7-rhel-7-headless-server

How do I install and configure KVM (Kernel-based Virtual Machine) on a CentOS 7 or RHEL (Red Hat Enterprise Linux) 7 server? How can I setup KMV on a CentOS 7 and use cloud images/cloud-init for installing guest VM?

Kernel-based Virtual Machine (KVM) is virtualization software for CentOS or RHEL 7. KVM turn your server into a hypervisor. This page shows how to setup and manage a virtualized environment with KVM in CentOS 7 or RHEL 7. It also described how to install and administer Virtual Machines (VMs) on a physical server using the CLI. Make sure that Virtualization Technology (VT) is enabled in your server’s BIOS. You can also run the following command to test if CPU Support Intel VT and AMD-V Virtualization tech:
$ lscpu | grep Virtualization
Virtualization: VT-x

Follow installation steps of KVM on CentOS 7/RHEL 7 headless sever

Step 1: Install kvm

Type the following yum command:
# yum install qemu-kvm libvirt libvirt-python libguestfs-tools virt-install
How to install KVM on CentOS 7 RHEL 7 Headless Server
Start the libvirtd service:
# systemctl enable libvirtd
# systemctl start libvirtd

Step 2: Verify kvm installation

Make sure KVM module loaded using lsmod command and grep command:
# lsmod | grep -i kvm

Step 3: Configure bridged networking

By default dhcpd based network bridge configured by libvirtd. You can verify that with the following commands:
# brctl show
# virsh net-list

KVM default networking
All VMs (guest machine) only have network access to other VMs on the same server. A private network 192.168.122.0/24 created for you. Verify it:
# virsh net-dumpxml default
If you want your VMs avilable to other servers on your LAN, setup a a network bridge on the server that connected to the your LAN. Update your nic config file such as ifcfg-enp3s0 or em1:
# vi /etc/sysconfig/network-scripts/enp3s0
Add line:
BRIDGE=br0
Save and close the file in vi. Edit /etc/sysconfig/network-scripts/ifcfg-br0 and add:
# vi /etc/sysconfig/network-scripts/ifcfg-br0
Append the following:
DEVICE="br0"
# I am getting ip from DHCP server #
BOOTPROTO="dhcp"
IPV6INIT="yes"
IPV6_AUTOCONF="yes"
ONBOOT="yes"
TYPE="Bridge"
DELAY="0"
Restart the networking service (warning ssh command will disconnect, it is better to reboot the box):
# systemctl restart NetworkManager
Verify it with brctl command:
# brctl show

Step 4: Create your first virtual machine

I am going to create a CentOS 7.x VM. First, grab CentOS 7.x latest ISO image using the wget command:
# cd /var/lib/libvirt/boot/
# wget https://mirrors.kernel.org/centos/7.4.1708/isos/x86_64/CentOS-7-x86_64-Minimal-1708.iso

Verify ISO images:
# wget https://mirrors.kernel.org/centos/7.4.1708/isos/x86_64/sha256sum.txt
# sha256sum -c sha256sum.txt

Create CentOS 7.x VM

In this example, I’m creating CentOS 7.x VM with 2GB RAM, 2 CPU core, 1 nics and 40GB disk space, enter:
# virt-install \
--virt-type=kvm \
--name centos7 \
--ram 2048 \
--vcpus=1 \
--os-variant=centos7.0 \
--cdrom=/var/lib/libvirt/boot/CentOS-7-x86_64-Minimal-1708.iso \
--network=bridge=br0,model=virtio \
--graphics vnc \
--disk path=/var/lib/libvirt/images/centos7.qcow2,size=40,bus=virtio,format=qcow2

To configure vnc login from another terminal over ssh and type:
# virsh dumpxml centos7 | grep vnc

Please note down the port value (i.e. 5901). You need to use an SSH client to setup tunnel and a VNC client to access the remote vnc server. Type the following SSH port forwarding command from your client/desktop/macbook pro system:
$ ssh vivek@server1.cyberciti.biz -L 5901:127.0.0.1:5901
Once you have ssh tunnel established, you can point your VNC client at your own 127.0.0.1 (localhost) address and port 5901 as follows:

You should see CentOS Linux 7 guest installation screen as follows:

Now just follow on screen instructions and install CentOS 7. Once installed, go ahead and click the reboot button. The remote server closed the connection to our VNC client. You can reconnect via KVM client to configure the rest of the server including SSH based session or firewall.

Step 5: Using cloud images

The above installation method is okay for learning purpose or a single VM. Do you need to deploy lots of VMs? Try cloud images. You can modify pre built cloud images as per your needs. For example, add users, ssh keys, setup time zone, and more using Cloud-init which is the defacto multi-distribution package that handles early initialization of a cloud instance. Let us see how to create CentOS 7 vm with 1024MB ram, 20GB disk space, and 1 vCPU.

Grab CentOS 7 cloud image

# cd /var/lib/libvirt/boot
# wget http://cloud.centos.org/centos/7/images/CentOS-7-x86_64-GenericCloud.qcow2

Create required directories

# D=/var/lib/libvirt/images
# VM=centos7-vm1 ## vm name ##
# mkdir -vp $D/$VM
mkdir: created directory '/var/lib/libvirt/images/centos7-vm1'

Create meta-data file

# cd $D/$VM
# vi meta-data

Append the following:
instance-id: centos7-vm1
local-hostname: centos7-vm1

Crete user-data file

I am going to login into VM using ssh keys. So make sure you have ssh-keys in place:
# ssh-keygen -t ed25519 -C "VM Login ssh key"
ssh-keygen command
See “How To Setup SSH Keys on a Linux / Unix System” for more info. Edit user-data as follows:
# cd $D/$VM
# vi user-data

Add as follows (replace hostname, users, ssh-authorized-keys as per your setup):
#cloud-config
 
# Hostname management
preserve_hostname: False
hostname: centos7-vm1
fqdn: centos7-vm1.nixcraft.com
 
# Users
users:
    - default
    - name: vivek
      groups: ['wheel']
      shell: /bin/bash
      sudo: ALL=(ALL) NOPASSWD:ALL
      ssh-authorized-keys:
        - ssh-ed25519 AAAAC3NzaC1lZDI1NTE5AAAAIIMP3MOF2ot8MOdNXCpHem0e2Wemg4nNmL2Tio4Ik1JY VM Login ssh key
 
# Configure where output will go
output:
  all: ">> /var/log/cloud-init.log"
 
# configure interaction with ssh server
ssh_genkeytypes: ['ed25519', 'rsa']
 
# Install my public ssh key to the first user-defined user configured
# in cloud.cfg in the template (which is centos for CentOS cloud images)
ssh_authorized_keys:
  - ssh-ed25519 AAAAC3NzaC1lZDI1NTE5AAAAIIMP3MOF2ot8MOdNXCpHem0e2Wemg4nNmL2Tio4Ik1JY VM Login ssh key
 
# set timezone for VM
timezone: Asia/Kolkata
 
# Remove cloud-init 
runcmd:
  - systemctl stop network && systemctl start network
  - yum -y remove cloud-init

Copy cloud image

# cd $D/$VM
# cp /var/lib/libvirt/boot/CentOS-7-x86_64-GenericCloud.qcow2 $VM.qcow2

Create 20GB disk image

# cd $D/$VM
# export LIBGUESTFS_BACKEND=direct
# qemu-img create -f qcow2 -o preallocation=metadata $VM.new.image 20G
# virt-resize --quiet --expand /dev/sda1 $VM.qcow2 $VM.new.image

Set VM image disk size
Overwrite it resized image:
# cd $D/$VM
# mv $VM.new.image $VM.qcow2

Creating a cloud-init ISO

# mkisofs -o $VM-cidata.iso -V cidata -J -r user-data meta-data
Creating a cloud-init ISO

Creating a pool

# virsh pool-create-as --name $VM --type dir --target $D/$VM
Pool centos7-vm1 created

Installing a CentOS 7 VM

# cd $D/$VM
# virt-install --import --name $VM \
--memory 1024 --vcpus 1 --cpu host \
--disk $VM.qcow2,format=qcow2,bus=virtio \
--disk $VM-cidata.iso,device=cdrom \
--network bridge=virbr0,model=virtio \
--os-type=linux \
--os-variant=centos7.0 \
--graphics spice \
--noautoconsole

Delete unwanted files:
# cd $D/$VM
# virsh change-media $VM hda --eject --config
# rm meta-data user-data centos7-vm1-cidata.iso

Find out IP address of VM

# virsh net-dhcp-leases default
CentOS7-VM1- Created

Log in to your VM

Use ssh command:
# ssh vivek@192.168.122.85
Sample VM session

Useful commands

Let us see some useful commands for managing VMs.

List all VMs

# virsh list --all

Get VM info

# virsh dominfo vmName
# virsh dominfo centos7-vm1

Stop/shutdown a VM

# virsh shutdown centos7-vm1

Start VM

# virsh start centos7-vm1

Mark VM for autostart at boot time

# virsh autostart centos7-vm1

Reboot (soft & safe reboot) VM

# virsh reboot centos7-vm1
Reset (hard reset/not safe) VM
# virsh reset centos7-vm1

Delete VM

# virsh shutdown centos7-vm1
# virsh undefine centos7-vm1
# virsh pool-destroy centos7-vm1
# D=/var/lib/libvirt/images
# VM=centos7-vm1
# rm -ri $D/$VM

To see a complete list of virsh command type
# virsh help | less
# virsh help | grep reboot

See also

Monday, January 29, 2018

What Is cURL?

https://www.rosehosting.com/blog/what-is-curl

What is cURL?
We’ll show you, What is cURL? and why would you use cURL? cURL (Client URL Library) is a computer software project providing a library and command-line tool for transferring data using various protocols. cURL is a tool to transfer data from or to a server, using one of the following  supported protocols (DICT, FILE, FTP, FTPS, GOPHER, HTTP, HTTPS, IMAP, IMAPS, LDAP, LDAPS, POP3, POP3S, RTMP, RTSP, SCP, SFTP, SMB, SMBS, SMTP, SMTPS, TELNET and TFTP). The command is designed to work without user interaction.If you are a Linux command line user, you probably came across the cURL command. cURL is a command line tool that most system admins are using on a day to day basis to perform variety of different tasks. In this article we will explain what is cURL and why would you want to use it on your Linux VPS.

1. What is cURL?

cURL or Client URL Library is command line tool which is used to transfer data from one server to another. Basically, the tool is designed to help you get or send files using URL based syntax and it works without user interaction. cURL supports wide variety of common Internet protocols including HTTP, HTTPS, IMAP, IMAPS, LDAP, LDAPS, POP3, POP3S, RTMP, RTSP, SCP, SFTP, SMTP, SMTPS, TELNET, TFTP, DICT, FILE, FTP, FTPS, GOPHER etc.
cURL is free and open source so it is also used in many different devices including routers, printers, mobile phones etc. Basically, it is used in thousands of applications and millions of users are using it on a daily basis without even knowing.

2. Why Would You Use cURL?

cURL allows you to perform multiple file uploads on a single command line. The user can specify multiple URLs and they will be fetched in the specified order. Moreover, cURL offers proxy support, file uploads via FTP, sending requests over HTTP protocol, establishing connections via SSL, getting and setting cookies, user and password authentication, SMTP authentication and sending emails, authentication via POP3 and IMAP and many more. Simply, cURL can be used for everything that is related to Internet protocol transfers. The full list of features is available here.
cURL uses libcurl, which is a client-side URL transfer library. This allows you to use cURL with multiple programming and scripting languages to build amazing applications.

3. Install cURL on a Linux VPS

In order to install and use cURL on your Linux VPS you need to have SSH access. Connect to your server via SSH and run the following commands to install cURL:
On an Ubuntu VPS, run:
sudo apt-get update
This will update the package index. Then, run the following command to install cURL:
sudo apt-get install curl
On a CentOS VPS, run:
yum install curl
Once you install cURL on your server you can check our guide about how to use cURL to perform simple URL checks, download files, get HTTP header information from a website as well as how to access an FTP server. Also, we recommend you to check the cURL man page for more usage options and examples:
man curl
What is cURL?Of course, you don’t have to install cURL on Linux server, if you use one of our Ultra-Fast and Fully Managed Linux VPS Hosting services, in which case you can simply ask our expert Linux admins to install cURL for you. They are available 24×7 and will take care of your request immediately. You can always ask our system administrator about what is cURL? and how to use it.
PS. If you liked this post on What Is cURL?  please share it with your friends on the social networks using the buttons on the left or simply leave a reply below. Thanks.

MapSCII – The World Map In Your Terminal

https://www.ostechnix.com/mapscii-world-map-terminal


MapSCII - The World Map In Your Terminal
I just stumbled upon an interesting utility. The World map in the Terminal! Yes, It is so cool. Say hello to MapSCII, a Braille and ASCII world map renderer for your xterm-compatible terminals. It supports GNU/Linux, Mac OS, and Windows. I thought it is a just another project hosted on GitHub. But I was wrong! It is really impressive what they did there. We can use our mouse pointer to drag and zoom in and out a location anywhere in the world map. The other notable features are;
  • Discover Point-of-Interests around any given location
  • Highly customizable layer styling with Mapbox Styles support
  • Connect to any public or private vector tile server
  • Or just use the supplied and optimized OSM2VectorTiles based one
  • Work offline and discover local VectorTile/MBTiles
  • Compatible with most Linux and OSX terminals
  • Highly optimizied algorithms for a smooth experience

Displaying the World Map in your Terminal using MapSCII

To open the map, just run the following command from your Terminal:
telnet mapscii.me
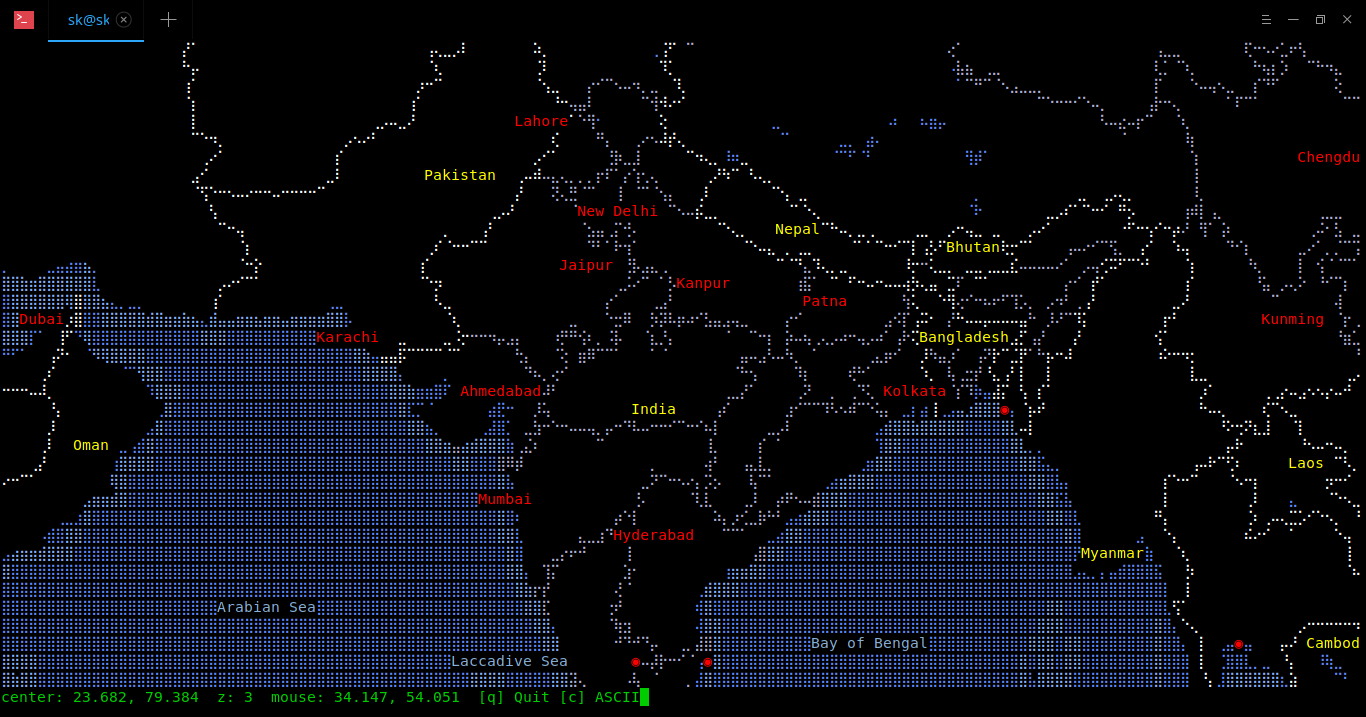
Here is the World map from my Terminal.

Cool, yeah?
To switch to Braille view, press c.

Type c again to switch back to the previous format.
To scroll around the map, use arrow keys up, down, left, right. To zoom in/out a location, use a and z keys. Also, you can use the scroll wheel of your mouse to zoom in or out. To quit the map, press q.
Like I already said, don’t think it is a simple project. Click on any location on the map and press “a” to zoom in.
Here are some the sample screenshots after I zoomed it.

I can be able to zoom to view the states in my country (India).

And the districts in a state (Tamilnadu):

Even the Taluks and the towns in a district:

And, the place where I completed my schooling:

Even though it is just a smallest town, MapSCII displayed it accurately. MapSCII uses OpenStreetMap to collect the data.

Install MapSCII locally

Liked it? Great! You can host it on your own system.
Make sure you have installed Node.js on your system. If not, refer the following link.
Then, run the following command to install it.
sudo npm install -g mapscii
To launch MapSCII, run:
mapscii
Have fun! More good stuffs to come. Stay tuned!
Cheers!
Resource: