Saturday, August 30, 2014

How to secure a LAMP server on CentOS or RHEL

http://xmodulo.com/2014/08/secure-lamp-server-centos-rhel.html

LAMP is a software stack composed of Linux (an operating system as a base layer), Apache (a web server that "sits on top" of the OS), MySQL (or MariaDB, as a relational database management system), and finally PHP (a server-side scripting language that is used to process and display information stored in the database).
In this article we will assume that each component of the stack is already up and running, and will focus exclusively on securing the LAMP server(s). We must note, however, that server-side security is a vast subject, and therefore cannot be addressed adequately and completely in a single article.
In this post, we will cover the essential must-do's to secure each part of the stack.

Securing Linux

Since you may want to manage your CentOS server via ssh, you need to consider the following tips to secure remote access to the server by editing the /etc/ssh/sshd_config file.
1) Use key-based authentication, whenever possible, instead of basic authentication (username + password) to log on to your server remotely. We assume that you have already created a key pair with your user name on your client machine and copied it to your server (see the tutorial).
1
2
3
PasswordAuthentication no
RSAAuthentication yes
PubkeyAuthentication yes
2) Change the port where sshd will be listening on. A good idea for the port is a number higher than 1024:
1
Port XXXX
3) Allow only protocol 2:
1
Protocol 2
4) Configure the authentication timeout, do not allow root logins, and restrict which users may login, via ssh:
1
2
3
LoginGraceTime 2m
PermitRootLogin no
AllowUsers gacanepa
5) Allow only specific hosts (and/or networks) to login via ssh:
In the /etc/hosts.deny file:
1
sshd: ALL
In the /etc/hosts.allow file:
1
sshd: XXX.YYY.ZZZ. AAA.BBB.CCC.DDD
where XXX.YYY.ZZZ. represents the first 3 octets of an IPv4 network address and AAA.BBB.CCC.DDD is an IPv4 address. With that setting, only hosts from network XXX.YYY.ZZZ.0/24 and host AAA.BBB.CCC.DDD will be allowed to connect via ssh. All other hosts will be disconnected before they even get to the login prompt, and will receive an error like this:

(Do not forget to restart the sshd daemon to apply these changes: service sshd restart).
We must note that this approach is a quick and easy -but somewhat rudimentary- way of blocking incoming connections to your server. For further customization, scalability and flexibility, you should consider using plain iptables and/or fail2ban.

Securing Apache

1) Make sure that the system user that is running Apache web server does not have access to a shell:
# grep -i apache /etc/passwd
If user apache has a default shell (such as /bin/sh), we must change it to /bin/false or /sbin/nologin:
# usermod -s /sbin/nologin apache

The following suggestions (2 through 5) refer to the /etc/httpd/conf/httpd.conf file:
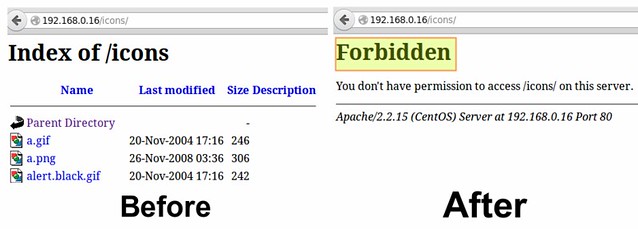
2) Disable directory listing: this will prevent the browser from displaying the contents of a directory if there is no index.html present in that directory.
Delete the word Indexes in the Options directive:
1
2
3
4
5
# The Options directive is both complicated and important.  Please see
# http://httpd.apache.org/docs/2.2/mod/core.html#options
# for more information.
#
Options Indexes FollowSymLinks
Should read:
1
Options None

In addition, you need to make sure that the settings for directories and virtual hosts do not override this global configuration.
Following the example above, if we examine the settings for the /var/www/icons directory, we see that "Indexes MultiViews FollowSymLinks" should be changed to "None".

    Options Indexes MultiViews FollowSymLinks
    AllowOverride None
    Order allow,deny
    Allow from all


    Options None
    AllowOverride None
    Order allow,deny
    Allow from all

Before After
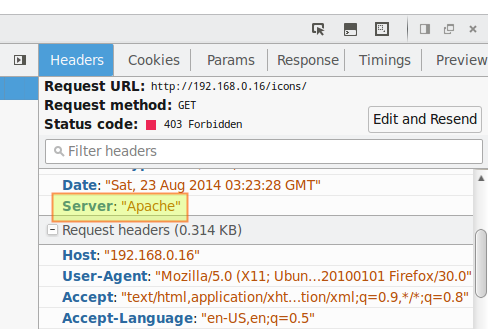
3) Hide Apache version, as well as module/OS information in error (e.g. Not Found and Forbidden) pages.
1
2
ServerTokens Prod # This means that the http response header will return just "Apache" but not its version number
ServerSignature Off # The OS information is hidden

4) Disable unneeded modules by commenting out the lines where those modules are declared:
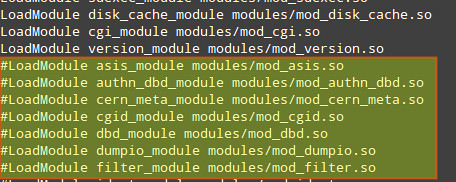
TIP: Disabling autoindex_module is another way to hide directory listings when there is not an index.html file in them.
5) Limit HTTP request size (body and headers) and set connection timeout:
Directive Context Example and meaning
LimitRequestBody server config, virtual host, directory, .htaccess Limit file upload to 100 KiB max. for the uploads directory:
1
2
3
"/var/www/test/uploads">
   LimitRequestBody 102400
</Directory>
This directive specifies the number of bytes from 0 (meaning unlimited) to 2147483647 (2GB) that are allowed in a request body.
LimitRequestFieldSize server config, virtual host Change the allowed HTTP request header size to 4KiB (default is 8KiB), server wide:
1
LimitRequestFieldSize 4094
This directive specifies the number of bytes that will be allowed in an HTTP request header and gives the server administrator greater control over abnormal client request behavior, which may be useful for avoiding some forms of denial-of-service attacks.
TimeOut server config, virtual host Change the timeout from 300 (default if no value is used) to 120:
1
TimeOut 120
Amount of time, in seconds, the server will wait for certain events before failing a request.
For more directives and instructions on how to set them up, refer to the Apache docs.

Securing MySQL Server

We will begin by running the mysql_secure_installation script which comes with mysql-server package.
1) If we have not set a root password for MySQL server during installation, now it's the time to do so, and remember: this is essential in a production environment.
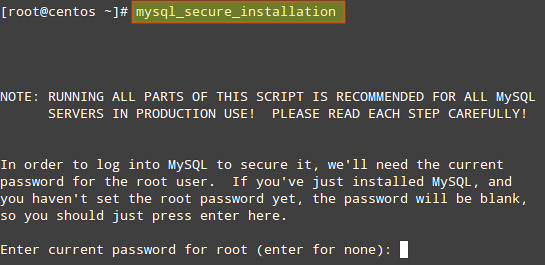
The process will continue:
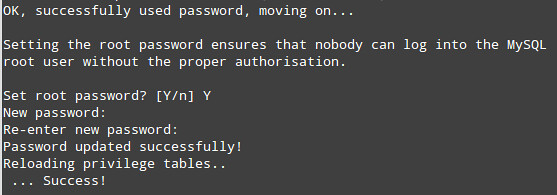
2) Remove the anonymous user:

3) Only allow root to connect from localhost:

4) Remove the default database named test:

5) Apply changes:
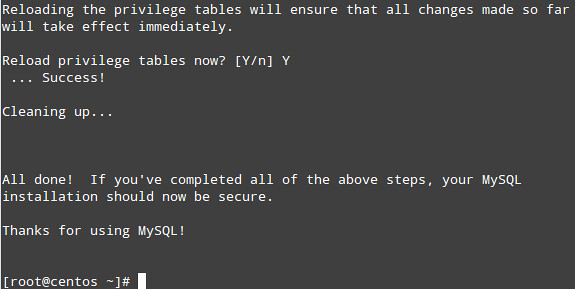
6) Next, we will edit some variables in the /etc/my.cnf file:
1
2
3
4
[mysqld]
bind-address=127.0.0.1 # MySQL will only accept connections from localhost
local-infile=0 # Disable direct filesystem access
log=/var/log/mysqld.log # Enable log file to watch out for malicious activities
Don't forget to restart MySQL server with 'service mysqld restart'.
Now, when it comes to day-to-day database administration, you'll find the following suggestions useful:
  • If for some reason we need to manage our database remotely, we can do so by connecting via ssh to our server first to perform the necessary querying and administration tasks locally.
  • We may want to enable direct access to the filesystem later if, for example, we need to perform a bulk import of a file into the database.
  • Keeping logs is not as critical as the two things mentioned earlier, but may come in handy to troubleshoot our database and/or be aware of unfamiliar activities.
  • DO NOT, EVER, store sensitive information (such as passwords, credit card numbers, bank PINs, to name a few examples) in plain text format. Consider using hash functions to obfuscate this information.
  • Make sure that application-specific databases can be accessed only by the corresponding user that was created by the application to that purpose:
To adjust access permission of MySQL users, use these instructions.
First, retrieve the list of users from the user table:
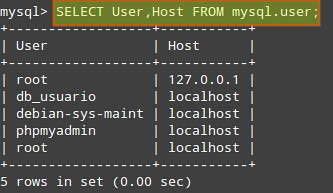
gacanepa@centos:~$ mysql -u root -p
Enter password: [Your root password here]
mysql> SELECT User,Host FROM mysql.user;

Make sure that each user only has access (and the minimum permissions) to the databases it needs. In the following example, we will check the permissions of user db_usuario:
mysql> SHOW GRANTS FOR 'db_usuario'@'localhost';

You can then revoke permissions and access as needed.

Securing PHP

Since this article is oriented at securing the components of the LAMP stack, we will not go into detail as far as the programming side of things is concerned. We will assume that our web applications are secure in the sense that the developers have gone out of their way to make sure that there are no vulnerabilities that can give place to common attacks such as XSS or SQL injection.
1) Disable unnecessary modules:
We can display the list of current compiled in modules with the following command: php -m
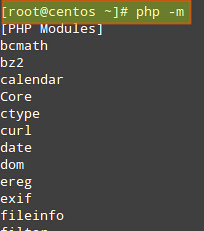
And disable those that are not needed by either removing or renaming the corresponding file in the /etc/php.d directory.
For example, since the mysql extension has been deprecated as of PHP v5.5.0 (and will be removed in the future), we may want to disable it:
# php -m | grep mysql
# mv /etc/php.d/mysql.ini /etc/php.d/mysql.ini.disabled

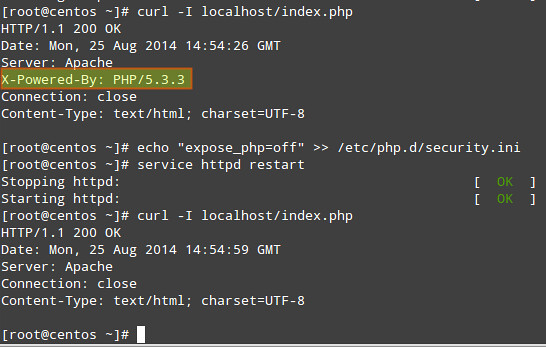
2) Hide PHP version information:
# echo "expose_php=off" >> /etc/php.d/security.ini [or modify the security.ini file if it already exists]

3) Set open_basedir to a few specific directories (in php.ini) in order to restrict access to the underlying file system:

4) Disable remote code/command execution along with easy exploitable functions such as exec(), system(), passthru(), eval(), and so on (in php.ini):
1
2
3
allow_url_fopen = Off
allow_url_include = Off
disable_functions = "exec, system, passthru, eval"


Summing Up

1) Keep packages updated to their most recent version (compare the output of the following commands with the output of 'yum info [package]'):
The following commands return the current versions of Apache, MySQL and PHP:
# httpd -v
# mysql -V (capital V)
# php -v

Then 'yum update [package]' can be used to update the package in order to have the latest security patches.
2) Make sure that configuration files can only be written by the root account:
# ls -l /etc/httpd/conf/httpd.conf
# ls -l /etc/my.cnf
# ls -l /etc/php.ini /etc/php.d/security.ini

3) Finally, if you have the chance, run these services (web server, database server, and application server) in separate physical or virtual machines (and protect communications between them via a firewall), so that in case one of them becomes compromised, the attacker will not have immediate access to the others. If that is the case, you may have to tweak some of the configurations discussed in this article. Note that this is just one of the setups that could be used to increase security in your LAMP server.

An introduction to Apache Hadoop for big data

http://opensource.com/life/14/8/intro-apache-hadoop-big-data


Apache Hadoop is an open source software framework for storage and large scale processing of data-sets on clusters of commodity hardware. Hadoop is an Apache top-level project being built and used by a global community of contributors and users. It is licensed under the Apache License 2.0.
Doug Cutting with his son's stuffed elephant, Hadoop
Hadoop was created by Doug Cutting and Mike Cafarella in 2005. It was originally developed to support distribution for the Nutch search engine project. Doug, who was working at Yahoo! at the time and is now Chief Architect of Cloudera, named the project after his son's toy elephant. Cutting's son was 2 years old at the time and just beginning to talk. He called his beloved stuffed yellow elephant "Hadoop" (with the stress on the first syllable). Now 12, Doug's son often exclaims, "Why don't you say my name, and why don't I get royalties? I deserve to be famous for this!"

The Apache Hadoop framework is composed of the following modules

  1. Hadoop Common: contains libraries and utilities needed by other Hadoop modules
  2. Hadoop Distributed File System (HDFS): a distributed file-system that stores data on the commodity machines, providing very high aggregate bandwidth across the cluster
  3. Hadoop YARN: a resource-management platform responsible for managing compute resources in clusters and using them for scheduling of users' applications
  4. Hadoop MapReduce: a programming model for large scale data processing
All the modules in Hadoop are designed with a fundamental assumption that hardware failures (of individual machines, or racks of machines) are common and thus should be automatically handled in software by the framework. Apache Hadoop's MapReduce and HDFS components originally derived respectively from Google's MapReduce and Google File System (GFS) papers.
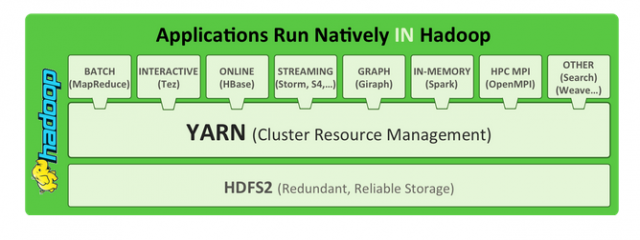
Beyond HDFS, YARN and MapReduce, the entire Apache Hadoop "platform" is now commonly considered to consist of a number of related projects as well: Apache Pig, Apache Hive, Apache HBase, and others.
An illustration of the Apache Hadoop ecosystem
For the end-users, though MapReduce Java code is common, any programming language can be used with "Hadoop Streaming" to implement the "map" and "reduce" parts of the user's program. Apache Pig and Apache Hive, among other related projects, expose higher level user interfaces like Pig latin and a SQL variant respectively. The Hadoop framework itself is mostly written in the Java programming language, with some native code in C and command line utilities written as shell-scripts.

HDFS and MapReduce

There are two primary components at the core of Apache Hadoop 1.x: the Hadoop Distributed File System (HDFS) and the MapReduce parallel processing framework. These are both open source projects, inspired by technologies created inside Google.

Hadoop distributed file system

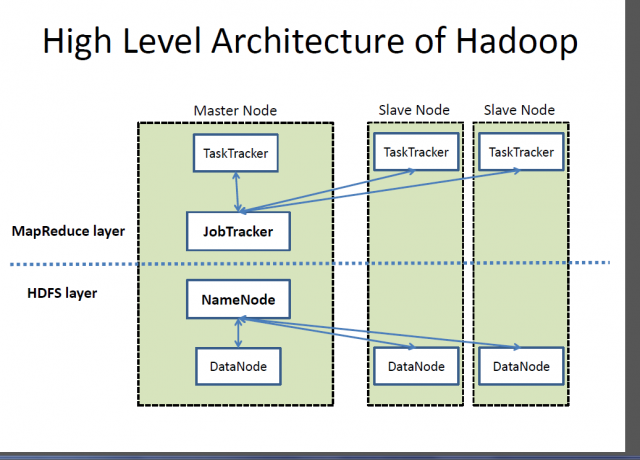
The Hadoop distributed file system (HDFS) is a distributed, scalable, and portable file-system written in Java for the Hadoop framework. Each node in a Hadoop instance typically has a single namenode, and a cluster of datanodes form the HDFS cluster. The situation is typical because each node does not require a datanode to be present. Each datanode serves up blocks of data over the network using a block protocol specific to HDFS. The file system uses the TCP/IP layer for communication. Clients use Remote procedure call (RPC) to communicate between each other.

HDFS stores large files (typically in the range of gigabytes to terabytes) across multiple machines. It achieves reliability by replicating the data across multiple hosts, and hence does not require RAID storage on hosts. With the default replication value, 3, data is stored on three nodes: two on the same rack, and one on a different rack. Data nodes can talk to each other to rebalance data, to move copies around, and to keep the replication of data high. HDFS is not fully POSIX-compliant, because the requirements for a POSIX file-system differ from the target goals for a Hadoop application. The tradeoff of not having a fully POSIX-compliant file-system is increased performance for data throughput and support for non-POSIX operations such as Append.
HDFS added the high-availability capabilities for release 2.x, allowing the main metadata server (the NameNode) to be failed over manually to a backup in the event of failure, automatic fail-over.
The HDFS file system includes a so-called secondary namenode, which misleads some people into thinking that when the primary namenode goes offline, the secondary namenode takes over. In fact, the secondary namenode regularly connects with the primary namenode and builds snapshots of the primary namenode's directory information, which the system then saves to local or remote directories. These checkpointed images can be used to restart a failed primary namenode without having to replay the entire journal of file-system actions, then to edit the log to create an up-to-date directory structure. Because the namenode is the single point for storage and management of metadata, it can become a bottleneck for supporting a huge number of files, especially a large number of small files. HDFS Federation, a new addition, aims to tackle this problem to a certain extent by allowing multiple name-spaces served by separate namenodes.
An advantage of using HDFS is data awareness between the job tracker and task tracker. The job tracker schedules map or reduce jobs to task trackers with an awareness of the data location. For example, if node A contains data (x, y, z) and node B contains data (a, b, c), the job tracker schedules node B to perform map or reduce tasks on (a,b,c) and node A would be scheduled to perform map or reduce tasks on (x,y,z). This reduces the amount of traffic that goes over the network and prevents unnecessary data transfer. When Hadoop is used with other file systems, this advantage is not always available. This can have a significant impact on job-completion times, which has been demonstrated when running data-intensive jobs. HDFS was designed for mostly immutable files and may not be suitable for systems requiring concurrent write-operations.
Another limitation of HDFS is that it cannot be mounted directly by an existing operating system. Getting data into and out of the HDFS file system, an action that often needs to be performed before and after executing a job, can be inconvenient. A filesystem in Userspace (FUSE) virtual file system has been developed to address this problem, at least for Linux and some other Unix systems.
File access can be achieved through the native Java API, the Thrift API, to generate a client in the language of the users' choosing (C++, Java, Python, PHP, Ruby, Erlang, Perl, Haskell, C#, Cocoa, Smalltalk, or OCaml), the command-line interface, or browsed through the HDFS-UI web app over HTTP.

JobTracker and TaskTracker: The MapReduce engine

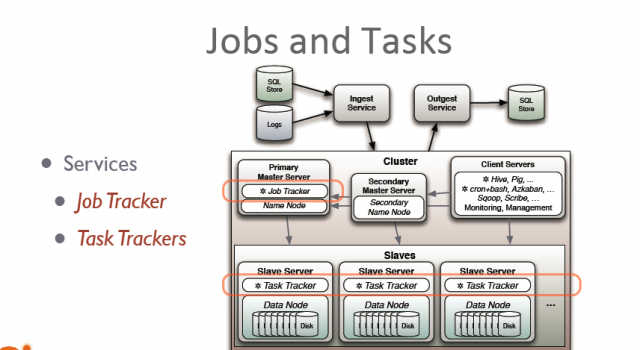
Jobs and tasks in Hadoop
Above the file systems comes the MapReduce engine, which consists of one JobTracker, to which client applications submit MapReduce jobs. The JobTracker pushes work out to available TaskTracker nodes in the cluster, striving to keep the work as close to the data as possible.
With a rack-aware file system, the JobTracker knows which node contains the data, and which other machines are nearby. If the work cannot be hosted on the actual node where the data resides, priority is given to nodes in the same rack. This reduces network traffic on the main backbone network.
If a TaskTracker fails or times out, that part of the job is rescheduled. The TaskTracker on each node spawns off a separate Java Virtual Machine process to prevent the TaskTracker itself from failing if the running job crashes the JVM. A heartbeat is sent from the TaskTracker to the JobTracker every few minutes to check its status. The Job Tracker and TaskTracker status and information is exposed by Jetty and can be viewed from a web browser.
 Hadoop 1.x MapReduce System is composed of the JobTracker, which is the master, and the per-node slaves, TaskTrackers
If the JobTracker failed on Hadoop 0.20 or earlier, all ongoing work was lost. Hadoop version 0.21 added some checkpointing to this process. The JobTracker records what it is up to in the file system. When a JobTracker starts up, it looks for any such data, so that it can restart work from where it left off.

Known limitations of this approach in Hadoop 1.x

The allocation of work to TaskTrackers is very simple. Every TaskTracker has a number of available slots (such as "4 slots"). Every active map or reduce task takes up one slot. The Job Tracker allocates work to the tracker nearest to the data with an available slot. There is no consideration of the current system load of the allocated machine, and hence its actual availability. If one TaskTracker is very slow, it can delay the entire MapReduce job—especially towards the end of a job, where everything can end up waiting for the slowest task. With speculative execution enabled, however, a single task can be executed on multiple slave nodes.

Apache Hadoop NextGen MapReduce (YARN)

MapReduce has undergone a complete overhaul in hadoop-0.23 and we now have, what we call, MapReduce 2.0 (MRv2) or YARN.
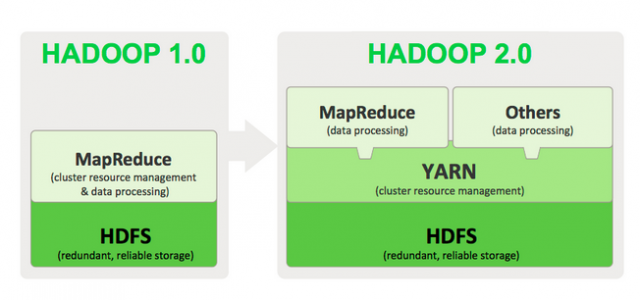
Apache™ Hadoop® YARN is a sub-project of Hadoop at the Apache Software Foundation introduced in Hadoop 2.0 that separates the resource management and processing components. YARN was born of a need to enable a broader array of interaction patterns for data stored in HDFS beyond MapReduce. The YARN-based architecture of Hadoop 2.0 provides a more general processing platform that is not constrained to MapReduce.
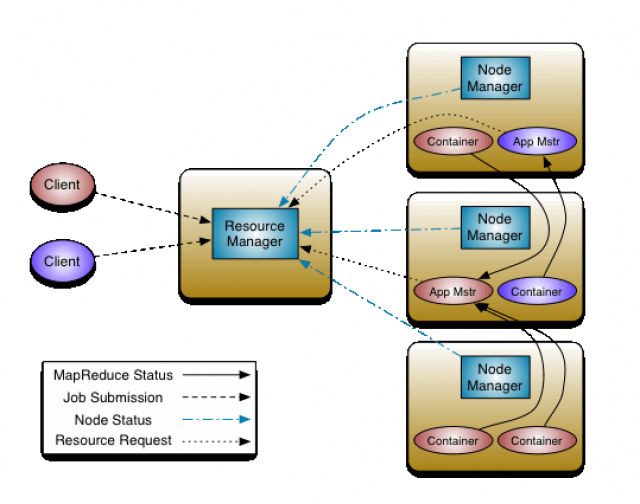
Architectural view of YARN
The fundamental idea of MRv2 is to split up the two major functionalities of the JobTracker, resource management and job scheduling/monitoring, into separate daemons. The idea is to have a global ResourceManager (RM) and per-application ApplicationMaster (AM). An application is either a single job in the classical sense of Map-Reduce jobs or a DAG of jobs.
The ResourceManager and per-node slave, the NodeManager (NM), form the data-computation framework. The ResourceManager is the ultimate authority that arbitrates resources among all the applications in the system.
The per-application ApplicationMaster is, in effect, a framework specific library and is tasked with negotiating resources from the ResourceManager and working with the NodeManager(s) to execute and monitor the tasks.
Overview of Hadoop1.0 and Hadopp2.0
As part of Hadoop 2.0, YARN takes the resource management capabilities that were in MapReduce and packages them so they can be used by new engines. This also streamlines MapReduce to do what it does best, process data. With YARN, you can now run multiple applications in Hadoop, all sharing a common resource management. Many organizations are already building applications on YARN in order to bring them IN to Hadoop.
A next-generation framework for Hadoop data processing
As part of Hadoop 2.0, YARN takes the resource management capabilities that were in MapReduce and packages them so they can be used by new engines. This also streamlines MapReduce to do what it does best, process data. With YARN, you can now run multiple applications in Hadoop, all sharing a common resource management. Many organizations are already building applications on YARN in order to bring them IN to Hadoop. When enterprise data is made available in HDFS, it is important to have multiple ways to process that data. With Hadoop 2.0 and YARN organizations can use Hadoop for streaming, interactive and a world of other Hadoop based applications.

What YARN does

YARN enhances the power of a Hadoop compute cluster in the following ways:
  • Scalability: The processing power in data centers continues to grow quickly. Because YARN ResourceManager focuses exclusively on scheduling, it can manage those larger clusters much more easily.
  • Compatibility with MapReduce: Existing MapReduce applications and users can run on top of YARN without disruption to their existing processes.
  • Improved cluster utilization: The ResourceManager is a pure scheduler that optimizes cluster utilization according to criteria such as capacity guarantees, fairness, and SLAs. Also, unlike before, there are no named map and reduce slots, which helps to better utilize cluster resources.
  • Support for workloads other than MapReduce: Additional programming models such as graph processing and iterative modeling are now possible for data processing. These added models allow enterprises to realize near real-time processing and increased ROI on their Hadoop investments.
  • Agility: With MapReduce becoming a user-land library, it can evolve independently of the underlying resource manager layer and in a much more agile manner.

How YARN works

The fundamental idea of YARN is to split up the two major responsibilities of the JobTracker/TaskTracker into separate entities:
  • a global ResourceManager
  • a per-application ApplicationMaster
  • a per-node slave NodeManager and
  • a per-application container running on a NodeManager
The ResourceManager and the NodeManager form the new, and generic, system for managing applications in a distributed manner. The ResourceManager is the ultimate authority that arbitrates resources among all the applications in the system. The per-application ApplicationMaster is a framework-specific entity and is tasked with negotiating resources from the ResourceManager and working with the NodeManager(s) to execute and monitor the component tasks. The ResourceManager has a scheduler, which is responsible for allocating resources to the various running applications, according to constraints such as queue capacities, user-limits etc. The scheduler performs its scheduling function based on the resource requirements of the applications. The NodeManager is the per-machine slave, which is responsible for launching the applications' containers, monitoring their resource usage (cpu, memory, disk, network) and reporting the same to the ResourceManager. Each ApplicationMaster has the responsibility of negotiating appropriate resource containers from the scheduler, tracking their status, and monitoring their progress. From the system perspective, the ApplicationMaster runs as a normal container.

Thursday, August 28, 2014

How to create a site-to-site IPsec VPN tunnel using Openswan in Linux

http://xmodulo.com/2014/08/create-site-to-site-ipsec-vpn-tunnel-openswan-linux.html

A virtual private network (VPN) tunnel is used to securely interconnect two physically separate networks through a tunnel over the Internet. Tunneling is needed when the separate networks are private LAN subnets with globally non-routable private IP addresses, which are not reachable to each other via traditional routing over the Internet. For example, VPN tunnels are often deployed to connect different NATed branch office networks belonging to the same institution.
Sometimes VPN tunneling may be used simply for its security benefit as well. Service providers or private companies may design their networks in such a way that vital servers (e.g., database, VoIP, banking servers) are placed in a subnet that is accessible to trusted personnel through a VPN tunnel only. When a secure VPN tunnel is required, IPsec is often a preferred choice because an IPsec VPN tunnel is secured with multiple layers of security.
This tutorial will show how we can easily create a site-to-site VPN tunnel using Openswan in Linux.

Topology

This tutorial will focus on the following topologies for creating an IPsec tunnel.


Installing Packages and Preparing VPN Servers

Usually, you will be managing site-A only, but based on the requirements, you could be managing both site-A and site-B. We start the process by installing Openswan.
On Red Hat based Systems (CentOS, Fedora or RHEL):
# yum install openswan lsof
On Debian based Systems (Debian, Ubuntu or Linux Mint):
# apt-get install openswan
Now we disable VPN redirects, if any, in the server using these commands:
# for vpn in /proc/sys/net/ipv4/conf/*;
# do echo 0 > $vpn/accept_redirects;
# echo 0 > $vpn/send_redirects;
# done
Next, we modify the kernel parameters to allow IP forwarding and disable redirects permanently.
# vim /etc/sysctl.conf
1
2
3
net.ipv4.ip_forward = 1
net.ipv4.conf.all.accept_redirects = 0
net.ipv4.conf.all.send_redirects = 0
Reload /etc/sysctl.conf:
# sysctl -p
We allow necessary ports in the firewall. Please make sure that the rules are not conflicting with existing firewall rules.
# iptables -A INPUT -p udp --dport 500 -j ACCEPT
# iptables -A INPUT -p tcp --dport 4500 -j ACCEPT
# iptables -A INPUT -p udp --dport 4500 -j ACCEPT
Finally, we create firewall rules for NAT.
# iptables -t nat -A POSTROUTING -s site-A-private-subnet -d site-B-private-subnet -j SNAT --to site-A-Public-IP
Please make sure that the firewall rules are persistent.
Note:
  • You could use MASQUERADE instead of SNAT. Logically it should work, but it caused me to have issues with virtual private servers (VPS) in the past. So I would use SNAT if I were you.
  • If you are managing site-B as well, create similar rules in site-B server.
  • Direct routing does not need SNAT.

Preparing Configuration Files

The first configuration file that we will work with is ipsec.conf. Regardless of which server you are configuring, always consider your site as 'left' and remote site as 'right'. The following configuration is done in siteA's VPN server.
# vim /etc/ipsec.conf
1
2
3
4
5
6
7
8
9
10
11
12
13
14
15
16
17
18
19
20
21
22
23
24
25
26
27
28
29
30
31
32
33
34
35
36
37
38
39
40
41
42
43
44
45
46
47
48
49
50
51
52
53
54
55
## general configuration parameters ##
 
config setup
        plutodebug=all
        plutostderrlog=/var/log/pluto.log
        protostack=netkey
        nat_traversal=yes
        virtual_private=%v4:10.0.0.0/8,%v4:192.168.0.0/16,%v4:172.16.0.0/16
        ## disable opportunistic encryption in Red Hat ##
        oe=off
 
## disable opportunistic encryption in Debian ##
## Note: this is a separate declaration statement ##
include /etc/ipsec.d/examples/no_oe.conf
 
## connection definition in Red Hat ##
conn demo-connection-redhat
        authby=secret
        auto=start
        ike=3des-md5
        ## phase 1 ##
        keyexchange=ike
        ## phase 2 ##
        phase2=esp
        phase2alg=3des-md5
        compress=no
        pfs=yes
        type=tunnel
        left=
        leftsourceip=
        leftsubnet=/netmask
        ## for direct routing ##
        leftsubnet=/32
        leftnexthop=%defaultroute
        right=
        rightsubnet=/netmask
 
## connection definition in Debian ##
conn demo-connection-debian
        authby=secret
        auto=start
        ## phase 1 ##
        keyexchange=ike
        ## phase 2 ##
        esp=3des-md5
        pfs=yes
        type=tunnel
        left=
        leftsourceip=
        leftsubnet=/netmask
        ## for direct routing ##
        leftsubnet=/32
        leftnexthop=%defaultroute
        right=
        rightsubnet=/netmask
Authentication can be done in several different ways. This tutorial will cover the use of pre-shared key, which is added to the file /etc/ipsec.secrets.
# vim /etc/ipsec.secrets
1
2
3
siteA-public-IP  siteB-public-IP:  PSK  "pre-shared-key"
## in case of multiple sites ##
siteA-public-IP  siteC-public-IP:  PSK  "corresponding-pre-shared-key"

Starting the Service and Troubleshooting

The server should now be ready to create a site-to-site VPN tunnel. If you are managing siteB as well, please make sure that you have configured the siteB server with necessary parameters. For Red Hat based systems, please make sure that you add the service into startup using chkconfig command.
# /etc/init.d/ipsec restart
If there are no errors in both end servers, the tunnel should be up now. Taking the following into consideration, you can test the tunnel with ping command.
  1. The siteB-private subnet should not be reachable from site A, i.e., ping should not work if the tunnel is not up.
  2. After the tunnel is up, try ping to siteB-private-subnet from siteA. This should work.
Also, the routes to the destination's private subnet should appear in the server's routing table.
# ip route
[siteB-private-subnet] via [siteA-gateway] dev eth0 src [siteA-public-IP]
default via [siteA-gateway] dev eth0
Additionally, we can check the status of the tunnel using the following useful commands.
# service ipsec status
IPsec running  - pluto pid: 20754
pluto pid 20754
1 tunnels up
some eroutes exist
# ipsec auto --status
## output truncated ##
000 "demo-connection-debian":     myip=; hisip=unset;
000 "demo-connection-debian":   ike_life: 3600s; ipsec_life: 28800s; rekey_margin: 540s; rekey_fuzz: 100%; keyingtries: 0; nat_keepalive: yes
000 "demo-connection-debian":   policy: PSK+ENCRYPT+TUNNEL+PFS+UP+IKEv2ALLOW+SAREFTRACK+lKOD+rKOD; prio: 32,28; interface: eth0;

## output truncated ##
000 #184: "demo-connection-debian":500 STATE_QUICK_R2 (IPsec SA established); EVENT_SA_REPLACE in 1653s; newest IPSEC; eroute owner; isakmp#183; idle; import:not set

## output truncated ##
000 #183: "demo-connection-debian":500 STATE_MAIN_I4 (ISAKMP SA established); EVENT_SA_REPLACE in 1093s; newest ISAKMP; lastdpd=-1s(seq in:0 out:0); idle; import:not set
The log file /var/log/pluto.log should also contain useful information regarding authentication, key exchanges and information on different phases of the tunnel. If your tunnel doesn't come up, you could check there as well.
If you are sure that all the configuration is correct, and if your tunnel is still not coming up, you should check the following things.
  1. Many ISPs filter IPsec ports. Make sure that UDP 500, TCP/UDP 4500 ports are allowed by your ISP. You could try connecting to your server IPsec ports from a remote location by telnet.
  2. Make sure that necessary ports are allowed in the firewall of the server/s.
  3. Make sure that the pre-shared keys are identical in both end servers.
  4. The left and right parameters should be properly configured on both end servers.
  5. If you are facing problems with NAT, try using SNAT instead of MASQUERADING.
To sum up, this tutorial focused on the procedure of creating a site-to-site IPSec VPN tunnel in Linux using Openswan. VPN tunnels are very useful in enhancing security as they allow admins to make critical resources available only through the tunnels. Also VPN tunnels ensure that the data in transit is secured from eavesdropping or interception.
Hope this helps. Let me know what you think.

Tuesday, August 26, 2014

Security Hardening with Ansible

http://www.linuxjournal.com/content/security-hardening-ansible

Ansible is an open-source automation tool developed and released by Michael DeHaan and others in 2012. DeHaan calls it a "general-purpose automation pipeline" (see Resources for a link to the article "Ansible's Architecture: Beyond Configuration Management"). Not only can it be used for automated configuration management, but it also excels at orchestration, provisioning of systems, zero-time rolling updates and application deployment. Ansible can be used to keep all your systems configured exactly the way you want them, and if you have many identical systems, Ansible will ensure they stay identical. For Linux system administrators, Ansible is an indispensable tool in implementing and maintaining a strong security posture.
Ansible can be used to deploy and configure multiple Linux servers (Red Hat, Debian, CentOS, OS X, any of the BSDs and others) using secure shell (SSH) instead of the more common client-server methodologies used by other configuration management packages, such as Puppet and Chef (Chef does have a solo version that does not require a server, per se). Utilizing SSH is a more secure method because the traffic is encrypted. The secure shell transport layer protocol is used for communications between the Ansible server and the target hosts. Authentication is accomplished using Kerberos, public-key authentication or passwords.
When I began working in system administration some years ago, a senior colleague gave me a simple formula for success. He said, "Just remember, automate, automate, automate." If this is true, and I believe it is, then Ansible can be a crucial tool in making any administrator's career successful. If you do not have a few really good automation tools, every task must be accomplished manually. That wastes a lot of time, and time is precious. Ansible makes it possible to manage many servers almost effortlessly.
Ansible uses a very simple method called playbooks to orchestrate configurations. A playbook is a set of instructions written in YAML that tells the Ansible server what "plays" to carry out on the target hosts. YAML is a very simple, human-readable markup language that gives the user fine granularity when setting up configuration schemes. It is installed, along with Ansible, as a dependency. Ansible uses YAML because it is much easier to write than common data formats, like JSON and XML. The learning curve for YAML is very low, hence proficiency can be gained very quickly. For example, the simple playbook shown in Figure 1 keeps the Apache RPM on targeted Web servers up to date and current.
Figure 1. Example Playbook That Will Upgrade Apache to the Latest Version
From the Ansible management server, you can create a cron job to push the playbook to the target hosts on a regular basis, thus ensuring you always will have the latest-and-greatest version of the Apache Web server.
Using YAML, you can instruct Ansible to target a specific group of servers, the remote user you want to run as, tasks to assign and many other details. You can name each task, which makes for easier reading of the playbook. You can set variables, and use loops and conditional statements. If you have updated a configuration file that requires restarting a service, Ansible uses tasks called handlers to notify the system that a service restart is necessary. Handlers also can be used for other things, but this is the most common.
The ability to reuse certain tasks from previously written playbooks is another great feature. Ansible uses a mechanism called roles to accomplish this. Roles are organizational units that are used to implement a specific configuration on a group of hosts. A role can include a set of variable values, handlers and tasks that can be assigned to a host group, or hosts corresponding to specific patterns. For instance, you could create a role for installing and configuring MySQL on a group of targeted servers. Roles make this a very simple task.
Besides intelligent automation, you also can use Ansible for ad hoc commands to contact all your target hosts simultaneously. Ad hoc commands can be performed on the command line. It is a very quick method to use when you want to see a specific type of output from all your target machines, or just a subset of them. For example, if you want to see the uptime for all the hosts in a group called dbservers, you would type, as user root:

# ansible dbservers -a /usr/bin/uptime
The output will look like Figure 2.
Figure 2. Example of ad hoc Command Showing Uptime Output for All Targets
If you want to specify a particular user, use the command in this way:

# ansible dbservers -a /usr/bin/uptime -u username
If you are running the command as a particular user, but want to act as root, you can run it through sudo and have Ansible ask for the root password:

# ansible dbservers -a /usr/bin/uptime -u username 
 ↪--sudo [ask-sudo-pass]
You also can switch to a different user by using the -U option:

# ansible dbservers -a /usr/bin/uptime -u username 
 ↪-U otheruser --sudo
# [ask-sudo-pass]
Occasionally, you may want to run the command with 12 parallel forks, or processes:

# ansible dbservers -a /usr/bin/uptime -f 12
This will get the job done faster by using 12 simultaneous processes, instead of the default value of 5. If you would like to set a permanent default for the number of forks, you can set it in the Ansible configuration file, which is located in /etc/ansible/ansible.cfg.
It also is possible to use Ansible modules in ad hoc mode by using the -m option. In this example, Ansible pings the target hosts using the ping module:

# ansible dbservers -m ping
Figure 3. In this example, Ansible pings the target hosts using the ping module.
As I write this, Michael DeHaan has announced that, in a few weeks, a new command-line tool will be added to Ansible version 1.5 that will enable the encrypting of various data within the configuration. The new tool will be called ansible-vault. It will be implemented by using the new --ask-vault-pass option. According to DeHaan, anything you write in YAML for your configuration can be encrypted with ansible-vault by using a password.
Server security hardening is crucial to any IT enterprise. We must face the fact that we are protecting assets in what has become an informational war-zone. Almost daily, we hear of enterprise systems that have fallen prey to malevolent individuals. Ansible can help us, as administrators, protect our systems. I have developed a very simple way to use Ansible, along with an open-source project called Aqueduct, to harden RHEL6 Linux servers. These machines are secured according to the standards formulated by the Defense Information Systems Agency (DISA). DISA publishes Security Technical Implementation Guides (STIGs) for various operating systems that provide administrators with solid guidelines for securing systems.
In a typical client-server setup, the remote client dæmon communicates with a server dæmon. Usually, this communication is in the clear (not encrypted), although Puppet and Chef have their own proprietary mechanisms to encrypt traffic. The implementation of public-key authentication (PKI) in SSH has been well vetted for many years by security professionals and system administrators. For my purposes, SSH is strongly preferred. Typically, there is a greater risk in using proprietary client-server dæmons than using SSH. They may be relatively new and could be compromised by malevolent individuals using buffer-overflow attack strategies or denial-of-service attacks. Any time we can reduce the total number of services running on a server, it will be more secure.
To install the current version of Ansible (1.4.3 at the time of this writing), you will need Python 2.4 or later and the Extra Packages for Enterprise Linux (EPEL) repository RPM. For the purposes of this article, I use Ansible along with another set of scripts from an open-source project called Aqueduct. This is not, however, a requirement for Ansible. You also will need to install Git, if you are not already using it. Git will be used to pull down the Aqueduct package.
Vincent Passaro, Senior Security Architect at Fotis Networks, pilots the Aqueduct project, which consists of the development of both bash scripts and Puppet manifests. These are written to deploy the hardening guidelines provided in the STIGs. Also included are CIS (Center for Internet Security) benchmarks and several others. On the Aqueduct home page, Passaro says, "Content is currently being developed (by me) for the Red Hat Enterprise Linux 5 (RHEL 5) Draft STIG, CIS Benchmarks, NISPOM, PCI", but I have found RHEL6 bash scripts there as well. I combined these bash scripts to construct a very basic Ansible playbook to simplify security hardening of RHEL6 systems. I accomplished this by using the included Ansible module called script.
According to the Ansible documentation, "The script module takes the script name followed by a list of space-delimited arguments. The local script at path will be transferred to the remote node and then executed. The given script will be processed through the shell environment on the remote node. This module does not require Python on the remote system, much like the raw module."
Ansible modules are tiny bits of code used for specific purposes by the API to carry out tasks. The documentation states, "Ansible modules are reusable units of magic that can be used by the Ansible API, or by the ansible or ansible-playbook programs." I view them as being very much like functions or subroutines. Ansible ships with many modules ready for use. Administrators also can write modules to fit specific needs using any programming language. Many of the Ansible modules are idempotent, which means they will not make a change to your system if a change does not need to be made. In other words, it is safe to run these modules repeatedly without worrying they will break things. For instance, running a playbook that sets permissions on a certain file will, by default, update the permissions on that file only if its permissions differ from those specified in the playbook.
For my needs, the script module works perfectly. Each Aqueduct bash script corresponds to a hardening recommendation given in the STIG. The scripts are named according to the numbered sections of the STIG document.
In my test environment, I have a small high-performance compute cluster consisting of one management node and ten compute nodes. For this test, the SSH server dæmon is configured for public-key authentication for the root user. To install Ansible on RHEL6, the EPEL repository must first be installed. Download the EPEL RPM from the EPEL site (see Resources).
Then, install it on your management node:

# rpm -ivh epel-release-6-8.noarch.rpm
Now, you are ready to install Ansible:

# yum install ansible
Ansible's main configuration file is located in /etc/ansible/ansible.cfg. Unless you want to add your own customizations, you can configure it with the default settings.
Now, create a directory in /etc/ansible called prod. This is where you will copy the Aqueduct STIG bash scripts. Also, create a directory in /etc/ansible called plays, where you will keep your Ansible playbooks. Create another directory called manual-check. This will hold scripts with information that must be checked manually. Next, a hosts file must be created in /etc/ansible. It is simply called hosts. Figure 4 shows how I configured mine for the ten compute nodes.
Figure 4. The /etc/hosts File for My Test Cluster
Eight of the compute nodes are typical nodes, but two are equipped with GPGPUs, so there are two groups: "hosts" and "gpus". Provide the IP address of each node (the host name also can be given if your DNS is set up properly). With this tiny bit of configuration, Ansible is now functional. To test it, use Ansible in ad hoc mode and execute the following command on your management node:

# ansible all -m ping
If this results in a "success" message from each host, all is well.
The Aqueduct scripts must be downloaded using Git. If you do not have this on your management node, then:

# yum install git 
Git "is a distributed revision control and source code management (SCM) system with an emphasis on speed" (Wikipedia). The command-line for acquiring the Aqueduct package of scripts and manifests goes like this:
# git clone git://git.fedorahosted.org/git/aqueduct.git This will create a directory under the current directory called aqueduct. The bash scripts for RHEL6 are located in aqueduct/compliance/bash/stig/rhel-6/prod. Now, copy all scripts therein to /etc/ansible/prod. There are some other aspects of the STIG that will need to be checked by either running the scripts manually or reading the script and performing the required actions. These scripts are located in aqueduct/compliance/bash/stig/rhel-6/manual-check. Copy these scripts to /etc/ansible/manual-check.
Now that the scripts are in place, a playbook must be written to deploy them on all target hosts. Copy the playbook to /etc/ansible/plays. Make sure all scripts are executable. Figure 5 shows the contents of my simple playbook called aqueduct.yml.
Figure 5. My Simple Playbook to Execute STIG Scripts on All Targets
On a few of the STIG scripts, a few edits were needed to get them to execute correctly. Admittedly, a more eloquent solution would be to replace the STIG scripts by translating them into customized Ansible modules. For now, however, I am taking the easier route by calling the STIG scripts as described from my custom Ansible playbook. The script module makes this possible. Next, simply execute the playbook on the management node with the command:
# ansible-playbook aqueduct.yml This operation takes about five minutes to run on my ten nodes, with the understanding that the plays run in parallel on the target hosts. Ansible produces detailed output that shows the progress of each play and host. When Ansible finishes running the plays, all of the target machines should be identically hardened, and a summary is displayed. In this case, everything ran successfully.
Figure 6. Output Showing a Successful STIG Playbook Execution
For system security hardening, the combination of Ansible and Aqueduct is a powerfully productive force in keeping systems safe from intruders.
If you've ever worked as a system administrator, you know how much time a tool like this can save. The more I learn about Ansible, the more useful it becomes. I am constantly thinking of new ways to implement it. As my system administration duties drift more toward using virtual technologies, I plan on using Ansible to provision and manage my virtual configurations quickly. I am also looking for more avenues to explore in the way of managing high-performance computing systems, since this is my primary duty. Michael DeHaan has developed another tool called Cobbler, which is excellent for taking advantage of Red Hat's installation method, Kickstart, to build systems quickly. Together, Cobbler and Ansible create an impressive arsenal for system management.
As system administrators, we are living in exciting times. Creative developers are inventing an amazing array of tools that, not only make our jobs easier, but also more fun. I can only imagine what the future may hold. One thing is certain: we will be responsible for more and more systems. This is due to the automation wizardry of technologies like Ansible that enable a single administrator to manage hundreds or even thousands of servers. These tools will only improve, as they have continued to do. As security continues to become more and more crucial, their importance will only increase.

Resources

Ansible's Architecture: Beyond Configuration Management: http://blog.ansibleworks.com/2013/11/29/ansibles-architecture-beyond-configuration-management
Michael DeHaan's Blog: http://michaeldehaan.net
Git Home: http://git-scm.com
Aqueduct Home: http://www.vincentpassaro.com/open-source-projects/aqueduct-red-hat-enterprise-linux-security-development
Ansible Documentation: http://docs.ansible.com/index.html
EPEL Repository Home: https://fedoraproject.org/wiki/EPEL
DISA RHEL6 STIG: http://iase.disa.mil/stigs/os/unix/red_hat.html

jBilling tutorial – an open source billing platform

http://www.linuxuser.co.uk/tutorials/jbilling-tutorial-an-open-source-billing-platform

Discover jBilling and make managing invoices, payments and billing simple and stress-free


A lot more people are taking up the entrepreneurial route these days. To the uninitiated it looks very easy; you are your own boss and can do whatever you wish. But someone who has already taken the plunge knows that being an entrepreneur is a lot tougher – whether working as a freelancer or the founder of a start- up, you will almost always find yourself donning several hats. While managing everything is relatively easy when you are small, it can become a daunting task to manage things when you start growing rapidly. Multitasking becomes a real skill as you negotiate with clients, send proposals and work on current assignments. With all this chaos, you certainly don’t want to miss out on payments – after all, that’s what you’re working for!
Today we introduce jBilling, which can help you manage the most important aspect of your business – the income. This is not the typical invoice management kind of tool, rather a full-fledged platform with several innovative features. jBilling helps you manage invoices, track payments, bill your customers and more with little effort on your behalf – just what you want when juggling responsibilities.
In this tutorial we will first cover the necessary steps to install and set up jBilling before having a closer look at the various features that can help you manage your business better. We have used the latest stable community edition of jBilling, version 3.1.0, for demo purposes in this article.
The main menu bar gives you access to all the pages you'll use most frequently
The main menu bar gives you access to all the pages you’ll use most frequently

Step-by-step

Step 01 Installation
jBilling is integrated with the web server out of the box, which helps make the installation process straightforward. Just unzip the downloaded zip file to a folder (where you want the installation to be done), eg ‘my_jBilling’. Open the command prompt and navigate to the folder /path/my_jBilling/bin. Assign executable permissions to all the shell script files, with the command chmod +x *.sh. Also, remember to set the JAVA_HOME variable with your Java Home path. You can then start jBilling by running ./startup.sh. This completes the installation process – note that the process may slightly differ depending on the OS you use. As the startup.sh script executes, the command prompt shows five lines of logs indicating successful start. You can then access jBilling via your browser at http://localhost:8080/jbilling and login with credentials admin/123qwe. You can also access http://localhost:8080/jbilling/signup to create your new signup.
Step 02 Customers
No one wants to add a customer’s detail to the system every single time an invoice is sent to them! It is generally a good idea to keep the details of your customer with you and that’s precisely what jBilling lets you do – simply click on the ‘Customer’ button on the main menu to go to the customer page. Here you can view all the details related to the customer – but before that, you need to add a customer. To do so, click on the ‘Add New’ button and then fill in all of the relevant details. Note that once you add a customer, a separate login for the customer is also created and they can then log in to your jBilling system and manage their account as well (to make payments, view invoices and so on). This may seem trivial for smaller organisations with a smaller number of customers, but if you have a huge customer base and would like customers to handle payments themselves, you will definitely like this feature.
Step 03 Products
Besides customers, the other important aspect of a business is what you sell – your products or services. Handling your products in jBilling is nice and straightforward. Simply click on the ‘Products’ button to go to the products page. To add a new product here, you must add product categories first – click on the ‘Add Category’ button to do that. After the category is created, select it to add new products to that particular category or view all the products within it. Once you have all your products listed in the system, you can use them to create orders, invoices and so on.
Step 04 Orders
Before serving your customer you need an order from them. jBilling lets you handle orders in a way that closely resembles real-world scenarios. Clicking on the ‘Orders’ link on the main menu will take you to the orders page where you can view a list of all the orders received up to now. At this point you may be puzzled; unlike other pages there is no button to create an order here. To create an order you must first navigate to the particular customer you plan to create it for (in the customer page) and then click the ‘Create Order’ button (located below the customer details). This arrangement makes sure that there is tight coupling between an order and related customer. Once the order is created you can see it in the Order page. You can then edit orders to add products or create invoices out of it.
Step 05 Invoices
We have tight coupling with customers and orders, so it makes sense that invoices in jBilling should be related to an order too. So, to create an invoice you need to go to the order for which you are raising the invoice and click the ‘Generate Invoice’ button. The invoice is then created – note that you can even apply other orders to an invoice (if it hasn’t been paid). Also, an order can’t be used to generate an invoice if an earlier invoice (related to it) has already been paid. Having generated the invoice, you can send it via email or download it as a PDF. You may find that you want to change the invoice logo – but we’ll get to configuration and customisation later on. We will also see in later steps about how the payments related to an invoice can also be tracked.
Invoices
Invoices
Step 06 Billing
Billing is the feature that helps you automate the whole process of invoicing and payments. It can come in handy for businesses with a subscription model or other cases where customers are charged in a recurring manner. To set the billing process, you need to go the Configuration page first. Once you are on the page, click on ‘Billing Process’ on the left-hand menu bar to set the date and other parameters. With the parameters set, billing process runs automatically and shows a representation of the invoices. This output (invoices) needs to be approved by the admin – only once this has happened can the real invoices get generated and delivered to the customer. The customers (whose payments are not automatic) can then pay their bills with their own logins.
Step 07 Payments
Any payment made for an invoice is tracked on the Payments page, where you can view a list of all the payments already taken care of. To create a new payment, you need to select the customer (for whom payment is being made) on the Customer page and then click the ‘Make Payment’ button at the very bottom (next to the ‘Create Order’ button). This takes you to a page with details of all the paid/unpaid invoices (raised for that customer). Just select the relevant invoice and fill up the details of payment method to complete the payment process. Later, if there is a need to edit the payment details, you need to unlink the invoice before editing the details.
Step 08 Partners
Partners – for example, any affiliate marketing partners for an eCommerce website – are people or organisations that help your business grow. They are generally paid a mutually agreed percentage of the revenue they bring in. jBilling helps you manage partners in a easy, automated way. Click on the Partners link on the homepage to reach the Partners page and set about adding a new partner. Here you will need to fill in the details related to percentage rate, referral fee, payout date and period and so on. Now whenever a new customer is added (with the Partner ID field filled in) the relevant partner gets entitled to the commission percentage (as set during adding the partner) and the jBilling system keeps a track of the partner’s due payment. Note that, as with customers, partners also get their own login once you add their details to jBilling. It is up to you to give them the login access, though.
Step 09 Reports
The reporting engine of jBilling lets you have a bird’s-eye view of what’s going on with your company’s accounts. Click on the Reports link on the main menu; here there are four report types available – invoice, order, payment and customer. You can select one to reveal the different reports available inside that type. After a report is selected, you can see a brief summary of what the report is supposed to show. Set the end date and then click on the ‘Run Report’ button to run the report. Having done this, the system shows you the output. You can also change the output format to PDF, Excel or HTML.
Reports
Reports
Step 10 Configuration
The configuration page lets you fine-tune your jBilling installation settings. Click on the Configuration link and you will see a list of settings available on the left menu bar. The links are somewhat self-explanatory but we’ll run through the more useful ones. The Billing Process link allows you to set the billing run parameters. You can change the invoice logo using the Invoice Display setting. To add new users, simply click on the ‘Users’ link. To set the default currency or add a new currency to the system, click on the ‘Currencies’ link. You can even blacklist customers under the ‘Blacklist’ link. You will find many more settings to customise jBilling as per your tastes and requirements – just keep exploring and make jBilling work for you.

Linux Performance Tools at LinuxCon North America 2014

http://www.brendangregg.com/blog/2014-08-23/linux-perf-tools-linuxcon-na-2014.html

This week I spoke at LinuxCon North America 2014 in Chicago, which was also my first LinuxCon. I really enjoyed the conference, and it was a privilege to take part and contribute. I'll be returning to work with some useful ideas from talks and talking with attendees.
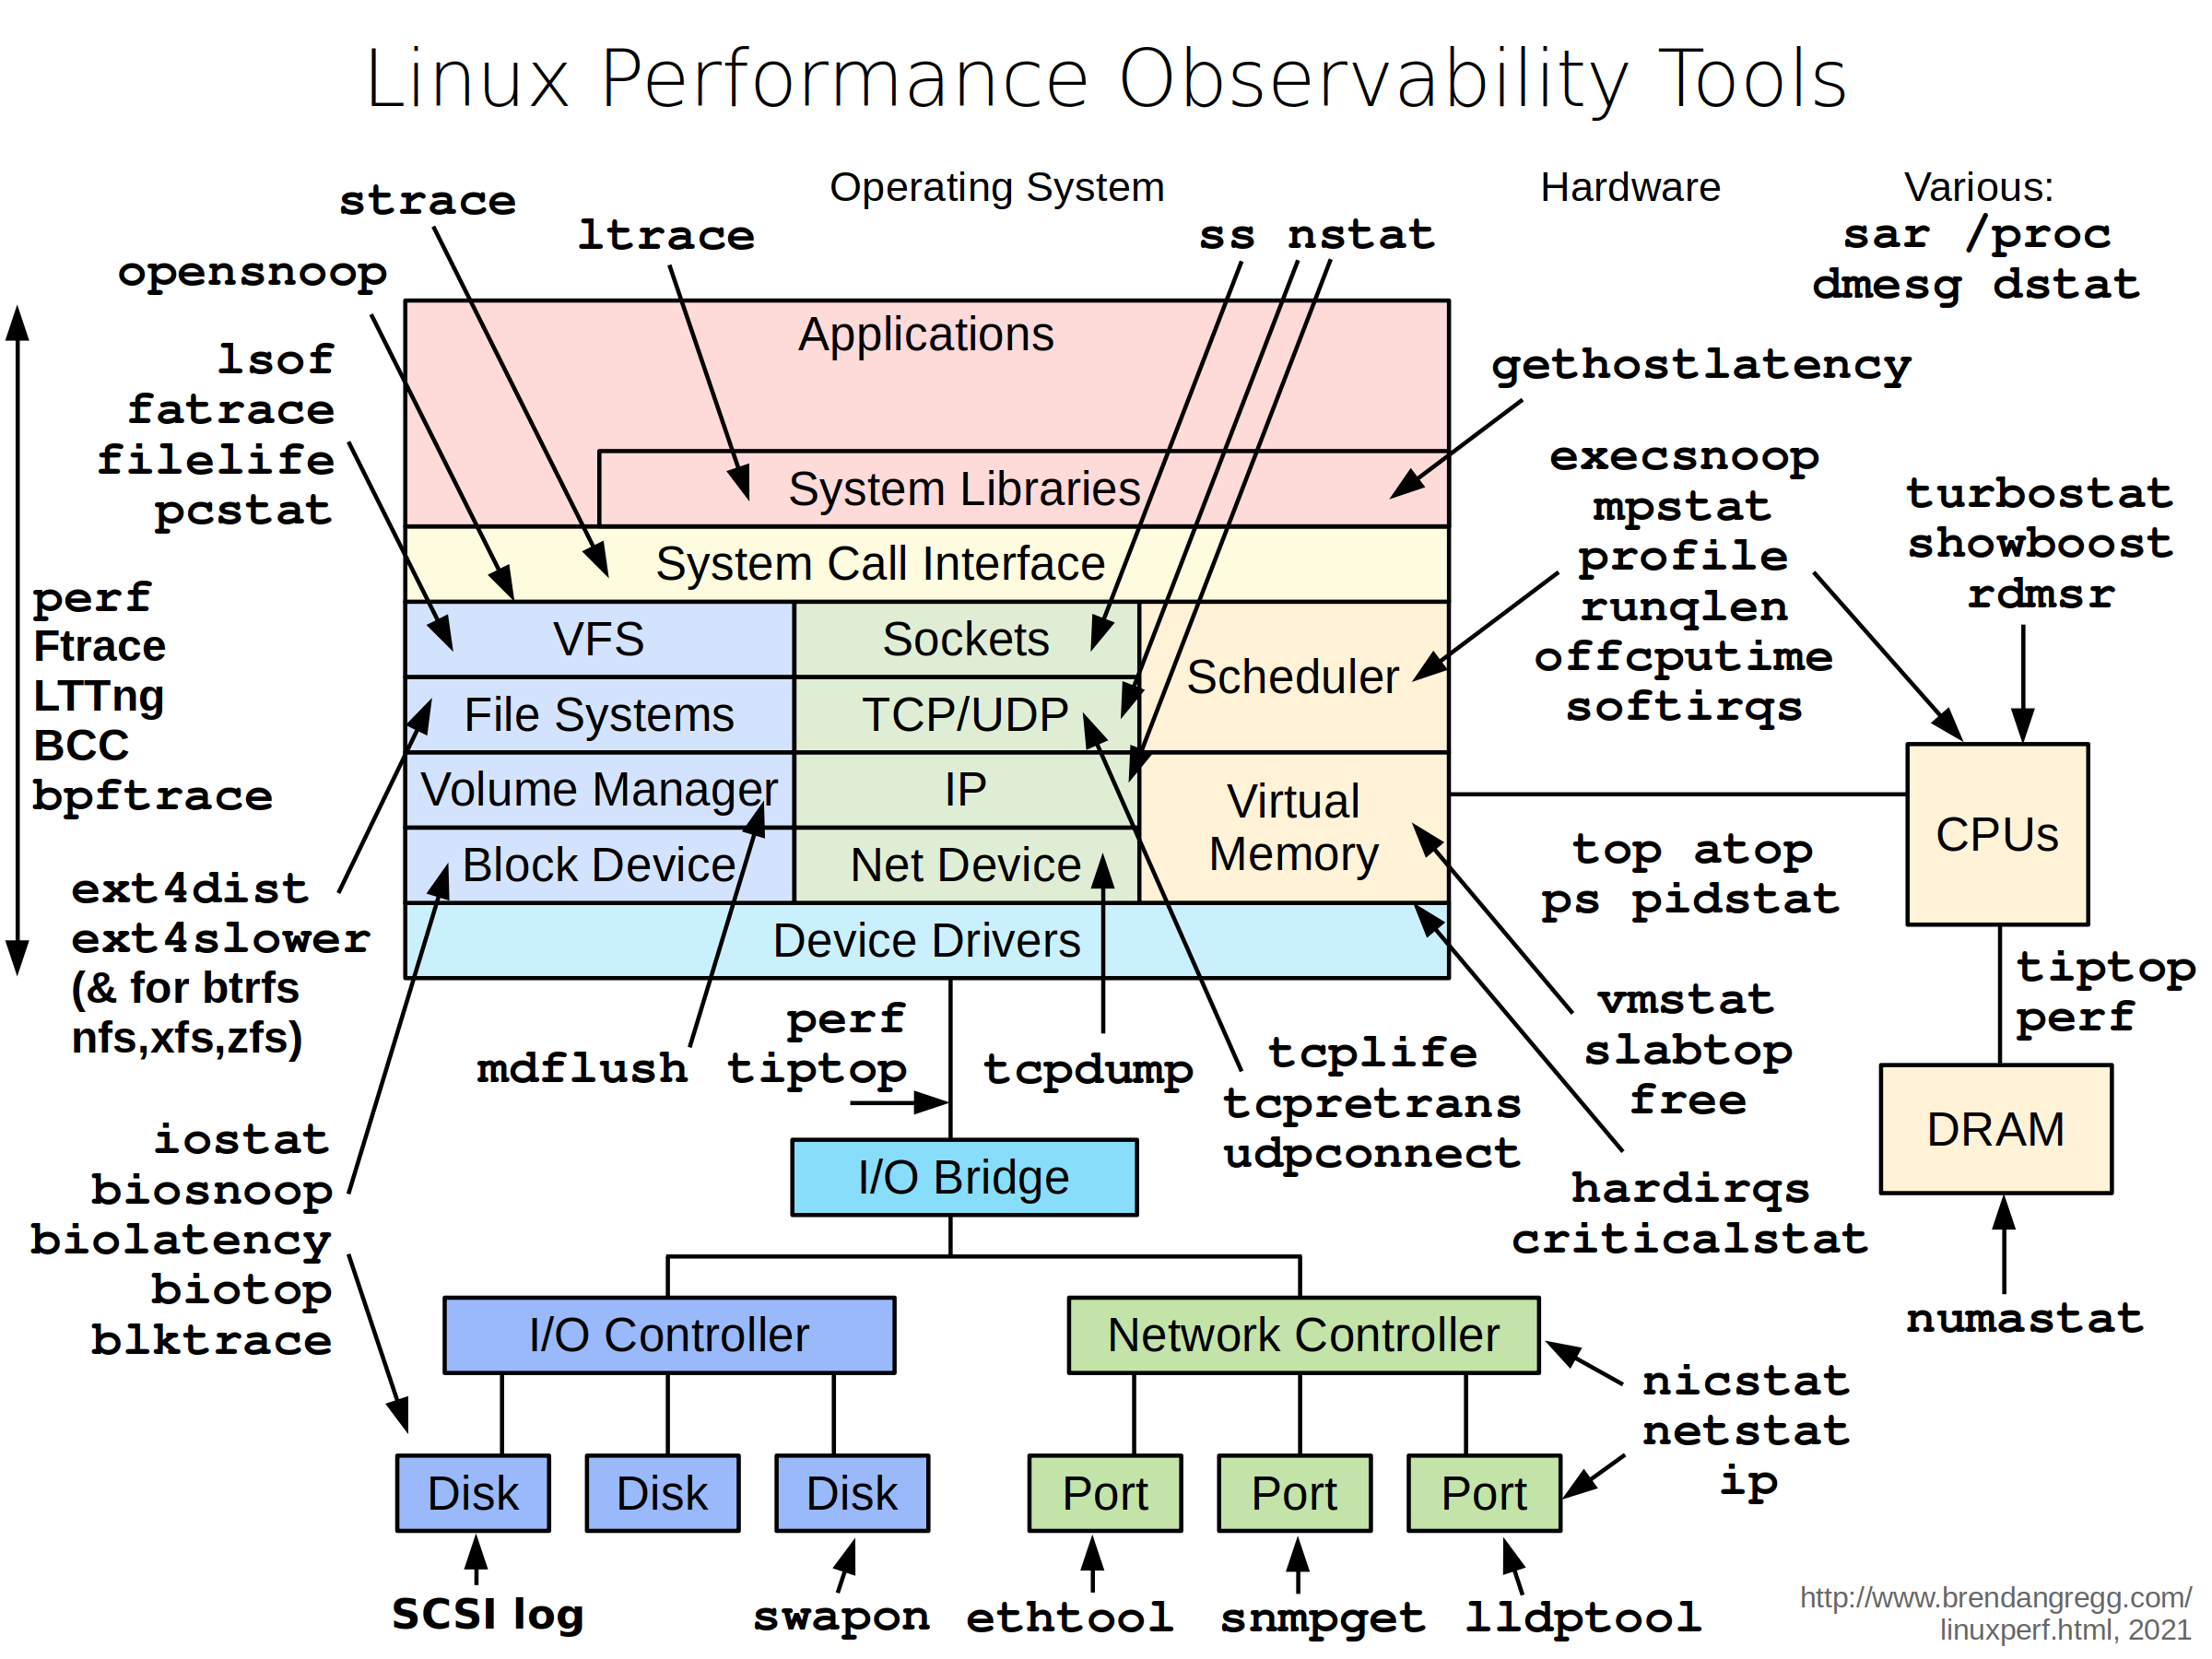
I included my latest Linux performance observability tools diagram, which I keep updated here:
But I was really excited to share some new diagrams, which are all in the slides:
I gave a similar talk two years ago at SCaLE11x, where I covered performance observability tools. This time, I covered observability, benchmarking, and tuning tools, providing a more complete picture of the performance tools landscape. I hope these help you in a similar way, when you move from observability to performing load tests with benchmarks, and finally tuning the system.
I also presented an updated summary on the state of tracing, after my recent discoveries with ftrace, which is able to serve some tracing needs in existing kernels. For more about ftrace, see my lwn.net article Ftrace: The hidden light switch, which was made open the same day as my talk.
At one point I included a blank template for observability tools (PNG):
My suggestion was to print this out and fill it in with whatever observability tools make most sense in your environment. This may include monitoring tools, both in-house and commercial, and can be supplemented by the server tools from my diagram above.

Photo by Linux Foundation
At Netflix, we have our own monitoring system to observe our thousands of cloud instances, and this diagram helps to see which Linux and server components it currently measures, and what can be developed next. (This monitoring tool also includes many application metrics.) As I said in the talk, we'll sometimes need to login to an instance using ssh, and run the regular server tools.
This diagram may also help you develop your own monitoring tools, by showing what would ideally be observed. It can also help rank commercial products: next time a salesperson tells you their tool can see everything, hand them this diagram and a pen. :-)
My talk was standing room only, and some people couldn't get in the room and missed out. Unfortunately, it wasn't videoed, either. Sorry, I should have figured this out sooner and arranged something in time. Given how popular it was, I suspect I'll give it again some time, and will hopefully get it on video.
Thanks to those who attended, and the Linux Foundation for having me and organizing a great event!