Sunday, November 30, 2014

How to install a paravirtualized Xen guest

http://xmodulo.com/install-paravirtualized-xen-guest.html

This is a follow-up to the Xen hypervisor installation article. By this point you have a workstation - perhaps an old laptop or desktop - running the Xen hypervisor and Debian Jessie.
You can now add a few guest machines. This procedure installs a copy of Debian Jessie into a Xen image, then uses that image to start a guest domain. The procedure uses the Xen tools xl and xen-create-image.

The Control Domain and Guest Domains

The Xen hypervisor software running on your workstation is a VMM (Virtual Machine Monitor) created by the Xen Project. This software is a thin layer running on top of the hardware. Its only job is to allow many virtual machines to run on one physical machine.
Each virtual machine running on Xen is called a "domain." You can run as many domains as you can fit on your workstation. The first domain is already running -Debian OS you already installed is a virtual machine running on Xen.
The first domain is special. It is the only domain with the privilege of telling Xen what to do. No other domain gets to tell Xen to allocate resources, start a machine or connect to a console. This domain is called "Domain-0", or the "control domain." You can use the xl command to show this domain.
root@debian:~# xl list
Name          ID   Mem VCPUs  State Time(s)
Domain-0      0  3868     2     r-----      48.0
Other domains cannot control Xen. These are called "guest domains" or "Domain-U" (that's U for Unprivileged).
Xen provides two ways of creating virtual machines, called PV (Para-Virtualized) and HVM (Hardware Virtual Machine). PV is more efficient, but it requires special kernel software to run - it doesn't work for non-Linux systems. If you have started a Linux EC2 instance on Amazon Web Services, you may have noticed it is called a "PV guest."

Install Xen-Tools

Create a new image using the xen-create-image command. This is a Perl script that bundles up the many tasks required to make a Xen image into one command.
The xen-create-image command is part of Xen-tools which helps you install Debian, Ubuntu and CentOS guests.
Log into your workstation as the root.
Install the xen-tools package.
# apt-get install xen-tools

Create a Xen Image

A Xen image is a copy of a boot disk. Once you put the image together with a configuration file describing what the virtual machine should look like, you can run your first guest domain.
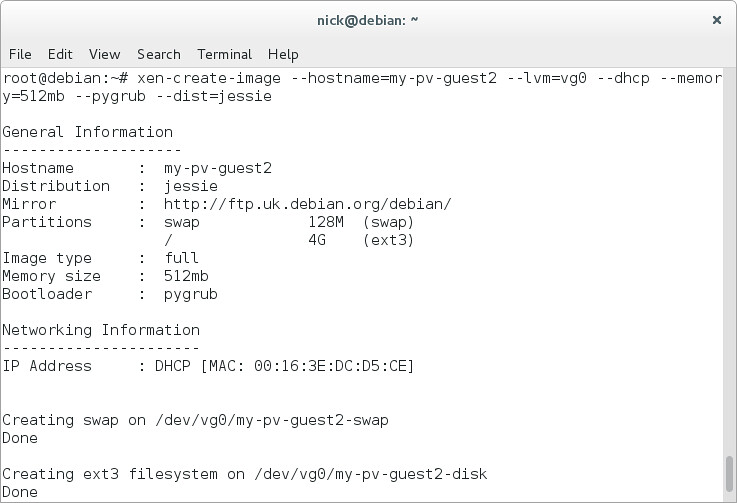
# xen-create-image \
--hostname=my-pv-guest \
--lvm=vg0 \
--dhcp \
--memory=512mb \
--pygrub \
--dist=jessie

The first time you create a Xen image using the above command, it will take a couple of minutes or more since necessary .deb packages will be downloaded and cached locally as part of Xen image creation. Make sure that the Xen host is connected to the Internet.
After successful run, the xen-create-image command creates a xen configuration file /etc/xen/my-pv-guest.cfg. This file contains instructions on how to create the guest machine. For instance, the .cfg file tells Xen to use PyGRUB to boot the kernel - this is one of the special tricks requried for PV guests.
The xen-create-image command carries out many other actions, including the following.
  • Add storage to the vg0 volume group (a 4GB root partition and a 128MB swap partition).
  • Run debootstrap to download .deb packages and install Debian Jessie.
  • Use the Bash script /usr/share/xen-tools/jessie.d/40-setup-networking to tell the new OS to use DHCP.
Check your work by making sure that new LVM volumes have appeared.
root@debian:~# lvs
  LV               VG   Attr       LSize   Pool Origin Data%  Meta%  Move Log Cpy%Sync Convert
  my-pv-guest-disk vg0  -wi-a-----   4.00g 
  my-pv-guest-swap vg0  -wi-a----- 128.00m      
The above command shows two new volumes - one acting as the root partition and the other as the swap disk.
As part of its run, the xen-create-image command also creates a random password for the root account which you will need to log in.
Find the root password in the activity log.
# cd /var/log/xen
# grep Password my-pv-guest.log
Root Password   :  6irURvu4j4mjw7pGGzuGySi
The password is a very long string.

Start a Guest Domain

Now you have an image and configuration file, you can create a new guest domain. The configuration file /etc/xen/my-pv-guest.cfg tells Xen how to create the new machine.
Start the guest.
# xl create /etc/xen/my-pv-guest.cfg
Check your work after starting this instance.
root@debian:~# xl list
Name              ID  Mem VCPUs      State   Time(s)
Domain-0          0  3299     2     r-----      54.9
my-pv-guest       1   512     1     -b----       2.3

Connect to Your New Guest

The guest domain is running, but using it is not obvious. Operating systems create a console that the administrator can use, to see system activity and make changes. The Linux console is a CLI, not a GUI.
Connect to the Linux console.
# xl console my-pv-guest
You may see many boot messages in the console.

Login with the root account.
Change the root password to something memorable.
# passwd
Log out. At this point, you are still connected to the guest's console.
Detach from the console with the key combination 'Ctrl' and ']'.

Clean Up

Hit the virtual power switch to turn off the machine.
# xl shutdown my-pv-guest
The new guest is destroyed instantly.
root@debian:~# xl shutdown my-pv-guest
Shutting down domain 1
The guest domain is gone but the image is still there, ready to be used next time.

Friday, November 28, 2014

6 tips for adopting open source

https://opensource.com/government/14/11/6-tips-adopting-open-source


Open source code drives collaborative innovation from a larger pool of developers at a lower cost, which is why federal agencies are adopting the "open source first" model. In fact Sonny Hashmi, CIO of the General Services Administration, recently announced that implementing open source software is among his top priorities this year.

So what’s the best way to increase your agency’s adoption of open source software and keep it secure? Here are six tips to get you there:

1. Standardize on a common platform.

Imagine the Army telling new recruits to stop by the gun store on the way to boot camp and pick out whichever rifle they want. You can picture the chaos that would ensue in training consistency, interoperability and logistics.

The same principle can be applied when designing a data center. Most developers want the latest tools at their disposal, but this desire conflicts with the goals of operations teams who want to provide a consistent, standardized, stable and secure foundation to build upon.

For example, the use of Software Collections, a repository of  enterprise Linux tools, benefits both teams by providing the latest stable databases, development tools and programming languages that make developers happy, while packaging them in a consistent, standardized, stable and secure way that improves function and efficiency for operations teams.

2. Use systems management tools to automate your success.

Once you’ve standardized, you can automate. Systems management tools will transform a data center from an artisan workshop to a high-output IT factory. By attaching standard systems to a centralized management tool, a common dashboard will show the status of systems in real time and if security patches or bug fixes are needed. Just like the operations control in a large factory, these tools can ensure a data center factory is humming along for its end users.

3. Use SCAP for continuous monitoring of your datacenter's security posture.

So, you just installed some open source software. How do you properly secure it? Fortunately, the Security Content Automation Protocol (SCAP) transformed security policy from human-interpreted prose to machine readable, unambiguous XML. In the past, SCAP scanners were only available from proprietary companies. Today, open source tools like OpenSCAP are freely available, built into many operating systems and certified by the National Institute of Standards and Technology. By combining OpenSCAP with systems management tools, IT pros can run large-scale automated scans frequently, ensuring the efficiency and security of the data center.

4. Master navigation of vendor vulnerability databases and tools to minimize vulnerability windows.

When a data center is vulnerable to security flaws, the window of attack needs to be patched immediately. The best way to do so is to choose software that is officially compatible with CVE, the set of standard identifiers for publicly known security vulnerabilities and exposures.

When a vulnerability is recognized, it’s assigned a CVE number. This gives multiple vendors a single identifier to determine their vulnerability in a consistent and measurable way. Many open source projects and communities don’t consistently track against CVEs, but several companies who commercialize these projects do, so choose wisely.

In addition to tracking the CVEs, admins can use OpenSCAP to do vulnerability scans. OpenSCAP can use Open Vulnerability and Assessment Language (OVAL) content to scan systems for known vulnerabilities where remediation is available. The trick is to ensure your chosen vendors provide OVAL content consistently, so again, choose wisely.

5. Use government-certified software.

Just because code is open source doesn’t mean it’s not government certified. Just like commercially supported proprietary software, commercially supported open source software may also meet government certifications like the FIPS 140 cryptographic standards and Common Criteria.

If your team is writing their own cryptography, please tell them to stop. Not only will they need to take the code through a lengthy and expensive certification process, their code is probably not as secure as something that has been scrutinized by the public and certified by labs for years.

Using FIPS-certified cryptography libraries to write your applications eliminates the need to obtain a FIPS-certification yourself. Certified cryptography libraries let developers stand on the shoulders of the giants who already did the certification work.

6. Have a vendor at your side.

Ask 10 Linux administrators a question, and you’ll probably get 11 answers. Maybe 12. Which one’s right? The problem is even worse when doing web searches for issues, and some answers may actually do more harm than good.

By working with commercial vendors, you’re not only benefitting from their product knowledge, but you’re also benefiting from their experience with other customers who may have already solved the same problem you’re encountering.  Also, when it comes to open source, you can get features added to a project yourself, but that takes time, effort and influence. By working with a vendor who is a contributor to the open source community, your voice can be amplified and change can result faster.

With these tips, introducing open source code doesn’t have to be an intimidating process. Open source software can be just as secure as proprietary software, with far greater benefits. The reduced cost and collaborative nature of the software allows for faster and more substantial innovation, resulting in improved efficiency agencywide.

Originally posted on GCN. Reposted under Creative Commons with author permission. Republished from GCN, the original publisher of this article.

Thursday, November 27, 2014

How to use inotify-tools to trigger scripts on filesystem events

http://techarena51.com/index.php/inotify-tools-example

In my last example of Bash if statements we created a backup script which would run “rsync” as per the time set in a cron.

But wouldn’t it be nice if we could run our “rsync” script only if there was a change to the files in our directory instead of running a cron every hour despite no change? With inotify-tools you can do just that.

What is inotify-tools?
Inotify tools are a set of command line programs based on inotify a Linux kernel (2.6.13 or later) feature which can be used to monitor filesystem events.

Installing inotify-tools
Software versions :

inotify-tools.x86_64 3.14-1.el6
CentOS 6.5
Linux kernel 2.6.32-042stab085.20
#Add the epel repo
[leo@linux-vps ~]$sudo rpm -Uvh http://download.fedoraproject.org/pub/epel/6/i386/epel-release-6-8.noarch.rpm
#Install inotify-tools
[leo_g@vps ~]$ sudo yum install inotify-tools

Inotify-tools has two commands

Inotifywait
This command simply blocks for inotify events, making it appropriate for use in shell scripts. It can watch any set of files and directories, and can recursively watch entire directory trees.

inotifywatch
inotifywatch collects filesystem usage statistics and outputs counts of each inotify event.
We will use inotifywait, since we do not need statistics.

inotifywait syntax
inotifywait filename

inotifywait example
[leo@linux-vps ~]$ inotifywait /tmp
Setting up watches.
Watches established.
/tmp/ MODIFY test

As you can see in the above example an event (in this case a “modify action” was performed on a file named “test” inside /tmp) triggered the output.

Now “inotifywait” by default checks for all events including if a file was opened but not written to, Since we only want “rsync” to trigger on change events like when a file is modified, we will need to specify the “-e” flag along with the list of events we want to be notified about.

[leo@linux-vps ~]$ inotifywait -m -r -e \ modify,attrib,close_write,move,create,delete /tmp
Setting up watches.  Beware: since -r was given, this may take a while!
Watches established.
/tmp/ MODIFY a
/tmp/ CLOSE_WRITE,CLOSE a

The -m flag is for continuous monitoring as by default inotifywait will exit on the first event and -r means recursively or check through sub-directories as well.

List of inotifywait events

access
A watched file or a file within a watched directory was read from.

modify
A watched file or a file within a watched directory was written to.

attrib
The metadata of a watched file or a file within a watched directory was modified. This includes timestamps, file permissions, extended attributes etc.

close_write
A watched file or a file within a watched directory was closed, after being opened in writeable mode. This does not necessarily imply the file was written to.

close_nowrite
A watched file or a file within a watched directory was closed, after being opened in read-only mode.

close
A watched file or a file within a watched directory was closed, regardless of how it was opened. Note that this is actually implemented simply by listening for both close_write and close_nowrite, hence all close events received will be output as one of these, not CLOSE.

open
A watched file or a file within a watched directory was opened.

moved_to
A file or directory was moved into a watched directory. This event occurs even if the file is simply moved from and to the same directory.

moved_from
A file or directory was moved from a watched directory. This event occurs even if the file is simply moved from and to the same directory.

move
A file or directory was moved from or to a watched directory. Note that this is actually implemented simply by listening for both moved_to and moved_from, hence all close events received will be output as one or both of these, not MOVE.

move_self
A watched file or directory was moved. After this event, the file or directory is no longer being watched.

create
A file or directory was created within a watched directory.

delete
A file or directory within a watched directory was deleted.

delete_self
A watched file or directory was deleted. After this event the file or directory is no longer being watched. Note that this event can occur even if it is not explicitly being listened for.

unmount
The filesystem on which a watched file or directory resides was unmounted. After this event the file or directory is no longer being watched. Note that this event can occur even if it is not explicitly being listened to.
Now let’s use inotifywait with our script.
[leo@linux-vps~]$ vim inotify-example
while true #run indefinitely
do 
inotifywait -r -e modify,attrib,close_write,move,create,delete /dir && /bin/bash backup-script
done

Since we want to continuously monitor changes, we use an infinite while loop and the Logic “&&” operator will ensure that our backup script is only triggered on a successful completion of the inotifywait event
 
[leo_g@vps scripts]$bash inotify-example 
+ true
+ inotifywait -r -e modify,attrib,close_write,move,create,delete /
Setting up watches.  Beware: since -r was given, this may take a while!
Watches established.
/dir DELETE a
+ /bin/bash backup-script 
+ rsync -avz  -e “ssh ” /path/to/yourfile user@backupserver.com:/backup/ 2> \ /tmp/error.txt
+ mail -s “backup complete” user@youremail.com
+ echo “backup for $(date) “
+ true
+ inotifywait -r -e modify,attrib,close_write,move,create,delete /dir
Setting up watches.  Beware: since -r was given, this may take a while!
Watches established.

If you have a suggestion feel free to let me know. The complete source code to the file syncing daemon with rsync and inotify can be found at https://github.com/Leo-g/backup-bash

You mat also like How to display a changing output like top
source https://github.com/rvoicilas/inotify-tools/wiki

Encrypt Everything: How to encrypt the disk to protect the data

http://blog.adityapatawari.com/2014/11/encrypt-everything-how-to-encrypt-disk.html

Recently, at BrowserStack.com, some of our services got compromised. We use Amazon Web Services extensively. The person (or group) who attacked us mounted one of our backups and managed to steal some of the data. We could have prevented this simply by ensuring that we use encrypted disks which would have made this attack useless. Learning from our mistakes, we have recently started encrypting everything and I am going to show you how to do that. One point worth noting here is that Amazon AWS does provide encryption support for the EBS volumes but that is transparent and would not help in case of the account getting compromised. I am going to use dm-crypt which is supported by Linux kernel so the steps are quite generic and would work on any kind of disk, on any kind of environment, including Amazon AWS, Google Compute Engine, physical disks in your datacenter.

Our goal is to encrypt /home. To achieve this, we'll attach a disk, encrypt it, move the entire /home data to this disk and create a symbolic link to /home.

Step1: We are going to use Linux Unified Key Setup. For that we need to install cryptsetup package.
# yum install cryptsetup

Step2: While using AWS, never attach the volume to be encrypted while launching the instance. If we do so, the instance will fail to boot up next time because it'll ask for decryption password while booting up which is not possible to supply in AWS. Still if it is absolutely mandatory to do this then I suggest trying to remove entries from fstab and crypttab but it is much easier to just attach the disk after the launching of the instance is done. Assuming that the attached disk is available at /dev/xvdf, we'll setup the encryption now.
# cryptsetup -y -v luksFormat /dev/xvdf
WARNING!
========
This will overwrite data on /dev/xvdf irrevocably.

Are you sure? (Type uppercase yes): YES
Enter LUKS passphrase:
Verify passphrase:

Command successful.


We can verify the encryption parameters as well. Default is AES 256 bit.
# cryptsetup luksDump /dev/xvdf

Step3: We'll open the device and map it to /dev/mapper/home so that we can use it.
# cryptsetup luksOpen /dev/xvdf home
Enter passphrase for /dev/xvdf:


Step4: This step is optional. To further protect our data, we can zero out the entire disk before even creating the filesystem.
# dd if=/dev/zero of=/dev/mapper/home

Step5: Now we'll create a filesytem
# mkfs.ext4 /dev/mapper/home

Step6: Let us mount and copy the data from /home
# mkdir /myhome
# mount /dev/mapper/home /myhome
# cp -a /home/* /myhome/
# rm -rf /home
# ln -s /myhome /home

Great! Our /home directory is encrypted. But wait a minute.. this approach has a short coming. We have deliberately designed it so that the disk won't auto-mount during the boot because there is no way to give it a password in cloud environment during the boot. Since the disk won't mount, we won't be able to ssh into the machine because the authorized_keys file is kept inside the home directory of the user. To address this problem, either change the "AuthorizedKeysFile" in sshd_config or create a user with home directory in /var/lib or /opt and grant sudo for cryptsetup and mount commands. So after reboot, if we take the first approach, we would be able to ssh without any problem or we'll ssh via other user, mount the encrypted drive and then use it normally.

$ ssh mountuser@
$ sudo /sbin/cryptsetup luksOpen /dev/xvdf home
$ sudo /bin/mount /dev/mapper/home /myhome/


Couple of points to remember:

  • Do not forget the LUKS password. It cannot be retrieved, if lost.
  • Try it a couple of times on staging machines before doing it on the machines that matter.

How to install Docker on CentOS 7

http://www.linuxtechi.com/install-docker-on-centos-7

Docker is an open-source tool that makes creating & managing Linux containers(LXC) easy. Containers are like lightweight VMs which can be started & stopped in milliseconds. Dockers help the system admin & coders to develop their application in a container and can further scale up to 1000 of nodes.
The main difference between container and VM(Virtual machine) is that dockers provide process based isolation , whereas VM provides full isolation of resources. Virtual machine takes a minute to start where as container can be started in a second or less than a second. Container uses the Kernel of host OS , whereas VM uses the separate Kernel.
One of the limitation of Docker is that it can be used only on 64bit hosts OS.
In this post we will discuss how to install docker in CentOS 7.x

Installation of Docker on CentOS 7

Docker package is included in the default CentOS-Extras repository. So to install docker , simply run below yum command :
[root@localhost ~]# yum install docker

Start the Docker Service

Once the Installation is finished , start docker service and enable it at boot using below commands
[root@localhost ~]# service docker start
[root@localhost ~]# chkconfig docker on
Download the official Centos images Locally
[root@localhost ~]# docker pull centos
Pulling repository centos
192178b11d36: Download complete 
70441cac1ed5: Download complete 
ae0c2d0bdc10: Download complete 
511136ea3c5a: Download complete 
5b12ef8fd570: Download complete
 Verify CentOS images that have been fetched :
[root@localhost ~]# docker images centos
REPOSITORY          TAG                 IMAGE ID            CREATED             VIRTUAL SIZE
centos              centos5             192178b11d36        2 weeks ago         466.9 MB
centos              centos6             70441cac1ed5        2 weeks ago         215.8 MB
centos              centos7             ae0c2d0bdc10        2 weeks ago         224 MB
centos              latest              ae0c2d0bdc10        2 weeks ago         224 MB

Run a Docker Container :

[root@localhost ~]# docker run -i -t centos /bin/bash
[root@dbf66395436d /]#
As we can see centos container has been started and we got the bash shell. In docker command we have used options like ‘-i attaches stdin and stdout’ and ‘-t allocates a terminal or console’ . To disconnect from container type exit .
[root@cd05639b3f5c /]# cat /etc/redhat-release 
CentOS Linux release 7.0.1406 (Core) 
[root@cd05639b3f5c /]# exit
exit
[root@localhost ~]#
We can also search Containers based on fedora & ubuntu OS.
[root@localhost ~]# docker search ubuntu
[root@localhost ~]# docker search fedora
Display the list of running containers
docker-ps

10 Sed (Stream Editor) Command Examples

http://www.nextstep4it.com/10-sed-command-examples

Overview :
Sed is a stream editor in UNIX like operating system which is used for filtering and transforming text. Sed is derived originally from the basic line editor ‘ed’, an editor you will find on every unix system but one that is rarely used because of its difficult user interface.
How sed works …. ?
As sed is a stream editor , its does its work on a stream of data it receives from stdin, such as through a pipe , writing its results as a stream of data on stdout ( often desktop screen). We can redirect this output to a file . Sed doesn’t typically modify an original input file ; instead we can send contents of our file through a pipe to be processed by sed. This means we don’t need to have a file on the disk with the data you want to changed, this is particularly useful if you have data coming from another process rather than already written in a file.
Syntax of sed :
# sed [option] commands [input-file ]
In this post we will discuss some of the practical examples of sed command , we will be doing lot of sed operation on the file ‘passwd’ , so first copy the file ‘/etc/passwd’ to /tmp folder.
root@nextstep4it:~# cp /etc/passwd /tmp/
Example:1 Deleting all the Lines with sed
root@nextstep4it:~# cat /tmp/passwd | sed 'd'
Above Command sent the entire contents of the file /tmp/passwd through a pipe to sed. Keep in mind the file /tmp/passwd was not altered at all. Sed only read the contents of the file and we didnot tell it to write to the file, only read from it.The results of editing commands on each line printed to standard output. In this case, nothing was printed to the screen because we have used option ‘d’ to delete every line.
Example:2 Invoking sed with ‘-e’ option
Instead of invoking sed by sending a file to it through a pipe, we can instruct sed to read data from a file as shown in the below example .
root@nextstep4it:~# sed -e 'd' /tmp/passwd
root@nextstep4it:~#
We can also redirect the standard output from the sed command into a file.
root@nextstep4it:~# sed -e 'd' /tmp/passwd > /tmp/new-passwd

Example:3 Printing lines using sed ( -n flag & p command)
The ‘-n’ flag disables the automatic printing so that sed will instead print lines only when it is explicitly told to do so with the ‘p’ command .
root@nextstep4it:~# cat /tmp/passwd | sed 'p' | head -5
root:x:0:0:root:/root:/bin/bash
daemon:x:1:1:daemon:/usr/sbin:/usr/sbin/nologin
bin:x:2:2:bin:/bin:/usr/sbin/nologin
As we see above if we specify ‘p’ editing command without ‘-n’ flag , sed will print duplicate lines. So to display unique lines use ‘-n’ flag with p command in sed. Examples is shown below :
root@nextstep4it:~# cat /tmp/passwd | sed -n 'p' | head -5
root:x:0:0:root:/root:/bin/bash
daemon:x:1:1:daemon:/usr/sbin:/usr/sbin/nologin
bin:x:2:2:bin:/bin:/usr/sbin/nologin
sys:x:3:3:sys:/dev:/usr/sbin/nologin
sync:x:4:65534:sync:/bin:/bin/sync

Example:4 Editing the Source file by using ‘-i’ option
Sed command by default does not edit the orginal or source file for our safety but by using ‘-i’ option source file can be edited.
root@nextstep4it:~# sed -i '1d' /tmp/passwd
Above command will delete the first line of source file /tmp/passwd.
Example:5 Take backup of source file prior to editing
When we use ‘-i’ option in sed command then it becomes very risky because it will directly edit the source file, so it is better to take the backup of source file before editing, example is shown below.
root@nextstep4it:~# sed -i.bak '1d' /tmp/passwd

root@nextstep4it:~# ls -l /tmp/passwd*
-rw-r--r-- 1 root root 2229 Nov 24 22:36 /tmp/passwd
-rw-r--r-- 1 root root 2261 Nov 24 22:35 /tmp/passwd.bak
In the above sed command , 1st line of file /tmp/passwd will be deleted but before that sed command takes the backup of /tmp/passwd as /tmp/passwd.bak
Example:6 Deleting the lines by specifying range.
Deleting first 5 lines of /tmp/passwd file.
root@nextstep4it:~# cat /tmp/passwd | sed '1,5d'

Example:7 Delete the empty lines of a file
root@nextstep4it:~# cat /tmp/detail.txt 
245
678

linux
unix

suse
In details.txt file we have two empty lines , use below command to delete empty lines.
root@nextstep4it:~# sed '/^$/d' /tmp/detail.txt
245
678
linux
unix
suse

Example:8 Deleting the lines containing the strings
Suppose we want to delete line from the file /tmp/passwd which contains ‘games’ word.
root@nextstep4it:~# sed '/games/d' /tmp/passwd

Example:9 Search and Replace strings in the file.
Suppose you want to replace the ‘root’ with ‘Admin’, example is shown below :
root@nextstep4it:~# sed 's/root/Admin/' /tmp/passwd
It is very important to note that sed substitutes only the first occurrence on a line. If the string ‘root’ occurs more than once on a line, only the first match will be replaced. To replace every string in the file with the new one instead of just the first occurrence , to make substitution globally add a letter ‘g’ to end of command as shown below :
root@nextstep4it:~# sed 's/root/Admin/g' /tmp/passwd

Example:10 Multiple substitution using -e option
Suppose we want to replace ‘root’ string with ‘Admin’ and ‘bash’ string with ‘sh’. Example is shown below :
root@nextstep4it:~# cat /tmp/passwd | sed -e 's/root/Admin/g' -e 's/bash/sh/g'

LinEnum – Linux Enumeration & Privilege Escalation Tool

http://www.darknet.org.uk/2014/11/linenum-linux-enumeration-privilege-escalation-tool

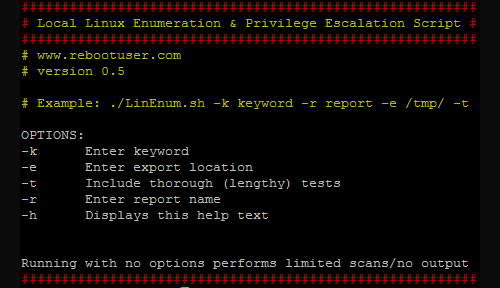
LinEnum will automate many Local Linux Enumeration & Privilege Escalation checks documented in this cheat sheet. It’s a very basic shell script that performs over 65 checks, getting anything from kernel information to locating possible escalation points such as potentially useful SUID/GUID files and Sudo/rhost mis-configurations and more.
An additional ‘extra’ feature is that the script will also use a provided keyword to search through *.conf and *.log files. Any matches will be displayed along with the full file path and line number on which the keyword was identified.
LinEnum - Linux Enumeration & Privilege Escalation Tool
After the scan has completed (please be aware that it make take some time) you’ll be presented with (possibly quite extensive) output, to which any key findings will be highlighted in yellow with everything else documented under the relevant headings.
Usage
Checks/Tasks Performed
  • Kernel and distribution release details
  • System Information:
    • Hostname
    • Networking details:
    • Current IP
    • Default route details
    • DNS server information
  • User Information:
    • Current user details
    • Last logged on users
    • List all users including uid/gid information
    • List root accounts
    • Extracts password policies and hash storage method information
    • Checks umask value
    • Checks if password hashes are stored in /etc/passwd
    • Extract full details for ‘default’ uid’s such as 0, 1000, 1001 etc
    • Attempt to read restricted files i.e. /etc/shadow
    • List current users history files (i.e .bash_history, .nano_history etc.)
    • Basic SSH checks
  • Privileged access:
    • Determine if /etc/sudoers is accessible
    • Determine if the current user has Sudo access without a password
    • Are known ‘good’ breakout binaries available via Sudo (i.e. nmap, vim etc.)
    • Is root’s home directory accessible
    • List permissions for /home/
  • Environmental:
    • Display current $PATH
  • Jobs/Tasks:
    • List all cron jobs
    • Locate all world-writable cron jobs
    • Locate cron jobs owned by other users of the system
  • Services:
    • List network connections (TCP & UDP)
    • List running processes
    • Lookup and list process binaries and associated permissions
    • List inetd.conf/xined.conf contents and associated binary file permissions
    • List init.d binary permissions
  • Version Information (of the following):
    • Sudo
    • MYSQL
    • Postgres
    • Apache
    • Checks user config
  • Default/Weak Credentials:
    • Checks for default/weak Postgres accounts
    • Checks for default/weak MYSQL accounts
  • Searches:
    • Locate all SUID/GUID files
    • Locate all world-writable SUID/GUID files
    • Locate all SUID/GUID files owned by root
    • Locate ‘interesting’ SUID/GUID files (i.e. nmap, vim etc)
    • List all world-writable files
    • Find/list all accessible *.plan files and display contents
    • Find/list all accessible *.rhosts files and display contents
    • Show NFS server details
    • Locate *.conf and *.log files containing keyword supplied at script runtime
    • List all *.conf files located in /etc
    • Locate mail
You can download LinEnum v0.5 here:
master.zip
Or read more here.

How to set the PATH variable in Bash

http://www.linuxbsdos.com/2014/11/26/how-to-set-the-path-variable-in-bash

So, how do you set the PATH variable in Bash?
That’s a very simple task, which should take less than a minute to complete. However, for the benefit of those not familiar with the Bash shell or the PATH variable, let’s start with a very brief introduction.
Note: The operating assumption in this article is that you have access to a machine running an operating system that uses Bash and that you know how to launch a shell terminal. Specifically for this tutorial, the assumption is that you’re running a Linux distribution. If you are reading this, you probably are. And if you’re and (you) don’t know what a shell terminal is or how to launch it, take a few minutes to read How to launch and use a shell terminal in Linux.
Now, about that brief introduction to the PATH variable and Bash.
The Bash shell is a command language interpreter for Linux and other Unix-like operating systems. There are other shells like it, but it has become the most popular, and it is the default shell in Linux and Mac OS X. Bash was designed as a free replacement for the Bourne shell, one of the earliest shells for the Unix operating system. It (the Bourne shell) was named after its creator – Stephen Bourne.
When Brian Fox wrote a shell as a replacement for the Bourne shell, he called his BASH, which is an acronym for Bourne Again SHell, itself a play on the Bourne shell or the last name of its creator. When spoken, it sounds like born again, like there’s a religious angle to it. But trust me, it’s got nothing to do with religion!
The PATH variable (always written in all caps) is an environment variable that contains a colon-delimited list of system directories. The directories are where commands are located, so that when you type a command, those directories are where the system searches for it. If the command is not in any of the directories in PATH, the system outputs a “command not found message.”
To see the value of the PATH variable on your system, type: echo $PATH. The output should be similar to the one below. (The $ sign before a variable’s name is used to evaluate and output the value of the variable.)

Each entry in PATH is called a directory path. In the output above, for example, /bin, /usr/bin, /sbin are directory paths, and the system looks in each in the order that they are listed for any command you attempt to execute until it finds it.
On a freshly-installed machine, the system assigns an initial set of path names to PATH, so PATH is never undefined. However, you can add and remove path names from PATH, so you’re not stuck with whatever the initial set is. In essence when you set the PATH variable on a modern Linux distribution, you are merely redefining and assigning it a new value. Most users will never ever have to redefine the PATH variable. Only if you’re a developer, you write your own scripts and you add those script to a folder in your home directory, will you ever want to modify the PATH variable to include that folder.
For this tutorial, assume that your username is finid and you have created some really cool Python scripts, which you put in a folder in your home directory. Let’s call that folder pybin. The full path to pybin will then be /home/finid/pybin or $HOME/pybin. HOME is a system variable that points to the path name of your home directory. To see the point I’m making here, type echo $HOME in a shell terminal. The output should match the path of your home directory.
That ends the brief introduction. If you want to learn more about Bash, visit the official documentation page at GNU Bash.
Bash shell terminal
Figure 1: Bash shell terminal on Fedora 20 KDE.
Ok, let’s get to the gist of this tutorial – How to set or redefine the PATH variable in Bash.
There are two ways to go about it. One modifies PATH temporarily, while the other modifies it permanently – until you change it again. Both methods are easy, but let’s try the temporary method first.
Set the PATH variable in Bash (temporarily): When the PATH variable is redefined using this method, the new value will not persist when you log out. I’ll explain the reason further down, but that’s why it’s temporary. To get this done, launch a shell terminal, then just to see what the value of your current PATH is, type echo $PATH.
Now type: PATH=$PATH:$HOME/pybin:. All that does is add $HOME/pybin or /home/finid/pybin to PATH. In other words, PATH has just been redefined.
.
When you make a change to PATH using this method or any other method, you have to export it to make it an environment variable. That’s how you let the system know the new value of PATH. And you do that using the export command. So to export the change you just made to PATH, type: export PATH.
Now if you type echo $PATH again, you should see the new value of PATH, which should have the directory path you added at the end of the output. As stated earlier, this change will only last until you log out. When next you log in, PATH will revert to its default value.
Why is that?
Any time you log into your machine or server, the system reads an initialization file for the Bash shell located in your home directory. In Linux, that file is called .bash_profile. Notice that the name starts with a . (dot), so it is a hidden file, which means you won’t see it in the output of the ls command. You’ll have to pass ls the -a option to see hidden files.
An initialization file like .bash_profile is a simple shell script, much like any you can write yourself. It is where system variables, like PATH and HOME are defined and assigned. Because it’s just a shell script, you can modify it with any text editor. And that brings us to the next method of redefining the PATH variable in a Bash shell – editing the .bash_profile file.
Set the PATH variable in Bash (permanently): Note that “permanently” only means that changes made to the definition of PATH in the bash initialization file in your home directory will remain even when you log out. You can always change it again. To edit the .bash_profile, open it with your favorite text editor. For Linux gurus, the most popular text editor is Vi, but if you a new to Linux and don’t want to learn how to use a text editor before you can edit a file, use Nano. So, to open the file, type nano .bash_profile.
This code block shows the contents of that file on my test machine.

Pay special attention to the last two lines, because those are the only ones that are pertinent to this tutorial. Did you observe that they are just like the commands used in the first method. They are, right?
However, you only need to modify the PATH assignment line. So to add the same directory path name that we added using the first method, append $HOME/pybin to the end of the PATH assignment line, so that it reads like the one in the code block below. Note that you need to separate it from the entry before it with a colon, so you really need to append :$HOME/pybin, not just $HOME/pybin.

When you are done, close the file. Now when you log out and log back in, PATH will assume the new value. But you don’t have to go through the log out/log in routine for the changes to take effect. You can have the system reinitialize the file so that the changes are reflected while you are still logged in. You do that by using the . (dot) command, a command that reads a script file and executes or initializes the commands in it.
That’s all – for now.


Sunday, November 23, 2014

How to visualize memory usage on Linux

http://xmodulo.com/visualize-memory-usage-linux.html

Lack of sufficient physical memory can significantly hamper the performance of Linux desktop and server environments. When your desktop is sluggish, one of the first things to do is to free up RAMs. Memory usage is even more critical in multi-user shared hosting or mission-critical server environments, where different users or application threads constantly compete for more memory.
When it comes to monitoring any type of system resources such as memory or CPUs, visualization is an effective means to help understand quickly how they are consumed by different processes and users. In this tutorial, I describe how to visualize memory usage in Linux environment using a command-line tool called smem.

Physical Memory Usage: RSS vs. PSS vs. USS

In the presence of virtual memory abstraction, accurately quantifying physical memory usage of a process is actually not straightforward. The virtual memory size of a process is not meaningful because it does not tell how much of it is actually allocated physical memory.
Resident set size (RSS), reported by top command, is one popular metric which captures what portion of a process' reported memory is residing in RAM. However, aggregating RSS of existing processes can easily overestimate the overall physical memory usage of the Linux system because the same physical memory page can be shared by different processes. Proportional set size (PSS) is a more accurate measurement of effective memory usage of Linux processes since PSS properly discounts the memory page shared by more than one process. Unique set size (USS) of a process is a subset of the process' PSS, which is not shared by any other processes.

Install Smem on Linux

The command-line tool smem can generate a variety of reports related to memory PSS/USS usage by pulling information from /proc. It comes with built-in graphical chart generation capabilities, so one can easily visualize overall memory consumption status.

Install Smem on Debian or Ubuntu

$ sudo apt-get install smem

Install Smem on Linux Mint

$ sudo apt-get install smem python-matplotlib python-tk

Install Smem on Fedora or CentOS/RHEL

On CentOS/RHEL, you need to enable EPEL repository first.
$ sudo yum install smem python-matplotlib

Check Memory Usage with Smem

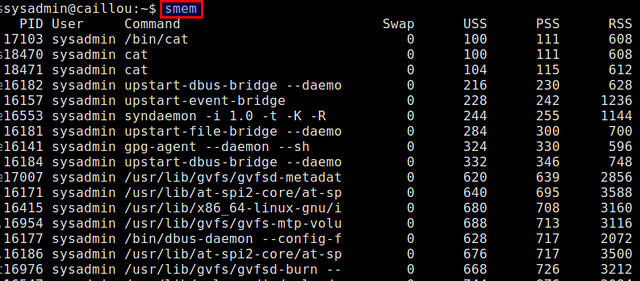
When you run smem as a unprivileged user, it will report physical memory usage of every process launched by the current user, in an increasing order of PSS.
$ smem

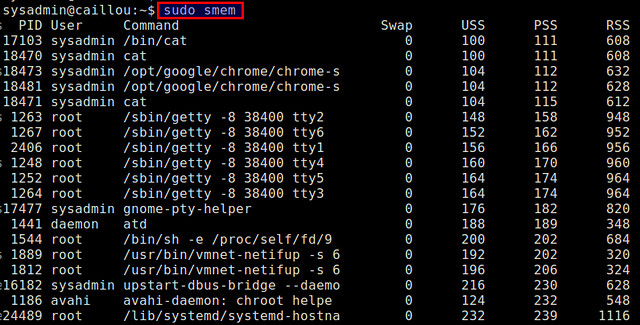
If you want to check the overall system memory usage for all users, run smem as the root.
$ sudo smem

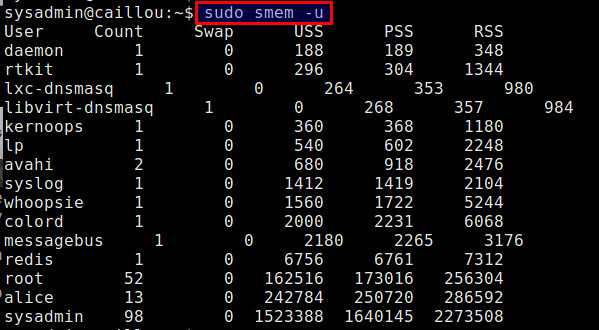
To view per-user memory usage:
$ sudo smem -u

smem allows you to filter memory usage results based on mapping, processes or users in the following format:
  • -M
  • -P
  • -U
For a complete usage of smem, refer to its man page.

Visualize Memory Usage with Smem

Visualized reports are often easier to read to identify the memory hogs of your system quickly. smem supports two kinds of graphical reports for memory usage visualization: bar and pie graphs.
Here are examples of memory usage visualization.
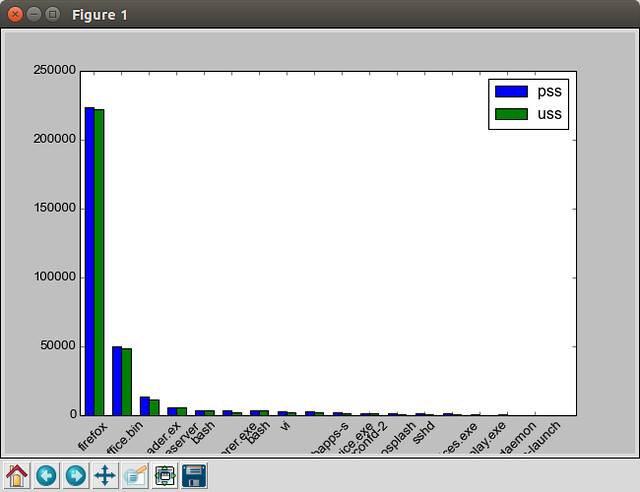
The following command will generate a bar graph that visualizes the PSS/USS memory usage of a user alice.
$ sudo smem --bar name -c "pss uss" -U alice

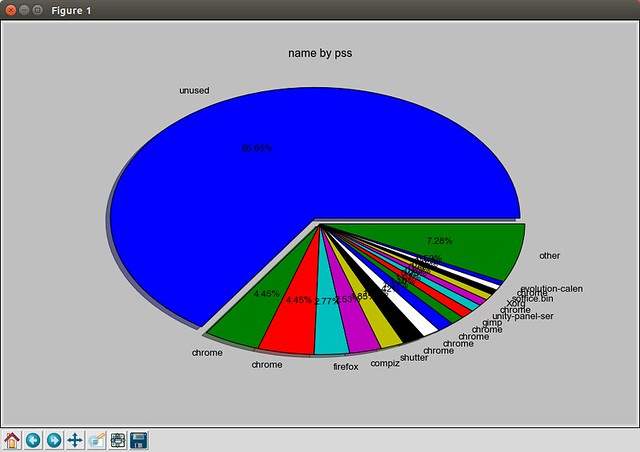
The next command will plot a pie graph of the overall PSS memory usage of different processes.
$ sudo smem --pie name -c "pss"

As a summary, smem is a simple and effective memory analysis tool that comes in handy in various circumstances. Using its formatted output, you can run smem to identify any memory issues and take an action in an automatic fashion. If you know of any good memory monitoring tool, share it in the comment.

How to create dialog boxes in an interactive shell script

http://xmodulo.com/create-dialog-boxes-interactive-shell-script.html

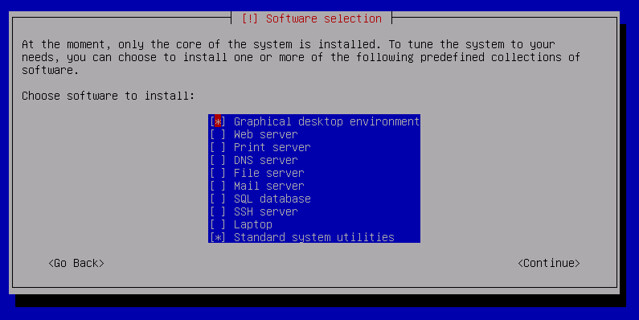
When you install new software in the terminal environment, you may often see informative dialog boxes popping up, accepting your input. The type of dialog boxes ranges from simple yes/no dialog to input box, password box, checklist, menu, and so on. The advantage of using such user-friendly dialog boxes is obvious as they can guide you to enter necessary information in an intuitive fashion.

When you write an interactive shell script, you can actually use such dialog boxes to take user's input. Pre-installed on all modern Linux distributions, a program called whiptail can streamline the process of creating terminal-based dialogs and message boxes inside a shell script, similar to how Zenity or Xdialog codes a GUI for scripts.
In this tutorial, I describe how to create user-friendly dialog boxes in a shell script by using whiptail. I also show Bash code snippets of various dialog boxes supported by whiptail.

Create a Message Box

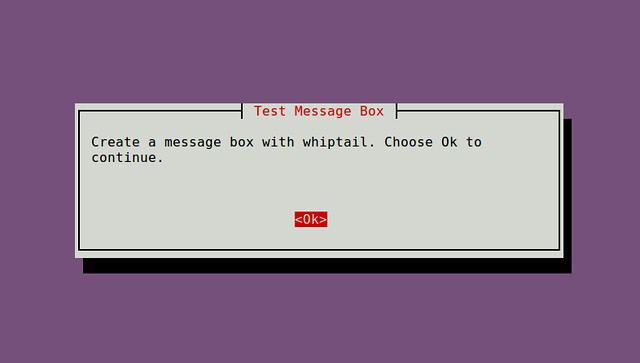
A message box shows any arbitrary text message with a confirmation button to continue.
whiptail --title "" --msgbox ""  
Example:
1
2
#!/bin/bash
whiptail --title "Test Message Box" --msgbox "Create a message box with whiptail. Choose Ok to continue." 10 60

Create a Yes/No Box

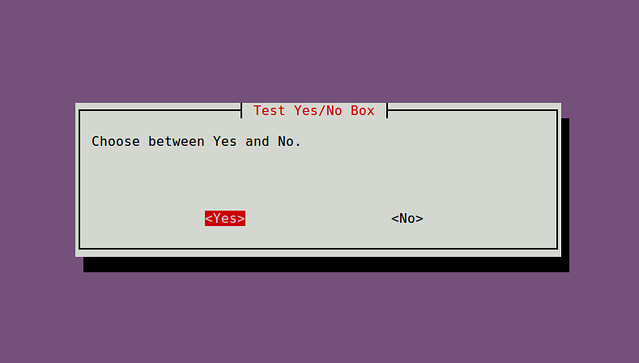
One common user input is Yes or No. This is when a Yes/No dialog box can be used.
whiptail --title "" --yesno ""  
Example:
1
2
3
4
5
6
#!/bin/bash
if (whiptail --title "Test Yes/No Box" --yesno "Choose between Yes and No." 10 60) then
    echo "You chose Yes. Exit status was $?."
else
    echo "You chose No. Exit status was $?."
fi

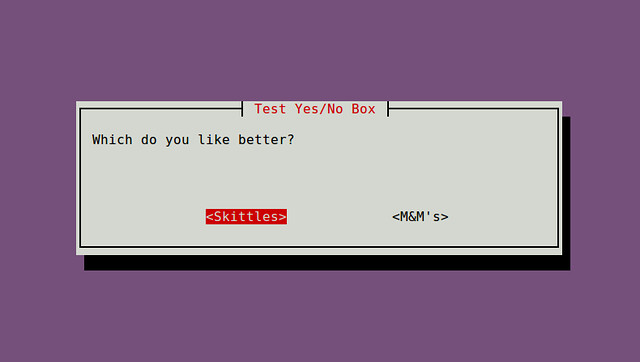
Optionally, you can customize the text for Yes and No buttons with "--yes-button" and "--no-button" options.
Example:
1
2
3
4
5
6
#!/bin/bash
if (whiptail --title "Test Yes/No Box" --yes-button "Skittles" --no-button "M&M's"  --yesno "Which do you like better?" 10 60) then
    echo "You chose Skittles Exit status was $?."
else
    echo "You chose M&M's. Exit status was $?."
fi

Create a Free-form Input Box

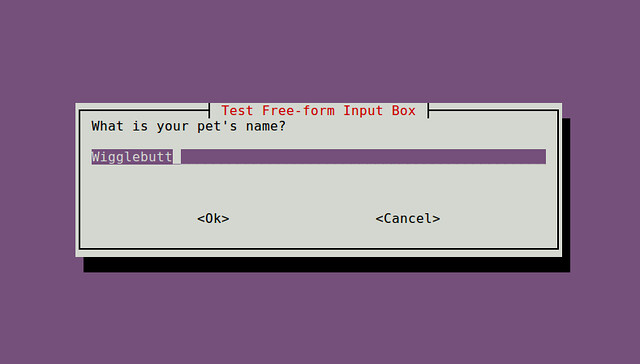
If you want to take any arbitrary text input from a user, you can use an input box.
whiptail --title "" --inputbox ""   
Example:
1
2
3
4
5
6
7
8
9
#!/bin/bash
PET=$(whiptail --title "Test Free-form Input Box" --inputbox "What is your pet's name?" 10 60 Wigglebutt 3>&1 1>&2 2>&3)
 
exitstatus=$?
if [ $exitstatus = 0 ]; then
    echo "Your pet name is:" $PET
else
    echo "You chose Cancel."
fi

Create a Password Box

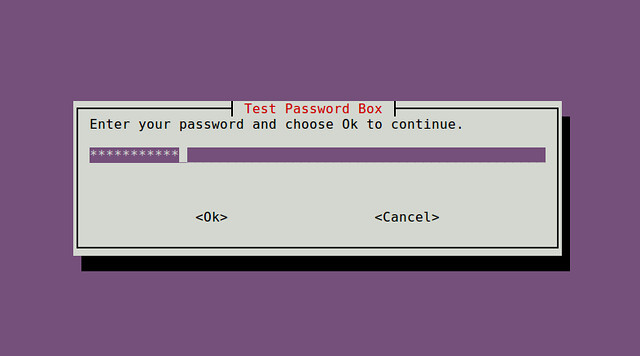
A password box is useful when you want to take a sensitive input from a user.
whiptail --title "" --passwordbox ""  
Example:
1
2
3
4
5
6
7
8
9
#!/bin/bash
PASSWORD=$(whiptail --title "Test Password Box" --passwordbox "Enter your password and choose Ok to continue." 10 60 3>&1 1>&2 2>&3)
 
exitstatus=$?
if [ $exitstatus = 0 ]; then
    echo "Your password is:" $PASSWORD
else
    echo "You chose Cancel."
fi

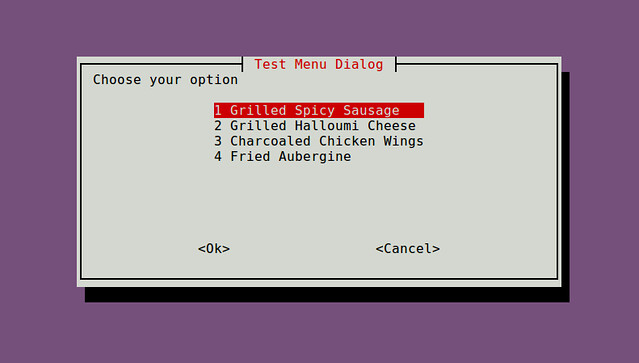
Create a Menu Box

When you want to ask a user to choose one among any arbitrary number of choices, you can use a menu box.
whiptail --title "" --menu ""    [   ] . . .
Example:
1
2
3
4
5
6
7
8
9
10
11
12
13
#!/bin/bash
OPTION=$(whiptail --title "Test Menu Dialog" --menu "Choose your option" 15 60 4 \
"1" "Grilled Spicy Sausage" \
"2" "Grilled Halloumi Cheese" \
"3" "Charcoaled Chicken Wings" \
"4" "Fried Aubergine"  3>&1 1>&2 2>&3)
 
exitstatus=$?
if [ $exitstatus = 0 ]; then
    echo "Your chosen option:" $OPTION
else
    echo "You chose Cancel."
fi

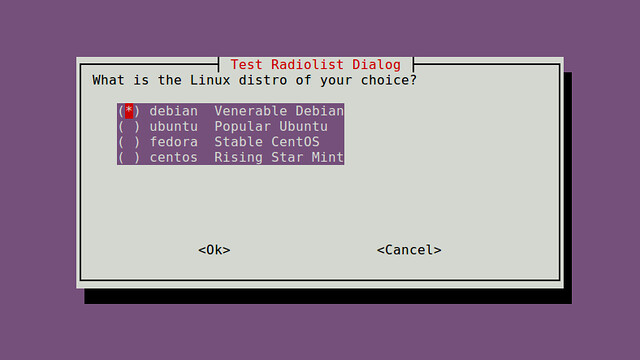
Create a Radiolist Dialog

A radiolist box is similar to a menu box in the sense that you can choose only option among a list of available options. Unlike a menu box, however, you can indicate which option is selected by default by specifying its status.
whiptail --title "" --radiolist ""    [    ] . . .
Example:
1
2
3
4
5
6
7
8
9
10
11
12
13
14
#!/bin/bash
DISTROS=$(whiptail --title "Test Checklist Dialog" --radiolist \
"What is the Linux distro of your choice?" 15 60 4 \
"debian" "Venerable Debian" ON \
"ubuntu" "Popular Ubuntu" OFF \
"centos" "Stable CentOS" OFF \
"mint" "Rising Star Mint" OFF 3>&1 1>&2 2>&3)
 
exitstatus=$?
if [ $exitstatus = 0 ]; then
    echo "The chosen distro is:" $DISTROS
else
    echo "You chose Cancel."
fi

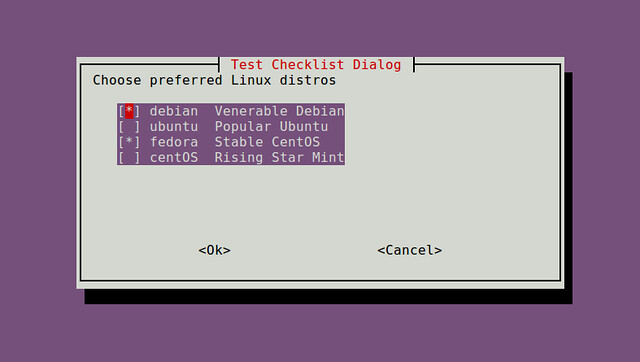
Create a Checklist Dialog

A checklist dialog is useful when you want to ask a user to choose more than one option among a list of options, which is in contrast to a radiolist box which allows only one selection.
whiptail --title "" --checklist ""    [    ] . . .
Example:
1
2
3
4
5
6
7
8
9
10
11
12
13
14
#!/bin/bash
DISTROS=$(whiptail --title "Test Checklist Dialog" --checklist \
"Choose preferred Linux distros" 15 60 4 \
"debian" "Venerable Debian" ON \
"ubuntu" "Popular Ubuntu" OFF \
"centos" "Stable CentOS" ON \
"mint" "Rising Star Mint" OFF 3>&1 1>&2 2>&3)
 
exitstatus=$?
if [ $exitstatus = 0 ]; then
    echo "Your favorite distros are:" $DISTROS
else
    echo "You chose Cancel."
fi

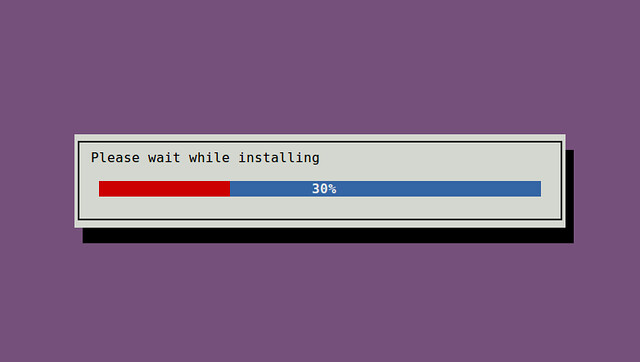
Create a Progress Bar

Another user-friendly dialog box is a progress bar. whiptail reads from standard input a percentage number (0 to 100) and displays a meter inside a gauge box accordingly.
whiptail --gauge ""   
1
2
3
4
5
6
7
#!/bin/bash
{
    for ((i = 0 ; i <= 100 ; i+=20)); do
        sleep 1
        echo $i
    done
} | whiptail --gauge "Please wait while installing" 6 60 0

By now, you must see how easy it is to create useful dialog boxes in an interactive shell script. Next time you need to write a shell script for someone, why don't you try whiptail and impress him or her? :-)