Friday, July 15, 2016

22 open source tools for creatives

https://opensource.com/life/16/7/22-open-source-tools-creatives

22 open source tools for creatives
Image credits : 
Whether it's visuals, audio, writing, or design, there's an open source tool out there to help get the job done.
"It's absolutely possible to go from concept to finished, polished products, using free and open source software," said Jason.
In this lightning talk, Opensource.com community moderator Jason van Gumster shares 22 open source tools for creatives:

Sunday, July 10, 2016

How To Read CPUID Instruction For Each CPU on Linux With x86info and cpuid Commands

http://www.cyberciti.biz/faq/linux-cpuid-command-read-cpuid-instruction-on-linux-for-cpu

Is there a CPU-Z like a freeware/open source software that detects the central processing unit (CPU) of a modern personal computer in Linux operating system? How can I get detailed information about the CPU(s) gathered from the CPUID instruction, including the exact model of CPU(s) on Linux operating system?

There are three programs on Linux operating system that can provide CPUID information and these tools are useful to find out if specific advanced features such as virtualization, extended page tables, encryption and more:
  1. lscpu command – Show information on CPU architecture.
  2. x86info command – Show x86 CPU diagnostics.
  3. cpuid command – Dump CPUID information for each CPU. This is the closet tool to CPU-Z app on Linux.

x86info

x86info is a program which displays a range of information about the CPUs present in an x86 system.

Install x86info on Debian / Ubuntu Linux

$ sudo apt-get install x86info

Install x86info on Fedora Linux

$ sudo dnf install x86info

Install x86info on RHEL/SL/CentOS Linux

$ sudo yum install x86info

Examples

Simply type the following command:
# x86info
Sample outputs:
Linux x86info Command To Display-x86 CPU Diagnostics Info On Linux
Fig.01: Linux x86info Command To Display-x86 CPU Diagnostics Info On Linux

See TLB, cache sizes and cache associativity

# x86info -c
Sample outputs:
x86info v1.30.  Dave Jones 2001-2011
Feedback to .
 
Found 4 identical CPUs
Extended Family: 0 Extended Model: 1 Family: 6 Model: 28 Stepping: 10
Type: 0 (Original OEM)
CPU Model (x86info's best guess): Atom D510
Processor name string (BIOS programmed): Intel(R) Atom(TM) CPU D510   @ 1.66GHz
 
Cache info
 L1 Instruction cache: 32KB, 8-way associative. 64 byte line size.
 L1 Data cache: 24KB, 6-way associative. 64 byte line size. ECC.
 L2 cache: 512KB, 8-way associative. 64 byte line size.
TLB info
Found unknown cache descriptors: 4f 59 ba c0
Total processor threads: 4
This system has 1 dual-core processor with hyper-threading (2 threads per core) running at an estimated 1.65GHz

See CPU feature flags like AES/FPU/SSE and more

# x86info -f
Sample outputs:
x86info v1.30.  Dave Jones 2001-2011
Feedback to .
 
Found 4 identical CPUs
Extended Family: 0 Extended Model: 1 Family: 6 Model: 28 Stepping: 10
Type: 0 (Original OEM)
CPU Model (x86info's best guess): Atom D510
Processor name string (BIOS programmed): Intel(R) Atom(TM) CPU D510   @ 1.66GHz
 
Feature flags:
 fpu vme de pse tsc msr pae mce cx8 apic sep mtrr pge mca cmov pat pse36 clflsh ds acpi mmx fxsr sse sse2 ss ht tm pbe sse3 dtes64 monitor ds-cpl tm2 ssse3 cx16 xTPR pdcm movbe
Extended feature flags:
 SYSCALL xd em64t lahf_lm dts
Long NOPs supported: yes
 
Total processor threads: 4
This system has 1 dual-core processor with hyper-threading (2 threads per core) running at an estimated 1.65GHz

See MP table showing CPUs BIOS knows about

# x86info -mp
Sample outputs:
x86info v1.30.  Dave Jones 2001-2011
Feedback to .
 
MP Table:
#	APIC ID	Version	State		Family	Model	Step	Flags
#	 0	 0x14	 BSP, usable	 6	 12	 10	 0xbfebfbff
#	 2	 0x14	 AP, usable	 6	 12	 10	 0xbfebfbff
.....
..

Show register values from all possible cpuid calls

# x86info -r
....
..
eax in: 0x00000000, eax = 0000000a ebx = 756e6547 ecx = 6c65746e edx = 49656e69
eax in: 0x00000001, eax = 000106ca ebx = 00040800 ecx = 0040e31d edx = bfebfbff
eax in: 0x00000002, eax = 4fba5901 ebx = 0e3080c0 ecx = 00000000 edx = 00000000
eax in: 0x00000003, eax = 00000000 ebx = 00000000 ecx = 00000000 edx = 00000000
eax in: 0x00000004, eax = 04004121 ebx = 0140003f ecx = 0000003f edx = 00000001
eax in: 0x00000005, eax = 00000040 ebx = 00000040 ecx = 00000003 edx = 00000010
eax in: 0x00000006, eax = 00000001 ebx = 00000002 ecx = 00000001 edx = 00000000
eax in: 0x00000007, eax = 00000000 ebx = 00000000 ecx = 00000000 edx = 00000000
eax in: 0x00000008, eax = 00000000 ebx = 00000000 ecx = 00000000 edx = 00000000
eax in: 0x00000009, eax = 00000000 ebx = 00000000 ecx = 00000000 edx = 00000000
eax in: 0x0000000a, eax = 07280203 ebx = 00000000 ecx = 00000000 edx = 00000503
eax in: 0x80000000, eax = 80000008 ebx = 00000000 ecx = 00000000 edx = 00000000
eax in: 0x80000001, eax = 00000000 ebx = 00000000 ecx = 00000001 edx = 20100800
eax in: 0x80000002, eax = 20202020 ebx = 20202020 ecx = 746e4920 edx = 52286c65
eax in: 0x80000003, eax = 74412029 ebx = 54286d6f ecx = 4320294d edx = 44205550
eax in: 0x80000004, eax = 20303135 ebx = 20402020 ecx = 36362e31 edx = 007a4847
eax in: 0x80000005, eax = 00000000 ebx = 00000000 ecx = 00000000 edx = 00000000
eax in: 0x80000006, eax = 00000000 ebx = 00000000 ecx = 02006040 edx = 00000000
eax in: 0x80000007, eax = 00000000 ebx = 00000000 ecx = 00000000 edx = 00000000
eax in: 0x80000008, eax = 00003024 ebx = 00000000 ecx = 00000000 edx = 00000000
....
..
To see all information, type:
# x86info -a

cpuid

cpuid dumps detailed information about the CPU(s) gathered from the CPUID instruction, and also determines the exact model of CPU(s) from that information. It dumps all information available from the CPUID instruction. The exact collection of information available varies between manufacturers and processors. The following information is available consistently on all modern CPUs:
  1. vendor_id
  2. version information (1/eax)
  3. miscellaneous (1/ebx)
  4. feature information (1/ecx)

Install cpuid on Debian / Ubuntu Linux

$ sudo apt-get install cpuid

Install cpuid on Fedora Linux

$ sudo dnf install cpuid

Install cpuid on RHEL/SL/CentOS Linux

$ sudo yum install cpuid

Examples

Simply type the following command (this command provides lots of useful information including list of all features in human readable format):
# cpuid
# cpuid | less
# cpuid | grep 'something'

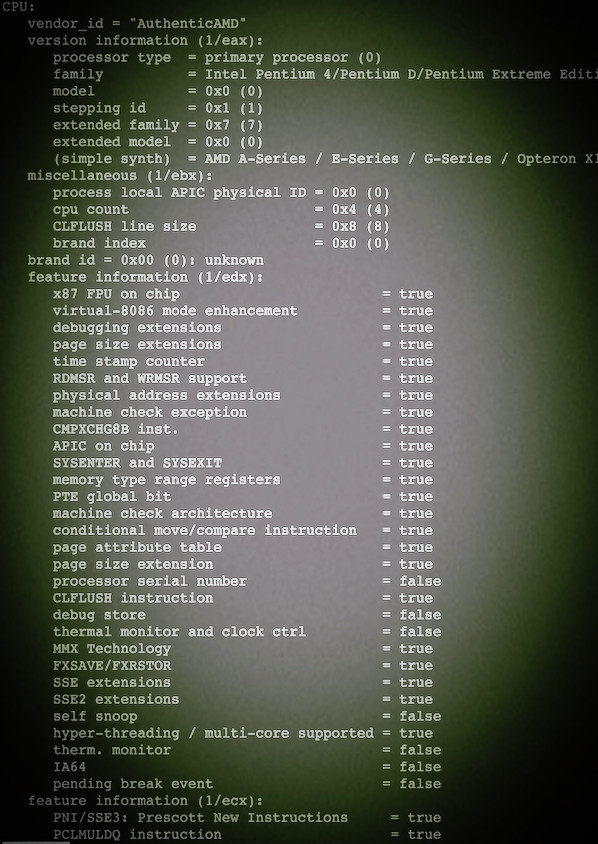
Sample outputs:
Fig.02: Linux cpuid Command To Dump CPUID information

Display information only for the first CPU

# cpuinfo -1

Use the CPUID instruction (default and very reliable)

# cpuinfo -i

Use the CPUID kernel module (not seems to be reliable on all combinations of CPU type and kernel version)

# cpuinfo -k

Search for specific CPU feature

## Is virtualization supported (see below for flags)? ##
# cpuid -1 | egrep --color -iw 'vmx|svm|ept|vpid|npt|tpr_shadow|vnmi|flexpriority'
VMX: virtual machine extensions = true
## Is advanced encryption supported? ##
# cpuid -1 | egrep --color -i 'aes|aes-ni'
AES instruction = true

Some important flags for sysadmins on Linux based system:
  1. vmx – Intel VT-x, basic virtualization.
  2. svm – AMD SVM, basic virtualization.
  3. ept – Extended Page Tables, an Intel feature to make emulation of guest page tables faster.
  4. vpid – VPID, an Intel feature to make expensive TLB flushes unnecessary when context switching between guests.
  5. npt – AMD Nested Page Tables, similar to EPT.
  6. tpr_shadow and flexpriority – Intel feature that reduces calls into the hypervisor when accessing the Task Priority Register, which helps when running certain types of SMP guests.
  7. vnmi – Intel Virtual NMI feature which helps with certain sorts of interrupt events in guests.

Display information only for the first CPU

# cpuinfo -1
Here is complete information about one of cpu:
CPU:
   vendor_id = "GenuineIntel"
   version information (1/eax):
      processor type  = primary processor (0)
      family          = Intel Pentium Pro/II/III/Celeron/Core/Core 2/Atom, AMD Athlon/Duron, Cyrix M2, VIA C3 (6)
      model           = 0xd (13)
      stepping id     = 0x7 (7)
      extended family = 0x0 (0)
      extended model  = 0x2 (2)
      (simple synth)  = Intel Core i7-3800/3900 (Sandy Bridge-E C2) / Xeon E5-1600/2600 (Sandy Bridge-E C2/M1), 32nm
   miscellaneous (1/ebx):
      process local APIC physical ID = 0x3 (3)
      cpu count                      = 0x20 (32)
      CLFLUSH line size              = 0x8 (8)
      brand index                    = 0x0 (0)
   brand id = 0x00 (0): unknown
   feature information (1/edx):
      x87 FPU on chip                        = true
      virtual-8086 mode enhancement          = true
      debugging extensions                   = true
      page size extensions                   = true
      time stamp counter                     = true
      RDMSR and WRMSR support                = true
      physical address extensions            = true
      machine check exception                = true
      CMPXCHG8B inst.                        = true
      APIC on chip                           = true
      SYSENTER and SYSEXIT                   = true
      memory type range registers            = true
      PTE global bit                         = true
      machine check architecture             = true
      conditional move/compare instruction   = true
      page attribute table                   = true
      page size extension                    = true
      processor serial number                = false
      CLFLUSH instruction                    = true
      debug store                            = true
      thermal monitor and clock ctrl         = true
      MMX Technology                         = true
      FXSAVE/FXRSTOR                         = true
      SSE extensions                         = true
      SSE2 extensions                        = true
      self snoop                             = true
      hyper-threading / multi-core supported = true
      therm. monitor                         = true
      IA64                                   = false
      pending break event                    = true
   feature information (1/ecx):
      PNI/SSE3: Prescott New Instructions     = true
      PCLMULDQ instruction                    = true
      64-bit debug store                      = true
      MONITOR/MWAIT                           = true
      CPL-qualified debug store               = true
      VMX: virtual machine extensions         = true
      SMX: safer mode extensions              = true
      Enhanced Intel SpeedStep Technology     = true
      thermal monitor 2                       = true
      SSSE3 extensions                        = true
      context ID: adaptive or shared L1 data  = false
      FMA instruction                         = false
      CMPXCHG16B instruction                  = true
      xTPR disable                            = true
      perfmon and debug                       = true
      process context identifiers             = true
      direct cache access                     = true
      SSE4.1 extensions                       = true
      SSE4.2 extensions                       = true
      extended xAPIC support                  = true
      MOVBE instruction                       = false
      POPCNT instruction                      = true
      time stamp counter deadline             = true
      AES instruction                         = true
      XSAVE/XSTOR states                      = true
      OS-enabled XSAVE/XSTOR                  = true
      AVX: advanced vector extensions         = true
      F16C half-precision convert instruction = false
      RDRAND instruction                      = false
      hypervisor guest status                 = false
   cache and TLB information (2):
      0x5a: data TLB: 2M/4M pages, 4-way, 32 entries
      0x03: data TLB: 4K pages, 4-way, 64 entries
      0x76: instruction TLB: 2M/4M pages, fully, 8 entries
      0xff: cache data is in CPUID 4
      0xb2: instruction TLB: 4K, 4-way, 64 entries
      0xf0: 64 byte prefetching
      0xca: L2 TLB: 4K, 4-way, 512 entries
   processor serial number: 0002-06D7-0000-0000-0000-0000
   deterministic cache parameters (4):
      --- cache 0 ---
      cache type                           = data cache (1)
      cache level                          = 0x1 (1)
      self-initializing cache level        = true
      fully associative cache              = false
      extra threads sharing this cache     = 0x1 (1)
      extra processor cores on this die    = 0xf (15)
      system coherency line size           = 0x3f (63)
      physical line partitions             = 0x0 (0)
      ways of associativity                = 0x7 (7)
      WBINVD/INVD behavior on lower caches = false
      inclusive to lower caches            = false
      complex cache indexing               = false
      number of sets - 1 (s)               = 63
      --- cache 1 ---
      cache type                           = instruction cache (2)
      cache level                          = 0x1 (1)
      self-initializing cache level        = true
      fully associative cache              = false
      extra threads sharing this cache     = 0x1 (1)
      extra processor cores on this die    = 0xf (15)
      system coherency line size           = 0x3f (63)
      physical line partitions             = 0x0 (0)
      ways of associativity                = 0x7 (7)
      WBINVD/INVD behavior on lower caches = false
      inclusive to lower caches            = false
      complex cache indexing               = false
      number of sets - 1 (s)               = 63
      --- cache 2 ---
      cache type                           = unified cache (3)
      cache level                          = 0x2 (2)
      self-initializing cache level        = true
      fully associative cache              = false
      extra threads sharing this cache     = 0x1 (1)
      extra processor cores on this die    = 0xf (15)
      system coherency line size           = 0x3f (63)
      physical line partitions             = 0x0 (0)
      ways of associativity                = 0x7 (7)
      WBINVD/INVD behavior on lower caches = false
      inclusive to lower caches            = false
      complex cache indexing               = false
      number of sets - 1 (s)               = 511
      --- cache 3 ---
      cache type                           = unified cache (3)
      cache level                          = 0x3 (3)
      self-initializing cache level        = true
      fully associative cache              = false
      extra threads sharing this cache     = 0x1f (31)
      extra processor cores on this die    = 0xf (15)
      system coherency line size           = 0x3f (63)
      physical line partitions             = 0x0 (0)
      ways of associativity                = 0x13 (19)
      WBINVD/INVD behavior on lower caches = false
      inclusive to lower caches            = true
      complex cache indexing               = true
      number of sets - 1 (s)               = 16383
   MONITOR/MWAIT (5):
      smallest monitor-line size (bytes)       = 0x40 (64)
      largest monitor-line size (bytes)        = 0x40 (64)
      enum of Monitor-MWAIT exts supported     = true
      supports intrs as break-event for MWAIT  = true
      number of C0 sub C-states using MWAIT    = 0x0 (0)
      number of C1 sub C-states using MWAIT    = 0x2 (2)
      number of C2 sub C-states using MWAIT    = 0x1 (1)
      number of C3 sub C-states using MWAIT    = 0x1 (1)
      number of C4 sub C-states using MWAIT    = 0x2 (2)
      number of C5 sub C-states using MWAIT    = 0x0 (0)
      number of C6 sub C-states using MWAIT    = 0x0 (0)
      number of C7 sub C-states using MWAIT    = 0x0 (0)
   Thermal and Power Management Features (6):
      digital thermometer                     = true
      Intel Turbo Boost Technology            = false
      ARAT always running APIC timer          = true
      PLN power limit notification            = true
      ECMD extended clock modulation duty     = true
      PTM package thermal management          = true
      digital thermometer thresholds          = 0x2 (2)
      ACNT/MCNT supported performance measure = true
      ACNT2 available                         = false
      performance-energy bias capability      = true
   extended feature flags (7):
      FSGSBASE instructions                    = false
      IA32_TSC_ADJUST MSR supported            = false
      BMI instruction                          = false
      HLE hardware lock elision                = false
      AVX2: advanced vector extensions 2       = false
      SMEP supervisor mode exec protection     = false
      BMI2 instructions                        = false
      enhanced REP MOVSB/STOSB                 = false
      INVPCID instruction                      = false
      RTM: restricted transactional memory     = false
      QM: quality of service monitoring        = false
      deprecated FPU CS/DS                     = false
      intel memory protection extensions       = false
      AVX512F: AVX-512 foundation instructions = false
      RDSEED instruction                       = false
      ADX instructions                         = false
      SMAP: supervisor mode access prevention  = false
      Intel processor trace                    = false
      AVX512PF: prefetch instructions          = false
      AVX512ER: exponent & reciprocal instrs   = false
      AVX512CD: conflict detection instrs      = false
      SHA instructions                         = false
      PREFETCHWT1                              = false
   Direct Cache Access Parameters (9):
      PLATFORM_DCA_CAP MSR bits = 1
   Architecture Performance Monitoring Features (0xa/eax):
      version ID                               = 0x3 (3)
      number of counters per logical processor = 0x4 (4)
      bit width of counter                     = 0x30 (48)
      length of EBX bit vector                 = 0x7 (7)
   Architecture Performance Monitoring Features (0xa/ebx):
      core cycle event not available           = false
      instruction retired event not available  = false
      reference cycles event not available     = false
      last-level cache ref event not available = false
      last-level cache miss event not avail    = false
      branch inst retired event not available  = false
      branch mispred retired event not avail   = false
   Architecture Performance Monitoring Features (0xa/edx):
      number of fixed counters    = 0x3 (3)
      bit width of fixed counters = 0x30 (48)
   x2APIC features / processor topology (0xb):
      --- level 0 (thread) ---
      bits to shift APIC ID to get next = 0x1 (1)
      logical processors at this level  = 0x2 (2)
      level number                      = 0x0 (0)
      level type                        = thread (1)
      extended APIC ID                  = 3
      --- level 1 (core) ---
      bits to shift APIC ID to get next = 0x5 (5)
      logical processors at this level  = 0x10 (16)
      level number                      = 0x1 (1)
      level type                        = core (2)
      extended APIC ID                  = 3
   XSAVE features (0xd/0):
      XCR0 lower 32 bits valid bit field mask = 0x00000007
      bytes required by fields in XCR0        = 0x00000340 (832)
      bytes required by XSAVE/XRSTOR area     = 0x00000340 (832)
      XCR0 upper 32 bits valid bit field mask = 0x00000000
   YMM features (0xd/2):
      YMM save state byte size                = 0x00000100 (256)
      YMM save state byte offset              = 0x00000240 (576)
   LWP features (0xd/0x3e):
      LWP save state byte size                = 0x00000000 (0)
      LWP save state byte offset              = 0x00000000 (0)
   extended feature flags (0x80000001/edx):
      SYSCALL and SYSRET instructions        = true
      execution disable                      = true
      1-GB large page support                = true
      RDTSCP                                 = true
      64-bit extensions technology available = true
   Intel feature flags (0x80000001/ecx):
      LAHF/SAHF supported in 64-bit mode     = true
      LZCNT advanced bit manipulation        = false
      3DNow! PREFETCH/PREFETCHW instructions = false
   brand = "       Intel(R) Xeon(R) CPU E5-2650 0 @ 2.00GHz"
   L1 TLB/cache information: 2M/4M pages & L1 TLB (0x80000005/eax):
      instruction # entries     = 0x0 (0)
      instruction associativity = 0x0 (0)
      data # entries            = 0x0 (0)
      data associativity        = 0x0 (0)
   L1 TLB/cache information: 4K pages & L1 TLB (0x80000005/ebx):
      instruction # entries     = 0x0 (0)
      instruction associativity = 0x0 (0)
      data # entries            = 0x0 (0)
      data associativity        = 0x0 (0)
   L1 data cache information (0x80000005/ecx):
      line size (bytes) = 0x0 (0)
      lines per tag     = 0x0 (0)
      associativity     = 0x0 (0)
      size (Kb)         = 0x0 (0)
   L1 instruction cache information (0x80000005/edx):
      line size (bytes) = 0x0 (0)
      lines per tag     = 0x0 (0)
      associativity     = 0x0 (0)
      size (Kb)         = 0x0 (0)
   L2 TLB/cache information: 2M/4M pages & L2 TLB (0x80000006/eax):
      instruction # entries     = 0x0 (0)
      instruction associativity = L2 off (0)
      data # entries            = 0x0 (0)
      data associativity        = L2 off (0)
   L2 TLB/cache information: 4K pages & L2 TLB (0x80000006/ebx):
      instruction # entries     = 0x0 (0)
      instruction associativity = L2 off (0)
      data # entries            = 0x0 (0)
      data associativity        = L2 off (0)
   L2 unified cache information (0x80000006/ecx):
      line size (bytes) = 0x40 (64)
      lines per tag     = 0x0 (0)
      associativity     = 8-way (6)
      size (Kb)         = 0x100 (256)
   L3 cache information (0x80000006/edx):
      line size (bytes)     = 0x0 (0)
      lines per tag         = 0x0 (0)
      associativity         = L2 off (0)
      size (in 512Kb units) = 0x0 (0)
   Advanced Power Management Features (0x80000007/edx):
      temperature sensing diode      = false
      frequency ID (FID) control     = false
      voltage ID (VID) control       = false
      thermal trip (TTP)             = false
      thermal monitor (TM)           = false
      software thermal control (STC) = false
      100 MHz multiplier control     = false
      hardware P-State control       = false
      TscInvariant                   = true
   Physical Address and Linear Address Size (0x80000008/eax):
      maximum physical address bits         = 0x2e (46)
      maximum linear (virtual) address bits = 0x30 (48)
      maximum guest physical address bits   = 0x0 (0)
   Logical CPU cores (0x80000008/ecx):
      number of CPU cores - 1 = 0x0 (0)
      ApicIdCoreIdSize        = 0x0 (0)
   (multi-processing synth): multi-core (c=8), hyper-threaded (t=2)
   (multi-processing method): Intel leaf 0xb
   (APIC widths synth): CORE_width=5 SMT_width=1
   (APIC synth): PKG_ID=0 CORE_ID=1 SMT_ID=1
   (synth) = Intel Xeon E5-1600/2600 (Sandy Bridge-E C2/M1), 32nm

lscpu command example

You will get information about your CPU Architecture on Linux:
$ lscpu
Sample outputs:
Architecture:          x86_64
CPU op-mode(s):        32-bit, 64-bit
Byte Order:            Little Endian
CPU(s):                32
On-line CPU(s) list:   0-31
Thread(s) per core:    2
Core(s) per socket:    8
Socket(s):             2
NUMA node(s):          2
Vendor ID:             GenuineIntel
CPU family:            6
Model:                 45
Stepping:              7
CPU MHz:               2000.063
BogoMIPS:              4001.39
Virtualization:        VT-x
L1d cache:             32K
L1i cache:             32K
L2 cache:              256K
L3 cache:              20480K
NUMA node0 CPU(s):     0-7,16-23
NUMA node1 CPU(s):     8-15,24-31
Of course you can also extract information from /proc/cpuinfo and /dev/cpu/* files:
$ less /proc/cpuinfo

How to back up and restore file permissions on Linux

http://ask.xmodulo.com/backup-restore-file-permissions-linux.html

Question: I want to back up the file permissions of the local filesystem, so that if I accidentally mess up the file permissions, I can restore them to the original state. Is there an easy way to back up and restore file permissions on Linux?
You may have heard of a tragic mistake of a rookie sysadmin who accidentally typed "chmod -R 777 /" and wreaked havoc to his/her Linux system. Sure, there are backup tools (e.g., cp, rsync, etckeeper) which can back up files along with their file permissions. If you are using such backup tools, no worries about corrupted file permissions.
But there are cases where you want to temporarily back up file permissions alone (not files themselves). For example, you want to prevent the content of some directory from being overwritten, so you temporarily remove write permission on all the files under the directory. Or you are in the middle of troubleshooting file permission issues, so running chmod on files here and there. In these cases, it will be nice to be able to back up the original file permissions before the change, so that you can recover the original file permissions later when needed. In many cases, full file backup is an overkill when all you really want is to back up file permissions.
On Linux, it is actually straightforward to back up and restore file permissions using access control list (ACL). The ACL defines access permissions on individual files by different owners and groups on a POSIX-compliant filesystem.
Here is how to back up and restore file permissions on Linux using ACL tools.
First of all, make sure that you have ACL tools installed.
On Debian, Ubuntu or Linux Mint:
$ sudo apt-get install acl
On CentOS, Fedora or RHEL:
$ sudo yum install acl
To back up the file permissions of all the files in the current directory (and all its sub directories recursively), run the following command.
$ getfacl -R . > permissions.txt
This command will export ACL information of all the files into a text file named permissions.txt.

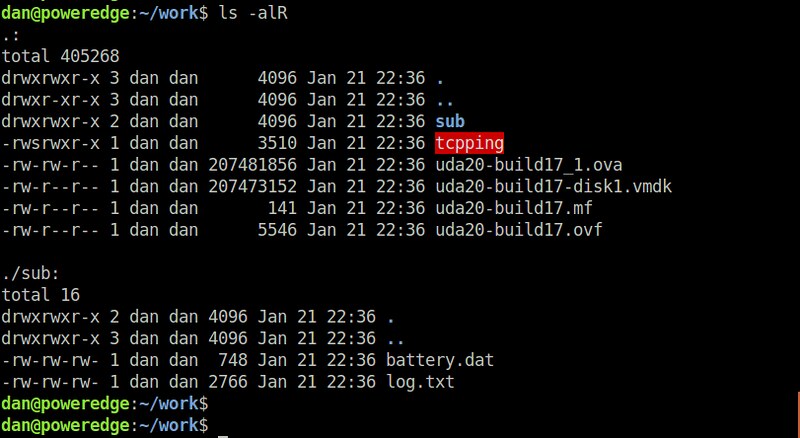
For example, the following is a snippet of permissions.txt generated from the directory shown in the screenshot.
# file: .
# owner: dan
# group: dan
user::rwx
group::rwx
other::r-x

# file: tcpping
# owner: dan
# group: dan
# flags: s--
user::rwx
group::rwx
other::r-x

# file: uda20-build17_1.ova
# owner: dan
# group: dan
user::rw-
group::rw-
other::r--
Now go ahead and change the file permissions as you want. For example:
$ chmod -R a-w .
To restore the original file permissions, go to the directory where permissions.txt was generated, and simply run:
$ setfacl --restore=permissions.txt
Verify that the original file permissions have been restored.
Download this article as ad-free PDF (made possible by your kind donation):  Download PDF

Find Out If Patch Number ( CVE ) Has Been Applied To RHEL / CentOS Linux

http://www.cyberciti.biz/faq/linux-find-out-patch-can-cve-applied

I know how to update my system using the yum command. But, how can I find out that patch has been applied to a package? How do I search CVE patch number applied to a package under a Red Hat Enterprise Linux/CentOS/RHEL/Fedora Linux based system?

You need to use the rpm command. Each rpm package stores information about patches including date, small description and CVE number. You can use the -q query option to display change information for the package.

rpm –changelog option

Use the command as follows:
rpm -q --changelog {package-name}
rpm -q --changelog {package-name} | more
rpm -q --changelog {package-name} | grep CVE-NUMBER

For example find out if CVE-2008-1927 has been applied to perl package or not, enter:
# rpm -q --changelog perl|grep CVE-2008-1927
Sample output:
- CVE-2008-1927 perl: double free on regular expressions with utf8 characters
List all applied patches for php, enter:
# rpm -q --changelog php
OR
# rpm -q --changelog php | more
Sample output:
* Tue Jun 03 2008 Joe Orton  5.1.6-20.el5_2.1
- add security fixes for CVE-2007-5898, CVE-2007-4782, CVE-2007-5899,
  CVE-2008-2051, CVE-2008-2107, CVE-2008-2108 (#445923)
 
* Tue Jan 15 2008 Joe Orton  5.1.6-20.el5
- use magic.mime provided by file (#240845)
- fix possible crash with setlocale() (#428675)
 
* Thu Jan 10 2008 Joe Orton  5.1.6-19.el5
- ext/date: fix test cases for recent timezone values (#266441)
 
* Thu Jan 10 2008 Joe Orton  5.1.6-18.el5
- ext/date: updates for system tzdata support (#266441)
 
* Wed Jan 09 2008 Joe Orton  5.1.6-17.el5
- ext/date: use system timezone database (#266441)
 
* Tue Jan 08 2008 Joe Orton  5.1.6-16.el5
- add dbase extension in -common (#161639)
- add /usr/share/php to builtin include_path (#238455)
- ext/ldap: enable ldap_sasl_bind (#336221)
- ext/libxml: reset stream context (#298031)
.........
...
....
* Fri May 16 2003 Joe Orton  4.3.1-3
- link odbc module correctly
- patch so that php -n doesn't scan inidir
- run tests using php -n, avoid loading system modules
 
* Wed May 14 2003 Joe Orton  4.3.1-2
- workaround broken parser produced by bison-1.875
 
* Tue May 06 2003 Joe Orton  4.3.1-1
- update to 4.3.1; run test suite
- open extension modules with RTLD_NOW rather than _LAZY

How do I find CVE for a rpm file itself?

Above command will query installed package only. To query rpm file, enter:
$ rpm -qp --changelog rsnapshot-1.3.0-1.noarch.rpm | more
Further readings:
  • rpm command man page: rpm(8)

4 open source tools for Linux system monitoring

https://opensource.com/life/16/2/open-source-tools-system-monitoring

Linux system monitoring tools
Image by : 
opensource.com
Information is the key to resolving any computer problem, including problems with or relating to Linux and the hardware on which it runs. There are many tools available for and included with most distributions even though they are not all installed by default. These tools can be used to obtain huge amounts of information.
This article discusses some of the interactive command line interface (CLI) tools that are provided with or which can be easily installed on Red Hat related distributions including Red Hat Enterprise Linux, Fedora, CentOS, and other derivative distributions. Although there are GUI tools available and they offer good information, the CLI tools provide all of the same information and they are always usable because many servers do not have a GUI interface but all Linux systems have a command line interface.
This article concentrates on the tools that I typically use. If I did not cover your favorite tool, please forgive me and let us all know what tools you use and why in the comments section.
My go to tools for problem determination in a Linux environment are almost always the system monitoring tools. For me, these are top, atop, htop, and glances.
All of these tools monitor CPU and memory usage, and most of them list information about running processes at the very least. Some monitor other aspects of a Linux system as well. All provide near real-time views of system activity.

Load averages

Before I go on to discuss the monitoring tools, it is important to discuss load averages in more detail.
Load averages are an important criteria for measuring CPU usage, but what does this really mean when I say that the 1 (or 5 or 10) minute load average is 4.04, for example? Load average can be considered a measure of demand for the CPU; it is a number that represents the average number of instructions waiting for CPU time. So this is a true measure of CPU performance, unlike the standard "CPU percentage" which includes I/O wait times during which the CPU is not really working.
For example, a fully utilized single processor system CPU would have a load average of 1. This means that the CPU is keeping up exactly with the demand; in other words it has perfect utilization. A load average of less than one means that the CPU is underutilized and a load average of greater than 1 means that the CPU is overutilized and that there is pent-up, unsatisfied demand. For example, a load average of 1.5 in a single CPU system indicates that one-third of the CPU instructions are forced to wait to be executed until the one preceding it has completed.
This is also true for multiple processors. If a 4 CPU system has a load average of 4 then it has perfect utilization. If it has a load average of 3.24, for example, then three of its processors are fully utilized and one is utilized at about 76%. In the example above, a 4 CPU system has a 1 minute load average of 4.04 meaning that there is no remaining capacity among the 4 CPUs and a few instructions are forced to wait. A perfectly utilized 4 CPU system would show a load average of 4.00 so that the system in the example is fully loaded but not overloaded.
The optimum condition for load average is for it to equal the total number of CPUs in a system. That would mean that every CPU is fully utilized and yet no instruction must be forced to wait. The longer-term load averages provide indication of the overall utilization trend.
Linux Journal has an excellent article describing load averages, the theory and the math behind them, and how to interpret them in the December 1, 2006 issue.

Signals

All of the monitors discussed here allow you to send signals to running processes. Each of these signals has a specific function though some of them can be defined by the receiving program using signal handlers.
The separate kill command can also be used to send signals to processes outside of the monitors. The kill -l can be used to list all possible signals that can be sent. Three of these signals can be used to kill a process.
  • SIGTERM (15): Signal 15, SIGTERM is the default signal sent by top and the other monitors when the k key is pressed. It may also be the least effective because the program must have a signal handler built into it. The program's signal handler must intercept incoming signals and act accordingly. So for scripts, most of which do not have signal handlers, SIGTERM is ignored. The idea behind SIGTERM is that by simply telling the program that you want it to terminate itself, it will take advantage of that and clean up things like open files and then terminate itself in a controlled and nice manner.
  • SIGKILL (9): Signal 9, SIGKILL provides a means of killing even the most recalcitrant programs, including scripts and other programs that have no signal handlers. For scripts and other programs with no signal handler, however, it not only kills the running script but it also kills the shell session in which the script is running; this may not be the behavior that you want. If you want to kill a process and you don't care about being nice, this is the signal you want. This signal cannot be intercepted by a signal handler in the program code.
  • SIGINT (2): Signal 2, SIGINT can be used when SIGTERM does not work and you want the program to die a little more nicely, for example, without killing the shell session in which it is running. SIGINT sends an interrupt to the session in which the program is running. This is equivalent to terminating a running program, particularly a script, with the Ctrl-C key combination.
To experiment with this, open a terminal session and create a file in /tmp named cpuHog and make it executable with the permissions rwxr_xr_x. Add the following content to the file.
#!/bin/bash
# This little program is a cpu hog
X=0;while [ 1 ];do echo $X;X=$((X+1));done
Open another terminal session in a different window, position them adjacent to each other so you can watch the results and run top in the new session. Run the cpuHog program with the following command:
/tmp/cpuHog
This program simply counts up by one and prints the current value of X to STDOUT. And it sucks up CPU cycles. The terminal session in which cpuHog is running should show a very high CPU usage in top. Observe the effect this has on system performance in top. CPU usage should immediately go way up and the load averages should also start to increase over time. If you want, you can open additional terminal sessions and start the cpuHog program in them so that you have multiple instances running.
Determine the PID of the cpuHog program you want to kill. Press the k key and look at the message under the Swap line at the bottom of the summary section. Top asks for the PID of the process you want to kill. Enter that PID and press Enter. Now top asks for the signal number and displays the default of 15. Try each of the signals described here and observe the results.

4 open source tools for Linux system monitoring

top

One of the first tools I use when performing problem determination is top. I like it because it has been around since forever and is always available while the other tools may not be installed.
The top program is a very powerful utility that provides a great deal of information about your running system. This includes data about memory usage, CPU loads, and a list of running processes including the amount of CPU time and memory being utilized by each process. Top displays system information in near real-time, updating (by default) every three seconds. Fractional seconds are allowed by top, although very small values can place a significant load the system. It is also interactive and the data columns to be displayed and the sort column can be modified.
A sample output from the top program is shown in Figure 1 below. The output from top is divided into two sections which are called the "summary" section, which is the top section of the output, and the "process" section which is the lower portion of the output; I will use this terminology for top, atop, htop and glances in the interest of consistency.
The top program has a number of useful interactive commands you can use to manage the display of data and to manipulate individual processes. Use the h command to view a brief help page for the various interactive commands. Be sure to press h twice to see both pages of the help. Use the q command to quit.

Summary section

The summary section of the output from top is an overview of the system status. The first line shows the system uptime and the 1, 5, and 15 minute load averages. In the example below, the load averages are 4.04, 4.17, and 4.06 respectively.
The second line shows the number of processes currently active and the status of each.
The lines containing CPU statistics are shown next. There can be a single line which combines the statistics for all CPUs present in the system, as in the example below, or one line for each CPU; in the case of the computer used for the example, this is a single quad core CPU. Press the 1 key to toggle between the consolidated display of CPU usage and the display of the individual CPUs. The data in these lines is displayed as percentages of the total CPU time available.
These and the other fields for CPU data are described below.
  • us: userspace – Applications and other programs running in user space, i.e., not in the kernel.
  • sy: system calls – Kernel level functions. This does not include CPU time taken by the kernel itself, just the kernel system calls.
  • ni: nice – Processes that are running at a positive nice level.
  • id: idle – Idle time, i.e., time not used by any running process.
  • wa: wait – CPU cycles that are spent waiting for I/O to occur. This is wasted CPU time.
  • hi: hardware interrupts – CPU cycles that are spent dealing with hardware interrupts.
  • si: software interrupts – CPU cycles spent dealing with software-created interrupts such as system calls.
  • st: steal time – The percentage of CPU cycles that a virtual CPU waits for a real CPU while the hypervisor is servicing another virtual processor.
The last two lines in the summary section are memory usage. They show the physical memory usage including both RAM and swap space.
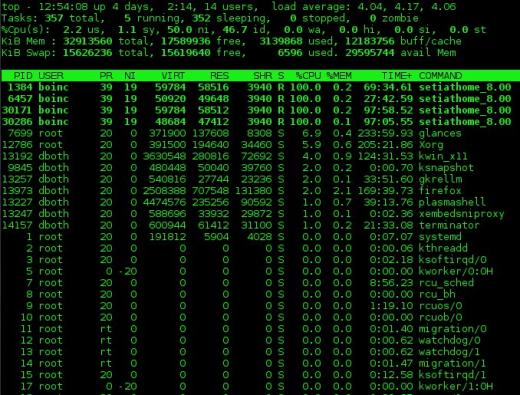
Figure 1: The top command showing a fully utilized 4-core CPU.
You can use the 1 command to display CPU statistics as a single, global number as shown in Figure 1, above, or by individual CPU. The l command turns load averages on and off. The t and m commands rotate the process/CPU and memory lines of the summary section, respectively, through off, text only, and a couple types of bar graph formats.

Process section

The process section of the output from top is a listing of the running processes in the system—at least for the number of processes for which there is room on the terminal display. The default columns displayed by top are described below. Several other columns are available and each can usually be added with a single keystroke. Refer to the top man page for details.
  • PID – The Process ID.
  • USER – The username of the process owner.
  • PR – The priority of the process.
  • NI – The nice number of the process.
  • VIRT – The total amount of virtual memory allocated to the process.
  • RES – Resident size (in kb unless otherwise noted) of non-swapped physical memory consumed by a process.
  • SHR – The amount of shared memory in kb used by the process.
  • S – The status of the process. This can be R for running, S for sleeping, and Z for zombie. Less frequently seen statuses can be T for traced or stopped, and D for uninterruptable sleep.
  • %CPU – The percentage of CPU cycles, or time used by this process during the last measured time period.
  • %MEM – The percentage of physical system memory used by the process.
  • TIME+ – Total CPU time to 100ths of a second consumed by the process since the process was started.
  • COMMAND – This is the command that was used to launch the process.
Use the Page Up and Page Down keys to scroll through the list of running processes. The d or s commands are interchangeable and can be used to set the delay interval between updates. The default is three seconds, but I prefer a one second interval. Interval granularity can be as low as one-tenth (0.1) of a second but this will consume more of the CPU cycles you are trying to measure.
You can use the < and > keys to sequence the sort column to the left or right.
The k command is used to kill a process or the r command to renice it. You have to know the process ID (PID) of the process you want to kill or renice and that information is displayed in the process section of the top display. When killing a process, top asks first for the PID and then for the signal number to use in killing the process. Type them in and press the enter key after each. Start with signal 15, SIGTERM, and if that does not kill the process, use 9, SIGKILL.

Configuration

If you alter the top display, you can use the W (in uppercase) command to write the changes to the configuration file, ~/.toprc in your home directory.

atop

I also like atop. It is an excellent monitor to use when you need more details about that type of I/O activity. The default refresh interval is 10 seconds, but this can be changed using the interval i command to whatever is appropriate for what you are trying to do. atop cannot refresh at sub-second intervals like top can.
Use the h command to display help. Be sure to notice that there are multiple pages of help and you can use the space bar to scroll down to see the rest.
One nice feature of atop is that it can save raw performance data to a file and then play it back later for close inspection. This is handy for tracking down internmittent problems, especially ones that occur during times when you cannot directly monitor the system. The atopsar program is used to play back the data in the saved file.
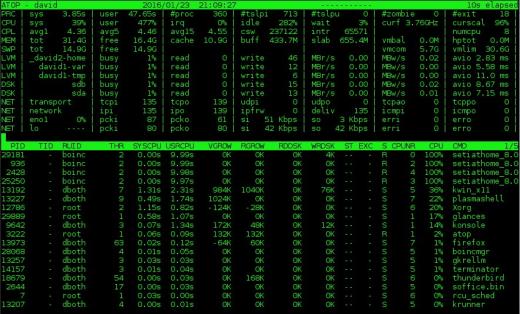
Figure 2: The atop system monitor provides information about disk and network activity in addition to CPU and process data..
Figure 2: The atop system monitor provides information about disk and network activity in addition to CPU and process data.

Summary section

atop contains much of the same information as top but also displays information about network, raw disk, and logical volume activity. Figure 2, above, shows these additional data in the columns at the top of the display. Note that if you have the horizontal screen real-estate to support a wider display, additional columns will be displayed. Conversely, if you have less horizontal width, fewer columns are displayed. I also like that atop displays the current CPU frequency and scaling factor—something I have not seen on any other of these monitors—on the second line in the rightmost two columns in Figure 2.

Process section

The atop process display includes some of the same columns as that for top, but it also includes disk I/O information and thread count for each process as well as virtual and real memory growth statistics for each process. As with the summary section, additional columns will display if there is sufficient horizontal screen real-estate. For example, in Figure 2, the RUID (Real User ID) of the process owner is displayed. Expanding the display will also show the EUID (Effective User ID) which might be important when programs run SUID (Set User ID).
atop can also provide detailed information about disk, memory, network, and scheduling information for each process. Just press the d, m, n or s keys respectively to view that data. The g key returns the display to the generic process display.
Sorting can be accomplished easily by using C to sort by CPU usage, M for memory usage, D for disk usage, N for network usage and A for automatic sorting. Automatic sorting usually sorts processes by the most busy resource. The network usage can only be sorted if the netatop kernel module is installed and loaded.
You can use the k key to kill a process but there is no option to renice a process.
By default, network and disk devices for which no activity occurs during a given time interval are not displayed. This can lead to mistaken assumptions about the hardware configuration of the host. The f command can be used to force atop to display the idle resources.

Configuration

The atop man page refers to global and user level configuration files, but none can be found in my own Fedora or CentOS installations. There is also no command to save a modified configuration and a save does not take place automatically when the program is terminated. So, there appears to be now way to make configuration changes permanent.

htop

The htop program is much like top but on steroids. It does look a lot like top, but it also provides some capabilities that top does not. Unlike atop, however, it does not provide any disk, network, or I/O information of any type.

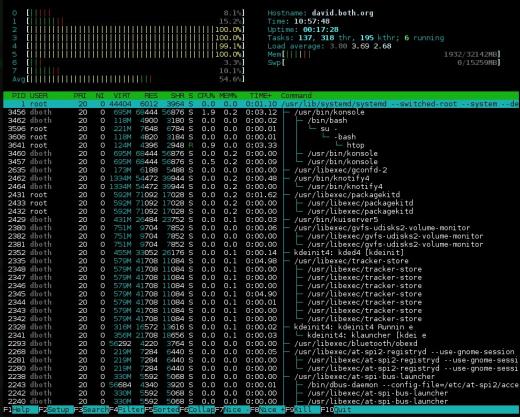
Figure 3: htop has nice bar charts to to indicate resource usage and it can show the process tree.

Summary section

The summary section of htop is displayed in two columns. It is very flexible and can be configured with several different types of information in pretty much any order you like. Although the CPU usage sections of top and atop can be toggled between a combined display and a display that shows one bar graph for each CPU, htop cannot. So it has a number of different options for the CPU display, including a single combined bar, a bar for each CPU, and various combinations in which specific CPUs can be grouped together into a single bar.
I think this is a cleaner summary display than some of the other system monitors and it is easier to read. The drawback to this summary section is that some information is not available in htop that is available in the other monitors, such as CPU percentages by user, idle, and system time.
The F2 (Setup) key is used to configure the summary section of htop. A list of available data displays is shown and you can use function keys to add them to the left or right column and to move them up and down within the selected column.

Process section

The process section of htop is very similar to that of top. As with the other monitors, processes can be sorted any of several factors, including CPU or memory usage, user, or PID. Note that sorting is not possible when the tree view is selected.
The F6 key allows you to select the sort column; it displays a list of the columns available for sorting and you select the column you want and press the Enter key.
You can use the up and down arrow keys to select a process. To kill a process, use the up and down arrow keys to select the target process and press the k key. A list of signals to send the process is displayed with 15, SIGTERM, selected. You can specify the signal to use, if different from SIGTERM. You could also use the F7 and F8 keys to renice the selected process.
One command I especially like is F5 which displays the running processes in a tree format making it easy to determine the parent/child relationships of running processes.

Configuration

Each user has their own configuration file, ~/.config/htop/htoprc and changes to the htop configuration are stored there automatically. There is no global configuration file for htop.

glances

I have just recently learned about glances, which can display more information about your computer than any of the other monitors I am currently familiar with. This includes disk and network I/O, thermal readouts that can display CPU and other hardware temperatures as well as fan speeds, and disk usage by hardware device and logical volume.
The drawback to having all of this information is that glances uses a significant amount of CPU resurces itself. On my systems I find that it can use from about 10% to 18% of CPU cycles. That is a lot so you should consider that impact when you choose your monitor.

Summary section

The summary section of glances contains most of the same information as the summary sections of the other monitors. If you have enough horizontal screen real estate it can show CPU usage with both a bar graph and a numeric indicator, otherwise it will show only the number.
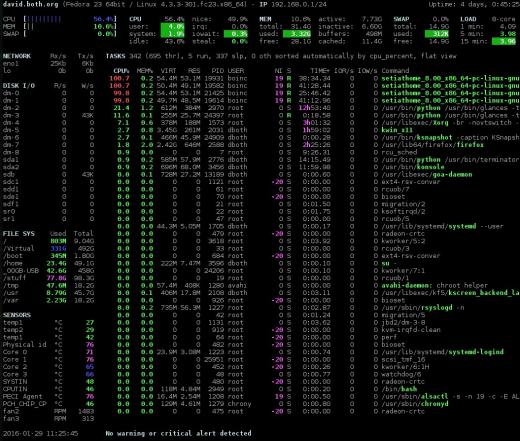
Figure 4: The glances interface with network, disk, filesystem, and sensor information.
I like this summary section better than those of the other monitors; I think it provides the right information in an easily understandable format. As with atop and htop, you can press the 1 key to toggle between a display of the individual CPU cores or a global one with all of the CPU cores as a single average as shown in Figure 4, above.

Process section

The process section displays the standard information about each of the running processes. Processes can be sorted automatically a, or by CPU c, memory m, name p, user u, I/O rate i, or time t. When sorted automatically processes are first sorted by the most used resource.
Glances also shows warnings and critical alerts at the very bottom of the screen, including the time and duration of the event. This can be helpful when attempting to diagnose problems when you cannot stare at the screen for hours at a time. These alert logs can be toggled on or off with the l command, warnings can be cleared with the w command while alerts and warnings can all be cleared with x.
It is interesting that glances is the only one of these monitors that cannot be used to either kill or renice a process. It is intended strictly as a monitor. You can use the external kill and renice commands to manipulate processes.

Sidebar

Glances has a very nice sidebar that displays information that is not available in top or htop. Atop does display some of this data, but glances is the only monitor that displays the sensors data. Sometimes it is nice to see the temperatures inside your computer. The individual modules, disk, filesystem, network, and sensors can be toggled on and off using the d,f, n, and s commands, respectively. The entire sidebar can be toggled using 2.
Docker stats can be displayed with D.

Configuration

Glances does not require a configuration file to work properly. If you choose to have one, the system-wide instance of the configuration file would be located in /etc/glances/glances.conf. Individual users can have a local instance at ~/.config/glances/glances.conf which will override the global configuration. The primary purpose of these configuration files is to set thresholds for warnings and critical alerts. There is no way I can find to make other configuration changes—such as sidebar modules or the CPU displays—permanent. It appears that you must reconfigure those items every time you start glances.
There is a document, /usr/share/doc/glances/glances-doc.html, that provides a great deal of information about using glances, and it explicitly states that you can use the configuration file to configure which modules are displayed. However, neither the information given nor the examples describe just how to do that.

Conclusion

Be sure to read the man pages for each of these monitors because there is a large amount of information about configuring and interacting with them. Also use the h key for help in interactive mode. This help can provide you with information about selecting and sorting the columns of data, setting the update interval and much more.
These programs can tell you a great deal when you are looking for the cause of a problem. They can tell you when a process, and which one, is sucking up CPU time, whether there is enough free memory, whether processes are stalled while waiting for I/O such as disk or network access to complete, and much more.
I strongly recommend that you spend time watching these monitoring programs while they run on a system that is functioning normally so you will be able to differentiate those things that may be abnormal while you are looking for the cause of a problem.
You should also be aware that the act of using these monitoring tools alters the system's use of resources including memory and CPU time. top and most of these monitors use perhaps 2% or 3% of a system's CPU time. glances has much more impact than the others and can use between 10% and 20% of CPU time. Be sure to consider this when choosing your tools.
I had originally intended to include SAR (System Activity Reporter) in this article but as this article grew longer it also became clear to me that SAR is significantly different from these monitoring tools and deserves to have a separate article. So with that in mind, I plan to write an article on SAR and the /proc filesystem, and a third article on how to use all of these tools to locate and resolve problems.

Automount NFS share in Linux using autofs

http://www.linuxtechi.com/automount-nfs-share-in-linux-using-autofs

Autofs is a service in Linux like operating system which automatically mounts the file system and remote shares when it is accessed. Main advantage of autofs is that you don’t need to mount file system at all time, file system is only mounted when it is in demand.
Autofs service reads two files Master map file ( /etc/auto.master ) and a map file like /etc/auto.misc or /etc/auto.xxxx.
In ‘/etc/auto.master’ file we have three different fields :
/        
In map file (/etc/auto.misc or /etc/auto.xxxx) also we have three different fields:
          
In this article we will mount the NFS share using autofs. NFS share ‘/db_backup‘ is exported from Fedora NFS Server (192.168.1.21). We are going to mount this nfs share on CentOS 7 & Ubuntu Linux using autofs.

Steps to mount nfs share using Autofs in CentOS 7.

Step:1 Install autofs package.

Install the autofs package using below yum command if it is not installed.
[root@linuxtechi ~]# rpm -q autofs
package autofs is not installed
[root@linuxtechi ~]# yum install autofs

Step:2 Edit the Master map file (/etc/auto.master )

Add the following line .
[root@linuxtechi ~]# vi /etc/auto.master
/dbstuff  /etc/auto.nfsdb  --timeout=180
Note : Mount point ‘/dbstuff’‘ must exist on your system. If not then create a directory ‘mkdir /dbstuff‘. NFS Share will automatically umount after 180 seconds or 3 minutes if don’t perform any action on the share.

Step:2 Creat a map file ‘/etc/auto.nfsdb’

Create a map file and add the following line.
[root@linuxtechi ~]# vi /etc/auto.nfsdb
db_backup  -fstype=nfs,rw,soft,intr  192.168.1.21:/db_backup
Save and exit the file.
Where :
  • db_backup is a mount point.
  • -fstype=nfs is the file system type & ‘rw,soft,intr’ are mount options.
  • ‘192.168.1.21:/db_backup’ is nfs share location.

Step:3 Start the auotfs service.

[root@linuxtechi ~]# systemctl start autofs.service
[root@linuxtechi ~]# systemctl enable autofs.service
ln -s '/usr/lib/systemd/system/autofs.service' '/etc/systemd/system/multi-user.target.wants/autofs.service'
[root@linuxtechi ~]#

Step:3 Now try to access the mount point.

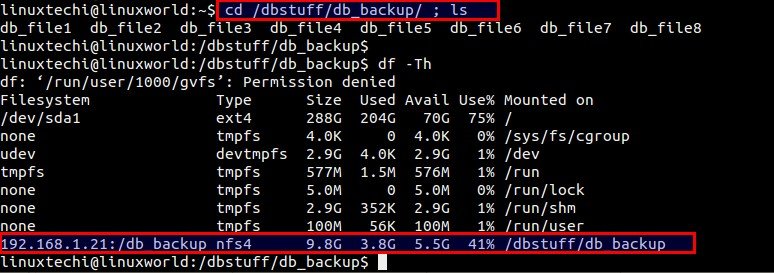
Mount point of nfs share will be ‘/dbstuff/db_backup’. When we try access the mount point then autofs service will mount nfs share automatically.
nfs-mount-autofs

Steps to mount NFS share using autofs in Ubuntu Linux.

Step:1 Install the autofs package using apt-get command.

linuxtechi@linuxworld:~$ sudo apt-get install autofs

Step:2 Edit the Master Map file ‘/etc/auto.master’

Add the following line in the master map file.
linuxtechi@linuxworld:~$ sudo vi /etc/auto.master
/dbstuff   /etc/auto.nfsdb   --timeout=180
Save & exit the file.
Create the mount point.
linuxtechi@linuxworld:~$ sudo mkdir /dbstuff
linuxtechi@linuxworld:~$

Step:2 Create a map file ‘/etc/auto.nfsdb’.

Add the following line in the map file.
linuxtechi@linuxworld:~$ sudo vi /etc/auto.nfsdb
db_backup   -fstype=nfs4,rw,soft,intr   192.168.1.21:/db_backup

Step:3 Start the autofs service.

linuxtechi@linuxworld:~$ sudo /etc/init.d/autofs start

Step:4 Try to access the mount point.

autofs-ubuntu