Thursday, April 30, 2015

Use Geofix to Geotag Photos in digiKam

http://scribblesandsnaps.com/2015/04/24/use-geofix-to-geotag-photos-in-digikam

Geofix is a simple Python script that lets you use an Android device to record the geographical coordinates of your current position. The clever part is that the script stores the obtained latitude and longitude values in the digiKam-compatible format, so you can copy the saved coordinates and use them to geotag photos in digiKam’s Geo-location module.
geofix-web
To deploy Geofix on your Android device, install the SL4A and PythonForAndroid APK packages from the Scripting Layer for Android website. Copy then the geofix.py script to the sl4a/scripts directory on the internal storage of your Android device. Open the SL4A app, and launch the script. For faster access, you can add to the homescreen an SL4A widget that links to the script.
Instead of using SL4A and Python for Android, which are all but abandoned by Google, you can opt for QPython. In this case, you need to use the geofix-qpython.py script. Copy it to the com.hipipal.qpyplus/scripts directory, and use the QPython app to launch the script.
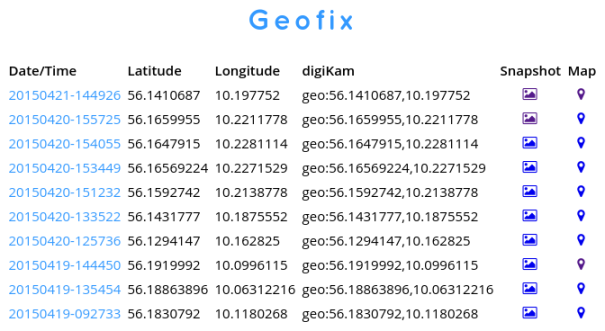
Both scripts save obtained data in the geofix.tsv tab-separated file and the geofix.sqlite database. You can use a spreadsheet application like LibreOffice Calc to open the former, or you can run the supplied web app to display data from the geofix.sqlite database in the browser. To do this, run the main.py script in the geofix-web directory by issuing the ./main.py command in the Terminal.
To geotag photos in digiKam using the data from Geofix, copy the desired coordinates in the digiKam format (e.g., geo:56.1831455,10.1182492). Select the photos you want to geotag and choose Image → Geo-location. Select the photos, right-click on the selection, and choose Paste coordinates.

5 Humanitarian FOSS projects to watch

http://opensource.com/life/15/4/5-more-humanitarian-foss-projects

Humanitarian open source software, outreached hand
Image credits : 
Photo by Jen Wike Huger
A few months ago, we profiled open source projects working to make the world a better place. In this new installment, we present some more humanitarian open source projects to inspire you.

Humanitarian OpenStreetmap Team (HOT)

Maps are vital in crises, and in places where incomplete information costs lives.
Immediately after the Haiti earthquake in 2010, the OpenStreetMap community started tracing streets and roads, place names, and any other data that could be traced from pre-earthquake materials. After the crisis, the project remained engaged throughout the recovery process, training locals and constantly improving data quality.
Whether it is tracking epidemics or improving information in a crisis, the crowdsourcing mappers at HOT are proving invaluable to aid agencies.

Literacy Bridge

Founded by Apache Project veteran Cliff Schmidt, the Literacy Bridge created the Talking Book, a portable device that could play and record audio content.
Designed to survive the rigors of sub-Saharan Africa, these devices have allowed villages to learn about and adopt modern agricultural practices, increase literacy rates, and allow villages and tribes to share their oral history more widely by recording and replaying legends and stories.

Human Rights Data Analysis Group

This project recently made headlines by analyzing the incidences of reported killings by police officers in the United States. By performing statistical analysis on records found after the fall of dictatorial regimes, the organization sheds light on human rights abuses in those countries. Its members are regularly called upon as expert witnesses in war crimes tribunals. Their website claims that they "believe that truth leads to accountability."

Sahana

Founded in the chaos of the 2004 tsunami in Sri Lanka, Sahana was a group of technologists' answer to the question: "What can we do to help?" The goal of the project has remained the same since: how can we leverage community efforts to improve communication and aid in a crisis situation? Sahana provides projects which help reunite children with their families, organize donations effectively, and help authorities understand where aid is most urgently needed.

FrontlineSMS

Where you have no internet, no reliable electricity, no roads, and no fixed line telephones, you can still find mobile phones sending SMS text messages. FrontlineSMS provides a framework to send, receive, and process text messages from a central application using a simple GSM modem or a mobile phone connected through a USB cable. The applications are widespread—central recording and analysis of medical reports from rural villages, community organizing, and gathering data related to sexual exploitation and human trafficking are just a few of the applications which have successfully used FrontlineSMS.
Do you know of other humanitarian free and open source projects? Let us know about them in the comments or send us your story.

Shell Scripting Part I: Getting started with bash scripting

https://www.howtoforge.com/tutorial/linux-shell-scripting-lessons

Hello. This is the first part of a series of Linux tutorials. In writing this tutorial, I assume that you are an absolute beginner in creating Linux scripts and are very much willing to learn. During the series the level will increase, so I am sure there will be something new even for more advanced users. So let's begin.

Introduction

Most of our operating systems including Linux can support different user interfaces (UI). The Graphical User Interface (GUI) is a user-friendly desktop interface that enables users to click icons to run an application. The other type of interface is the Command Line Interface (CLI) which is purely textual and accepts commands from the user. A shell, the command interpreter reads the command through the CLI and invokes the program. Most of the operating systems nowadays, provide both interfaces including Linux distributions.
When using shell, the user has to type in a series of commands at the terminal. No problem if the user has to do the task only once. However, if the task is complex and has to be repeated multiple times, it can get a bit tedious for the user. Luckily, there is a way to automate the tasks of the shell. This can be done by writing and running shell scripts. A shell script is a type of file which is composed of a series and sequence of commands that are supported by the Linux shell.

Why create shell scripts?

The shell script is a very useful tool in automating tasks in Linux OSes. It can also be used to combine utilities and create new commands. You can combine long and repetitive sequences of commands into one simple command. All scripts can be run without the need of compiling it, so the user will have a way of prototyping commands seamlessly.

I am new to Linux environment, can I still learn how to create shell scripts?

Of course! Creating shell scripts does not require complex knowledge of Linux. A basic knowledge of the common commands in the Linux CLI and a text editor will do. If you are an absolute beginner and have no background knowledge in Linux Command Line, you might find this tutorial helpful.

Creating my first shell script

The bash (Bourne-Again Shell) is the default shell in most of the Linux distributions and OS X. It is an open-source GNU project that was intended to replace the sh (Bourne Shell), the original Unix shell. It was developed by Brian Fox and was released in 1989.
You must always remember that each Linux script using bash will start with the following line:
#!/bin/bash
Every Linux script starts with a shebang (#!) line. The bang line specifies the full path /bin/bash of the command interpreter that will be used to run the script.

Hello World!

Every programming language begins with the Hello World! display. We will not end this tradition and create our own version of this dummy output in Linux scripting.
To start creating our script, follow the steps below:
Step 1: Open a text editor. I will use gedit for this example. To open gedit using the terminal, press CTRL + ALT + T on your keyboard and type gedit. Now, we can start writing our script.
Step 2: Type the following command at the text editor:
#!/bin/bash
echo "Hello World"
Step 3: Now, save the document with a file name hello.sh. Note that each script will have a .sh file extension.
Step 4: As for security reasons enforced by Linux distributions, files and scripts are not executable by default. However we can change that for our script using the chmod command in Linux CLI. Close the gedit application and open a terminal. Now type the following command:
chmod +x hello.sh
The line above sets the executable permission to the hello.sh file. This procedure has to be done only once before running the script for the first time.
Step 5: To run the script, type the following command at the terminal:
./hello.sh
Let's have another example. This time, we will incorporate displaying some system information by using the whoami and date commands to our hello script.
Open the hello.sh in our text editor and we will edit our script by typing:
#!/bin/bash
echo "Hello $(whoami) !"
echo "The date today is $(date)"
Save the changes we made in the script and run the script (Step 5 in the previous example) by typing:
./hello.sh
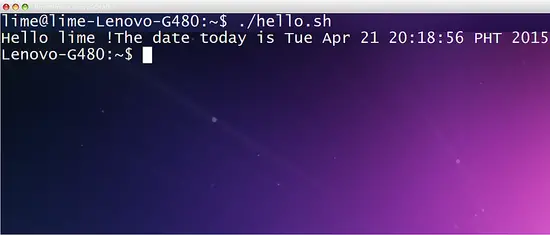
The output of the script will be:

In the previous example, the commands whoami and date were used inside the echo command. This only signifies that all utilities and commands available in the command line can also be used in shell scripts.

Generating output using printf

So far, we have used echo to print strings and data from commands in our previous example. Echo is used to display a line of text. Another commmand that can be used to display data is the printf command. The printf controls and prints data like the printf function in C.
Below is the summary of the common prinf controls:
Control Usage
\" Double quote
\\ Backslash
\b Backspace
\c Produce no further output
\e Escape
\n New Line
\r Carriage Return
\t Horizontal tab
\v Vertical Tab
Example3: We will open the previous hello.sh and change all echo to printf and run the script again. Notice what changes occur in our output.
#!/bin/bash
printf "Hello $(whoami) !"
printf "The date today is $(date)"

All lines are attached to each other because we didn't use any controls in the printf command. Therefore the printf command in Linux has the same properties as the C function printf.
To format the output of our script, we will use two of the controls in the table summary above. In order to work, the controls have to be indicated by a \ inside the quotes of the printf command. For instance, we will edit the previous content of the hello.sh into:
#!/bin/bash
printf "Hello \t $(whoami) !\n"
printf "The date today is $(date)\n"
The script outputs the following:

Conclusion

In this tutorial, you have learned the basics of shell scripting and were able to create and run shell scripts. During the second part of the tutorial I will introduce how to declare variables, accept inputs and perform arithmetic operations using shell commands.

Wednesday, April 29, 2015

Lost your Android phone? Now you can just Google its location

http://thenextweb.com/insider/2015/04/15/lost-your-android-phone-now-you-can-just-google-its-location

Google can help you find almost anything, but it’s no good if you’ve lost your smartphone – until today. The search engine now has the ability to look up your lost device directly from its homepage.
Just type in “Find my phone,” and Google will show where your phone is on a map. You can then set it to ring, should it be lost under piles of laundry or something of the sort.

FindMyPhone 1024x512%2B%25281%2529 Lost your Android phone? Now you can just Google its location
There are some caveats: your phone must have the latest version of Android’s main Google app installed, and your browser must be logged into the same Google account your phone is, but it’s a much simpler way to find your phone than going through the Android Device Manager, which many Android users may not even be aware of.

DevOps: Better Than the Sum of Its Parts

http://www.linuxjournal.com/content/devops-better-sum-its-parts

Most of us longtime system administrators get a little nervous when people start talking about DevOps. It's an IT topic surrounded by a lot of mystery and confusion, much like the term "Cloud Computing" was a few years back. Thankfully, DevOps isn't something sysadmins need to fear. It's not software that allows developers to do the job of the traditional system administrator, but rather it's just a concept making both development and system administration better. Tools like Chef and Puppet (and Salt Stack, Ansible, New Relic and so on) aren't "DevOps", they're just tools that allow IT professionals to adopt a DevOps mindset. Let's start there.

What Is DevOps?

Ask ten people to define DevOps, and you'll likely get 11 different answers. (Those numbers work in binary too, although I suggest a larger sample size.) The problem is that many folks confuse DevOps with DevOps tools. These days, when people ask me, "What is DevOps?", I generally respond: "DevOps isn't a thing, it's a way of doing a thing."
The worlds of system administration and development historically have been very separate. As a sysadmin, I tend to think very differently about computing from how a developer does. For me, things like scalability and redundancy are critical, and my success often is gauged by uptime. If things are running, I'm successful. Developers have a different way of approaching their jobs, and need to consider things like efficiency, stability, security and features. Their success often is measured by usability.
Hopefully, you're thinking the traits I listed are important for both development and system administration. In fact, it's that mindset from which DevOps was born. If we took the best practices from the world of development, and infused them into the processes of operations, it would make system administration more efficient, more reliable and ultimately better. The same is true for developers. If they can begin to "code" their own hardware as part of the development process, they can produce and deploy code more quickly and more efficiently. It's basically the Reese's Peanut Butter Cup of IT. Combining the strengths of both departments creates a result that is better than the sum of its parts.
Once you understand what DevOps really is, it's easy to see how people confuse the tools (Chef, Puppet, New Relic and so on) for DevOps itself. Those tools make it so easy for people to adopt the DevOps mindset, that they become almost synonymous with the concept itself. But don't be seduced by the toys—an organization can shift to a very successful DevOps way of doing things simply by focusing on communication and cross-discipline learning. The tools make it easier, but just like owning a rake doesn't make someone a farmer, wedging DevOps tools into your organization doesn't create a DevOps team for you. That said, just like any farmer appreciates a good rake, any DevOps team will benefit from using the plethora of tools in the DevOps world.

The System Administrator's New Rake

In this article, I want to talk about using DevOps tools as a system administrator. If you're a sysadmin who isn't using a configuration management tool to keep track of your servers, I urge you to check one out. I'm going to talk about Chef, because for my day job, I recently taught a course on how to use it. Since you're basically learning the concepts behind DevOps tools, it doesn't matter that you're focusing on Chef. Kyle Rankin is a big fan of Puppet, and conceptually, it's just another type of rake. If you have a favorite application that isn't Chef, awesome.
If I'm completely honest, I have to admit I was hesitant to learn Chef, because it sounded scary and didn't seem to do anything I wasn't already doing with Bash scripts and cron jobs. Plus, Chef uses the Ruby programming language for its configuration files, and my programming skills peaked with:

10 PRINT "Hello!"
20 GOTO 10
Nevertheless, I had to learn about it so I could teach the class. I can tell you with confidence, it was worth it. Chef requires basically zero programming knowledge. In fact, if no one mentioned that its configuration files were Ruby, I'd just have assumed the syntax for the conf files was specific and unique. Weird config files are nothing new, and honestly, Chef's config files are easy to figure out.

Chef: Its Endless Potential

DevOps is a powerful concept, and as such, Chef can do amazing things. Truly. Using creative "recipes", it's possible to spin up hundreds of servers in the cloud, deploy apps, automatically scale based on need and treat every aspect of computing as if it were just a function to call from simple code. You can run Chef on a local server. You can use the cloud-based service from the Chef company instead of hosting a server. You even can use Chef completely server-less, deploying the code on a single computer in solo mode.
Once it's set up, Chef supports multiple environments of similar infrastructures. You can have a development environment that is completely separate from production, and have the distinction made completely by the version numbers of your configuration files. You can have your configurations function completely platform agnostically, so a recipe to spin up an Apache server will work whether you're using CentOS, Ubuntu, Windows or OS X. Basically, Chef can be the central resource for organizing your entire infrastructure, including hardware, software, networking and even user management.
Thankfully, it doesn't have to do all that. If using Chef meant turning your entire organization on its head, no one would ever adopt it. Chef can be installed small, and if you desire, it can grow to handle more and more in your company. To continue with my farmer analogy, Chef can be a simple garden rake, or it can be a giant diesel combine tractor. And sometimes, you just need a garden rake. That's what you're going to learn today. A simple introduction to the Chef way of doing things, allowing you to build or not build onto it later.

The Bits and Pieces

Initially, this was going to be a multipart article on the specifics of setting up Chef for your environment. I still might do a series like that for Chef or another DevOps configuration automation package, but here I want everyone to understand not only DevOps itself, but what the DevOps tools do. And again, my example will be Chef.
At its heart, Chef functions as a central repository for all your configuration files. Those configuration files also include the ability to carry out functions on servers. If you're a sysadmin, think of it as a central, dynamic /etc directory along with a place all your Bash and Perl scripts are held. See Figure 1 for a visual on how Chef's information flows.
Figure 1. This is the basic Chef setup, showing how data flows.
The Admin Workstation is the computer at which configuration files and scripts are created. In the world of Chef, those are called cookbooks and recipes, but basically, it's the place all the human-work is done. Generally, the local Chef files are kept in a revision control system like Git, so that configurations can be rolled back in the case of a failure. This was my first clue that DevOps might make things better for system administrators, because in the past all my configuration revision control was done by making a copy of a configuration file before editing it, and tacking a .date at the end of the filename. Compared to the code revision tools in the developer's world, that method (or at least my method) is crude at best.
The cookbooks and recipes created on the administrator workstation describe things like what files should be installed on the server nodes, what configurations should look like, what applications should be installed and stuff like that. Chef does an amazing job of being platform-neutral, so if your cookbook installs Apache, it generally can install Apache without you needing to specify what type of system it's installing on. If you've ever been frustrated by Red Hat variants calling Apache "httpd", and Debian variants calling it "apache2", you'll love Chef.
Once you have created the cookbooks and recipes you need to configure your servers, you upload them to the Chef server. You can connect to the Chef server via its Web interface, but very little actual work is done via the Web interface. Most of the configuration is done on the command line of the Admin Workstation. Honestly, that is something a little confusing about Chef that gets a little better with every update. Some things can be modified via the Web page interface, but many things can't. A few things can only be modified on the Web page, but it's not always clear which or why.
With the code, configs and files uploaded to the Chef Server, the attention is turned to the nodes. Before a node is part of the Chef environment, it must be "bootstrapped". The process isn't difficult, but it is required in order to use Chef. The client software is installed on each new node, and then configuration files and commands are pulled from the Chef server. In fact, in order for Chef to function, the nodes must be configured to poll the server periodically for any changes. There is no "push" methodology to send changes or updates to the node, so regular client updates are important. (These are generally performed via cron.)
At this point, it might seem a little silly to have all those extra steps when a simple FOR loop with some SSH commands could accomplish the same tasks from the workstation, and have the advantage of no Chef client installation or periodic polling. And I confess, that was my thought at first too. When programs like Chef really prove their worth, however, is when the number of nodes begins to scale up. Once the admittedly complex setup is created, spinning up a new server is literally a single one-liner to bootstrap a node. Using something like Amazon Web Services, or Vagrant, even the creation of the computers themselves can be part of the Chef process.

To Host or Not to Host

The folks at Chef have made the process of getting a Chef Server instance as simple as signing up for a free account on their cloud infrastructure. They maintain a "Chef Server" that allows you to upload all your code and configs to their server, so you need to worry only about your nodes. They even allow you to connect five of your server nodes for free. If you have a small environment, or if you don't have the resources to host your own Chef Server, it's tempting just to use their pre-configured cloud service. Be warned, however, that it's free only because they hope you'll start to depend on the service and eventually pay for connecting more than those initial five free nodes.
They have an enterprise-based self-hosted solution that moves the Chef Server into your environment like Figure 1 shows. But it's important to realize that Chef is open source, so there is a completely free, and fully functional open-source version of the server you can download and install into your environment as well. You do lose their support, but if you're just starting out with Chef or just playing with it, having the open-source version is a smart way to go.

How to Begin?

The best news about Chef is that incredible resources exist for learning how to use it. On the http://getchef.com Web site, there is a video series outlining a basic setup for installing Apache on your server nodes as an example of the process. Plus, there's great documentation that describes the installation process of the open-source Chef Server, if that's the path you want to try.
Once you're familiar with how Chef works (really, go through the training videos, or find other Chef fundamentals training somewhere), the next step is to check out the vibrant Chef community. There are cookbooks and recipes for just about any situation you can imagine. The cookbooks are just open-source code and configuration files, so you can tweak them to fit your particular needs, but like any downloaded code, it's nice to start with something and tweak it instead of starting from scratch.
DevOps is not a scary new trend invented by developers in order to get rid of pesky system administrators. We're not being replaced by code, and our skills aren't becoming useless. What a DevOps mindset means is that we get to steal the awesome tools developers use to keep their code organized and efficient, while at the same time we can hand off some of the tasks we hate (spinning up test servers for example) to the developers, so they can do their jobs better, and we can focus on more important sysadmin things. Tearing down that wall between development and operations truly makes everyone's job easier, but it requires communication, trust and a few good rakes in order to be successful. Check out a tool like Chef, and see if DevOps can make your job easier and more awesome.

Resources

Chef Fundamentals Video Series: https://learn.getchef.com/fundamentals-series
Chef Documentation: https://docs.getchef.com
Community Cookbooks/Tools: https://supermarket.getchef.com
JavaScript All the Way Down

http://www.linuxjournal.com/content/javascript-all-way-down

There is a well known story about a scientist who gave a talk about the Earth and its place in the solar system. At the end of the talk, a woman refuted him with "That's rubbish; the Earth is really like a flat dish, supported on the back of a turtle." The scientist smiled and asked back "But what's the turtle standing on?", to which the woman, realizing the logical trap, answered, "It's very simple: it's turtles all the way down!" No matter the verity of the anecdote, the identity of the scientist (Bertrand Russell or William James are sometimes mentioned), or even if they were turtles or tortoises, today we may apply a similar solution to Web development, with "JavaScript all the way down".
If you are going to develop a Web site, for client-side development, you could opt for Java applets, ActiveX controls, Adobe Flash animations and, of course, plain JavaScript. On the other hand, for server-side coding, you could go with C# (.Net), Java, Perl, PHP and more, running on servers, such as Apache, Internet Information Server, Nginx, Tomcat and the like. Currently, JavaScript allows you to do away with most of this and use a single programming language, both on the client and the server sides, and with even a JavaScript-based server. This way of working even has produced a totally JavaScript-oriented acronym along the lines of the old LAMP (Linux+Apache+MySQL+PHP) one: MEAN, which stands for MongoDB (a NoSQL database you can access with JavaScript), Express (a Node.js module to structure your server-side code), Angular.JS (Google's Web development framework for client-side code) and Node.js.
In this article, I cover several JavaScript tools for writing, testing and deploying Web applications, so you can consider whether you want to give a twirl to a "JavaScript all the way down" Web stack.

What's in a Name?

JavaScript originally was developed at Netscape in 1995, first under the name Mocha, and then as LiveScript. Soon (after Netscape and Sun got together; nowadays, it's the Mozilla Foundation that manages the language) it was renamed JavaScript to ride the popularity wave, despite having nothing to do with Java. In 1997, it became an industry standard under a fourth name, ECMAScript. The most common current version of JavaScript is 5.1, dated June 2011, and version 6 is on its way. (However, if you want to use the more modern features, but your browser won't support them, take a look at the Traceur compiler, which will back-compile version 6 code to version 5 level.)
Some companies produced supersets of the language, such as Microsoft, which developed JScript (renamed to avoid legal problems) and Adobe, which created ActionScript for use with Flash.
There are several other derivative languages (which actually compile to JavaScript for execution), such as the more concise CoffeeScript, Microsoft's TypeScript or Google's most recent AtScript (JavaScript plus Annotations), which was developed for the Angular.JS project. The asm.js project even uses a JavaScript subset as a target language for efficient compilers for other languages. Those are many different names for a single concept!

Why JavaScript?

Although stacks like LAMP or its Java, Ruby or .Net peers do power many Web applications today, using a single language both for client- and server-side development has several advantages, and companies like Groupon, LinkedIn, Netflix, PayPal and Walmart, among many more, are proof of it.
Modern Web development is split between client-side and server-side (or front-end and back-end) coding, and striving for the best balance is more easily attained if your developers can work both sides with the same ease. Of course, plenty of developers are familiar with all the languages needed for both sides of coding, but in any case, it's quite probable that they will be more productive at one end or the other.
Many tools are available for JavaScript (building, testing, deploying and more), and you'll be able to use them for all components in your system (Figure 1). So, by going with the same single set of tools, your experienced JavaScript developers will be able to play both sides, and you'll have fewer problems getting the needed programmers for your company.
Figure 1. JavaScript can be used everywhere, on the client and the server sides.
Of course, being able to use a single language isn't the single key point. In the "old days" (just a few years ago!), JavaScript lived exclusively in browsers to read and interpret JavaScript source code. (Okay, if you want to be precise, that's not exactly true; Netscape Enterprise Server ran server-side JavaScript code, but it wasn't widely adopted.) About five years ago, when Firefox and Chrome started competing seriously with (by then) the most popular Internet Explorer, new JavaScript engines were developed, separated from the layout engines that actually drew the HTML pages seen on browsers. Given the rising popularity of AJAX-based applications, which required more processing power on the client side, a competition to provide the fastest JavaScript started, and it hasn't stopped yet. With the higher performance achieved, it became possible to use JavaScript more widely (Table 1).

Table 1. The Current Browsers and Their JavaScript Engines

Browser JavaScript Engine
Chrome V8
Firefox SpiderMonkey
Opera Carakan
Safari Nitro
Some of these engines apply advanced techniques to get the most speed and power. For example, V8 compiles JavaScript to native machine code before executing it (this is called JIT, Just In Time compilation, and it's done on the run instead of pre-translating the whole program as is traditional with compilers) and also applies several optimization and caching techniques for even higher throughput. SpiderMonkey includes IonMonkey, which also is capable of compiling JavaScript code to object code, although working in a more traditional way. So, accepting that modern JavaScript engines have enough power to do whatever you may need, let's now start a review of the Web stack with a server that wouldn't have existed if it weren't for that high-level language performance: Node.js.

Node.js: a New Kind of Server

Node.js (or plain Node, as it's usually called) is a Web server, mainly written itself in JavaScript, which uses that language for all scripting. It originally was developed to simplify developing real-time Web sites with push capabilities—so instead of all communications being client-originated, the server might start a connection with a client by itself. Node can work with lots of live connections, because it's very lightweight in terms of requirements. There are two key concepts to Node: it runs a single process (instead of many), and all I/O (database queries, file accesses and so on) is implemented in a non-blocking, asynchronous way.
Let's go a little deeper and further examine the main difference between Node and more traditional servers like Apache. Whenever Apache receives a request, it starts a new, separate thread (process) that uses RAM of its own and CPU processing power. (If too many threads are running, the request may have to wait a bit longer until it can be started.) When the thread produces its answer, the thread is done. The maximum number of possible threads depends on the average RAM requirements for a process; it might be a few thousand at the same time, although numbers vary depending on server size (Figure 2).
Figure 2. Apache and traditional Web servers run a separate thread for each request.
On the other hand, Node runs a single thread. Whenever a request is received, it is processed as soon as it's possible, and it will run continuously until some I/O is required. Then, while the code waits for the I/O results to be available, Node will be able to process other waiting requests (Figure 3). Because all requests are served by a single process, the possible number of running requests rises, and there have been experiments with more than one million concurrent connections—not shabby at all! This shows that an ideal use case for Node is having server processes that are light in CPU processing, but high on I/O. This will allow more requests to run at the same time; CPU-intensive server processes would block all other waiting requests and produce a high drop in output.
Figure 3. Node runs a single thread for all requests.
A great asset of Node is that there are many available modules (an estimate ran in the thousands) that help you get to production more quickly. Though I obviously can't list all of them, you probably should consider some of the modules listed in Table 2.

Table 2. Some widely used Node.js modules that will help your development and operation.

Module Description
async Simplifies asynchronous work, a possible alternative to promises.
cluster Improves concurrency in multicore systems by forking worker processes. (For further scalability, you also could set up a reverse proxy and run several Node.js instances, but that goes beyond the objective of this article.)
connect Works with "middleware" for common tasks, such as error handling, logging, serving static files and more.
ejs, handlebars or jade, EJS Templating engines.
express A minimal Web framework—the E in MEAN.
forever A command-line tool that will keep your server up, restarting if needed after a crash or other problem.
mongoose, cradle, sequelize Database ORM, for MongoDB, CouchDB and for relational databases, such as MySQL and others.
passport Authentication middleware, which can work with OAuth providers, such as Facebook, Twitter, Google and more.
request or superagent HTTP clients, quite useful for interacting with RESTful APIs.
underscore or lodash Tools for functional programming and for extending the JavaScript core objects.
Of course, there are some caveats when using Node.js. An obvious one is that no process should do heavy computations, which would "choke" Node's single processing thread. If such a process is needed, it should be done by an external process (you might want to consider using a message queue for this) so as not to block other requests. Also, care must be taken with error processing. An unhandled exception might cause the whole server to crash eventually, which wouldn't bode well for the server as a whole. On the other hand, having a large community of users and plenty of fully available, production-level, tested code already on hand can save you quite a bit of development time and let you set up a modern, fast server environment.

Planning and Organizing Your Application

When starting out with a new project, you could set up your code from zero and program everything from scratch, but several frameworks can help you with much of the work and provide clear structure and organization to your Web application. Choosing the right framework will have an important impact on your development time, on your testing and on the maintainability of your site. Of course, there is no single answer to the question "What framework is best?", and new frameworks appear almost on a daily basis, so I'm just going with three of the top solutions that are available today: AngularJS, Backbone and Ember. Basically, all of these frameworks are available under permissive licenses and give you a head start on developing modern SPA (single page applications). For the server side, several packages (such as Sails, to give just one example) work with all frameworks.
AngularJS (or Angular.JS or just plain Angular—take your pick) was developed in 2009 by Google, and its current version is 1.3.4, dated November 2014. The framework is based on the idea that declarative programming is best for interfaces (and imperative programming for the business logic), so it extends HTML with custom tag attributes that are used to bind input and output data to a JavaScript model. In this fashion, programmers don't have to manipulate the Web page directly, because it is updated automatically. Angular also focuses on testing, because the difficulty of automatic testing heavily depends upon the code structure. Note that Angular is the A in MEAN, so there are some other frameworks that expand on it, such as MEAN.IO or MEAN.JS.
Backbone is a lighter, leaner framework, dated from 2010, which uses a RESTful JSON interface to update the server side automatically. (Fun fact: Backbone was created by Jeremy Ashkenas, who also developed CoffeeScript; see the "What's in a Name?" sidebar.) In terms of community size, it's second only to Angular, and in code size, it's by far the smallest one. Backbone doesn't include a templating engine of its own, but it works fine with Underscore's templating, and given that this library is included by default, it is a simple choice to make. It's considered to be less "opinionated" than other frameworks and to have a quite shallow learning curve, which means that you'll be able to start working quickly. A deficiency is that Backbone lacks two-way data binding, so you'll have to write code to update the view whenever the model changes and vice versa. Also, you'll probably be manipulating the Web page directly, which will make your code harder to unit test.
Finally, Ember probably is harder to learn than the other frameworks, but it rewards the coder with higher performance. It favors "convention over configuration", which likely will make Ruby on Rails or Symfony users feel right at home. It integrates easily with a RESTful server side, using JSON for communication. Ember includes Handlebars (see Table 2) for templating and provides two-way updates. A negative point is the usage of

How to monitor OpenVZ limits with vzwatchd on Debian and Ubuntu

https://www.howtoforge.com/tutorial/how-to-monitor-openvz-limits-with-vzwatchd-on-debian-and-ubuntu

Vzwatchd is an OpenVZ monitoring daemon that informs the server administrator by email when a limit of the container is reached. OpenVZ is a Linux Kernel virtualisation technology that is often used by Web Hosting services, it is the free core of the commercial virtuozzo virtualisation application. OpenVZ is a lightweight virtualisation which has less overhead then KVM or XEN, it is more like a Linux LXC jail but with advanced limit options to define how many ressources a virtual machine may use and it has support for filesystem quota.
This tutorial explains the installation and configuration of the vzwatchd daemon on Debian and Ubuntu.

1 Does my virtual server use OpenVZ

Have you rented a virtual server from a hosting company without knowing which virtualisation technology it uses? Run the following command to test if it uses OpenVZ:
cat /proc/user_beancounters
If the output is similar to the one below, then your server uses OpenVZ or a compatible technology and you can use vzwatchd to monitor the vserver.
root@www:/# cat /proc/user_beancounters
Version: 2.5
 uid resource held maxheld barrier limit failcnt
 101: kmemsize 190939926 274194432 9223372036854775807 9223372036854775807 0
 lockedpages 0 3211 1048576 1048576 0
 privvmpages 749006 781311 9223372036854775807 9223372036854775807 0
 shmpages 22506 30698 9223372036854775807 9223372036854775807 0
 dummy 0 0 9223372036854775807 9223372036854775807 0
 numproc 237 312 9223372036854775807 9223372036854775807 0
 physpages 486543 804959 0 1048576 0
 vmguarpages 0 0 3145728 9223372036854775807 0
 oomguarpages 233498 242378 1048576 9223372036854775807 0
 numtcpsock 111 298 9223372036854775807 9223372036854775807 0
 numflock 253 294 9223372036854775807 9223372036854775807 0
 numpty 1 12 9223372036854775807 9223372036854775807 0
 numsiginfo 0 33 9223372036854775807 9223372036854775807 0
 tcpsndbuf 7083944 11209000 9223372036854775807 9223372036854775807 0
 tcprcvbuf 3300832 10792248 9223372036854775807 9223372036854775807 0
 othersockbuf 261256 1008400 9223372036854775807 9223372036854775807 0
 dgramrcvbuf 0 5152 9223372036854775807 9223372036854775807 0
 numothersock 166 526 1024 1024 0
 dcachesize 168291899 247843839 9223372036854775807 9223372036854775807 0
 numfile 3098 5205 9223372036854775807 9223372036854775807 0
 dummy 0 0 9223372036854775807 9223372036854775807 0
 dummy 0 0 9223372036854775807 9223372036854775807 0
 dummy 0 0 9223372036854775807 9223372036854775807 0
 numiptent 28 35 9223372036854775807 9223372036854775807 0
The output shows the limits of the virtual machine, each line describes one limit and the column that is watched by vzwatchd is the last column that counts how often a limit has been reached.

2 Install vzwatchd

Vzwatchd is written in Perl, it is downloaded and installed from Perl CPAN archive with the CPAN command.

Installing the prerequisites

I will do the following steps as root user, run sudo -s on Ubuntu to become root:
sudo -s
First I will install the make tool and the nano editor, make is used by CPAN to build vzwatchd and I will use nano later to edit the config file:
apt-get install make nano
Next I will install vzwatchd from CPAN with this command:
cpan -i App::OpenVZ::BCWatch
If this is the first time that you use CPAN on a server, the script will ask you a few questions about the basic CPAN configuration:
Would you like to configure as much as possible automatically? [yes]
Would you like me to automatically choose some CPAN mirror sites for you? (This means connecting to the Internet) [yes]
Answer both questions with "yes".
The installer will now download, compile and install a lot of Perl modules:
root@rz3:~# cpan -i App::OpenVZ::BCWatch

CPAN.pm requires configuration, but most of it can be done automatically.
If you answer 'no' below, you will enter an interactive dialog for each
configuration option instead.

Would you like to configure as much as possible automatically? [yes] yes

Autoconfigured everything but 'urllist'.

Now you need to choose your CPAN mirror sites. You can let me
pick mirrors for you, you can select them from a list or you
can enter them by hand.

Would you like me to automatically choose some CPAN mirror
sites for you? (This means connecting to the Internet) [yes] yes
Trying to fetch a mirror list from the Internet
Fetching with LWP:
http://www.perl.org/CPAN/MIRRORED.BY

Looking for CPAN mirrors near you (please be patient)
.............................. done!

New urllist
 http://www.planet-elektronik.de/CPAN/
 http://cpan.noris.de/
 http://cpan.lnx.sk/

Autoconfiguration complete.

commit: wrote '/root/.cpan/CPAN/MyConfig.pm'

You can re-run configuration any time with 'o conf init' in the CPAN shell
Fetching with LWP:
http://www.planet-elektronik.de/CPAN/authors/01mailrc.txt.gz
Going to read '/root/.cpan/sources/authors/01mailrc.txt.gz'
............................................................................DONE
Fetching with LWP:
http://www.planet-elektronik.de/CPAN/modules/02packages.details.txt.gz
Going to read '/root/.cpan/sources/modules/02packages.details.txt.gz'
 Database was generated on Mon, 13 Apr 2015 23:29:02 GMT
..............
 New CPAN.pm version (v2.10) available.
 [Currently running version is v1.960001]
 You might want to try
 install CPAN
 reload cpan
 to both upgrade CPAN.pm and run the new version without leaving
 the current session.
 
 [... snip ...]
 
 CPAN.pm: Going to build G/GW/GWOLF/Config-File-1.50.tar.gz

Building Config-File
 GWOLF/Config-File-1.50.tar.gz
 ./Build -- OK
Running Build test
t/pod.t ........... Subroutine main::all_pod_files_ok redefined at /usr/local/share/perl/5.14.2/Test/Pod.pm line 90.
t/pod.t ........... ok
t/pod_coverage.t .. ok
t/test.t .......... 1/11 Invalid characters in key to'be^ignored at line 10 - Ignoring at /root/.cpan/build/Config-File-1.50-NjLxod/blib/lib/Config/File.pm line 41,  line 10.
Line format invalid at line 11: 'malformed line that should be also dropped (no equal sign)' at /root/.cpan/build/Config-File-1.50-NjLxod/blib/lib/Config/File.pm line 35,  line 11.
t/test.t .......... ok
All tests successful.
Files=3, Tests=13, 0 wallclock secs ( 0.03 usr 0.00 sys + 0.13 cusr 0.02 csys = 0.18 CPU)
Result: PASS
 GWOLF/Config-File-1.50.tar.gz
 ./Build test -- OK
Running Build install
Building Config-File
Installing /usr/local/share/perl/5.14.2/Config/File.pm
Installing /usr/local/man/man3/Config::File.3pm
 GWOLF/Config-File-1.50.tar.gz
 ./Build install -- OK
Running Build for S/SC/SCHUBIGER/App-OpenVZ-BCWatch-0.04.tar.gz
 Has already been unwrapped into directory /root/.cpan/build/App-OpenVZ-BCWatch-0.04-4Al97O

 CPAN.pm: Going to build S/SC/SCHUBIGER/App-OpenVZ-BCWatch-0.04.tar.gz

Building App-OpenVZ-BCWatch
 SCHUBIGER/App-OpenVZ-BCWatch-0.04.tar.gz
 ./Build -- OK
Running Build test
t/00-load.t ....... ok
t/basic.t ......... ok
t/pod-coverage.t .. ok
t/pod.t ........... ok
All tests successful.
Files=4, Tests=6, 0 wallclock secs ( 0.04 usr 0.01 sys + 0.27 cusr 0.04 csys = 0.36 CPU)
Result: PASS
 SCHUBIGER/App-OpenVZ-BCWatch-0.04.tar.gz
 ./Build test -- OK
Running Build install
Building App-OpenVZ-BCWatch
Installing /usr/local/man/man1/vzwatchd.1p
Installing /usr/local/share/perl/5.14.2/App/OpenVZ/BCWatch.pm
Installing /usr/local/man/man3/App::OpenVZ::BCWatch.3pm
Installing /usr/local/bin/vzwatchd
 SCHUBIGER/App-OpenVZ-BCWatch-0.04.tar.gz
 ./Build install -- OK
It is important that you see the line
./Build install -- OK
at the end of of the compile output. If you get an error instead, then rerun the command. I had to run the command twice to compile all modules successfully.
To check if the installation was successfull, run the command:
vzwatchd check
This will check the installation and create an example config file.
root@server:~# vzwatchd check
/etc/vzwatchd.conf does not exist, creating one with defaults.
Edit /etc/vzwatchd.conf to suit your needs and then start /usr/local/bin/vzwatchd again.

3 Configure and activate vzwatchd

Now I will edit the vzwatchd.conf file and set the email address for the notification messages.
nano /etc/vzwatchd.conf
The config file shall look like this after you edited it, just with your own email address off course.
mail[from] = root@example.com
mail[to] = admin@example.com
mail[subject] = vzwatchd on server.example.com: NOTICE
sleep = 60
verbose = 0
monitor_fields = failcnt
_active = 1
The changes are:
  • The line "mail[from]" contains the from address of the notification emails.
  • The line "mail[to]" contains the email address that shall receive the notifications.
  • The value in the line "_active" has to be changed to 1 to activate vzwatchd.
  • When you run multiple OpenVZ servers then it might be handy to change "mail[subject]" to contain the server name.
Configure vzwatchd to start automatically when the server is booting:
vzwatchd install
root@server:~# vzwatchd install
+ /usr/sbin/update-rc.d vzwatchd defaults
update-rc.d: warning: /etc/init.d/vzwatchd missing LSB information
update-rc.d: see
Adding system startup for /etc/init.d/vzwatchd ...
/etc/rc0.d/K20vzwatchd -> ../init.d/vzwatchd
/etc/rc1.d/K20vzwatchd -> ../init.d/vzwatchd
/etc/rc6.d/K20vzwatchd -> ../init.d/vzwatchd
/etc/rc2.d/S20vzwatchd -> ../init.d/vzwatchd
/etc/rc3.d/S20vzwatchd -> ../init.d/vzwatchd
/etc/rc4.d/S20vzwatchd -> ../init.d/vzwatchd
/etc/rc5.d/S20vzwatchd -> ../init.d/vzwatchd
And start the vzwatchd monitor daemon:
vzwatchd start
root@server:~# vzwatchd start
Starting /usr/local/bin/vzwatchd server
Now you will get notified by email when your OpenVZ virtual server reaches one of the limits of the OpenVZ container.

Links

Sourcegraph: A free code search tool for open source developers

http://opensource.com/business/15/4/better-software-with-sourcegraph

Grasshopper outside with graph overlay
Image credits : 
Photo by Jen Wike Huger
submit to reddit
A goldmine of open source code is available to programmers, but choosing the right library and understanding how to use it can be tricky. Sourcegraph has created a search engine and code browser to help developers find better code and build software faster.
Sourcegraph is a code search engine and browsing tool that semantically indexes all the open source code available on the web. You can search for code by repository, package, or function and click on fully linked code to read the docs, jump to definitions, and instantly find usage examples. And you can do all of this in your web browser, without having to configure any editor plugin.
Sourcegraph was created by two Stanford grads, Quinn Slack and Beyang Liu, who, after spending hours hunting through poorly documented code, decided to build a tool to help them better read and understand code.
func Parse() {
	// Ignore errors; CommandLine is set for ExitOnError.
	CommandLine.Parse(os.Args[1:])
}
Try clicking on code snippets from Docker, a popular open source container library.

Are you a repository author?

If you're an author of an open source project or library, you should enable your repository on Sourcegraph. Enabling your repositories tells Sourcegraph to analyze and index your code so that contributors and users of your libraries can search and browse the code on Sourcegraph. These features can help your users save hours by letting them quickly find and understand pieces of code. A single good usage example can be worth a thousand words of documentation. Enabling repositories is free and always will be for open source.

Semantic search for projects, functions, or packages

Sourcegraph indexes code at a semantic level, which means it parses and understands code the same way a compiler does. This is necessary to support features such as semantic search and finding usage examples. Sourcegraph currently supports Go, Java, and Python, with JavaScript, Ruby, and Haskell in beta.
Try searching for popular projects like Docker, the AWS Java SDK, Kubernetes, redis-py, or your own project.

Interactive code snippets

From Sourcegraph's UI, you can browse open source libraries quickly and efficiently. But sometimes, you want to share code outside that interface. For example, you might want to embed a snippet of code in a blog post or an answer to a forum question. Sourcegraph lets you embed clickable, interactive snippets of code with Sourceboxes. Here's an example:
func Marshal(v interface{}) ([]byte, error) {
	e := &encodeState{}
	err := e.marshal(v)
	if err != nil {
		return nil, err
	}
	return e.Bytes(), nil
}
The above code snippet is interactive. Try clicking on function calls and type references. Direct link to usage example..

Open source at its core

The core analysis library of Sourcegraph is open source and available as an easy-to-use library called srclib (pronounced "Source Lib"). srclib powers all the semantic analysis-enabled features you see on Sourcegraph.com, and also supports editor plugins that provide jump-to-definition and other semantically aware functionality.

How to set up NTP server in CentOS

http://xmodulo.com/setup-ntp-server-centos.html

Network Time Protocol (NTP) is used to synchronize system clocks of different hosts over network. All managed hosts can synchronize their time with a designated time server called an NTP server. An NTP server on the other hand synchronizes its own time with any public NTP server, or any server of your choice. The system clocks of all NTP-managed devices are synchronized to the millisecond precision.
In a corporate environment, if they do not want to open up their firewall for NTP traffic, it is necessary to set up in-house NTP server, and let employees use the internal server as opposed to public NTP servers. In this tutorial, we will describe how to configure a CentOS system as an NTP server. Before going into the detail, let's go over the concept of NTP first.

Why Do We Need NTP?

Due to manufacturing variances, all (non-atomic) clocks do not run at the exact same speed. Some clocks tend to run faster, while some run slower. So over a large timeframe, the time of one clock gradually drifts from another, causing what is known as "clock drift" or "time drift". To minimize the effect of clock drift, the hosts using NTP should periodically communicate with a designated NTP server to keep their clock in sync.
Time synchrony across different hosts is important for things like scheduled backup, intrusion detection logging, distributed job scheduling or transaction bookkeeping. It may even be required as part of regulatory compliance.

NTP Hierarchy

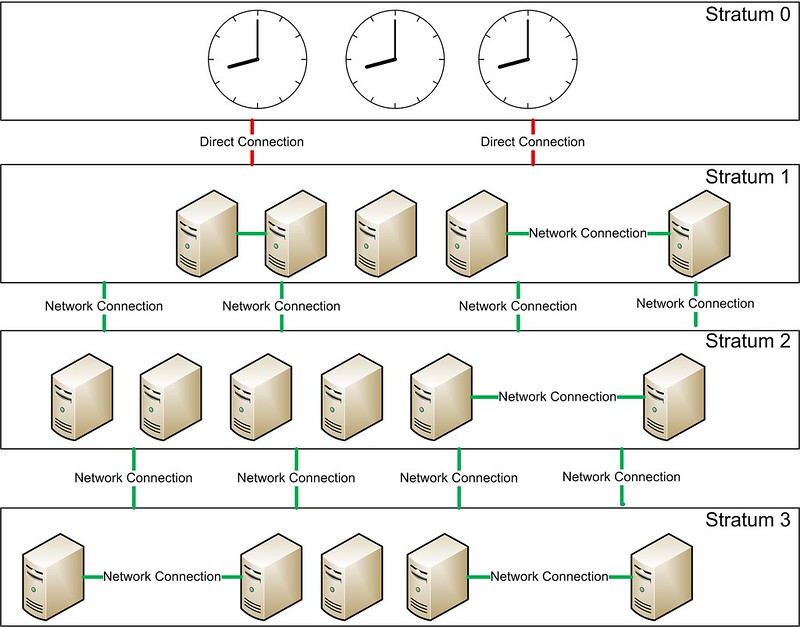
NTP clocks are organized in a layered hierarchy. Each level of the hierarchy is called a stratum. The notion of stratum describes how many NTP hops away a machine is from an authoritative time source.

Stratum 0 is populated with clocks that have virtually no time drifts, such as atomic clocks. These clocks cannot be directly used over the network. Stratum N (N > 1) servers synchronize their time against Stratum N-1 servers. Stratum N clocks may be connected with each other over network.
NTP supports up to 15 stratums in the hierarchy. Stratum 16 is considered unsynchronized and unusable.

Preparing CentOS Server

Now let's proceed to set up an NTP server on CentOS.
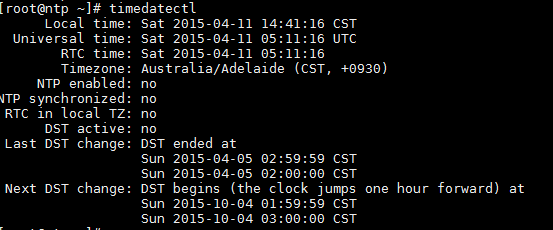
First of all, we need to make sure that the time zone of the server is set up correctly. In CentOS 7, we can use the timedatectl command to view and change the server time zone (e.g., "Australia/Adelaide")
# timedatectl list-timezones | grep Australia
# timedatectl set-timezone Australia/Adelaide
# timedatectl

Go ahead and set up necessary software using yum.
# yum install ntp
Then we will add the global NTP servers to synchronize time with.
# vim /etc/ntp.conf
server 0.oceania.pool.ntp.org
server 1.oceania.pool.ntp.org
server 2.oceania.pool.ntp.org
server 3.oceania.pool.ntp.org
By default, NTP server logs are saved in /var/log/messages. If you want to use a custom log file, that can be specified as well.
logfile /var/log/ntpd.log
If you opt for a custom log file, make sure to change its ownership and SELinux context.
# chown ntp:ntp /var/log/ntpd.log
# chcon -t ntpd_log_t /var/log/ntpd.log
Now initiate NTP service and make sure it's added to startup.
# systemctl restart ntp
# systemctl enable ntp

Verifying NTP Server Clock

We can use the ntpq command to check how the local server's clock is synchronized via NTP.

The following table explains the output columns.
remote The sources defined at ntp.conf. '*' indicates the current and best source; '+' indicates that these sources are available as NTP source. Sources with - are considered unusable.
refid The IP address of the clock with which the remote server clock is synchronized with.
st Stratum
t Type. 'u' is for unicast. Other values may include local, multicast, broadcast.
when The time elapsed (in seconds) since the last contact with the server.
poll Polling frequency with the server in seconds.
reach An octal value that indicates whether there are any errors in communication with the server. The value 377 indicates 100% success.
delay The round trip time between our server and the remote server.
offset The time difference between our server and the remote server in milliseconds.
jitter The average time difference in milliseconds between two samples.

Controlling Access to NTP Server

By default, NTP server allows incoming queries from all hosts. If you want to filter incoming NTP synchronization connections, you could add a rule in your firewall to filter the traffic.
# iptables -A INPUT -s 192.168.1.0/24 -p udp --dport 123 -j ACCEPT
# iptables -A INPUT -p udp --dport 123 -j DROP
The rule will allow NTP traffic (on port UDP/123) from 192.168.1.0/24, and deny traffic from all other networks. You can update the rule to match your requirements.

Configuring NTP Clients

1. Linux

NTP client hosts need the ntpdate package to synchronize time against the server. The package can be easily installed using yum or apt-get. After installing the package, run the command with the IP address of the server.
# ntpdate
The command is identical for RHEL and Debian based systems.

2. Windows

If you are using Windows, look for 'Internet Time' under Date and Time settings.

3. Cisco Devices

If you want to synchronize the time of a Cisco device, you can use the following command from the global configuration mode.
# ntp server
NTP enabled devices from other vendors have their own parameters for Internet time. Please check the documentation of the device if you want to synchronize its time with the NTP server.

Conclusion

To sum up, NTP is a protocol that keeps the clocks across all your hosts in sync. We have demonstrated how we can set up an NTP server, and let NTP enabled devices synchronize their time against the server.
Hope this helps.

Tuesday, April 28, 2015

Create Multiboot OS USB with Multisystem in Linux

http://www.ubuntubuzz.com/2015/04/create-multiboot-os-usb-with-multisystem-in-linux.html

We can make a bootable USB flash drive containing more than one operating system. This drive called multiboot drive. You can make it from Linux by using Multisystem. I show you how to use Multisystem to create Ubuntu, elementary OS, Fedora, and Antergos inside a 16 GB USB drive.

Multisystem

Install Multisystem


  1. sudo apt-add-repository 'deb http://liveusb.info/multisystem/depot all main'  
  2. wget -q -O - http://liveusb.info/multisystem/depot/multisystem.asc | sudo apt-key add -   
  3. sudo apt-get update  
  4. sudo apt-get install multisystem  

Explanation: to install Multisystem, we need 4 commands. First command above tells Ubuntu to add Mutisystem Debian Repository. Second command tells Ubuntu to get verification key for security (to make sure that the repository is correct). Third command tells Ubuntu to reset the repositories list so the new repository added (Multisystem) will be used for further. The last command installs Multisystem.

Installing Multisystem and Dependencies

Burn Linux ISO Images To The Drive


  1. Insert your USB drive to USB port. Mount it. 
  2. Open Multisystem. 
  3. Multisystem main window will detect your USB drive. In this example, I use Kingston DataTraveler. So it detects the same device. If it doesn't detect it on your machine, mount the drive and click the reload button.  
  4. Select Your Drive
  5. Then select your drive and click Confirm button.
  6. A dialog will appear saying that the Grub2 will be installed in MBR. It means Multisystem will install bootloader into your USB drive (not HDD). Click OK. 
  7. Confirm GRUB Installation
  8. Now you see a blank Multisystem window like this.  
  9. Main Window
  10. Click the disc icon below Select an .iso section to open ISO file. 
  11. Select ISO file.  
  12. Select ISO
  13. A black window will appear. It is a Terminal asking you for your password. Enter it.
  14. Multisystem Is Burning
  15. The terminal will do the burning process. Wait until finished. 
  16. One Operating System Burnt into The Drive Successfully
  17. Repeat points 7 - 10 for another ISO. 
  18. The result in Multisystem is it reads your drive to has 4 operating systems like this. 
  19. Multisystem Reads My Drive Contents

Bonus


Actually when you install Multisystem, you will install QEMU dependencies too. By using QEMU, you can try your USB without restarting nor testing on another machine. QEMU is a great virtualization hypervisor. It is relatively lighter than Virtualbox. Just go to main window > Boot Tab > click Test your liveusb in QEMU. See picture below.

Testing The Drive with QEMU Virtualization