Monday, January 27, 2014

Zato—Agile ESB, SOA, REST and Cloud Integrations in Python

http://www.linuxjournal.com/content/zato%E2%80%94agile-esb-soa-rest-and-cloud-integrations-python

Zato is a Python-based platform for integrating applications and exposing back-end services to front-end clients. It's an ESB (Enterprise Service Bus) and an application server focused on data integrations. The platform doesn't enforce any limits on architectural style for designing systems and can be used for SOA (Service Oriented Architecture), REST (Representational State Transfer) and for building systems of systems running in-house or in the cloud.
At its current version of 1.1 (at the time of this writing), Zato supports HTTP, JSON, SOAP, SQL, AMQP, JMS WebSphere MQ, ZeroMQ, Redis NoSQL and FTP. It includes a browser-based GUI, CLI, API, security, statistics, job scheduler, HAProxy-based load balancer and hot-deployment. Each piece is extensively documented from the viewpoint of several audiences: architects, admins and programmers.
Zato servers are built on top of gevent and gunicorn frameworks that are responsible for handling incoming traffic using asynchronous notification libraries, such as libevent or libev, but all of that is hidden from programmers' views so they can focus on their job only.
Servers always are part of a cluster and run identical copies of services deployed. There is no limit on how many servers a single cluster can contain.
Each cluster keeps its configuration in Redis and an SQL database. The former is used for statistics or data that is frequently updated and mostly read-only. The latter is where the more static configuration shared between servers is kept.
Users access Zato through its Web-based GUI, the command line or API.
Zato promotes loose coupling, reusability of components and hot-deployment. The high-level goal is to make it trivial to access or expose any sort of information. Common integration techniques and needs should be, at most, a couple clicks away, removing the need to reimplement the same steps constantly, slightly differently in each integration effort.
Everything in Zato is about minimizing the interference of components on each other, and server-side objects you create can be updated easily, reconfigured on fly or reused in other contexts without influencing any other.
This article guides you through the process of exposing complex XML data to three clients using JSON, a simpler form of XML and SOAP, all from a single code base in an elegant and Pythonic way that doesn't require you to think about the particularities of any format or transport.
To speed up the process of retrieving information by clients, back-end data will be cached in Redis and updated periodically by a job-scheduled service.
The data provider used will be US Department of the Treasury's real long-term interest rates. Clients will be generic HTTP-based ones invoked through curl, although in practice, any HTTP client would do.

The Process and IRA Services

The goal is to make it easy and efficient for external client applications to access long-term US rates information. To that end, you'll make use of several features of Zato:
Zato encourages the division of each business process into a set of IRA services—that is, each service exposed to users should be:
  • Interesting: services should provide a real value that makes potential users pause for a moment and, at least, contemplate using the service in their own applications for their own benefit.
  • Reusable: making services modular will allow you to make use of them in circumstances yet unforeseen—to build new, and possibly unexpected, solutions on top of lower-level ones.
  • Atomic: a service should have a well defined goal, indivisible from the viewpoint of a service's users, and preferably no functionality should overlap between services.
The IRA approach closely follows the UNIX philosophy of "do one thing and do it well" as well as the KISS principle that is well known and followed in many areas of engineering.
When you design an IRA service, it is almost exactly like defining APIs between the components of a standalone application. The difference is that services connect several applications running in a distributed environment. Once you take that into account, the mental process is identical.
Anyone who already has created an interesting interface of any sort in a single-noded application written in any programming language will feel right like home when dealing with IRA services.
From Zato's viewpoint, there is no difference in whether a service corresponds to an S in SOA or an R in REST; however, throughout this article, I'm using the the former approach.

Laying Out the Services

The first thing you need is to diagram the integration process, pull out the services that will be implemented and document their purpose. If you need a hand with it, Zato offers its own API's documentation as an example of how a service should be documented (see https://zato.io/docs/progguide/documenting.html and https://zato.io/docs/public-api/intro.html):
  • Zato's scheduler is configured to invoke a service (update-cache) refreshing the cache once in an hour.
  • update-cache, by default, fetches the XML for the current month, but it can be configured to grab data for any date. This allows for reuse of the service in other contexts.
  • Client applications use either JSON or simple XML to request long-term rates (get-rate), and responses are produced based on data cached in Redis, making them super-fast. A single SIO Zato service can produce responses in JSON, XML or SOAP. Indeed, the same service can be exposed independently in completely different channels, such as HTTP or AMQP, each using different security definitions and not interrupting the message flow of other channels.
Figure 1. Overall Business Process

Implementation

The full code for both services is available as a gist on GitHub, and only the most interesting parts are discussed.
linuxjournal.update-cache
Steps the service performs are:
  • Connect to treasury.gov.
  • Download the big XML.
  • Find interesting elements containing the business data.
  • Store it all in Redis cache.
Key fragments of the service are presented below.
When using Zato services, you are never required to hard-code network addresses. A service shields such information and uses human-defined names, such as "treasury.gov"; during runtime, these resolve into a set of concrete connection parameters. This works for HTTP and any other protocol supported by Zato. You also can update a connection definition on the fly without touching the code of the service and without any restarts:

 1 # Fetch connection by its name
 2 out = self.outgoing.plain_http.get('treasury.gov')
 3
 4 # Build a query string the backend data source expects
 5 query_string = {
 6  '$filter':'month(QUOTE_DATE) eq {} and year(QUOTE_DATE) eq
{}'.format(month, year)
 7 }
 8
 9 # Invoke the backend with query string, fetch 
   # the response as a UTF-8 string
10 # and turn it into an XML object
11 response = out.conn.get(self.cid, query_string)
lxml is a very good Python library for XML processing and is used in the example to issue XPath queries against the complex document returned:

1 xml = etree.fromstring(response)
2
3 # Look up all XML elements needed (date and rate) using XPath
4 elements = xml.xpath('//m:properties/d:*/text()', 
  ↪namespaces=NAMESPACES)
For each element returned by the back-end service, you create an entry in the Redis cache in the format specified by REDIS_KEY_PATTERN—for instance, linuxjournal:rates:2013:09:03 with a value of 1.22:

 1 for date, rate in elements:
 2
 3   # Create a date object out of string
 4   date = parse(date)
 5
 6   # Build a key for Redis and store the data under it
 7   key = REDIS_KEY_PATTERN.format(
 8       date.year, str(date.month).zfill(2), 
         ↪str(date.day).zfill(2))
 9   self.kvdb.conn.set(key, rate)
10
12   # Leave a trace of our activity
13   self.logger.info('Key %s set to %s', key, rate)
linuxjournal.get-rate
Now that a service for updating the cache is ready, the one to return the data is so simple yet powerful that it can be reproduced in its entirety:

 1 class GetRate(Service):
 2 """ Returns the real long-term rate for a given date
 3 (defaults to today if no date is given).
 4 """
 5 class SimpleIO:
 6     input_optional = ('year', 'month', 'day')
 7     output_optional = ('rate',)
 8
 9 def handle(self):
10     # Get date needed either from input or current day
11     year, month, day = get_date(self.request.input)
12
13     # Build the key the data is cached under
14     key = REDIS_KEY_PATTERN.format(year, month, day)
15
16     # Assign the result from cache directly to response
17     self.response.payload.rate = self.kvdb.conn.get(key)
A couple points to note:
  • SimpleIO was used—this is a declarative syntax for expressing simple documents that can be serialized to JSON or XML in the current Zato version, with more to come in future releases.
  • Nowhere in the service did you have to mention JSON, XML or even HTTP at all. It's all working on a high level of Python objects without specifying any output format or transport method.
This is the Zato way. It promotes reusability, which is valuable because a generic and interesting service, such as returning interest rates, is bound to be desirable in situations that cannot be predicted.
As an author of a service, you are not forced into committing to a particular format. Those are configuration details that can be taken care of through a variety of means, including a GUI that Zato provides. A single service can be exposed simultaneously through multiple access channels each using a different data format, security definition or rate limit independently of any other.

Installing Services

There are several ways to install a service:
  • Hot-deployment from the command line.
  • Hot-deployment from the browser.
  • Adding it to services-sources.txt—you can specify a path to a single module, to a Python package or a Python-dotted name by which to import it.
Let's hot-deploy what you have so far from the command line, assuming a Zato server is installed in /opt/zato/server1. You can do this using the cp command:

$ cp linuxjournal.py /opt/zato/server1/pickup-dir
$
Now in the server log:

INFO - zato.hot-deploy.create:22 - Creating tar archive
INFO - zato.hot-deploy.create:22 - Uploaded package id:[21],
 ↪payload_name:[linuxjournal.py]
Here's what just happened:
  • The server to be deployed was stored in an SQL database, and each server from a cluster was notified of the deployment of new code.
  • Each server made a backup of currently deployed services and stored it in the filesystem (by default, there's a circular log of the last 100 backups kept).
  • Each server imported the service and made it available for use.
All those changes were introduced throughout the whole cluster with no restarts and no reconfiguration.

Using the GUI to Configure the Resources Needed

Zato's Web admin is a GUI that can be used to create server objects that services need quickly, check runtime statistics or gather information needed for debugging purposes.
The Web admin is merely a client of Zato's own API, so everything it does also can be achieved from the command line or by user-created clients making API calls.
On top of that, server-side objects can be managed "en masse" using a JSON-based configuration that can be kept in a config repository for versioning and diffing. This allows for interesting workflows, such as creating a base configuration on a development environment and exporting it to test environments where the new configuration can be merged into an existing one, and later on, all that can be exported to production.
Figures 2–6 show the following configs:
  • Scheduler's job to invoke the service updating the cache.
  • Outgoing HTTP connection definitions for connecting to treasury.gov.
  • HTTP channels for each client—there is no requirement that each client be given a separate channel but doing so allows one to assign different security definitions to each channel without interfering with any other.
Figure 2. Scheduler Job Creation Form
Figure 3. Outgoing HTTP Connection Creation Form
Figure 4. JSON Channel Creation Form
Figure 5. Plain XML Channel Creation Form
Figure 6. SOAP Channel Creation Form

Testing It

update-cache will be invoked by the scheduler, but Zato's CLI offers the means to invoke any service from the command line, even if it's not mounted on any channel, like this:

$ zato service invoke /opt/zato/server1 linuxjournal.update-cache
 ↪--payload '{}'
(None)
$
There was no output, because the service doesn't produce any. However, when you check the logs you notice:

INFO - Key linuxjournal:rates:2013:09:03 set to 1.22
Now you can invoke get-rate from the command line using curl with JSON, XML and SOAP. The very same service exposed through three independent channels will produce output in three formats, as shown below (output slightly reformatted for clarity).
Output 1:

$ curl localhost:17010/client1/get-rate -d 
 ↪'{"year":"2013","month":"09","day":"03"}' 
 ↪{"response": {"rate": "1.22"}}
$
Output 2:

$ curl localhost:17010/client2/get-rate -d '
  20130903'

 
  K295602460207582970321705053471448424629
  ZATO_OK
 
 
  1.22
 

$
Output 3:

$ curl localhost:17010/client3/get-rate \
    -H "SOAPAction:get-rates" -d '


        2013
        09
        03
      
    
  '


     K175546649891418529601921746996004574051
    ZATO_OK
   
   
    1.22


$

IRA Is the Key

IRA (Interesting, Reusable, Atomic) is the key you should always keep in mind when designing services that are to be successful.
Both the services presented in the article meet the following criteria:
  • I: focus on providing data interesting to multiple parties.
  • R: can take part in many processes and be accessed through more than one method.
  • A: focus on one job only and do it well.
In this vein, Zato makes it easy for you to expose services over many channels and to incorporate them into higher-level integration scenarios, thereby increasing their overall attractiveness (I in IRA) to potential client applications.
It may be helpful to think of a few ways not to design services:
  • Anti-I: update-cache could be turned into two smaller services. One would fetch data and store it in an SQL database; the other would grab it from SQL and put it into Redis. Even if such a design could be defended by some rationale, neither of the pair of services would be interesting for external applications. A third service wrapping these two should be created and exposed to client apps, in the case of it being necessary for other systems to update the cache. In other words, let's keep the implementation details inside without exposing them to the whole world.
  • Anti-R: hard-coding nontrivial parameters is almost always a poor idea. The result being that a service cannot be driven by external systems invoking it with a set of arguments. For instance, creating a service that is limited to a specific year only ensures its limited use outside the original project.
  • Anti-A: returning a list of previous queries in response to a request may be a need of one particular client application, but contrary to the needs of another. In cases when a composite service becomes necessary, it should not be obliged upon each and every client.
Designing IRA services is like designing a good programming interface that will be released as an open-source library and used in places that can't be predicted initially.

Born Out of Practical Experience

Zato it not only about IRA but also about codifying common admin and programming tasks that are of a practical nature:
  • Each config file is versioned automatically and kept in a local bzr repository, so it's always possible to revert to a safe state. This is completely transparent and needs no configuration nor management.
  • A frequent requirement before integration projects are started, particularly if certain services already are available on the platform, is to provide usage examples in the form of message requests and responses. Zato lets you specify that one-in-n invocations of a service be stored for a later use, precisely so that such requirements can be fulfilled by admins quickly.
Two popular questions asked regarding production are: 1) What are my slowest services? and 2) Which services are most commonly used? To answer these, Zato provides statistics that can be accessed via Web admin, CLI or API. Data can be compared over arbitrary periods or exported to CSV as well.
Figure 7. Sample Statistics

Summary

Despite being a relatively new project, Zato is already a lightweight yet complete solution that can be used in many integration and back-end scenarios. Regardless of the project's underlying integration principles, such as SOA or REST, the platform can be used to deliver scalable architectures that are easy to use, maintain and extend.

Tuesday, January 14, 2014

How to use PostgreSQL Foreign Data Wrappers for external data management

http://www.openlogic.com/wazi/bid/331001/how-to-use-postgresql-foreign-data-wrappers-for-external-data-management


Often times, huge web projects use multiple programming languages and even multiple databases. While relational database management systems (RDBMS) are common, they have limitations when it comes to the management of highly variable data. For such applications, NoSQL databases are a better alternative. The PostgreSQL RDBMS now provides Foreign Data Wrappers (FDW) that let PostgreSQL query non-relational external data sources.
FDWs are drivers that allow PostgreSQL database administrators to run queries and get data from external sources, including other SQL databases (Oracle, MySQL), NoSQL databases(MongoDB, Redis, CouchDB), text files in CSV and JSON formats, and content from Twitter. A few of the wrappers, such as the one for Kyoto Tycoon, allow PostgreSQL to handle both read and write operations on remote data.
FDWs are based on the SQL Management of External Data (SQL/MED) standard, which supports SQL interfaces to remote data sources and objects. They have been officially supported since PostgreSQL 9.1. You can see a full list of released FDWs on the PostgreSQL wiki.

Strengths and weaknesses of relational and NoSQL databases

Why might you want to use FDWs when most web applications use relation databases on the back end? RDBMSes have been around for decades and are perfectly suitable to storing data whose structure is known in advance. Relational databases allow developers to create complex queries on data from multiple tables. They are secure and flexible when it comes to retrieving structured data, and they keep data consistent.
But RDBMSes are not suitable for storing data with huge variations in record structures or many hierarchical sublevels. NoSQL database models offer more freedom in data structure, simpler management, fewer system requirements, high scalability on multiple servers, and fast performance. They allow the storage of multidimensional structures with huge amount of data. On the minus side, however, they do not always preserve data consistency.
SQL databases maintain the properties of atomicity, consistency, isolation, and durability (ACID), which makes them a natural choice for storing important data such as financial transactions and accounts. By contrast, NoSQL databases are typically used to store less important data, such as server logs, or variable data that cannot be easily described in a structure during the design stage.
FDWs are designed to preserve PostgreSQL security and utilize the numerous features of PostgreSQL databases while taking advantage of the performance and scalability of NoSQL databases.

How to connect PostgreSQL with MongoDB through an FDW

MongoDB, one popular NoSQL solution, is a document database that allows objects with different numbers of fields to be included in a database. Objects can also be nested in other objects, with no limit on the depth. Let's see how to use FDWs in PostgreSQL to access MongoDB data.
I'll assume you have installed and configured PostgreSQL on your server. You may have the latest stable release, PostgreSQL 9.3, installed, but the latest version of the MongoDB FDW (currently mongo_fdw 2.0.0), which is developed by a third-party company, is compatible only with PotsgreSQL 9.2. The temporary lack of compatibility with the latest stable PotsgreSQL release is one of the disadvantages of this approach. While we can expect a new release of the wrapper that is compatible with PostgreSQL 9.3, there is no current information when it will be ready.
You can install the PostgreSQL 9.2 RPM package for your architecture by running the following commands:
wget http://yum.postgresql.org/9.2/redhat/rhel-6-i386/pgdg-centos92-9.2-6.noarch.rpm
rpm -ivH pgdg-centos92-9.2-6.noarch.rpm
Then use the yum search postgres command to list all the available packages for your architecture, and install them with a command like yum install postgresql92-devel postgresql92-server postgresql92-contrib.
Initialize your PostgreSQL cluster and start the server:
service postgresql-9.2 initdb
Initializing database:                                     [  OK  ]
/etc/init.d/postgresql-9.2 start
Starting postgresql-9.2 service:                           [  OK  ]
Once you have your PostgreSQL database server up and running, you can log in with the special postgres user, run the command-line interface for PostgreSQL, and create a test table with some sample data – in this case a list of shops and their addresses:
su postgres
bash-4.1$ psql
postgres=# CREATE TABLE shops(id serial primary key NOT NULL, name text NOT NULL, address char(50));
postgres=# INSERT INTO shops(name, address) VALUES ('My Hardware', 'USA, NY, 5th Avenue 33'), ('My Mobile Devices', 'UK, London, Fulham Road 22'), ('My Software', 'Germany, Berlin, Rosenthaler Street 3');
You can verify the data that you have entered through the SELECT query:
postgres=# select * from shops;
 id |       name        |                      address
----+-------------------+----------------------------------------------------
  1 | My Hardware       | USA, NY, 5th Avenue 33
  2 | My Mobile Devices | UK, London, Fulham Road 22
  3 | My Software       | Germany, Berlin, Rosenthaler Street 3
(3 rows)
In an application that uses this data you might want to collect the total income from all the different types of online shops. Getting the answer might be complicated by the fact that each shop might sell totally different products, and it might be difficult to define the tables' structures during the design stage.
Instead of trying to force the data to follow a relational structure, you can use a document database like MongoDB that better supports the storage of highly variable data.
Create the corresponding /etc/yum.repos.d/mongodb.repo file with the configuration details for the MongoDB repository as explained in the official installation instructions. Then use the yum install mongo-10gen mongo-10gen-server command to install the latest stable release of the MongoDB server and the included tools. Start the service by entering /etc/init.d/mongod start at the command prompt.
You can configure both PostgreSQL and MongoDB to auto-start after your system is rebooted by entering the commands chkconfig postgresql-9.2 on && chkconfig mongod on.
Start the MongoDB command shell by typing mongo followed by the database name:
mongo myshops
MongoDB shell version: 2.4.8
connecting to: myshops
Next, enter some sample objects in the MongoDB database:
db.orders.insert({
  "shop_id" : 1,
  "order_id" : 1,
  "customer" : "Joe D.",
  "products" : [ 
    { "product_id" : "SKU01", "type" : "CPU", "model" : "Intel Core i3 4340", "price" : 220 }, 
 { "product_id" : "SKU04", "type" : "CPU", "model" : "Intel Core i7 4770", "price" : 420 },
    { "product_id" : "SKU35", "type" : "laptop bag", "model" : "leather 1", "colour" : "black", "price" : 40 }
  ],
  "delivery_address" : {
 "country" : "USA",
 "state" : "California",
 "town" : "Yorba Linda",
 "street_address" : "Main street 23",
 "zip" : "92886",
 "mobile_phone" : "101001010101"
  }
})
db.orders.insert({
  "shop_id" : 2,
  "order_id" : 2,
  "customer" : "Mike A.",
  "products" : [ 
    { "product_id" : "SKU01", "type" : "smart phone", "model" : "Google Nexus", "price" : 400 }, 
 { "product_id" : "SKU05", "type" : "tablet", "model" : "iPad Air", "memory" : "16GB", "price" : 420 }
  ],
  "delivery_address" : {
 "country" : "Belgium", 
 "town" : "Brussels",
 "street_address" : "1st street 2",
 "zip" : "1234",
 "mobile_phone" : "1010010143"
  }
})
db.orders.insert({
  "shop_id" : 2,
  "order_id" : 3,
  "customer" : "Mike A.",
   "products" : [ 
    { "product_id" : "SKU04", "type" : "smart phone", "model" : "HTC Hero", "condition" : "used", "price" : 20 }, 
 { "product_id" : "SKU05", "type" : "tablet", "model" : "iPad Air", "memory" : "16GB", "promotion" : "Christmas 20% off", "price" : 336 }
  ],
  "delivery_address" : {
 "country" : "UK", 
 "town" : "London",
 "street_address" : "2nd street 22",
 "zip" : "9999",
 "mobile_phone" : "41010010143"
  }
})
db.orders.insert({
  "shop_id" : 3,
  "order_id" : 4,
  "customer" : "John C.",
  "products" : [ 
   { "product_id" : "SKU335", "type" : "book", "title" : "Learn PostgreSQL", "price" : 30 }
  ],
  "delivery_address" : {
 "country" : "Germany", 
 "town" : "Koln",
 "PO_box" : "223"
  }
})
You can use the built-in MongoDB aggregation functionality to get the total sum for every order and store it in a separate data collection:
var total = db.orders.aggregate( [
    { $unwind: "$products" },
    { $group: {
        _id: '$_id',
  shop_id : { $first : "$shop_id" },
  order_id : { $first : "$order_id" },
  customer : { $first : "$customer" },
  sum: { $sum: '$products.price' } 
    } } 
] );
db.total.insert(total.result);
To see the result:
db.total.find().pretty().sort( { order_id: 1 } )
{
        "_id" : ObjectId("52c47761ab2d51cfcc878609"),
        "shop_id" : 1,
        "order_id" : 1,
        "customer" : "Joe D.",
        "sum" : 680
}
{
        "_id" : ObjectId("52c47761ab2d51cfcc87860a"),
        "shop_id" : 2,
        "order_id" : 2,
        "customer" : "Mike A.",
        "sum" : 820
}
{
        "_id" : ObjectId("52c47761ab2d51cfcc87860b"),
        "shop_id" : 2,
        "order_id" : 3,
        "customer" : "Mike A.",
        "sum" : 356
}
{
        "_id" : ObjectId("52c47762ab2d51cfcc87860c"),
        "shop_id" : 3,
        "order_id" : 4,
        "customer" : "John C.",
        "sum" : 30
}
Once you have sample data stored in your PostgreSQL and MongoDB databases you are ready to bind the two through the FDW.
First, use git to get the latest version of the FDW from the repository, then build and install the wrapper:
cd /usr/src/
git clone https://github.com/citusdata/mongo_fdw
cd /usr/src/mongo_fdw/
PATH=/usr/pgsql-9.2/bin/:$PATH make
PATH=/usr/pgsql-9.2/bin/:$PATH make install
Next, load the extension from the PostgreSQL command-line interface. Verify it and create a server instance for the wrapper:
postgres=# CREATE EXTENSION mongo_fdw;
CREATE EXTENSION
postgres=# \dx mongo_fdw;
                      List of installed extensions
   Name    | Version | Schema |               Description
-----------+---------+--------+-----------------------------------------
 mongo_fdw | 1.0     | public | foreign data wrapper for MongoDB access
(1 row)
postgres=# CREATE SERVER mongo_server FOREIGN DATA WRAPPER mongo_fdw OPTIONS (address '127.0.0.1', port '27017');
CREATE SERVER
Then set up a foreign table:
CREATE FOREIGN TABLE shops_sales
(
    shop_id INTEGER,
    order_id INTEGER,
 customer TEXT,
 sum INTEGER
)
SERVER mongo_server
OPTIONS (database 'myshops', collection 'total');
Now you are ready to run SQL queries on the data stored in the MongoDB database. For example, you can list all the records from the table, and then run another query to find the total income for each shop and sort the result based on the shop ID.
SELECT * FROM shops_sales;
 shop_id | order_id | customer | sum
---------+----------+----------+-----
       3 |        4 | John C.  |  30
       2 |        2 | Mike A.  | 820
       1 |        1 | Joe D.   | 680
       2 |        3 | Mike A.  | 356
(4 rows)

SELECT shops.id AS "shop ID", shops.name AS "shop name", SUM(shops_sales.sum) AS "income" FROM shops INNER JOIN shops_sales ON shops.id = shops_sales.shop_id GROUP BY shops.id ORDER BY shops.id;
 shop ID |     shop name     | income
---------+-------------------+--------
       1 | My Hardware       |    680
       2 | My Mobile Devices |   1176
       3 | My Software       |     30
(3 rows)

FDW future

Most of the currently available FDWs support only reading from the remote data sources. Since the release of PostgreSQL 9.3, developers can create FDWs to also perform inserts, updates, and deletes on foreign data. Whether any particular FDW supports these operations depends on the developers of the corresponding wrapper.
FDWs work as mediators between PostgreSQL databases and external data sources in different formats. You can run SQL queries on every possible source of information as long as the wrapper knows how to convert the external data to PostgreSQL format. FDWs give PostgreSQL application developers a useful tool to extract data from diverse technologies and use a single, unified way to query it.

Friday, January 3, 2014

Manage Your Configs with vcsh

http://www.linuxjournal.com/content/manage-your-configs-vcsh

If you're anything like me (and don't you want to be?), you probably have more than one Linux or UNIX machine that you use on a regular basis. Perhaps you've got a laptop and a desktop. Or, maybe you've got a few servers on which you have shell accounts. Managing the configuration files for applications like mutt, Irssi and others isn't hard, but the administrative overhead just gets tedious, particularly when moving from one machine to another or setting up a new machine.
Some time ago, I started using Dropbox to manage and synchronize my configuration files. What I'd done was create several folders in Dropbox, and then when I'd set up a new machine, I'd install Dropbox, sync those folders and create symlinks from the configs in those directories to the desired configuration file in my home directory. As an example, I'd have a directory called Dropbox/conf/mutt, with my .muttrc file inside that directory. Then, I'd create a symlink like ~/.muttrc -> Dropbox/conf/mutt/.muttrc. This worked, but it quickly got out of hand and became a major pain in the neck to maintain. Not only did I have to get Dropbox working on Linux, including my command-line-only server machines, but I also had to ensure that I made a bunch of symlinks in just the right places to make everything work. The last straw was when I got a little ARM-powered Linux machine and wanted to get my configurations on it, and realized that there's no ARM binary for the Dropbox sync dæmon. There had to be another way.

...and There Was Another Way

It turns out I'm not the only one who's struggled with this. vcsh developer Richard Hartmann also had this particular itch, except he came up with a way to scratch it: vcsh. vcsh is a script that wraps both git and mr into an easy-to-use tool for configuration file management.
So, by now, I bet you're asking, "Why are you using git for this? That sounds way too complicated." I thought something similar myself, until I actually started using it and digging in. Using vcsh has several advantages, once you get your head around the workflow. The first and major advantage to using vcsh is that all you really need is git, bash and mr—all of which are readily available (or can be built relatively easily)—so there's no proprietary dæmons or services required. Another advantage of using vcsh is that it leverages git's workflow. If you're used to checking in files with git, you'll feel right at home with vcsh. Also, because git is powering the whole system, you get the benefit of having your configuration files under version control, so if you accidentally make an edit to a file that breaks something, it's very easy to roll back using standard git commands.

Let's Get Started!

I'm going to assume you're on Ubuntu 12.04 LTS or higher for this, because it makes installation easy. A simple sudo apt-get install vcsh mr git will install vcsh and its dependencies. If you're on another Linux distro, or some other UNIX derivative, you may need to check out vcsh and mr, and then build git if it's not packaged. I'm also going to assume you've got a working git server installed on another machine, because vcsh really shines for helping keep your configs synchronized between machines.
Once you've installed vcsh and its dependencies, it's time to start using vcsh. Let's take a fairly common config file that most everyone who's ever used a terminal has—the config file for vim. This file lives in your home directory, and it's called .vimrc. If you've used vim at all before, this file will be here. I'm going to show you how to get it checked into a git repository that is under vcsh's control.
First, run the following command to initialize vcsh's git repository for vim:

bill@test:~$ vcsh init vim
vcsh: info: attempting to create '/home/bill/.config/vcsh/repo.d'
vcsh: info: attempting to create '/home/bill/.gitignore.d'
Initialized empty Git repository in 
 ↪/home/bill/.config/vcsh/repo.d/vim.git/
I like to think of the "fake git repos" that vcsh works with to be almost like chroots (if you're familiar with that concept), as it makes things easier to work with. You're going to "enter a chroot", in a way, by telling vcsh you want to work inside the fake git repo for vim. This is done with this command:

bill@test:~$ vcsh enter vim
Now, you're going to add the file .vimrc to the repository you created above by running the command:

bill@test:~$ git add .vimrc
You're using normal git here, but inside the environment managed by vcsh. This is a design feature of vcsh to make it function very similarly to git.
Now that your file's being tracked by the git repository inside vcsh, let's commit it by running the following git-like command:

bill@test:~$ git commit -m 'Initial Commit'
master (root-commit) bc84953 Initial Commit
 Committer: Bill Childers bill@test.home
 1 file changed, 2 insertions(+)
 create mode 100644 .vimrc
Now for the really cool part. Just like standard git, you can push your files to a remote repository. This lets you make them available to other machines with one command. Let's do that now. First, you'll add the remote server. (I assume you already have a server set up and have the proper accounts configured. You'll also need a bare git repo on that server.) For example:

bill@test:~$ git remote add origin git@gitserver:vim.git
Next, push your files to that remote server:

bill@test:~$ git push -u origin master
    Counting objects: 3, done.
    Compressing objects: 100% (2/2), done.
    Writing objects: 100% (3/3), 272 bytes, done.
    Total 3 (delta 0), reused 0 (delta 0)
    To git@gitserver:vim.git
    * new branch      master -> master
    Branch master set up to track remote branch master from origin.
bill@test:~$ exit
Note the exit line at the end. This exits the "vcsh fake git repo". Now your .vimrc file is checked in and copied to a remote server! If there are other programs for which you'd like to check in configurations, like mutt, you simply can create a new repo by running vcsh init mutt, and then run through the process all over again, but this time, check your files into the mutt repository.

Move Your Configuration to Another Machine

To sync your configuration to another machine, you just need to install vcsh, git and mr, and then run a similar process as the steps above, except you'll do a git pull from your server, rather than a push. This is because you don't have the .vimrc file you want locally, and you want to get it from your remote git repository.
The commands to do this are:

bill@test2:~$ sudo apt-get install vcsh git mr
bill@test2:~$ vcsh enter vim
bill@test2:~$ git remote add origin git@gitserver:vim.git
bill@test2:~$ git pull -u origin master
From gitserver:vim
* branch            master     -> FETCH_HEAD
bill@test2:~$ exit
Now you've got your checked-in .vimrc file on your second host! This process works, but it's a little clunky, and it can become unwieldy when you start spawning multiple repositories. Luckily, there's a tool for this, and it's called mr.

Wrapping It All Up with mr

If you plan on using multiple repositories with vcsh (and you should—I'm tracking 13 repositories at the moment), getting a configuration set up for mr is essential. What mr brings to the table is a way to manage all the repositories you're tracking with vcsh. It allows you to enable and disable repositories simply by adjusting one symlink per repository, and it also gives you the ability to update all your repos simply by running one easy command: mr up.
Perhaps the best way to get started using mr is to clone the repo that the vcsh author provides. This is done with the following command:

bill@test2:~$ vcsh clone 
 ↪git://github.com/RichiH/vcsh_mr_template.git mr
Initialized empty Git repository in 
 ↪/home/bill/.config/vcsh/repo.d/mr.git/
remote: Counting objects: 19, done.
remote: Compressing objects: 100% (14/14), done.
remote: Total 19 (delta 1), reused 15 (delta 0)
Unpacking objects: 100% (19/19), done.
From git://github.com/RichiH/vcsh_mr_template
* new branch      master     -> origin/master 
Now that you've got your mr repo cloned, you'll want to go in and edit the files to point to your setup. The control files for mr live in ~/.config/mr/available.d, so go to that directory:
bill@test2:~/.config/mr/available.d$ ls mr.vcsh zsh.vcsh Rename the zsh.vcsh file to vim.vcsh, because you're working with vim, and change the repository path to point to your server:
bill@test2:~/.config/mr/available.d$ mv zsh.vcsh vim.vcsh bill@test2:~/.config/mr/available.d$ vi vim.vcsh [$HOME/.config/vcsh/repo.d/vim.git] checkout = vcsh clone git@gitserver:vim.git vim Also, edit the mr.vcsh file to point to your server as well:
bill@test2:~/.config/mr/available.d$ vi mr.vcsh [$HOME/.config/vcsh/repo.d/mr.git] checkout = vcsh clone git@gitserver:mr.git mr The mr tool relies on symlinks from the available.d directory to the config.d directory (much like Ubuntu's Apache configuration, if you're familiar with that). This is how mr determines which repositories to sync. Since you've created a vim repo, make a symlink to tell mr to sync the vim repo:
bill@test2:~/.config/mr/available.d$ cd ../config.d bill@test2:~/.config/mr/config.d$ ls -l total 0 lrwxrwxrwx 1 bill bill 22 Jun 11 18:14 mr.vcsh -> ↪../available.d/mr.vcsh bill@test2:~/.config/mr/config.d$ ln -s ↪../available.d/vim.vcsh vim.vcsh bill@test2:~/.config/mr/config.d$ ls -l total 0 lrwxrwxrwx 1 bill bill 22 Jun 11 18:14 mr.vcsh -> ↪../available.d/mr.vcsh lrwxrwxrwx 1 bill bill 23 Jun 11 20:51 vim.vcsh -> ↪../available.d/vim.vcsh Now, set up mr to be able to sync to your git server:
bill@test2:~/.config/mr/config.d$ cd ../.. bill@test2:~/.config$ vcsh enter mr bill@test2:~/.config$ ls mr vcsh bill@test2:~/.config$ git add mr bill@test2:\~/.config$ git commit -m 'Initial Commit' [master fa4eb18] Initial Commit Committer: Bill Childers [bill@test2.home] 3 files changed, 4 insertions(+), 1 deletion(-) create mode 100644 .config/mr/available.d/vim.vcsh create mode 120000 .config/mr/config.d/vim.vcsh bill@test2:\~/.config$ git remote add origin git@gitserver:mr.git fatal: remote origin already exists. Oh no! Why does the remote origin exist already? It's because you cloned the repo from the author's repository. Remove it, then create your own:
bill@test2:~/.config$ git remote show origin bill@test2:~/.config$ git remote rm origin bill@test2:~/.config$ git remote add origin git@gitserver:mr.git bill@test2:~/.config$ git push -u origin master Counting objects: 28, done. Compressing objects: 100% (21/21), done. Writing objects: 100% (28/28), 2.16 KiB, done. Total 28 (delta 2), reused 0 (delta 0) To git@gitserver:mr.git * [new branch] master -> master Branch master set up to track remote branch master from origin. bill@test2:~/.config$ exit That's it! However, now that mr is in the mix, all you need to do to set up a new machine is do a vcsh clone git@gitserver:mr.git mr to clone your mr repository, then do an mr up, and that machine will have all your repos automatically.

Conclusion

vcsh is a very powerful shell tool, and one that takes some time to adapt your thought processes to. However, once you do it, it makes setting up a new machine (or account on a machine) a snap, and it also gives you a way to keep things in sync easily. It's saved me a lot of time in the past few months, and it's allowed me to recover quickly from a bad configuration change I've made. Check it out for yourself!

Setting up a Remote Git Repo

A quick note on setting up a remote git repo: you'll need to set up passwordless authentication using SSH keys (see Resources for more information). Once you have that going using a "git" user, you simply need to create a git repo as the git user. That's done easily enough, just run the command:
git@gitserver:~$ git init --bare vim.git Initialized empty Git repository in /home/git/vim.git/ Your bare repo will be ready for your vcsh client to check in stuff!

Resources

vcsh Home Page: http://github.com/RichiH/vcsh
mr Home Page: http://joeyh.name/code/mr
vcsh Background Slides: https://raw.github.com/RichiH/talks/slides/2012/fosdem/vcsh/fosdem-2012-vcsh-talk.pdf
How to Set Up Your Own Git Server: http://tumblr.intranation.com/post/766290565/how-set-up-your-own-private-git-server-linux
Set Up Passwordless SSH Key-Based Authentication: http://askubuntu.com/questions/46930/how-can-i-set-up-password-less-ssh-login
 

How to set up BGP Looking Glass server on CentOS

http://xmodulo.com/2013/12/bgp-looking-glass-server-centos.html

This tutorial will describe how to set up a BGP Looking Glass server on CentOS. For those of you new to the concept of BGP and Looking Glass, let's start with introduction. If you are familiar with BGP, skip it over.

What is Border Gateway Protocol (BGP)?

BGP is literally the routing backbone of the Internet. As we all know it, the Internet consists of millions of interconnected networks. In the telecom industry, these millions of individual networks are referred to as Autonomous Systems (ASs). Each AS is managed under a single administrative domain (e.g., one organization or an ISP), with its own unique AS number and IP address pools aka IP prefixes. The AS number can be private (i.e., not visible publicly), and so can be the IP address pools. For example, when multiple branch offices of one company interconnect, they can use a private AS number and IP prefix for each branch office. Networks that want to use a public AS number and publicly routable IP addresses have to apply for them at a Regional Internet Registry (RIR) like ARIN, APNIC, RIPE. The RIR assigns a unique AS number and IP prefix(es) to that network.
BGP is the industry standard inter-domain routing protocol used to interconnect different ASs. All IP prefixes known to one AS are shared with neighboring ASs, thus populating the BGP routing tables of their border routers. The Internet is formed by such interconnections between millions of public ASs through BGP. So stating here again, BGP is essentially the routing backbone of the Internet.

What is Looking Glass?

Looking Glass (LG) is a web-based tool that helps network operators analyze how traffic is routed to and from a particular AS. The BGP routing table of an AS depends on what other ASs it is connected with. To be more specific, the IP prefixes learnt from neighboring ASs will populate the local BGP routing table, which will be used by the local AS to make its routing decisions.
Now assume that for troubleshooting routing or network latency related issues, we want to run ping or traceroute from a remote AS. Naturally, we do not have access to their equipment so running the test from remote locations is not feasible. However, the admins of a remote AS could set up a Looking Glass server with web-based interface, which will allow any user to run specific commands like ping, traceroute, or access the remote AS's BGP routing information, without logging in to their routers. These tests provide useful insight during network troubleshooting, as the ping or traceroute probing can be conducted from another AS's networks.

Setting Up BGP Looking Glass on CentOS

Before we start, please make sure that SELinux and firewall are tuned to permit necessary services and ports like 23, 2601, 2605, 80.
First of all, dependencies are installed. Using the Reporforge repository is recommended.
[root@lg ~]# yum install wget perl-Net-Telnet perl-Net-Telnet-Cisco perl-XML-Parser httpd
The Looking Glass will be set up using LG1. Necessary software is downloaded and extracted. The directory where the site will be stored is also created.
[root@lg ~]# cd /root
[root@lg ~]# wget http://www.version6.net/lg/lg-1.9.tar.gz
[root@lg ~]# tar zxvf lg-1.9.tar.gz
[root@lg ~]# mkdir /var/www/html/lg
Now that all files have been extracted, they are copied into the web server directory. Necessary permissions are also set.
[root@lg ~]# cd /var/www/html/lg
[root@lg lg]# cp /root/lg-1.9/lg.cgi .
[root@lg lg]# cp /root/lg-1.9/favicon.ico .
[root@lg lg]# cp /root/lg-1.9/lg.conf .
All the files must be readable.
[root@lg lg]# chmod 644 *
The lg.cgi script must be executable.
[root@lg lg]# chmod 755 lg.cgi

Tuning the Web Server

The index.html file is created for LG with necessary redirection.
[root@lg ~]# vim /var/www/html/index.html
In case DNS is set up for the Looking Glass server:
1
2
3
4
5
<html>
<head>
<meta http-equiv="refresh" content="0;url=http://lg.example.tst/lg/lg.cgi">
</head>
</html>
Without DNS:
1
2
3
4
5
<html>
<head>
<meta http-equiv="refresh" content="0;url=http://IP/lg.cgi">
</head>
</html>
The following parameters are modified in the web server.
[root@lg ~]# vim /etc/httpd/conf/httpd.conf
## The favicon path and the cgi script paths are defined ##
Alias /lg/favicon.ico "/var/www/html/lg/favicon.ico"
ScriptAlias /lg "/var/www/html/lg/lg.cgi"
The httpd service is started and added to startup list.
[root@lg ~]# service httpd start
[root@lg ~]# chkconfig httpd on

Adding Routers to the Looking Glass

LG supports Cisco, Juniper and Linux Quagga routers. All routers are added to /var/www/html/lg/lg.conf. Please note that the router password required is the remote login password, and NOT the privileged EXEC password aka 'enable' password.
[root@lg ~]# vim /var/www/html/lg/lg.conf
1
2
3
4
5
6
7
8
9
10
11
12
13
<Separator>Sample Routers</Separator>
 
<Router Name="Router-A">
<Title>Router-A</Title>
<URL>telnet://login:routerPassword@routerIP</URL>
</Router>
 
<Router Name="Router-B">
<Title>Router-B</Title>
<URL>telnet://login:routerPassword@routerIP</URL>
</Router>
The Looking Glass is now ready with minimum configuration. It can be accessed by entering the http://IP, or http://lg.example.tst in a web browser.
Here's a screenshot of the fresh Looking Glass.

Provisioning for IPv6

Preparing the Looking Glass for IPv6 is simple as well. The following lines are modified.
[root@lg ~]# vim /var/www/html/lg/lg.cgi
## $ipv4enabled-- is replaced with $ipv4enabled++ around line 398 ##
### Commented out $ipv4enabled-- ####
$ipv4enabled++
Then the routers that support IPv6 are specified.
[root@lg ~]# vim /var/www/html/lg/lg.conf
1
2
3
4
5
<Router Name="Router-A" EnableIPv6="Yes">
<Title>Router-A</Title>
<URL>telnet://login:routerPassword@routerIP</URL>
</Router>
Any reachable IPv4 or IPv6 address that can be used for logging in to the router can be specified here as the IP address.

Optional Configurations

The following configuration is optional. However, they can help in giving the LG a professional look.
1. Logo
The logo image is stored in /var/www/html/images.
[root@lg ~]# mkdir /var/www/html/images
[root@lg ~]# cp logo.png /var/www/html/images/logo.png
[root@lg ~]# vim /var/www/html/lg/lg.conf
1
<LogoImage Align="center" Link="http://www.companyweb.com/">/images/logo.png</LogoImage>
2. Page Headers
The headers of the page can modified as needed.
[root@lg ~]# vim /var/www/html/lg/lg.conf
1
2
<HTMLTitle>ASXXXX IPv4 and IPv6 Looking Glass</HTMLTitle>
<ContactMail>lg@example.tst</ContactMail>
[root@lg ~]# vim /var/www/html/lg/lg.cgi
1
2
3
4
5
6
7
8
9
10
11
#### In the closing section of the HTML tag i.e. </HTML>, the following line can be added####
<I>
  Please email questions or comments to
 <A HREF="mailto:$email">$email</A>.
</I>
<P>
<P>
Powered By: <a href="http://wiki.version6.net/LG">Looking Glass 1.9</a></P>
</CENTER>
</BODY>
</HTML>
3. Logging
Needless to say, logging is important. The log file can be created this way.
[root@lg ~]# touch /var/log/lg.log
[root@lg ~]# chown apache:apache /var/log/lg.log
[root@lg ~]# vim /var/www/html/lg/lg.conf
1
<LogFile>/var/log/lg.log</LogFile>
Now the Looking Glass is up, and ready to be used.

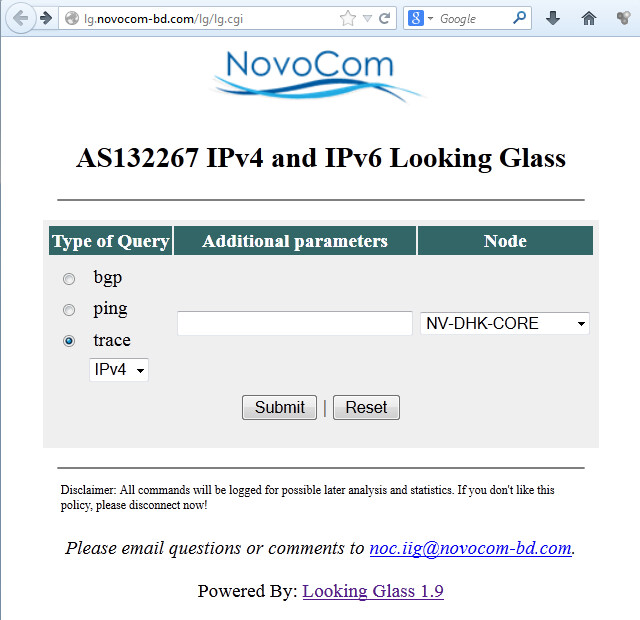
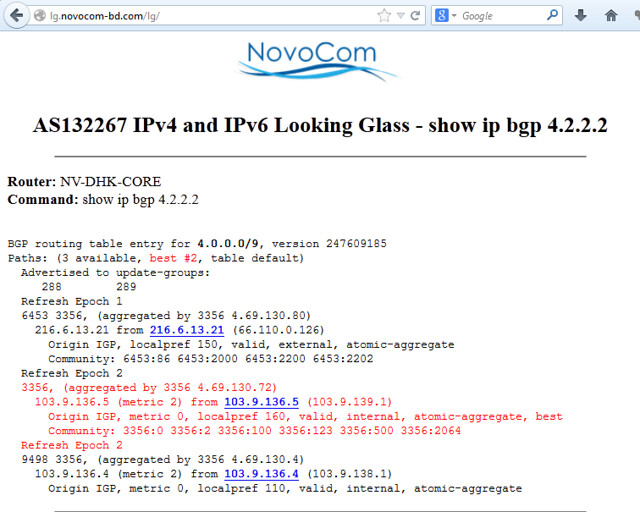
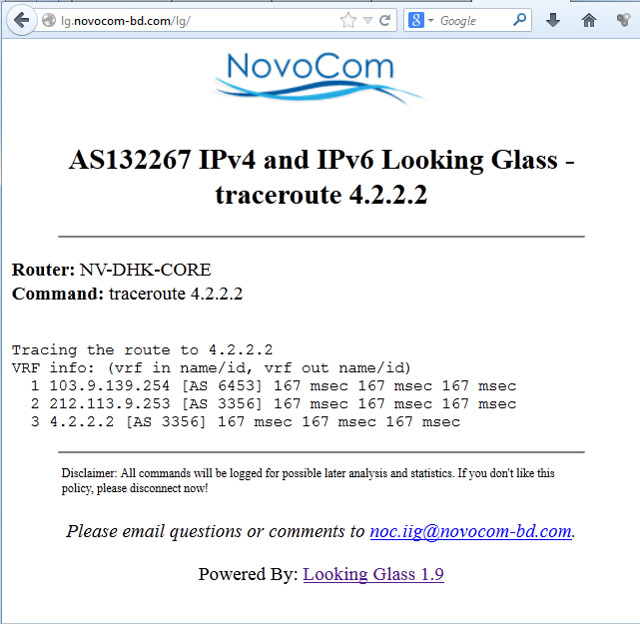
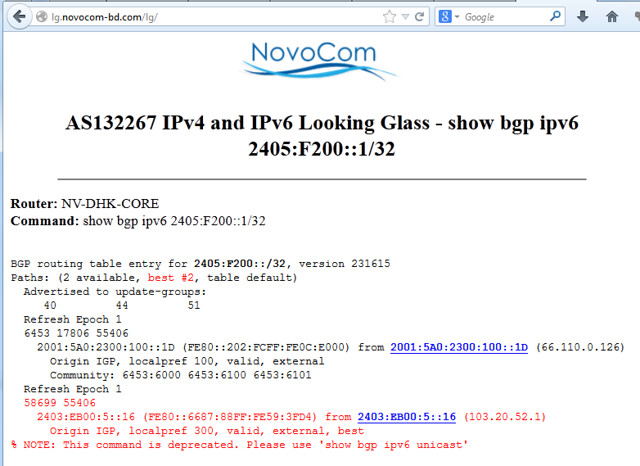
Looking Glass Screenshots

The following are some screenshots from the Looking Glass of AS 132267.
  • Live Looking Glass Interface

  • "show ip bgp" output

  • traceroute output

  • "show bgp ipv6" output

  • traceroute ipv6 output

  • Hope this helps.