eBox Platform is an open source small business server that allows you to manage all your services like firewall, DHCP, DNS, VPN, proxy, IDS, mail, file and printer sharing, VoIP, IM and much more.
These functionalities are tightly integrated, automating most tasks, avoiding mistakes and saving time for system administrators.
This tutorial shows you step by step how to use eBox as Windows Primary Domain Controller. At the end of it you will be using eBox Platform 1.2 for users and shared resources management on your Windows domain.
1. Installing the eBox server
The system installation can be done in two different ways:
- Using the eBox Platform Installer (recommended).
- Using an existing Ubuntu LTS Server Edition installation..
Nevertheless, in the first case eBox Platform installation and deployment is easier as all the dependencies are in a single CD and in addition, some pre- configuration is made during the installation process.
For this reason we will take this approach on this tutorial.

The eBox Platform installer is based on the Ubuntu installer and therefore those who are already familiar with it will find the installation process very similar.
We will not cover here the Ubuntu system installation, but you can check the official installation documentation
When the base system installation ends, the system will reboot and the eBox installation process will begin.
Then will first ask you which software components are going to be installed.
There are two methods for selecting the functionalities you want to deploy on your system, we will choose the 'simple' method.

After choosing the 'simple' method, you will get a list of software profiles. In this case we will choose only the 'Office' profile which contains all the software components needed for the PDC.
This selection is not final and if you need more functionalities on the future you can install and remove packages according to your needs.

Once you have selected the components to install, a progress bar will show you the installation process status.

When the installation finish, you will be requested to enter a password to access the eBox Platform web interface.

You need to confirm the password.

The installer will try to pre-configure some basic configuration parameters. First, it will ask you if any of your network interfaces are external (not within the local network), i.e. used to connect to the Internet.
Strict policies for all incoming traffic through external network interfaces will be applied. Depending on the role the server plays, i.e. placed inside your local network, there might be no external interfaces at all.

Then it will ask you for your default mail virtual domain name. As we will not be using the email server on this tutorial you can enter here any name you like.

Once you have answered these questions, each module you installed will be pre- configured.

After this process is completed, a message will inform you on how to connect to the web interface of eBox Platform.

2. Login to the web interface
Now you are ready to login for first time to the eBox web interface. With your browser, go to https://address/ where the address is the one given to you by the installer in the previous step.
Because the eBox server has a new self-signed certificate your browser likely will ask you whether it should trust it. Make your browser trust it to be able to continue.
Then you will be show the login screen, to login enter here the eBox administration password that you set in the installation process.

After the login you will be show the summary page.

3. Enabling and disabling modules
Next step is to disable the modules that are not needed for the PDC server. To do so in the left menu select Module Status.
In this page you will be shown the list of installed eBox modules and a checkbox to enable or disable them.

By default all installed modules are enabled but to make better use of your resources you might want to disable modules not related with the PDC server.
The modules needed for the PDC server are:
- Network
- Logs
- Users and Groups
- File Sharing
- Printers
- Antivirus
4. Creating groups
You may need user groups in your domain. To create a group, in the left menu select Groups -> Add group.
You will be asked for a group name and an optional commentary.

After a group creation you will be forwarded to the Edit group page. We are not interested in any setting here right now, but remember you can come back to this page selecting in left menu Groups -> Edit group.
We will create the group IT for this tutorial. You can also create any other necessary groups for your domain.
5. Creating users
To create your domain users, in the left menu select Users -> Add user. You will be show a form for adding the new user.
This form has the following fields:
- User name: user name for the user.
- First name: first name of the user.
- Last name: last name of the user.
- Comment: optional commentary.
- Password and Retype password: first user password, he can change his password when he connects to the domain. We will see later how to establish password policies for the domain users.
- Group: user primary group. After its creation the user can be added to more aditional groups.

For this tutorial we will create a user with pdcadmin as user name. Other fields will be filled in with the appropiate vaules.
After a user creation you will be forwarded to the Edit user page. Remember that you can come back to this page selecting in the left menu Users -> Edit user.
There are some PDC user settings on this page, under the PDC/File sharing account heading.
You can enable or disable the user account, a disabled account cannot login or be used in the domain. We will leave our new user account enabled.
Also you can give administration rights to the user. An user with administration rights can add computers to the domain so you will need at least one user with administration rights.
For this reason, we will enable this option for the pdcadmin user.
There is another field to change the disk quota for the user. We do not need to touch this setting now.

Now you can create some other user accounts for your regular users. They only need to have an enabled account without administration rights.
If you feel that their disk quota is too big or too small you can edit it as well.
6. Configuring general PDC settings
To configure the general PDC and file sharing settings, in the left menu select File sharing.
In the General settings tab will enable the PDC with the Enable PDC checkbox. Also you may change the domain name from is default value to a name which makes sense for your domain or organization.
We will use ebox as domain name. You may change the netbios name as well. This will be the name used to identify the server when using the netbios protocol.
This name should not be the same than the domain, regardless of their case, or we will have troubles connecting. We will use ebox-server as netbios name.
In the Description field you can enter some text to identify the domain.
The Quota limit field is to assign the default disk quota to new users.
The Enable roaming profiles checkbox controls whether the user desktop profile is saved to the PDC server and used in every desktop the user logs in.
The downside of this feature is that in some cases the user profile could take a lot of space in the disk. We want to use this feature on this tutorial so we will enable it.
The Drive letter field assigns which letter will be used for the virtual drive containing the user home.

7. Configuring PDC password policy settings
Domain administrators usually enforce some kind of password policy because left to users themselves they will choose weak passwords and rarely will change them.
In the PDC tab we will see three passwords settings to configure:
The first one is Password Length, We want that all users choose a password with 8 character at least, so we raise this value to 8 characters.
The second one is Maximum Password Age, we set it to 180 days to make sure that the users change their password at least two times for year.
Last one is Enforce password history, this setting is to make sure that the users do not reuse old passwords, we set it to Keep history for 5 passwords so the users cannot reuse their last five passwords.

8. Saving changes
Now that we have the basic PDC configuration nailed down, we need to save the changes to commit them to the system.
For this we have a button Save changes in the right upper corner, if we have pending changes to commit it will have a red colour otherwise it will be in green.
Since we have made changes it will be painted with a bright red, so we can click on it.
After clicking you will see a screen which will show you two options, saving the pending configuration changes or discard them.
If you discard them the configuration will revert either to the default state or, if you have already saved any changes, to the last time you saved changes.
We want to commit our changes so we will click on the button Save changes.
In some cases after clicking a screen will be pop up asking for authorization to overwrite some configuration files.
If you want that eBox to manage those files accept the request, if you deny it eBox would not be able to commit your configuration.
Then you will show a screen which displays the progress in committing the new configuration. When it finish a Changes saved message will be show.
Warning: Changes in user and groups are committed immediately, so you don't need to save them and couldn't discard them.
9. Adding computers to the PDC
Now we have our PDC server running is time to add some computers to the domain.
For this we will need to know the name of our domain and the user name and password of a user with administration rights. In our example the user pdcadmin fits the bills.
The computer to be added must be in the same network and need to have a CIFS- capable Windows (i.e. Windows XP Professional).
The eBox network interface that connects to this network must not be marked as external interface. In the following instructions we will assume that you have a Windows XP Professional.
Log into the Windows system and click on My PC -> Properties, then click on the button Change, in the section To rename this computer or join a domain.
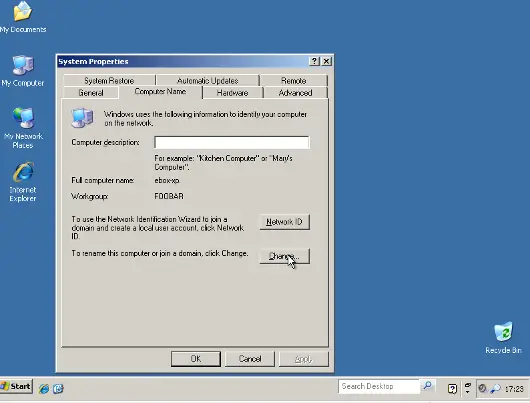
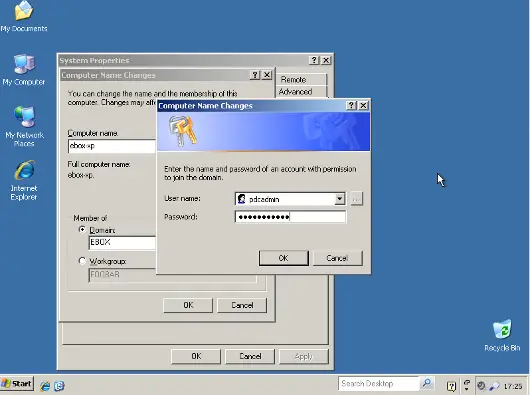
In the next window, set the domain name and then click OK.

A login window will pop up, you have to login as the user with administration privileges.
If all the steps were correctly done a welcome message to the domain should appear. After joining the domain you will need to restart the computer.
You next login could be done with a domain user.

If you need more assistance to add the computer to your domain you can check the Microsoft documentation about this procedure.
10. Configuring shares
We have already our domain active with its users, groups and computers. Now we want to add the file sharing service to ease the sharing of data between users.
We have three types of shares available in eBox:
- Users home directory shares
- Groups shares
- General shares
Only the user can connect to its home directory share so it is useful to have access to the same files regardless on which domain the user has logged on.
On the other hand, groups shares are not created automatically, you need to go to the Edit Group window and give a name for the share.
All members of the group are granted access to it with the only restriction that they cannot modify or delete files that are owned by other members of the group.

As for the third category of shares, eBox allows us to define multiple file shares each with its own access controls lists (ACL) which will determine what users and groups can read and write the files in that share.
To illustrate this feature we will create a share for the IT technical documentation, all members of the group IT should be able to read the files and the user pdcadmin should have permissions to update them.
To create a share select the Shares tab that can be found in File sharing in the left menu.
We will see the list of shares but since we will have none created the list will be empty.
To create the first share click on Add new, this will show you a form to setup the share.
The first parameter in the share is for enabling or disabling the share, we left the share enabled. However if we wanted to disable it temporally this setting would be useful.
Share name is the name to identify this share, in our example we will call the share IT documentation.
The comment field could explain the purpose of this share.
Back to our example, we can write Documentation and knowledge base for the IT department there.
Finally we must choose the path of the share in the server, two options are available: Directory under eBox or File path.
The second one is intended for already existent directories so in our example we will choose Directory under eBox and give as directory name itdoc.

Once we have our share defined we will need to choose a correct set of ACLs for it. To do so we must go to the shares list, look for the line of the share and click on the Access Control field.
Here we can add the ACLs for the share, each ACL give permissions to a user or a group. The permissions can be read, read< and write and administrator.
The administrator permission allows to write and remove files owned by other users so it must be sparingly granted.
In our example, we will add a read permission to the IT group and a read and write permission to the user pdcadmin.
This way the IT members can read the files but only pdcadmin can add or remove them.

Special shares. are created automatically by eBox and access is only granted to users with administration rights.
They are ebox-internal-backups which contains the eBox backup files and ebox-quarantine which contains infected files.
11. File share antivirus
eBox can scan the shares files for viruses. The scan is done when a file is written or accessed so you can be sure that all files in the share have been checked by the antivirus.
If an infected file is found it is moved to the ebox-quarantine share which is only accessible by users with administration rights.
These users can browse this share and choose whether delete these files or to do another action with them.
To use this feature the antivirus module has to be enabled, so if you disabled it you should enable it again.
The antivirus updates its virus database automatically each hour so you don't need to worry about updates.
To configure antivirus scan go to the File Sharing page and there under the Antivirus tab. The Scan setting determines if the files should be scanned or not.
We want the antivirus to scan the shares so we enable this for our example.
In the Samba shares antivirus exceptions list we can add exceptions to the antivirus scan, the shares listed here will not be scanned regardless of the value of the Scan setting.

12. Accessing shares
We have our shares defined so we could want to access them now. But before we have to make sure that we have saved the last changes in the configuration like we have explained in the Saving changes section.
When login into a domain computer with a domain user you will be able to access the shares via the Entire network window, to open this window go to My PC -> Network Place and then click in the link in the Other places left panel.

Then you can click in the eBox server and all the shares known to the user will appear. You can try to access a share clicking on it, if the user has read access a browser page with the share contents will be shown.

Additionally the user home directory will be mapped to a virtual drive with the letter set in the PDC configuration.
Alternative. In a GNU/Linux system you can use the program smbclient to access the shares. You can find a guide to use it here.
Another option is using a file browser with SMB capabilities like the default ones in KDE or Gnome.
If you have the antivirus enabled you can test it trying to upload an infected file. For testing purposes we recommend the EICAR test file because is harmless.
13. Logon script
eBox supports the use of Windows logon script. This script will be downloaded and executed every time a user logs into a domain computer.
When writing this script you have take in account that it is executed into the computer where the user logs in, so you should do only things that could be done in every computer of your domain.
Furthermore, it will be a Windows computer so you have take care that the file is written with DOS return/linefeed characters.
To be sure of this you can write it in a Windows computer or use the Unix tool flip to convert between the two formats.
Once you have written your logon script you have to save it as logon.bat under the /home/samba/netlogon directory in your eBox server.
To continue our example we will show a logon script that maps a share called timetable which contains the organization timetables to the drive Y:.
Remember to create this share and grant access to it before trying this logon script!
# contents of logon.bat search server
# map timetable share
echo "Mapping timetable share to drive Y: ..."
net use y: \\ebox-server\timetable
14. The endThat's all folks. We hope the information and examples on this tutorial have helped you to use eBox as a Windows Primary Domain Controller and file server.I'd like to thank Falko Timme who wrote a file-sharing howto for a previous version of eBox which has been a source of inspiration for this document.

No comments:
Post a Comment