http://xmodulo.com/2013/12/bgp-looking-glass-server-centos.html
This tutorial will describe how to set up a BGP Looking Glass server on CentOS. For those of you new to the concept of BGP and Looking Glass, let's start with introduction. If you are familiar with BGP, skip it over.
BGP is the industry standard inter-domain routing protocol used to interconnect different ASs. All IP prefixes known to one AS are shared with neighboring ASs, thus populating the BGP routing tables of their border routers. The Internet is formed by such interconnections between millions of public ASs through BGP. So stating here again, BGP is essentially the routing backbone of the Internet.
Now assume that for troubleshooting routing or network latency related issues, we want to run ping or traceroute from a remote AS. Naturally, we do not have access to their equipment so running the test from remote locations is not feasible. However, the admins of a remote AS could set up a Looking Glass server with web-based interface, which will allow any user to run specific commands like ping, traceroute, or access the remote AS's BGP routing information, without logging in to their routers. These tests provide useful insight during network troubleshooting, as the ping or traceroute probing can be conducted from another AS's networks.
First of all, dependencies are installed. Using the Reporforge repository is recommended.
Without DNS:
The following parameters are modified in the web server.
The Looking Glass is now ready with minimum configuration. It can be
accessed by entering the http://IP, or http://lg.example.tst in a web
browser.
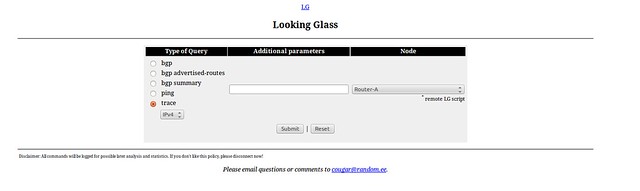
Here's a screenshot of the fresh Looking Glass.
Any reachable IPv4 or IPv6 address that can be used for logging in to the router can be specified here as the IP address.
1. Logo
The logo image is stored in /var/www/html/images.
2. Page Headers
The headers of the page can modified as needed.
3. Logging
Needless to say, logging is important. The log file can be created this way.
Now the Looking Glass is up, and ready to be used.
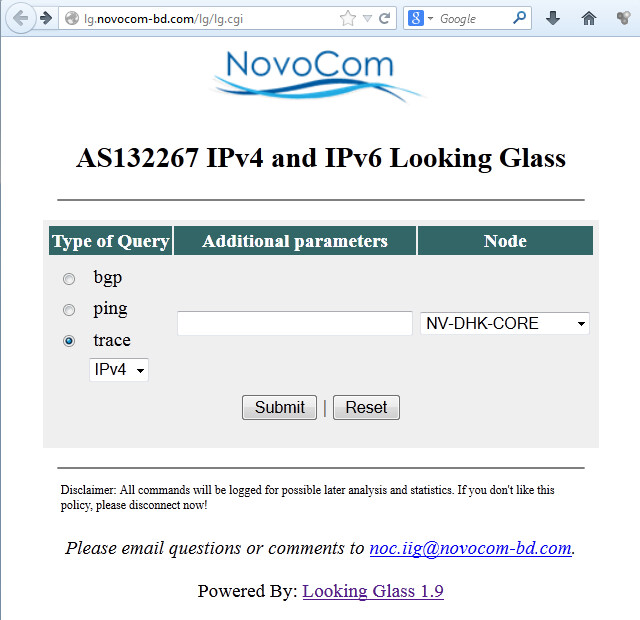
Live Looking Glass Interface
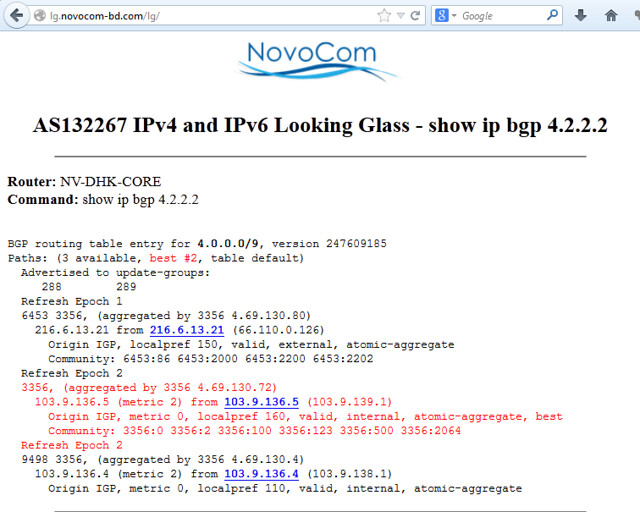
"show ip bgp" output
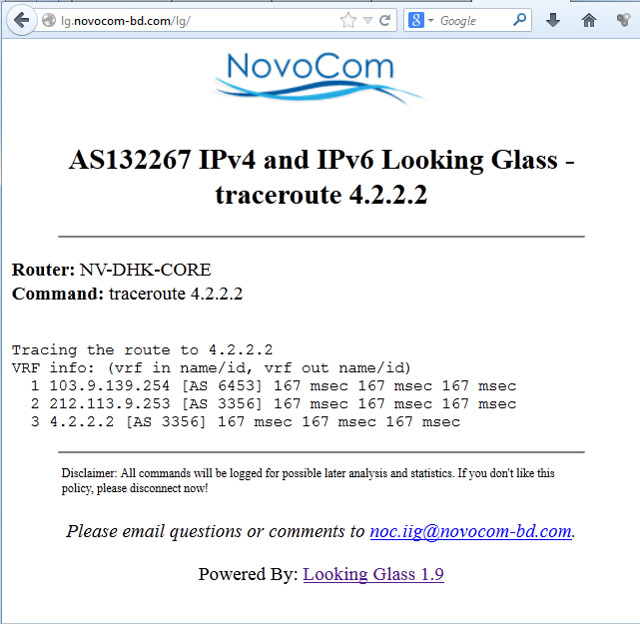
traceroute output
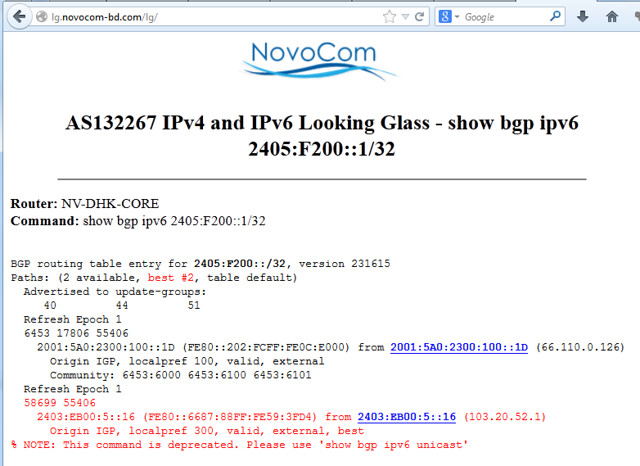
"show bgp ipv6" output
traceroute ipv6 output

Hope this helps.
This tutorial will describe how to set up a BGP Looking Glass server on CentOS. For those of you new to the concept of BGP and Looking Glass, let's start with introduction. If you are familiar with BGP, skip it over.
What is Border Gateway Protocol (BGP)?
BGP is literally the routing backbone of the Internet. As we all know it, the Internet consists of millions of interconnected networks. In the telecom industry, these millions of individual networks are referred to as Autonomous Systems (ASs). Each AS is managed under a single administrative domain (e.g., one organization or an ISP), with its own unique AS number and IP address pools aka IP prefixes. The AS number can be private (i.e., not visible publicly), and so can be the IP address pools. For example, when multiple branch offices of one company interconnect, they can use a private AS number and IP prefix for each branch office. Networks that want to use a public AS number and publicly routable IP addresses have to apply for them at a Regional Internet Registry (RIR) like ARIN, APNIC, RIPE. The RIR assigns a unique AS number and IP prefix(es) to that network.BGP is the industry standard inter-domain routing protocol used to interconnect different ASs. All IP prefixes known to one AS are shared with neighboring ASs, thus populating the BGP routing tables of their border routers. The Internet is formed by such interconnections between millions of public ASs through BGP. So stating here again, BGP is essentially the routing backbone of the Internet.
What is Looking Glass?
Looking Glass (LG) is a web-based tool that helps network operators analyze how traffic is routed to and from a particular AS. The BGP routing table of an AS depends on what other ASs it is connected with. To be more specific, the IP prefixes learnt from neighboring ASs will populate the local BGP routing table, which will be used by the local AS to make its routing decisions.Now assume that for troubleshooting routing or network latency related issues, we want to run ping or traceroute from a remote AS. Naturally, we do not have access to their equipment so running the test from remote locations is not feasible. However, the admins of a remote AS could set up a Looking Glass server with web-based interface, which will allow any user to run specific commands like ping, traceroute, or access the remote AS's BGP routing information, without logging in to their routers. These tests provide useful insight during network troubleshooting, as the ping or traceroute probing can be conducted from another AS's networks.
Setting Up BGP Looking Glass on CentOS
Before we start, please make sure that SELinux and firewall are tuned to permit necessary services and ports like 23, 2601, 2605, 80.First of all, dependencies are installed. Using the Reporforge repository is recommended.
[root@lg ~]# yum install wget perl-Net-Telnet perl-Net-Telnet-Cisco perl-XML-Parser httpd
The Looking Glass will be set up using LG1. Necessary software is
downloaded and extracted. The directory where the site will be stored is
also created.
[root@lg ~]# cd /root
[root@lg ~]# wget http://www.version6.net/lg/lg-1.9.tar.gz
[root@lg ~]# tar zxvf lg-1.9.tar.gz
[root@lg ~]# mkdir /var/www/html/lg
Now that all files have been extracted, they are copied into the web server directory. Necessary permissions are also set.[root@lg ~]# wget http://www.version6.net/lg/lg-1.9.tar.gz
[root@lg ~]# tar zxvf lg-1.9.tar.gz
[root@lg ~]# mkdir /var/www/html/lg
[root@lg ~]# cd /var/www/html/lg
[root@lg lg]# cp /root/lg-1.9/lg.cgi .
[root@lg lg]# cp /root/lg-1.9/favicon.ico .
[root@lg lg]# cp /root/lg-1.9/lg.conf .
All the files must be readable.[root@lg lg]# cp /root/lg-1.9/lg.cgi .
[root@lg lg]# cp /root/lg-1.9/favicon.ico .
[root@lg lg]# cp /root/lg-1.9/lg.conf .
[root@lg lg]# chmod 644 *
The lg.cgi script must be executable.
[root@lg lg]# chmod 755 lg.cgi
Tuning the Web Server
The index.html file is created for LG with necessary redirection.
[root@lg ~]# vim /var/www/html/index.html
In case DNS is set up for the Looking Glass server:
1
2
3
4
5
| <html><head><meta http-equiv="refresh" content="0;url=http://lg.example.tst/lg/lg.cgi"></head></html> |
1
2
3
4
5
| <html><head><meta http-equiv="refresh" content="0;url=http://IP/lg.cgi"></head></html> |
[root@lg ~]# vim /etc/httpd/conf/httpd.conf
## The favicon path and the cgi script paths are defined ##
Alias /lg/favicon.ico "/var/www/html/lg/favicon.ico"
ScriptAlias /lg "/var/www/html/lg/lg.cgi"
The httpd service is started and added to startup list.
[root@lg ~]# service httpd start
[root@lg ~]# chkconfig httpd on
[root@lg ~]# chkconfig httpd on
Adding Routers to the Looking Glass
LG supports Cisco, Juniper and Linux Quagga routers. All routers are added to /var/www/html/lg/lg.conf. Please note that the router password required is the remote login password, and NOT the privileged EXEC password aka 'enable' password.
[root@lg ~]# vim /var/www/html/lg/lg.conf
1
2
3
4
5
6
7
8
9
10
11
12
13
| <Separator>Sample Routers</Separator><Router Name="Router-A"><Title>Router-A</Title><URL>telnet://login:routerPassword@routerIP</URL></Router><Router Name="Router-B"><Title>Router-B</Title><URL>telnet://login:routerPassword@routerIP</URL></Router> |
Here's a screenshot of the fresh Looking Glass.
Provisioning for IPv6
Preparing the Looking Glass for IPv6 is simple as well. The following lines are modified.
[root@lg ~]# vim /var/www/html/lg/lg.cgi
## $ipv4enabled-- is replaced with $ipv4enabled++ around line 398 ##
### Commented out $ipv4enabled-- ####
$ipv4enabled++
Then the routers that support IPv6 are specified.
[root@lg ~]# vim /var/www/html/lg/lg.conf
1
2
3
4
5
| <Router Name="Router-A" EnableIPv6="Yes"><Title>Router-A</Title><URL>telnet://login:routerPassword@routerIP</URL></Router> |
Optional Configurations
The following configuration is optional. However, they can help in giving the LG a professional look.1. Logo
The logo image is stored in /var/www/html/images.
[root@lg ~]# mkdir /var/www/html/images
[root@lg ~]# cp logo.png /var/www/html/images/logo.png
[root@lg ~]# cp logo.png /var/www/html/images/logo.png
[root@lg ~]# vim /var/www/html/lg/lg.conf
1
| <LogoImage Align="center" Link="http://www.companyweb.com/">/images/logo.png</LogoImage> |
The headers of the page can modified as needed.
[root@lg ~]# vim /var/www/html/lg/lg.conf
1
2
| <HTMLTitle>ASXXXX IPv4 and IPv6 Looking Glass</HTMLTitle><ContactMail>lg@example.tst</ContactMail> |
[root@lg ~]# vim /var/www/html/lg/lg.cgi
1
2
3
4
5
6
7
8
9
10
11
| #### In the closing section of the HTML tag i.e. </HTML>, the following line can be added####<I> Please email questions or comments to <A HREF="mailto:$email">$email</A>.</I><P><P>Powered By: <a href="http://wiki.version6.net/LG">Looking Glass 1.9</a></P></CENTER></BODY></HTML> |
Needless to say, logging is important. The log file can be created this way.
[root@lg ~]# touch /var/log/lg.log
[root@lg ~]# chown apache:apache /var/log/lg.log
[root@lg ~]# chown apache:apache /var/log/lg.log
[root@lg ~]# vim /var/www/html/lg/lg.conf
1
| <LogFile>/var/log/lg.log</LogFile> |
Looking Glass Screenshots
The following are some screenshots from the Looking Glass of AS 132267.Hope this helps.

No comments:
Post a Comment