https://www.howtoforge.com/tutorial/install-git-and-github-on-ubuntu-14.04
GitHub is a treasure trove of some of the world's best projects, built by the contributions of developers all across the globe. This simple, yet extremely powerful platform helps every individual interested in building or developing something big to contribute and get recognized in the open source community.
This tutorial will be a quick setup guide for installing and using GitHub and how to perform its various functions of creating a repository locally, connecting this repo to the remote host that contains your project (where everyone can see), committing the changes and finally pushing all the content in the local system to GitHub.
Please note that this tutorial assumes that you have a basic
knowledge of the terms used in Git such as push, pull requests, commit,
repository, etc. It also requires you to register to GitHub here and make a note of your GitHub username. So let's begin:

So here, Mytest is the folder that is created and "init" makes the folder a GitHub repository. Change the directory to this newly created folder:
Here we already have the README file. So, lets create another file which contains a simple C program and call it sample.c. The contents of it will be:
Once this is created, we can push the contents of the local repository onto the GitHub repository in your profile. Connect to the repository on GitHub using the command:
Important Note: Make sure you replace 'user_name' and 'Mytest' in the path with your Github username and folder before running the command!
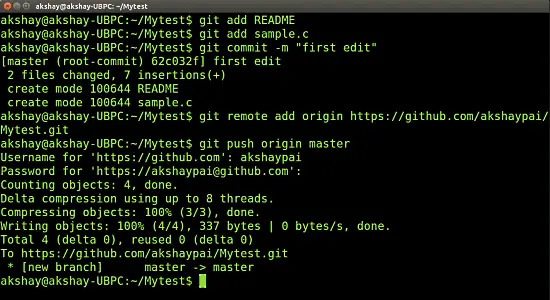
The following image shows the procedure from step 5 to step 8
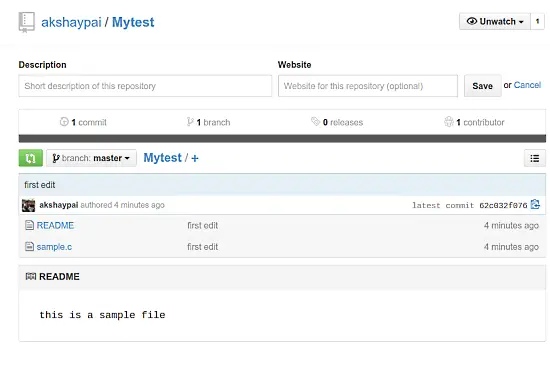
So this adds all the contents of the Mytest folder (my local repository) to GitHub. For subsequent projects or for creating repositories, you can start off with step 3 directly. Finally, if you login to to your GitHub account and click on your Mytest repository, you can see that the 2 files README and sample.c have been uploaded and are visible to all as shown in the follwoing image.
GitHub is a treasure trove of some of the world's best projects, built by the contributions of developers all across the globe. This simple, yet extremely powerful platform helps every individual interested in building or developing something big to contribute and get recognized in the open source community.
This tutorial will be a quick setup guide for installing and using GitHub and how to perform its various functions of creating a repository locally, connecting this repo to the remote host that contains your project (where everyone can see), committing the changes and finally pushing all the content in the local system to GitHub.
1 Installing Git for Linux
Download and install Git for Linux :
sudo apt-get install git
2 Configuring GitHub
Once the installation has successfully completed, the next thing to do is to set up the configuration details of the GitHub user. To do this use the following two commands by replacing "user_name" with your GitHub username and replacing "email_id" with your email-id you used to create your GitHub account.
git config --global user.name "user_name"
git config --global user.email "email_id"
The following image shows an example for my configuration with my
"user_name" being "akshaypai" and my "email_id" being "abc123@gmail.com"3 Creating a local repository
Create a folder in your system. This will serve as a local repository which will later be pushed onto the GitHub website. Use the following command:
git init Mytest
If the repository is created successfully, then you will get the following line:
Initialized empty Git repository in /home/akshay/Mytest/.git/
This line may vary depending on your system.So here, Mytest is the folder that is created and "init" makes the folder a GitHub repository. Change the directory to this newly created folder:
cd Mytest
4 Creating a README file to describe the repository
Now create a README file and enter some text like "this is a git setup on linux". The README file is generally used to describe what the repository contains or what the project is all about. Example:
gedit README
You can use any other text editors. I use gedit. The content of the README file will be:
This is a git repo
5 Adding repository files to an index
This is an important step. Here we add all the things that need to be pushed onto the website into an index. These things might be the text files or programs that you might add for the first time into the repository or it could be adding a file that already exists but with some changes (a newer version/updated version).Here we already have the README file. So, lets create another file which contains a simple C program and call it sample.c. The contents of it will be:
#includeSo, now that we have 2 filesint main() { printf("hello world"); return 0; }
README and sample.c
add it to the index by using the following 2 commands:
git add README
git add smaple.c
Note that the "git add" command can be used to add any number of
files and folders to the index. Here, when I say index, what I am
refering to is a buffer like space that stores the files/folders that
have to be added into the Git repository.6 Committing changes made to the index
Once all the files are added, we can commit it. This means that we have finalized what additions and/or changes have to be made and they are now ready to be uploaded onto our repository. Use the command :
git commit -m "some_message"
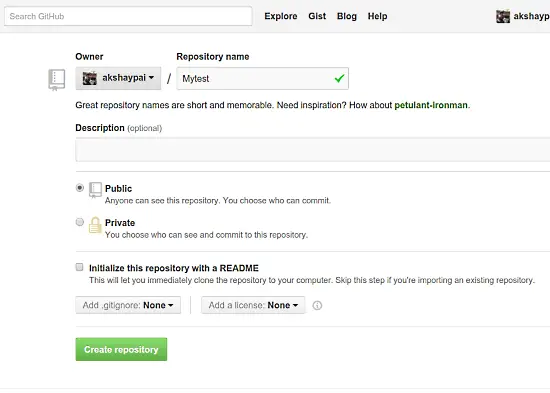
"some_message" in the above command can be any simple message like "my first commit" or "edit in readme", etc.7 Creating a repository on GitHub
Create a repository on GitHub. Notice that the name of the repository should be the same as the repository's on the local system. In this case, it will be "Mytest". To do this login to your account on https://github.com. Then click on the "plus(+)" symbol at the top right corner of the page and select "create new repository". Fill the details as shown in the image below and click on "create repository" button.Once this is created, we can push the contents of the local repository onto the GitHub repository in your profile. Connect to the repository on GitHub using the command:
Important Note: Make sure you replace 'user_name' and 'Mytest' in the path with your Github username and folder before running the command!
git remote add origin https://github.com/user_name/Mytest.git
8 Pushing files in local repository to GitHub repository
The final step is to push the local repository contents into the remote host repository (GitHub), by using the command:
git push origin master
Enter the login credentials [user_name and password] .The following image shows the procedure from step 5 to step 8
So this adds all the contents of the Mytest folder (my local repository) to GitHub. For subsequent projects or for creating repositories, you can start off with step 3 directly. Finally, if you login to to your GitHub account and click on your Mytest repository, you can see that the 2 files README and sample.c have been uploaded and are visible to all as shown in the follwoing image.

No comments:
Post a Comment