http://www.linuxbsdos.com/2013/03/21/how-to-deploy-piwik-web-analytics-on-openshift-online
Piwik Web Analytics is a Free Software traffic analytics application for Web publishers. If you have the resources to run your own, it is a good replacement for Google Analytics. It is a database-driven, PHP application that you can download and install on your Web hosting account. There is also a hosted service provided by Arvixe.
If you have a Web hosting account, but not enough resources to host Piwik, OpenShift Online presents an alternative platform to host it on. OpenShift Online is a cloud computing Platform as a Service (PaaS) provided by Red Hat, Inc. If you are new to OpenShift, you may want to review OpenShift Online: A non-developer’s guide.
This article, the second on OpenShift, shows how to deploy Piwik on a FreeShift account, the free service component of OpenShift Online.
If you don’t yet have an account, you may sign up for one here. After signing up and verifying the account, you may start using and deploying applications via a Web interface or by using the command-line OpenShift Client Tools (RHC) from any supported operating system. Linux, Mac OS X, and Windows are currently supported.

The Web interface is really nice, but I find that the easiest method for deploying an application initially is via RHC. That requires installing the client control application on the operating system you are using. In this article, the steps to install and use it from Fedora and Ubuntu are given. For Windows or Mac OS X installation guide, please see this installation guide.
After setting up a new account, one of the first things you do from the Web management interface is create a namespace. Your account will have a .rhcloud.com URL, which will be accessible from yourNamespace.rhcloud.com. so your namespace is like a subdomain of rhcloud.com. That’s a very simplified way of explaining it, but I think it gets the point across better than spewing more technical jargon. Any application you create will be accessible from Appname-yourNamespace.rhcloud.com.
I deployed Piwik from a Fedora 18 installation, but you can do it from any other Linux distribution. The client tools are Ruby applications, so you’ll need to install it and everything else that it needs to run. Plus, Git will have to be installed, because that’s what will be used to push or deploy the app to your OpenShift Online account.
So after creating and configuring a new account, here are the steps required to create and deploy Piwik:
1. Install the requirements: Ruby 1.8.7 (or later) and Git are required. To install them on Fedora 18, you just need one command –
2. Create and deploy Piwik: Now that you have all the requirements in place, the next step is to create and deploy the applications to your OpenShift Online account. Doing this involves creating a PHP app on your account. (Piwik is a PHP applications.). Then adding a (MySQL) database cartridge, cloning the Piwik repository, and pushing it to your OpenShift account. (Steps for doing this were taken from the official Piwik OpenShift quickstart guide.) You may want to visit that guide, then come back to step 3 of this tutorial when you are done.
The next five screen shots show how the process unfolded on my Fedora 18 computer.
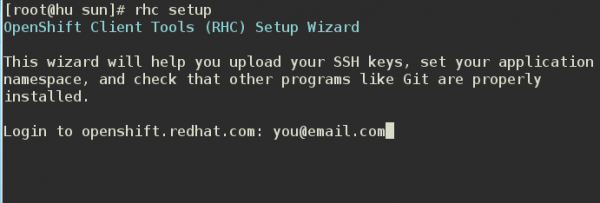
Run the command rhc setup to start the setup wizard. This assumes that you have already created and configured your account, so what you have to do here is login.
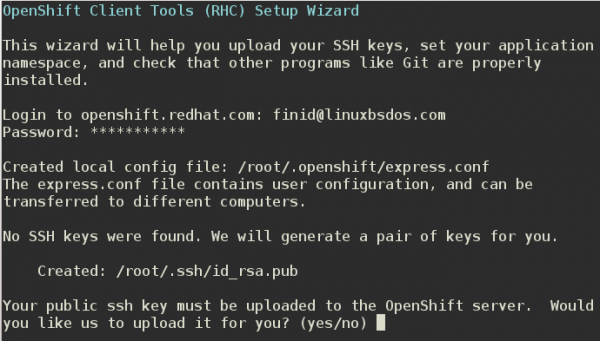
Authentication between your computer and your OpenShift account is accomplished using SSH keys. The first time you run rhc setup, the keys will be created and the public key uploaded to your account. After this, you may log into your account via ssh. The instruction will be on the Web management interface.
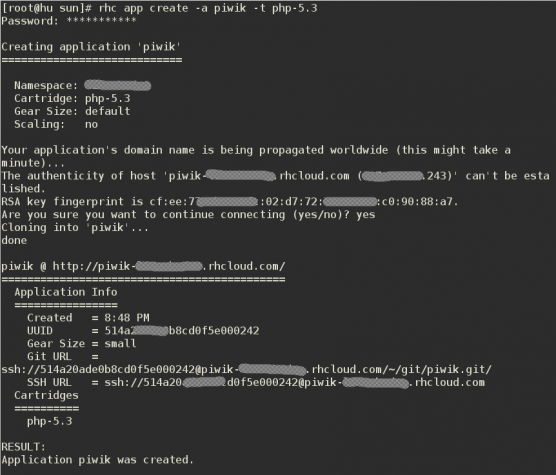
Next. Create the application using the commands in this screen shot. The “-a” switch is used to specify the name of the application, while the “-t” is used to specify the Web framework (cartridge) the application will use.
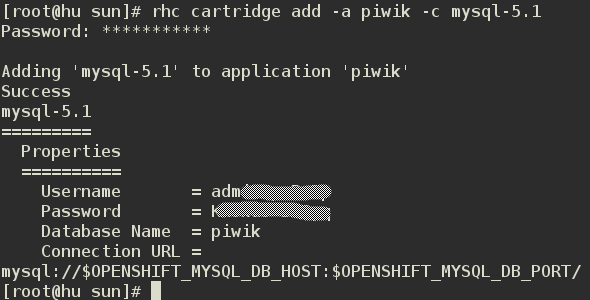
Piwik is database-driven, so you need to add a MySQL cartridge using
the commands shown in this screen shot. Make note of the name, username,
and password of the database created here, because you’ll need them to
setup and Piwik later. To make it easier to manage the MySQL databases
you create in your account, I highly recommend that you create a
phpMyAdmin cartridge from the Web Management interface. Creating one on
my account made it easy to identify the source of a show-stopper error
during the final step of this exercise.
The foregoing should have created a “piwik/php” directory where you’ve been running the commands. So you need to change into the piwik/php directory, make sure its empty (run rm -rf *), then clone the Piwik Git repository using these commands:
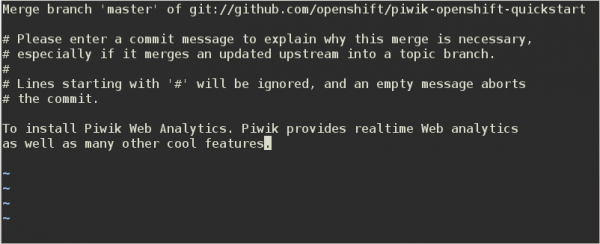
Finally, push the cloned repo to your OpenShift account using the git push command. You’ll be promoted to enter a commit message. Note that you’ll be entering the message via Vi, so you need to enter edit mode by hitting the a, i, or o keys. Type the message, then press the Esc key to exit edit mode. After that, save and quit by using the following character sequence :wq. That takes care of step 2. You will be given the URL of your applications, which should take for form: piwik-yourNamespace.rhcloud.net. For the final step, you need to access that URL and install Piwik.
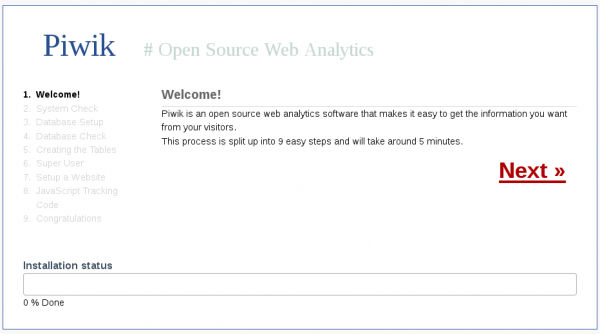
3. Setup and configure Piwik: When you access Piwik’s URL, you will see something like this screen shot. Click Next.
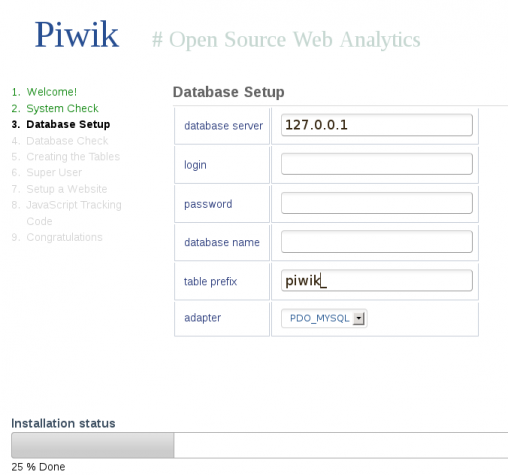
This is where you input the database name, username and password that was created in the previous step. It was supposed to be the easiest step, but it improved otherwise. By default, the database server is referenced by the server’s loopback address, which is always 127.0.0.1.
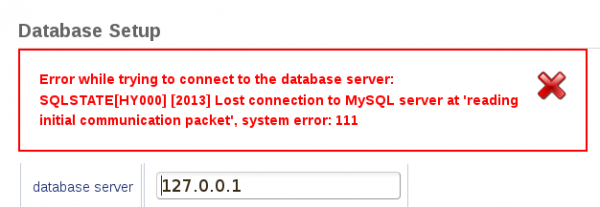
Specifying the database credentials and clicking Next produced the error message shown in this screen shot.
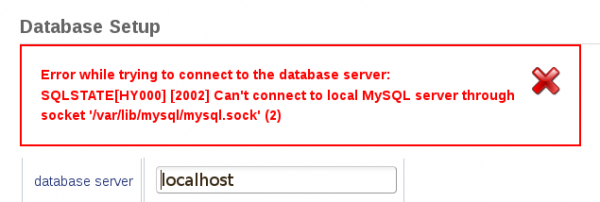
Changing the loopback address to localhost, which means the same thing, produced a different error message.
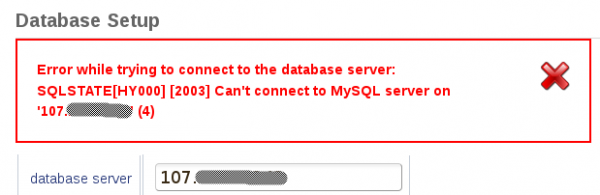
Using the server’s routable IP address produced yet a different error message. A search of the knowledgebase and googling did not give me a solution that worked, so I accessed phpMyAdmin to see what I could find.
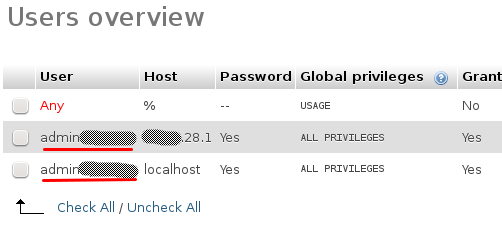
This screen shot shows what I found on phpMyAdmin. For some reason, a duplicate of the username was created with an actual IP address. Specifying the IP address I found here in place of localhost or the loopback address solved the problem.
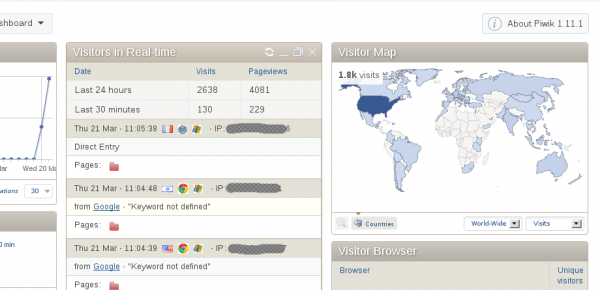
So there you have it. I now have Piwik running on a FreeShift account on OpenShift Online, which I use to monitor traffic on this website. Saves me from running it on my VPS account. Besides the RAM and disk space quota, one small gear also has a 40,000-file limitation. But that’s not something to worry about here, because this setup has generated just 3287 files.
This just shows how a non-developer can take advantage of a developer-targeted service like OpenShift. Piwik is just one of many ready-made applications you can deploy on OpenShift. View the complete list here.
Piwik Web Analytics is a Free Software traffic analytics application for Web publishers. If you have the resources to run your own, it is a good replacement for Google Analytics. It is a database-driven, PHP application that you can download and install on your Web hosting account. There is also a hosted service provided by Arvixe.
If you have a Web hosting account, but not enough resources to host Piwik, OpenShift Online presents an alternative platform to host it on. OpenShift Online is a cloud computing Platform as a Service (PaaS) provided by Red Hat, Inc. If you are new to OpenShift, you may want to review OpenShift Online: A non-developer’s guide.
This article, the second on OpenShift, shows how to deploy Piwik on a FreeShift account, the free service component of OpenShift Online.
If you don’t yet have an account, you may sign up for one here. After signing up and verifying the account, you may start using and deploying applications via a Web interface or by using the command-line OpenShift Client Tools (RHC) from any supported operating system. Linux, Mac OS X, and Windows are currently supported.

The Web interface is really nice, but I find that the easiest method for deploying an application initially is via RHC. That requires installing the client control application on the operating system you are using. In this article, the steps to install and use it from Fedora and Ubuntu are given. For Windows or Mac OS X installation guide, please see this installation guide.
After setting up a new account, one of the first things you do from the Web management interface is create a namespace. Your account will have a .rhcloud.com URL, which will be accessible from yourNamespace.rhcloud.com. so your namespace is like a subdomain of rhcloud.com. That’s a very simplified way of explaining it, but I think it gets the point across better than spewing more technical jargon. Any application you create will be accessible from Appname-yourNamespace.rhcloud.com.
I deployed Piwik from a Fedora 18 installation, but you can do it from any other Linux distribution. The client tools are Ruby applications, so you’ll need to install it and everything else that it needs to run. Plus, Git will have to be installed, because that’s what will be used to push or deploy the app to your OpenShift Online account.
So after creating and configuring a new account, here are the steps required to create and deploy Piwik:
1. Install the requirements: Ruby 1.8.7 (or later) and Git are required. To install them on Fedora 18, you just need one command –
yum install rubygem-rhc git. Or if you installed and prefer using Dnf, type dnf install rubygem-rhc git. That will install Ruby, the RHC tools and Git. On Ubuntu, you need two commands to achieve the same thing. First, type sudo apt-get install rubygems git, then gem install rhc. 2. Create and deploy Piwik: Now that you have all the requirements in place, the next step is to create and deploy the applications to your OpenShift Online account. Doing this involves creating a PHP app on your account. (Piwik is a PHP applications.). Then adding a (MySQL) database cartridge, cloning the Piwik repository, and pushing it to your OpenShift account. (Steps for doing this were taken from the official Piwik OpenShift quickstart guide.) You may want to visit that guide, then come back to step 3 of this tutorial when you are done.
The next five screen shots show how the process unfolded on my Fedora 18 computer.
Run the command rhc setup to start the setup wizard. This assumes that you have already created and configured your account, so what you have to do here is login.
Authentication between your computer and your OpenShift account is accomplished using SSH keys. The first time you run rhc setup, the keys will be created and the public key uploaded to your account. After this, you may log into your account via ssh. The instruction will be on the Web management interface.
Next. Create the application using the commands in this screen shot. The “-a” switch is used to specify the name of the application, while the “-t” is used to specify the Web framework (cartridge) the application will use.
The foregoing should have created a “piwik/php” directory where you’ve been running the commands. So you need to change into the piwik/php directory, make sure its empty (run rm -rf *), then clone the Piwik Git repository using these commands:
git remote add upstream -m master git://github.com/openshift/piwik-openshift-quickstart.git
git pull -s recursive -X theirs upstream master.
Finally, push the cloned repo to your OpenShift account using the git push command. You’ll be promoted to enter a commit message. Note that you’ll be entering the message via Vi, so you need to enter edit mode by hitting the a, i, or o keys. Type the message, then press the Esc key to exit edit mode. After that, save and quit by using the following character sequence :wq. That takes care of step 2. You will be given the URL of your applications, which should take for form: piwik-yourNamespace.rhcloud.net. For the final step, you need to access that URL and install Piwik.
3. Setup and configure Piwik: When you access Piwik’s URL, you will see something like this screen shot. Click Next.
This is where you input the database name, username and password that was created in the previous step. It was supposed to be the easiest step, but it improved otherwise. By default, the database server is referenced by the server’s loopback address, which is always 127.0.0.1.
Specifying the database credentials and clicking Next produced the error message shown in this screen shot.
Changing the loopback address to localhost, which means the same thing, produced a different error message.
Using the server’s routable IP address produced yet a different error message. A search of the knowledgebase and googling did not give me a solution that worked, so I accessed phpMyAdmin to see what I could find.
This screen shot shows what I found on phpMyAdmin. For some reason, a duplicate of the username was created with an actual IP address. Specifying the IP address I found here in place of localhost or the loopback address solved the problem.
So there you have it. I now have Piwik running on a FreeShift account on OpenShift Online, which I use to monitor traffic on this website. Saves me from running it on my VPS account. Besides the RAM and disk space quota, one small gear also has a 40,000-file limitation. But that’s not something to worry about here, because this setup has generated just 3287 files.

This just shows how a non-developer can take advantage of a developer-targeted service like OpenShift. Piwik is just one of many ready-made applications you can deploy on OpenShift. View the complete list here.

No comments:
Post a Comment