http://www.tuxarena.com/intro/aliases.php
Aliases are custom commands which can replace a longer command or a group of commands, thus making it faster and easier to execute particular tasks by only typing a few characters. For example, one can only type upgrade instead of typing sudo apt-get upgrade && sudo apt-get upgrade and upgrade his Debian-based system. Aliases are very useful time-savers.
On most systems, the shell profile file includes certain aliases to be available by default. To see what aliases you have defined on your system, open a terminal and use the alias command. Here's a possible output:
In the above example, l, la, ll and ls are all aliases. When you type into the terminal la, the shell will actually execute the ls -A command, which is aliased to la, thus listing all the files in the current directory, omitting the virtual files . and ...
So how do you create aliases? It's pretty simple, you add them in a text file which is read by Bash. In this tutorial, we will add aliases to the ~/.bashrc file, which should already exist and is read by default by the shell. Notice that ~ means your home directory (e.g. /home/username) and also that .bashrc is a hidden directory, so you will have to enable viewing of hidden files in your file manager if you decide to edit it with a graphical application. We will add aliases at the end of this file, and since it's a plain text file, a simple text editor should suffice (like Gedit or Nano). For this example I will use Nano:
Go to the end of the file, and, under the last line, add aliases in the form of alias_name='commands'.
Notice that there should be no spaces between the alias name and the
command(s), which in turn is inside the single quote characters.
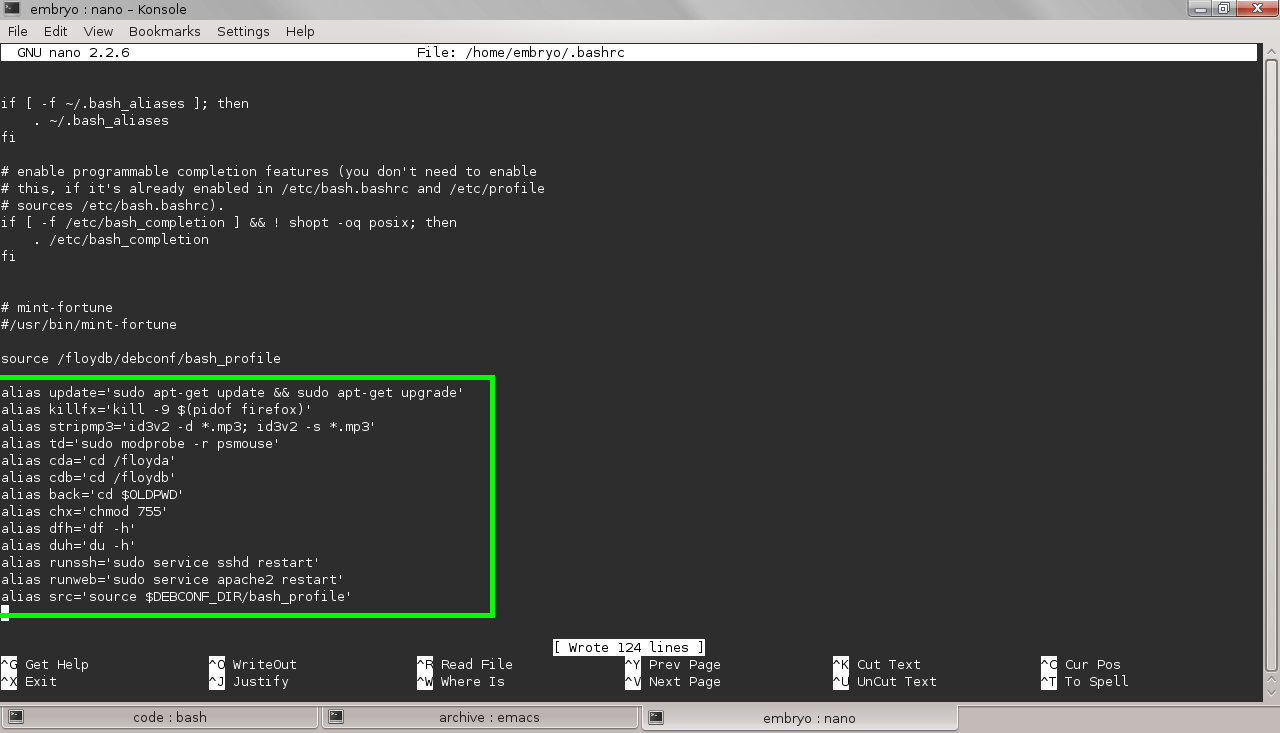
Take a look at the screenshot below to see several examples of aliases:

Now let's explain them.
This lets you upgrade your system (if it's a Debian-based one and uses apt) just by typing update. The && operator will only execute the commands that follow it if the first part was executed successfully (if sudo apt-get update fails, the last part will not be executed anymore).
This allows you to kill Firefox by typing killfx in the terminal.
This uses the command-line tool id3v2 to remove all tags from all the MP3 files in a directory. Notice the * wildcard, which expands into a list of all the files that end in .mp3 and the semicolon, which separates commands.
You can use this one to disable the laptop touchpad.
These aliases are shortcuts when changing the current working directory. You can make up anything here, e.g. alias cdnet='cd /etc/network/' or automatically edit a file like alias netedit='sudo nano /etc/network/interfaces'. The last one changes the current directory to the last known working directory.
The next alias sets the permissions of a file to 755 (rwxr-xr-x), making it executable for everybody, while the dfh and duh will display the disk usage, and, respectively, the current directory usage in human-readable format.
I'll skip to the last one now, which tells the shell to read (for that it uses source) the file $DEBCONF_DIR/bash_profile. This is just an example which I use on my computer, you may want to use here alias src='~/.bashrc'. This is useful to source again (read below) your ~/.bashrc file whenever you modify it.
Keep in mind that these are just examples, you can create your own aliases to virtually any commands. After you're done, save the file (Ctrl+O in Nano) and proceed to the next step.
Now everything should be in place. Type alias to see the aliases, then test them.
Aliases are custom commands which can replace a longer command or a group of commands, thus making it faster and easier to execute particular tasks by only typing a few characters. For example, one can only type upgrade instead of typing sudo apt-get upgrade && sudo apt-get upgrade and upgrade his Debian-based system. Aliases are very useful time-savers.
On most systems, the shell profile file includes certain aliases to be available by default. To see what aliases you have defined on your system, open a terminal and use the alias command. Here's a possible output:
alias l='ls -CF'
alias la='ls -A'
alias ll='ls -lF'
alias ls='ls --color=auto'
So how do you create aliases? It's pretty simple, you add them in a text file which is read by Bash. In this tutorial, we will add aliases to the ~/.bashrc file, which should already exist and is read by default by the shell. Notice that ~ means your home directory (e.g. /home/username) and also that .bashrc is a hidden directory, so you will have to enable viewing of hidden files in your file manager if you decide to edit it with a graphical application. We will add aliases at the end of this file, and since it's a plain text file, a simple text editor should suffice (like Gedit or Nano). For this example I will use Nano:
nano ~/.bashrc
Take a look at the screenshot below to see several examples of aliases:
Now let's explain them.
alias update='sudo apt-get update && sudo apt-get upgrade'
alias killfx='kill -9 $(pidof firefox)'
alias stripmp3='id3v2 -d *.mp3; id3v2 -s *.mp3'
alias td='sudo modprobe -r psmouse'
alias cda='cd /floyda'
alias cdb='cd /floydb'
alias back='cd $OLDPWD'
The next alias sets the permissions of a file to 755 (rwxr-xr-x), making it executable for everybody, while the dfh and duh will display the disk usage, and, respectively, the current directory usage in human-readable format.
I'll skip to the last one now, which tells the shell to read (for that it uses source) the file $DEBCONF_DIR/bash_profile. This is just an example which I use on my computer, you may want to use here alias src='~/.bashrc'. This is useful to source again (read below) your ~/.bashrc file whenever you modify it.
Keep in mind that these are just examples, you can create your own aliases to virtually any commands. After you're done, save the file (Ctrl+O in Nano) and proceed to the next step.
OK, I Added the Aliases, Now What?
Now we have to make Bash aware of the newly added aliases. For this, we need to source the .bashrc file:
source ~/.bashrc

No comments:
Post a Comment