http://xmodulo.com/install-paravirtualized-xen-guest.html
This is a follow-up to the Xen hypervisor installation article. By this point you have a workstation - perhaps an old laptop or desktop - running the Xen hypervisor and Debian Jessie.
You can now add a few guest machines. This procedure installs a copy of Debian Jessie into a Xen image, then uses that image to start a guest domain. The procedure uses the Xen tools xl and xen-create-image.
Each virtual machine running on Xen is called a "domain." You can run as many domains as you can fit on your workstation. The first domain is already running -Debian OS you already installed is a virtual machine running on Xen.
The first domain is special. It is the only domain with the privilege of telling Xen what to do. No other domain gets to tell Xen to allocate resources, start a machine or connect to a console. This domain is called "Domain-0", or the "control domain." You can use the xl command to show this domain.
Xen provides two ways of creating virtual machines, called PV (Para-Virtualized) and HVM (Hardware Virtual Machine). PV is more efficient, but it requires special kernel software to run - it doesn't work for non-Linux systems. If you have started a Linux EC2 instance on Amazon Web Services, you may have noticed it is called a "PV guest."
The xen-create-image command is part of Xen-tools which helps you install Debian, Ubuntu and CentOS guests.
Log into your workstation as the root.
Install the xen-tools package.
The first time you create a Xen image using the above command, it will take a couple of minutes or more since necessary .deb packages will be downloaded and cached locally as part of Xen image creation. Make sure that the Xen host is connected to the Internet.
After successful run, the xen-create-image command creates a xen configuration file /etc/xen/my-pv-guest.cfg. This file contains instructions on how to create the guest machine. For instance, the .cfg file tells Xen to use PyGRUB to boot the kernel - this is one of the special tricks requried for PV guests.
The xen-create-image command carries out many other actions, including the following.
As part of its run, the xen-create-image command also creates a random password for the root account which you will need to log in.
Find the root password in the activity log.
Start the guest.
Connect to the Linux console.

Login with the root account.
Change the root password to something memorable.
Detach from the console with the key combination 'Ctrl' and ']'.
This is a follow-up to the Xen hypervisor installation article. By this point you have a workstation - perhaps an old laptop or desktop - running the Xen hypervisor and Debian Jessie.
You can now add a few guest machines. This procedure installs a copy of Debian Jessie into a Xen image, then uses that image to start a guest domain. The procedure uses the Xen tools xl and xen-create-image.
The Control Domain and Guest Domains
The Xen hypervisor software running on your workstation is a VMM (Virtual Machine Monitor) created by the Xen Project. This software is a thin layer running on top of the hardware. Its only job is to allow many virtual machines to run on one physical machine.Each virtual machine running on Xen is called a "domain." You can run as many domains as you can fit on your workstation. The first domain is already running -Debian OS you already installed is a virtual machine running on Xen.
The first domain is special. It is the only domain with the privilege of telling Xen what to do. No other domain gets to tell Xen to allocate resources, start a machine or connect to a console. This domain is called "Domain-0", or the "control domain." You can use the xl command to show this domain.
root@debian:~# xl list
Name          ID   Mem VCPUs  State Time(s)
Domain-0      0  3868     2     r-----      48.0
Other domains cannot control Xen. These are called "guest domains" or "Domain-U" (that's U for Unprivileged).
Xen provides two ways of creating virtual machines, called PV (Para-Virtualized) and HVM (Hardware Virtual Machine). PV is more efficient, but it requires special kernel software to run - it doesn't work for non-Linux systems. If you have started a Linux EC2 instance on Amazon Web Services, you may have noticed it is called a "PV guest."
Install Xen-Tools
Create a new image using the xen-create-image command. This is a Perl script that bundles up the many tasks required to make a Xen image into one command.The xen-create-image command is part of Xen-tools which helps you install Debian, Ubuntu and CentOS guests.
Log into your workstation as the root.
Install the xen-tools package.
# apt-get install xen-tools
Create a Xen Image
A Xen image is a copy of a boot disk. Once you put the image together with a configuration file describing what the virtual machine should look like, you can run your first guest domain.
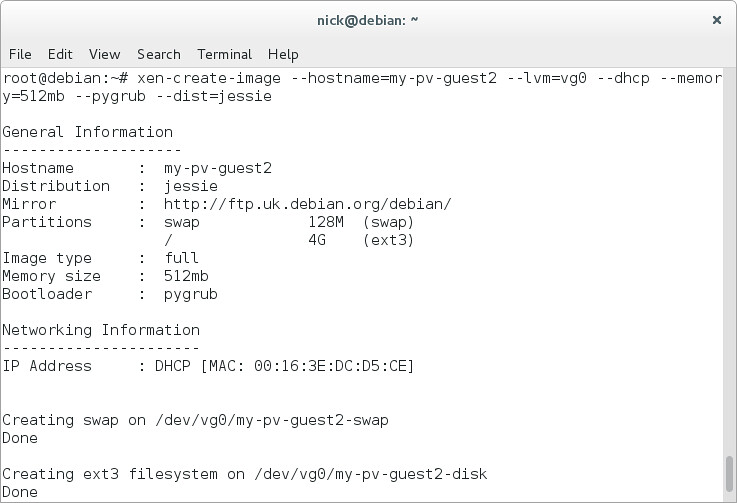
# xen-create-image \
--hostname=my-pv-guest \
--lvm=vg0 \
--dhcp \
--memory=512mb \
--pygrub \
--dist=jessie
--hostname=my-pv-guest \
--lvm=vg0 \
--dhcp \
--memory=512mb \
--pygrub \
--dist=jessie
The first time you create a Xen image using the above command, it will take a couple of minutes or more since necessary .deb packages will be downloaded and cached locally as part of Xen image creation. Make sure that the Xen host is connected to the Internet.
After successful run, the xen-create-image command creates a xen configuration file /etc/xen/my-pv-guest.cfg. This file contains instructions on how to create the guest machine. For instance, the .cfg file tells Xen to use PyGRUB to boot the kernel - this is one of the special tricks requried for PV guests.
The xen-create-image command carries out many other actions, including the following.
- Add storage to the vg0 volume group (a 4GB root partition and a 128MB swap partition).
- Run debootstrap to download .deb packages and install Debian Jessie.
- Use the Bash script /usr/share/xen-tools/jessie.d/40-setup-networking to tell the new OS to use DHCP.
root@debian:~# lvs
  LV               VG   Attr       LSize   Pool Origin Data%  Meta%  Move Log Cpy%Sync Convert
  my-pv-guest-disk vg0  -wi-a-----   4.00g
  my-pv-guest-swap vg0  -wi-a----- 128.00m
The above command shows two new volumes - one acting as the root partition and the other as the swap disk.
As part of its run, the xen-create-image command also creates a random password for the root account which you will need to log in.
Find the root password in the activity log.
# cd /var/log/xen
# grep Password my-pv-guest.log
# grep Password my-pv-guest.log
Root Password : 6irURvu4j4mjw7pGGzuGySiThe password is a very long string.
Start a Guest Domain
Now you have an image and configuration file, you can create a new guest domain. The configuration file /etc/xen/my-pv-guest.cfg tells Xen how to create the new machine.Start the guest.
# xl create /etc/xen/my-pv-guest.cfg
Check your work after starting this instance.
root@debian:~# xl list
Name              ID  Mem VCPUs      State   Time(s)
Domain-0          0  3299     2     r-----      54.9
my-pv-guest       1   512     1     -b----       2.3
Connect to Your New Guest
The guest domain is running, but using it is not obvious. Operating systems create a console that the administrator can use, to see system activity and make changes. The Linux console is a CLI, not a GUI.Connect to the Linux console.
# xl console my-pv-guest
You may see many boot messages in the console. Login with the root account.
Change the root password to something memorable.
# passwd
Log out. At this point, you are still connected to the guest's console. Detach from the console with the key combination 'Ctrl' and ']'.
Clean Up
Hit the virtual power switch to turn off the machine.
# xl shutdown my-pv-guest
The new guest is destroyed instantly.
root@debian:~# xl shutdown my-pv-guest
Shutting down domain 1The guest domain is gone but the image is still there, ready to be used next time.

No comments:
Post a Comment