https://www.howtoforge.com/tutorial/ubuntu-linux-screencast
There are many screencasting solutions for Linux users to choose from nowadays and more tools pop out every day to cover this special need. Although many suffer from performance issues, especially when used to capture in game action, there are many good pieces of software like the simple to use and versatile Simple Screen Recorder (http://www.maartenbaert.be/simplescreenrecorder/)
GUI tools are nice but things can always be better when using the
terminal. This would increase performance even further and bring you to a
deeper understanding of what you are asking the system to do. It's easy
and fairly simple so let's get started.
To capture your desktop you will need the popular FFmpeg set of libraries installed in your system. To do so open your distribution's package manager and search for the package “ffmpeg”. Ubuntu users can use the following commands on a terminal:
Pressing the 'q' button will stop the capturing and save the file.
Now what if you want the sound to be captured too? That is easy using
ALSA with FFmpeg. All you need to do is simply add this line: '-f alsa -ac 2 -i puls' to
the previous command and before the newfilename that is in the end.
This will add sound to your capturing and you can use the following
parameters for more advanced sound related options: -ac: Channels, -ar: Audio sample rate, -ab: Audio bitrate
For those of you who want to do this for gaming you should better
first capture the video and then encode it instead of doing both at the
same time which is more system-streching. To improve the situation you
can add the -vcodec parameter to your command followed by a supported
codec and then -preset ultrafast. Here's a list of the supported video and audio codecs (https://www.ffmpeg.org/general.html#Video-Codecs)
Other options of x11grab that is what allows us to capture a region of our x11 display include the '-follow_mouse' and the 'show_region' arguments. The follow mouse guidesthe capturing area according to the mouse movements and can be either centered or with a pixel tollerance area. It is written like this in our command: '-follow_mouse centered' or '-follow_mouse 500' (mouse cursor can move inside a 500 pixel area before the context is moved).
The show_region shows what part of the whole screen is actually grabbed by ffmpeg. This can be useful in some cases and it is enabled by adding the following in our command: -show_region 1
There are many screencasting solutions for Linux users to choose from nowadays and more tools pop out every day to cover this special need. Although many suffer from performance issues, especially when used to capture in game action, there are many good pieces of software like the simple to use and versatile Simple Screen Recorder (http://www.maartenbaert.be/simplescreenrecorder/)
To capture your desktop you will need the popular FFmpeg set of libraries installed in your system. To do so open your distribution's package manager and search for the package “ffmpeg”. Ubuntu users can use the following commands on a terminal:
sudo apt-get install ffmpeg
and then
sudo apt-get update
After that you are ready to go right away. What you need is to
determine a few parameters that will act as a guide for ffmpeg. These
parameters include the size of the video, the type of the exported file,
the quality, the frame rate and the sound capture. The command goes
like this:
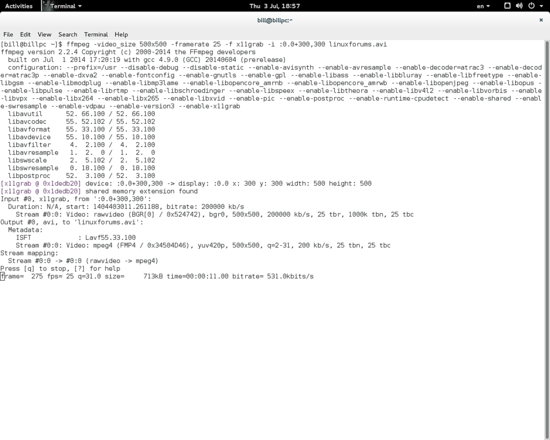
ffmpeg -video_size (desired resolution) -framerate (number) -f x11grab i 0.0 (start from the point 0.0) newfilename.mp4
So if I want to capture a video that represents a box at the center
of my screen and take an avi file as an output I would put something
like 500x500 after the -video_size and i: 0.0+300,300 that means put the
top left corner of the capturing box in x=300 and y=300 on my screen.
For the avi you would simple put filename.avi in the end of the command.
As simple as that :)Pressing the 'q' button will stop the capturing and save the file.
Other options of x11grab that is what allows us to capture a region of our x11 display include the '-follow_mouse' and the 'show_region' arguments. The follow mouse guidesthe capturing area according to the mouse movements and can be either centered or with a pixel tollerance area. It is written like this in our command: '-follow_mouse centered' or '-follow_mouse 500' (mouse cursor can move inside a 500 pixel area before the context is moved).
The show_region shows what part of the whole screen is actually grabbed by ffmpeg. This can be useful in some cases and it is enabled by adding the following in our command: -show_region 1

No comments:
Post a Comment