http://www.cyberciti.biz/hardware/howto-display-linux-logo-in-bash-terminal-using-screenfetch-linux_logo
Do you want to display a super cool logo of your Linux distribution along with basic hardware information? Look no further try awesome screenfetch and linux_logo utilities.

Here is the output from various operating system:
You will see a screenshot file at ~/Desktop/screenFetch-*.jpg. To take a screenshot and upload to imgur directly, enter:
Sample outputs:
OR
Sample outputs:
To see openbsd logo:
Or just see some random Linux logo:
You can combine bash for loop as follows to display various logos, enter:
Do you want to display a super cool logo of your Linux distribution along with basic hardware information? Look no further try awesome screenfetch and linux_logo utilities.
Say hello to screenfetch
screenFetch is a CLI bash script to show system/theme info in screenshots. It runs on a Linux, OS X, FreeBSD and many other Unix-like system. From the man page:This handy Bash script can be used to generate one of those nifty terminal theme information + ASCII distribution logos you see in everyone's screenshots nowadays. It will auto-detect your distribution and display an ASCII version of that distribution's logo and some valuable information to the right.
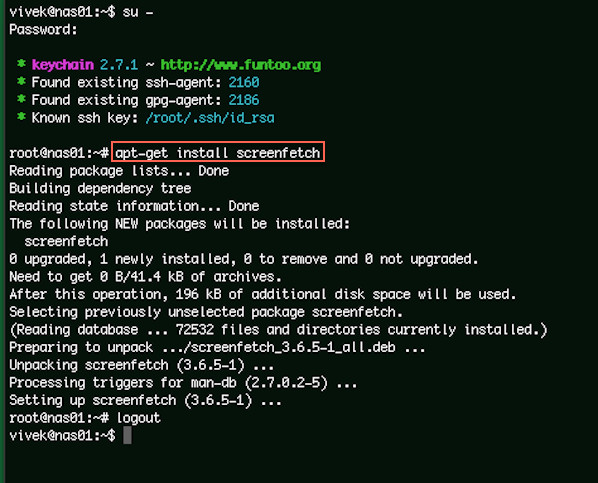
Installing screenfetch on Linux
Open the Terminal application. Simply type the following apt-get command on a Debian or Ubuntu or Mint Linux based system:$ sudo apt-get install screenfetch
Fig.01: Installing screenfetch using apt-get
Installing screenfetch Mac OS X
Type the following command:$ brew install screenfetch
Fig.02: Installing screenfetch using brew command
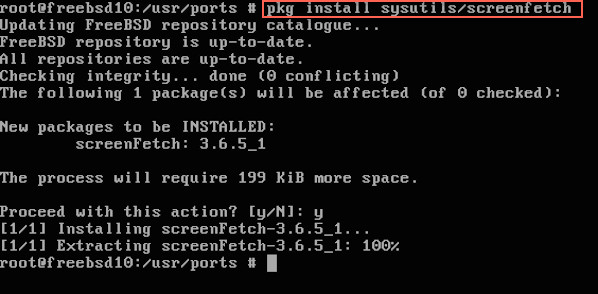
Installing screenfetch on FreeBSD
Type the following pkg command:$ sudo pkg install sysutils/screenfetch
Fig.03: FreeBSD install screenfetch using pkg
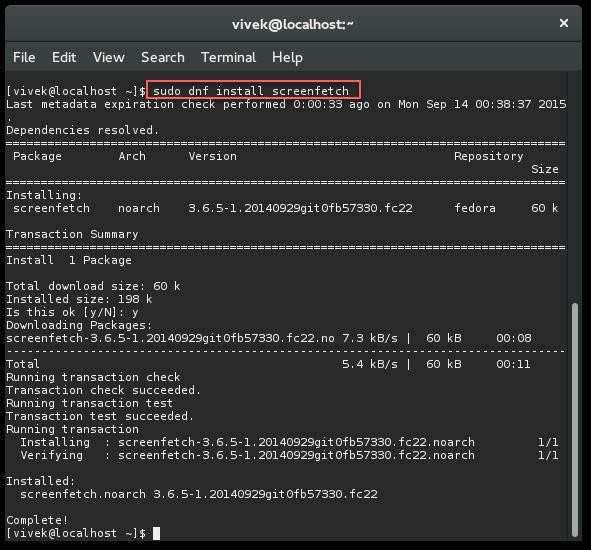
Installing screenfetch on Fedora Linux
Type the following dnf command:$ sudo dnf install screenfetch
Fig.04: Fedora Linux 22 install screenfetch using dnf
How do I use screefetch utility?
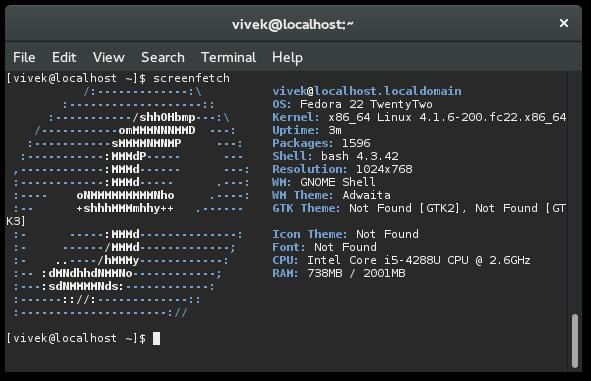
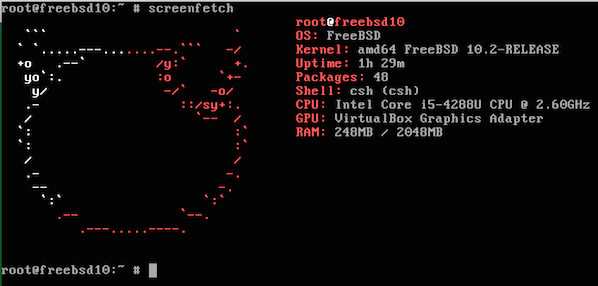
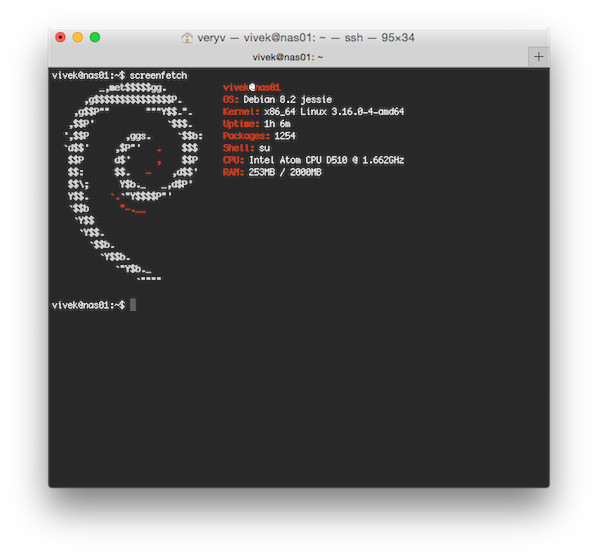
Simply type the following command:$ screenfetchHere is the output from various operating system:
-
- Screenfetch on Fedora
-
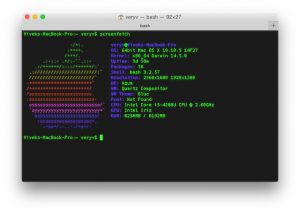
- Screenfetch on OS X
-
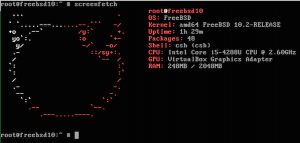
- Screenfetch on FreeBSD
-
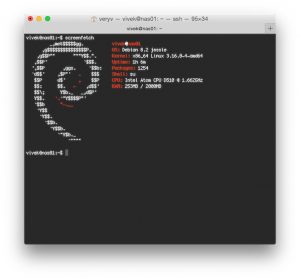
- Screenfetch on Debian Linux
Take screenshot
To take a screenshot and to save a file, enter:$ screenfetch -sYou will see a screenshot file at ~/Desktop/screenFetch-*.jpg. To take a screenshot and upload to imgur directly, enter:
$ screenfetch -su imgur Sample outputs:
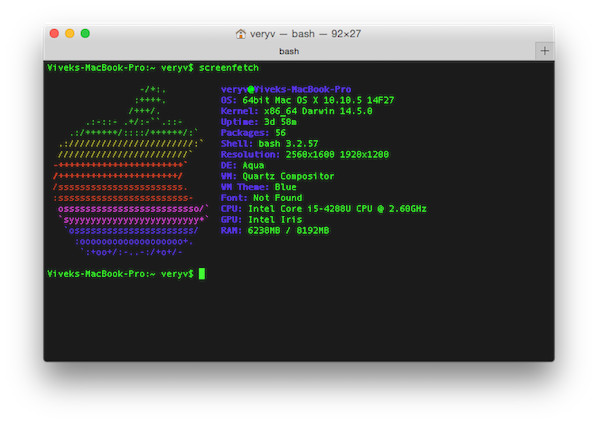
                 -/+:.          veryv@Viveks-MacBook-Pro
                :++++.          OS: 64bit Mac OS X 10.10.5 14F27
               /+++/.           Kernel: x86_64 Darwin 14.5.0
       .:-::- .+/:-``.::-       Uptime: 3d 1h 36m
    .:/++++++/::::/++++++/:`    Packages: 56
  .:///////////////////////:`   Shell: bash 3.2.57
  ////////////////////////`     Resolution: 2560x1600 1920x1200
 -+++++++++++++++++++++++`      DE: Aqua
 /++++++++++++++++++++++/       WM: Quartz Compositor
 /sssssssssssssssssssssss.      WM Theme: Blue
 :ssssssssssssssssssssssss-     Font: Not Found
  osssssssssssssssssssssssso/`  CPU: Intel Core i5-4288U CPU @ 2.60GHz
  `syyyyyyyyyyyyyyyyyyyyyyyy+`  GPU: Intel Iris
   `ossssssssssssssssssssss/    RAM: 6405MB / 8192MB
     :ooooooooooooooooooo+.
      `:+oo+/:-..-:/+o+/-

Taking shot in 3.. 2.. 1.. 0.
==>  Uploading your screenshot now...your screenshot can be viewed at http://imgur.com/HKIUznn
You can visit http://imgur.com/HKIUznn to see uploaded screenshot.Say hello to linux_logo
The linux_logo program generates a color ANSI picture of a penguin which includes some system information obtained from the /proc filesystem.Installation
Simply type the following command as per your Linux distro.Debian/Ubutnu/Mint
$ sudo apt-get install linux_logoOR
$ sudo apt-get install linuxlogoCentOS/RHEL/Older Fedora
# yum install linux_logoFedora Linux v22+ or newer
# dnf install linux_logoRun it
Simply type the following command:$ linux_logo
linux_logo in action
But wait, there's more!
You can see a list of compiled in logos using:$ linux_logo -f -L listSample outputs:
Available Built-in Logos:
 Num Type Ascii Name  Description
 1 Classic Yes aix  AIX Logo
 2 Banner Yes bsd_banner FreeBSD Logo
 3 Classic Yes bsd  FreeBSD Logo
 4 Classic Yes irix  Irix Logo
 5 Banner Yes openbsd_banner OpenBSD Logo
 6 Classic Yes openbsd  OpenBSD Logo
 7 Banner Yes solaris  The Default Banner Logos
 8 Banner Yes banner  The Default Banner Logo
 9 Banner Yes banner-simp Simplified Banner Logo
 10 Classic Yes classic  The Default Classic Logo
 11 Classic Yes classic-nodots The Classic Logo, No Periods
 12 Classic Yes classic-simp Classic No Dots Or Letters
 13 Classic Yes core  Core Linux Logo
 14 Banner Yes debian_banner_2 Debian Banner 2
 15 Banner Yes debian_banner Debian Banner (white)
 16 Classic Yes debian  Debian Swirl Logos
 17 Classic Yes debian_old Debian Old Penguin Logos
 18 Classic Yes gnu_linux Classic GNU/Linux
 19 Banner Yes mandrake Mandrakelinux(TM) Banner
 20 Banner Yes mandrake_banner Mandrake(TM) Linux Banner
 21 Banner Yes mandriva Mandriva(TM) Linux Banner
 22 Banner Yes pld  PLD Linux banner
 23 Classic Yes raspi  An ASCII Raspberry Pi logo
 24 Banner Yes redhat  RedHat Banner (white)
 25 Banner Yes slackware Slackware Logo
 26 Banner Yes sme  SME Server Banner Logo
 27 Banner Yes sourcemage_ban Source Mage GNU/Linux banner
 28 Banner Yes sourcemage Source Mage GNU/Linux large
 29 Banner Yes suse  SUSE Logo
 30 Banner Yes ubuntu  Ubuntu Logo

Do "linux_logo -L num" where num is from above to get the appropriate logo.
Remember to also use -a to get ascii version.
To see aix logo, enter:
$ linux_logo -f -L aixTo see openbsd logo:
$ linux_logo -f -L openbsdOr just see some random Linux logo:
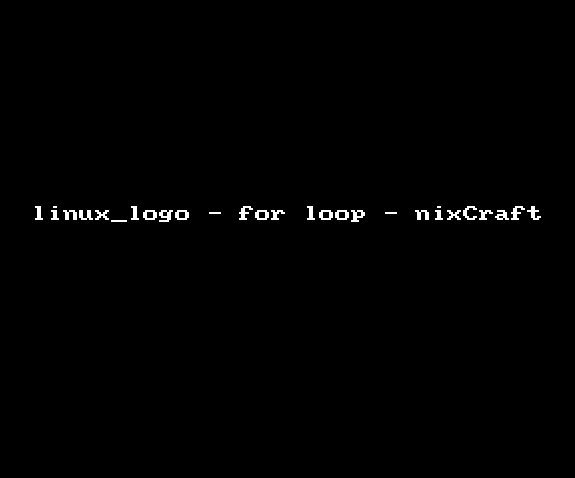
$ linux_logo -f -L random_xyYou can combine bash for loop as follows to display various logos, enter:
Gif 01: linux_logo and bash for loop for fun and profie
Getting help
Simply type the following command:$ screenfetch -h
$ linux_logo -h
No comments:
Post a Comment