http://www.ubuntugeek.com/nagios-core-configuration-using-nagiosql-web-interface.html
NagiosQL is a web based administration tool designed for Nagios, but might also work with forks. It helps you to easily build a complex configuration with all options, manage and use them. NagiosQL is based on a webserver with PHP, MySQL and local file or remote access to the Nagios configuration files.
NagiosQL Features
create, delete, modify and copy settings
create and export configuration files
create and download configuration files
easy configuration import
auto backup configuration files
consistency checks
syntax verification
user management
instant activation of new configs
many translations
easy Installation wizard
MySQL database platform
We have already discussed how to Install Nagios4.0.8 on ubuntu 15.04 Server
Install NagioSQL on Ubuntu 15.04
Download the latest version from here .Once you have .tar.gz file you can move this to /var/www directory
Enable NagioSQL website using the following command
To activate the new configuration, you need to run:

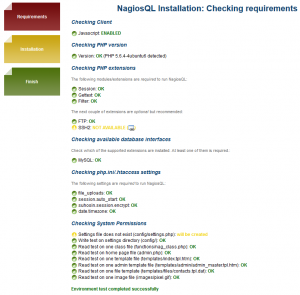
NagiosQL installation requirements verification

From the above screen we can see date.timezone setting missing so this can be changed from /etc/php5/apache/php.ini file
NsqiosQL configuration tool required certain permission to change the Naqios Core configuration files from the web interface. Following commands will give proper permission to NagiosQL plugin for the successful installation.
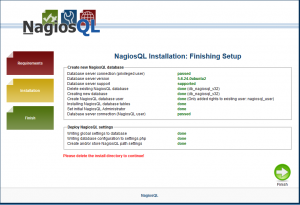
In this step installer will input the database details to be used for nagiosql. Also update the nagiosql path values as per given screenshots. Click Next

This screen showing that all the steps has successfully completed. You just need to click Next
After completing installation, you will be redirected to NagiosQL login screen here you need to enter login credentials

Once you logged in you can see similar to the following screen

Configure NagiosQL3.2.0 with Nagios Core
This is very important part of NagiosQL setup which will help you to complete integration
Edit NagiosQL Configuration
Login to NagiosQL administrator section and navigate to Administration ---> Administration ---> Config targets and click on Modify button for Local installation.


Edit Nagios Core Configuration File
Now edit nagios configuration file ( Eg: /usr/local/nagios/etc/nagios.cfg ) and commend all earlier cfg_file and cfg_dir configuration settings and add new cfg_dir with /usr/local/nagios/nagiosql only.
Verify Nagios core configuration file
NagiosQL is a web based administration tool designed for Nagios, but might also work with forks. It helps you to easily build a complex configuration with all options, manage and use them. NagiosQL is based on a webserver with PHP, MySQL and local file or remote access to the Nagios configuration files.
NagiosQL Features
create, delete, modify and copy settings
create and export configuration files
create and download configuration files
easy configuration import
auto backup configuration files
consistency checks
syntax verification
user management
instant activation of new configs
many translations
easy Installation wizard
MySQL database platform
We have already discussed how to Install Nagios4.0.8 on ubuntu 15.04 Server
Install NagioSQL on Ubuntu 15.04
Download the latest version from here .Once you have .tar.gz file you can move this to /var/www directory
cp nagiosql_320.tar.gz /var/wwwExtract the file
sudo tar -xvzf nagiosql_320.tar.gzChange the permissions
sudo chown -R www-data:www-data nagiosql32Now you need to configure NagioSQL website under /etc/apache2/sites-available
sudo vi /etc/apache2/sites-available/nagiosql32.confadd the following lines
Alias /nagiosql32 /var/www/nagiosql32/Save and exit the file
Options None
Order allow,deny
allow from all
Enable NagioSQL website using the following command
sudo a2ensite nagiosql32Enabling site nagiosql32.
To activate the new configuration, you need to run:
sudo service apache2 reloadNow you can access the NgiosQL web interface using the following URL
http://serverip/nagiosql32You can see similar to the following screen here click the button START INSTALLATION

NagiosQL installation requirements verification

From the above screen we can see date.timezone setting missing so this can be changed from /etc/php5/apache/php.ini file
sudo vi /etc/php5/apache2/php.inichange the following line
;date.timezone =Save and exit the file
to
date.timezone =Europe/London
NsqiosQL configuration tool required certain permission to change the Naqios Core configuration files from the web interface. Following commands will give proper permission to NagiosQL plugin for the successful installation.
sudo chgrp www-data /usr/local/nagios/etc/Once you have fixed the error you can see simiilar to the following screen and click next
sudo chgrp www-data /usr/local/nagios/etc/nagios.cfg
sudo chgrp www-data /usr/local/nagios/etc/cgi.cfg
sudo chmod 775 /usr/local/nagios/etc/
sudo chmod 664 /usr/local/nagios/etc/nagios.cfg
sudo chmod 664 /usr/local/nagios/etc/cgi.cfg
sudo chown nagios:www-data /usr/local/bin/nagios
sudo chmod 750 /usr/local/bin/nagios

In this step installer will input the database details to be used for nagiosql. Also update the nagiosql path values as per given screenshots. Click Next

This screen showing that all the steps has successfully completed. You just need to click Next

After completing installation, you will be redirected to NagiosQL login screen here you need to enter login credentials

Once you logged in you can see similar to the following screen

Configure NagiosQL3.2.0 with Nagios Core
This is very important part of NagiosQL setup which will help you to complete integration
Edit NagiosQL Configuration
Login to NagiosQL administrator section and navigate to Administration ---> Administration ---> Config targets and click on Modify button for Local installation.


Edit Nagios Core Configuration File
Now edit nagios configuration file ( Eg: /usr/local/nagios/etc/nagios.cfg ) and commend all earlier cfg_file and cfg_dir configuration settings and add new cfg_dir with /usr/local/nagios/nagiosql only.
sudo vi /usr/local/nagios/etc/nagios.cfgComment out all the following lines
#cfg_file=/usr/local/nagios/nagiosql/commands.cfgAdd the following line
#cfg_file=/usr/local/nagios/nagiosql/contacts.cfg
#cfg_file=/usr/local/nagios/nagiosql/timeperiods.cfg
#cfg_file=/usr/local/nagios/nagiosql/templates.cfg
#cfg_file=/usr/local/nagios/etc/objects/localhost.cfg
#cfg_file=/usr/local/nagios/etc/objects/windows.cfg
#cfg_file=/usr/local/nagios/etc/objects/switch.cfg
#cfg_file=/usr/local/nagios/etc/objects/printer.cfg
#cfg_dir=/usr/local/nagios/etc/servers
#cfg_dir=/usr/local/nagios/etc/printers
#cfg_dir=/usr/local/nagios/etc/switches
#cfg_dir=/usr/local/nagios/etc/routers
cfg_dir=/usr/local/nagios/nagiosqlSave and exit the file
Verify Nagios core configuration file
sudo /usr/local/nagios/bin/nagios -v /usr/local/nagios/etc/nagios.cfgIf above command show no errors on screen, restart nagios core service
sudo /etc/init.d/nagios restart

No comments:
Post a Comment