https://opensource.com/life/15/12/real-time-linux-video-editing-with-obs-studio

It
may be a relatively niche market, but not all video editing is done in
post production. There are use cases for live, on-the-fly video editing
and basic compositing. You've seen it done yourself, whether you realize
it or not—news broadcasts, live webcasts, and live TV events usually
use multiple-camera setups controlled by one central software suite.
Open Broadcast Studio (formerly Open Broadcaster Software) is an open source central control room for live, realtime video editing. It features instant encoding using x264 (an open source h.264 encoder) and AAC and streams to services like YouTube, DailyMotion, Twitch, your own streaming server, or just to a file.
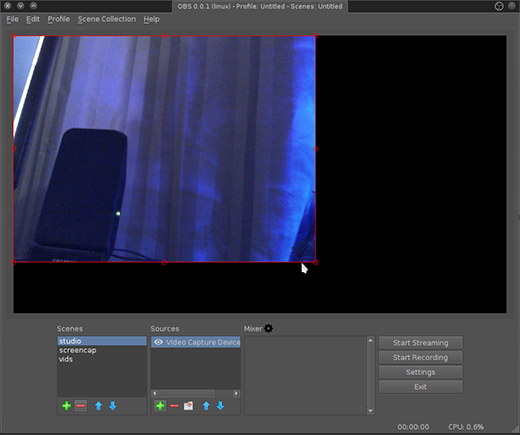
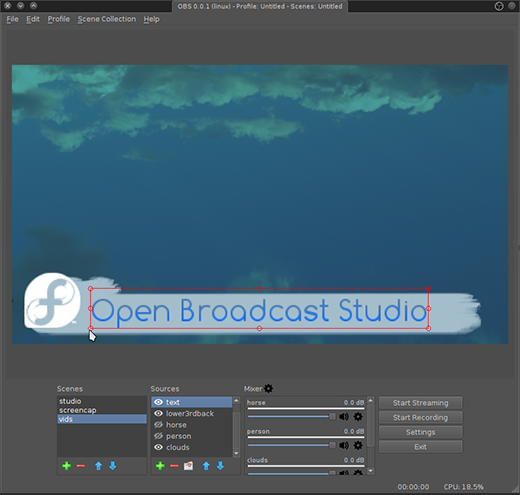
The initial window of Open Broadcast Studio is the main way for controlling the application.

The large video monitor in the middle is your canvas; anything in that screen is being streamed to your delivery destination. The panels in the bottom of the window are quick-access lists to scenes and sources.
You can think of scenes as directories that contain sources, which are clips or streams of media.
The first step is for you to create your sources. These are probably location-based; if you have a studio setup, some pre-recorded video files, and some on-screen footage, then one source might be studio, another vids, and the third screencap.
If your studio set up has two cameras, then create two sources within the scene. Sources can be nearly any kind of media you can imagine: still images on your hard drive, webcam feeds, JACK inputs, video files, and more. For example, to add a video camera as a source, click the plus button under the Sources window and select Video Capture Device (V4L2).
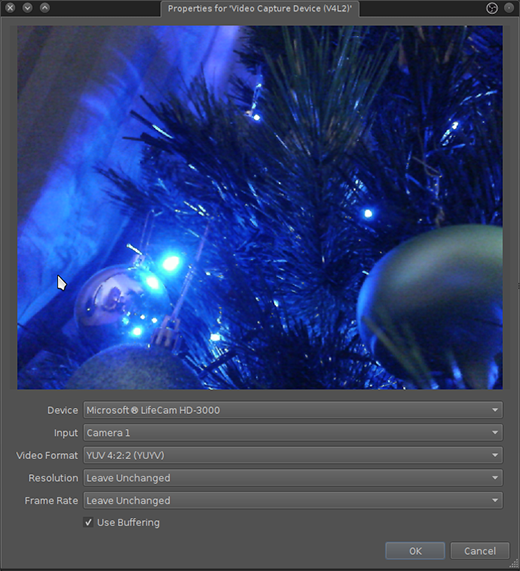
Select the camera you want to add and its appropriate settings (or accept the defaults) and click the OK button in the bottom right corner.
Once the source has been added to a scene, it becomes the displayed source. Depending on what kind of camera you are using and your intended destination, there may be a disconnect between the input and your output. If this is the case, scale the image as needed so that it fits into your screen.
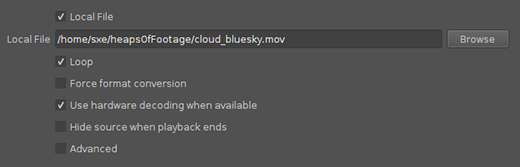
Similarly, for your pre-recorded clips, select the vids scene and add a Media Source source. Set the source as a local file and select the video clip you want to add.
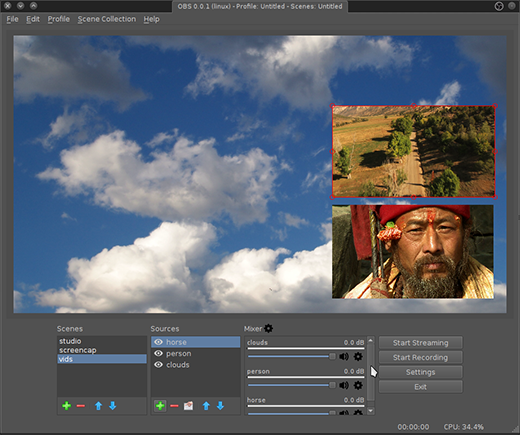
Adjust the clip to fit the portion of the screen you need it to fill, and continue adding sources.
By clicking and dragging the red bounding box, sources can also be scaled to achieve a picture-in-picture effect.
Text and still images are also acceptable input formats, so standard lower thirds are easy to cobble together. Add text as a Text (Freetype2) source, and add a backdrop for the text created in GIMP. Usually, a PNG file with an alpha channel is best.
If your project wants animated titles, then you'll have to animate separately in Synfig Studio, Blender, or Phil Shapiro's magical blend of Inkscape and Animatron.
Filters can be added to either an entire scene or to individual source. To add a filter, right-click on the scene or source and select Filters. In the filter window that appears, add either an audio or video filter or a video effect. Effects are not yet keyframe-able, so they affect the entire clip.
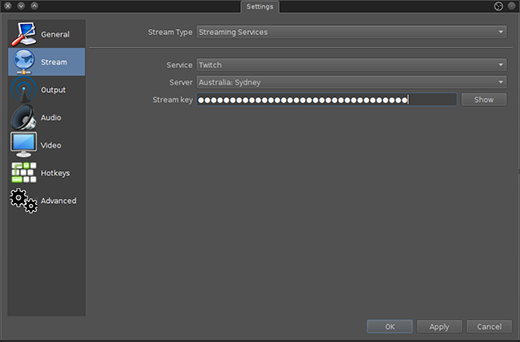
In the Settings window that appears, choose Stream from the left column. Select the streaming server you have an account on and enter your credentials. If you run your own streaming server, select the Custom option from the topmost dropdown menu.
Click the Apply and OK buttons when finished.
To go live, click the Start Streaming button in the main OBS interface.
To set up recording, click the Settings button on the right side of OBS.

In the Settings window that appears, choose Output from the left column. What settings you use are up to you and will depend on all the usual factors: How much space do you want your file to take up? What kind of quality are you looking for? What kind of quality are you capturing in the first place?
For HD streams, I usually set a bitrate to roughly 15000 (that's about twice the bitrate of a standard definition DVD, but at the low end of what would be considered Blu Ray quality), and an audio rate of 80kbps (dialogue is not terribly demanding). If you want advanced options, such as video rescaling and access to x264 profiles, use the Advanced setting in the topmost dropdown menu.
Click the Apply and OK buttons when finished.
To begin recording, click the Start Recording button in the main OBS interface.
Open Broadcast Studio (formerly Open Broadcaster Software) is an open source central control room for live, realtime video editing. It features instant encoding using x264 (an open source h.264 encoder) and AAC and streams to services like YouTube, DailyMotion, Twitch, your own streaming server, or just to a file.
Scenes and sources
Assuming you have installed OBS Studio, you can launch it as usual. It is compatible with Pulse Audio, ALSA, and JACK, so you can manage audio however you prefer. ALSA and Pulse are the most straightforward, although JACK offers more options.The initial window of Open Broadcast Studio is the main way for controlling the application.
The large video monitor in the middle is your canvas; anything in that screen is being streamed to your delivery destination. The panels in the bottom of the window are quick-access lists to scenes and sources.
You can think of scenes as directories that contain sources, which are clips or streams of media.
The first step is for you to create your sources. These are probably location-based; if you have a studio setup, some pre-recorded video files, and some on-screen footage, then one source might be studio, another vids, and the third screencap.
If your studio set up has two cameras, then create two sources within the scene. Sources can be nearly any kind of media you can imagine: still images on your hard drive, webcam feeds, JACK inputs, video files, and more. For example, to add a video camera as a source, click the plus button under the Sources window and select Video Capture Device (V4L2).
Select the camera you want to add and its appropriate settings (or accept the defaults) and click the OK button in the bottom right corner.
Once the source has been added to a scene, it becomes the displayed source. Depending on what kind of camera you are using and your intended destination, there may be a disconnect between the input and your output. If this is the case, scale the image as needed so that it fits into your screen.
Similarly, for your pre-recorded clips, select the vids scene and add a Media Source source. Set the source as a local file and select the video clip you want to add.
Adjust the clip to fit the portion of the screen you need it to fill, and continue adding sources.
Compositing
Sources within a scene are exactly like layers in GIMP or Kdenlive; the top source takes precedence over lower sources, and any source may be made invisible by clicking the eye icon to the source's left.By clicking and dragging the red bounding box, sources can also be scaled to achieve a picture-in-picture effect.
Text and still images are also acceptable input formats, so standard lower thirds are easy to cobble together. Add text as a Text (Freetype2) source, and add a backdrop for the text created in GIMP. Usually, a PNG file with an alpha channel is best.
If your project wants animated titles, then you'll have to animate separately in Synfig Studio, Blender, or Phil Shapiro's magical blend of Inkscape and Animatron.
Filters
OBS features a select few video filters, too. Currently it's just the bare basics, but the ones that are included are useful:- Gain
- Audio/Video sync adjustment
- Noise gate
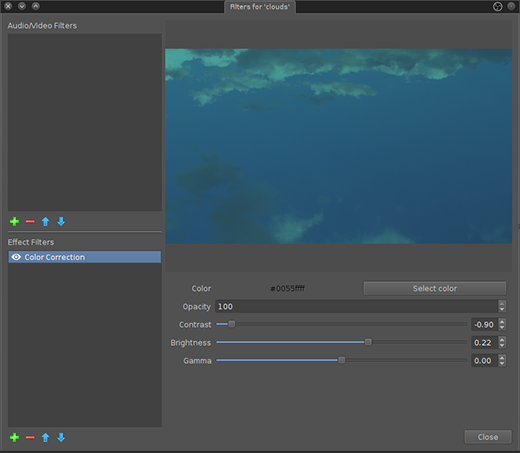
- Color Correction
- Mask
- Keys
Filters can be added to either an entire scene or to individual source. To add a filter, right-click on the scene or source and select Filters. In the filter window that appears, add either an audio or video filter or a video effect. Effects are not yet keyframe-able, so they affect the entire clip.
Output
The destination of an OBS project is either a file or, more likely, a live stream. Any action you make within OBS that shows in its canvas view will be sent to your output device, whatever it may be. There is currently no built-in time delay, so everything is streamed pretty much as it happens (not counting for network delays).Streaming
To set up streaming, click the Settings button on the right side of OBS.In the Settings window that appears, choose Stream from the left column. Select the streaming server you have an account on and enter your credentials. If you run your own streaming server, select the Custom option from the topmost dropdown menu.
Click the Apply and OK buttons when finished.
To go live, click the Start Streaming button in the main OBS interface.
Recording
If you're not streaming, then you're probably recording your "broadcast" to a file.To set up recording, click the Settings button on the right side of OBS.
In the Settings window that appears, choose Output from the left column. What settings you use are up to you and will depend on all the usual factors: How much space do you want your file to take up? What kind of quality are you looking for? What kind of quality are you capturing in the first place?
For HD streams, I usually set a bitrate to roughly 15000 (that's about twice the bitrate of a standard definition DVD, but at the low end of what would be considered Blu Ray quality), and an audio rate of 80kbps (dialogue is not terribly demanding). If you want advanced options, such as video rescaling and access to x264 profiles, use the Advanced setting in the topmost dropdown menu.
Click the Apply and OK buttons when finished.
To begin recording, click the Start Recording button in the main OBS interface.

No comments:
Post a Comment