http://www.ostechnix.com/configure-grub-2-boot-loader-settings-ubuntu-16-04


![Ubuntu 16.04 LTS Desktop [Running] - Oracle VM VirtualBox_011](https://www.ostechnix.com/wp-content/uploads/2016/04/Ubuntu-16.04-LTS-Desktop-Running-Oracle-VM-VirtualBox_011.jpg)
As you probably know GRUB 2 is default boot loader for most Linux operating systems. GRUB stands for GRand Unified Bootloader.
GRUB boot loader is the first program that runs when the computer
starts. It is responsible for loading and transferring control to the
operating system Kernel. Then, the Kernel takes charge, and initializes
the rest of the operating system.
In this tutorial, we will be discussing
about configuring some important GRUB2 Boot Loader’s settings Ubuntu
16.04 LTS desktop. I tested this guide in Ubuntu 16.04 LTS desktop,
however these instructions might work on all Linux operating systems
that uses GRUB 2 boot loader.
Configure GRUB 2 Boot Loader settings
Warning: The default configuration file for GRUB 2 is /boot/grub/grub.cfg.
You shouldn’t edit or modify this file, unless you are much familiar
with GRUB 2. This is the main file to boot into the Linux OS. If you do
anything wrong with this file, then you will be surely end up with
broken system. So, Don’t touch this file!
All settings related to the GRUB 2 will be stored in /etc/default/grub file. Whatever the changes you made in this file will be reflected to the GRUB 2.
Make a backup of /etc/default/grub file before making any changes.
sudo cp /etc/default/grub /etc/default/grub.bak
Let us see the main options in the GRUB boot loader.
The typical grub will look like below.
cat /etc/default/grub
Sample output:
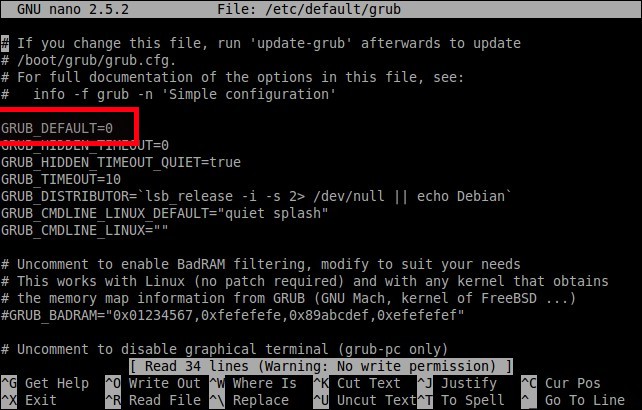
# If you change this file, run 'update-grub' afterwards to update
# /boot/grub/grub.cfg.
# For full documentation of the options in this file, see:
# info -f grub -n 'Simple configuration'

GRUB_DEFAULT=0
GRUB_HIDDEN_TIMEOUT=0
GRUB_HIDDEN_TIMEOUT_QUIET=true
GRUB_TIMEOUT=10
GRUB_DISTRIBUTOR=`lsb_release -i -s 2> /dev/null || echo Debian`
GRUB_CMDLINE_LINUX_DEFAULT="quiet splash"
GRUB_CMDLINE_LINUX=""

# Uncomment to enable BadRAM filtering, modify to suit your needs
# This works with Linux (no patch required) and with any kernel that obtains
# the memory map information from GRUB (GNU Mach, kernel of FreeBSD ...)
#GRUB_BADRAM="0x01234567,0xfefefefe,0x89abcdef,0xefefefef"

# Uncomment to disable graphical terminal (grub-pc only)
#GRUB_TERMINAL=console

# The resolution used on graphical terminal
# note that you can use only modes which your graphic card supports via VBE
# you can see them in real GRUB with the command `vbeinfo'
#GRUB_GFXMODE=640x480

# Uncomment if you don't want GRUB to pass "root=UUID=xxx" parameter to Linux
#GRUB_DISABLE_LINUX_UUID=true

# Uncomment to disable generation of recovery mode menu entries
#GRUB_DISABLE_RECOVERY="true"

# Uncomment to get a beep at grub start
#GRUB_INIT_TUNE="480 440 1"
Whenever you made a change in this file, you must run the following command to apply the changes to the GRUB 2.
sudo update-grub
Let us do three important tweaks in the GRUB2 boot loader.
1. Select default OS (GRUB_DEFAULT)
We can select the default OS to boot
using this option. If you set the value as “0”, the first operating
system in the GRUB boot menu entry will boot. If you set it as “1”, the
second OS will boot, and so on.
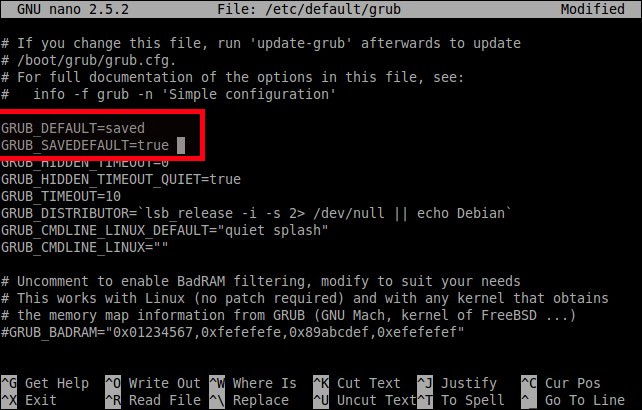
Also, if you have more than one OS in your system, you can boot the last operating system using the value GRUB_DEFAULT=saved. Whenever you reboot the system, the last operating system will start boot. Please note that you should add a line GRUB_SAVEDEFAULT=true to make this trick work.
You can also specify the name of the
operating system’s entry to boot a particular OS. For example, if there
is an entry called “Lubuntu 14.04 LTS” in the BOOT menu, you could use GRUB_DEFAULT=”Lubuntu 14.04 LTS” to boot Lubuntu by default. Be mindful that you should specify the value within the quotes.
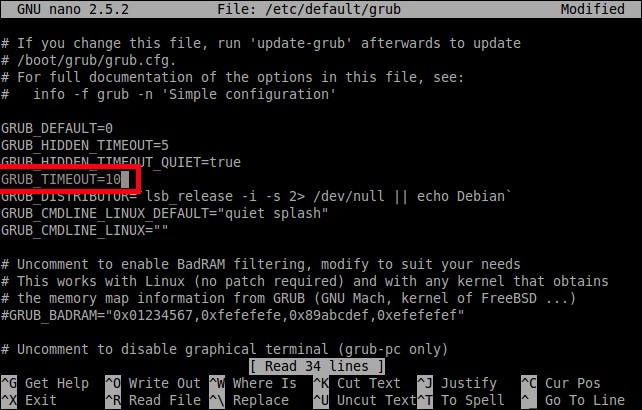
2. Set OS timeout (GRUB_TIMEOUT)
By default, the selected entry from the boot menu will start to boot in 10 seconds.
You can increase or decrease this
timeout setting. If the value is “0”, the default OS will immediately
start to boot. If the value is “5” , the boot menu will appear for 5
seconds, so that you can select which OS you want to load when the
system starts.
3. Change GRUB background image
To change the GRUB background image, you need to copy your preferred image to /boot/grub/ location.
sudo cp ostechnix.png /boot/grub/
Replace the image path with your own.
You can use JPG/JPEG format images as well. But GRUB supports only 256
color JPG/JPEG image formats only. So, it is better to use PNG format
images.
Once you made the necessary changes in the GRUB file, Save and close it.
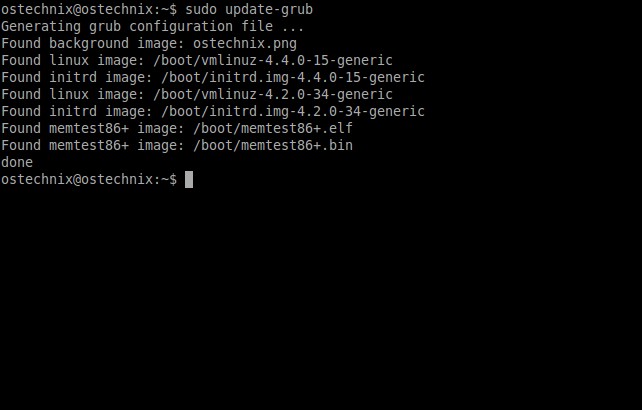
To apply the changes, you must run the following command:
sudo update-grub
You should see the following output:
Generating grub configuration file ...
Found background image: ostechnix.png
Found linux image: /boot/vmlinuz-4.4.0-15-generic
Found initrd image: /boot/initrd.img-4.4.0-15-generic
Found linux image: /boot/vmlinuz-4.2.0-34-generic
Found initrd image: /boot/initrd.img-4.2.0-34-generic
Found memtest86+ image: /boot/memtest86+.elf
Found memtest86+ image: /boot/memtest86+.bin
done
Reboot and check whether the changes are working or not.
Please be mindful that you shouldn’t
edit or modify GRUB 2 settings in mission critical or production
systems. This is going to lead you into a big trouble. So, I recommend
you to test these settings in any virtual machine first, and then apply
to the production systems.
That’s all folks. I will be here soon with another Interesting article.
Cheers for now, stay tuned with OSTechNix for more updates.

No comments:
Post a Comment