https://www.howtoforge.com/tutorial/how-to-setup-haproxy-as-load-balancer-for-nginx-on-centos-7
HAProxy or High Availability Proxy is an open source TCP and HTTP load balancer and proxy server software. HAProxy has been written by Willy Tarreau in C, it supports SSL, compressions, keep-alive, custom log formats and header rewriting. HAProxy is a fast and lightweight proxy server and load balancer with a small memory footprint and low CPU usage. It is used by large sites like Github, StackOverflow, Reddit, Tumblr, Twitter and others. It has become the most popular software load balancer and proxy server in the past years.
In this tutorial, I will guide you trough the HAProxy installation and configuration for 3 servers, one load balancer, and two Nginx web servers. We will install HAProxy on a single server and then install Nginx web server on the other servers. HAProxy acts as a load balancer for the Nginx web servers.
Roundrobin
This is the most simple balance algorithm. For each new connection, it will be handled by the next backend server. If the last backend server in the list is reached, it will start again from the top of backend list.
Lastconn
The new connection will be handled by the backend server with least amount of connections. This is useful when the time and load of the requests vary a lot.
Source
This is for sticky sessions, the client IP will be hashed to determine the backend server that received the last request from this IP. So an IP A will always be handled by backend1, and IP B will always be handled by banckend2 to not interrupt sessions
There are oOther algorithm - check the official HAProxy site for details.
192.168.1.102
nginx1
192.168.1.104
nginx2
192.168.1.105
Next, edit the hosts file on the Nginx servers (nginx1 and nginx2):
Next, configure rsyslog for HAProxy.
We will configure the rsyslog daemon to log the HAProxy statistics. Edit the rsyslog.conf file to enable the UDP port 514 to be used by rsyslog.
Then create new haproxy configuration file for rsyslog:
Now restart rsyslog and then start the haproxy:
Log in to the servers:


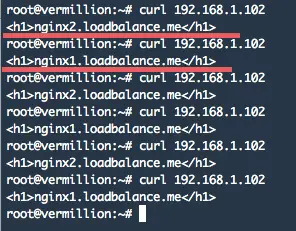
Testing with curl command:

Testing to login to the HAProxy web monitoring that is running on port 8080 with username and password "howtoforge":
http://192.168.1.102:8080/stats
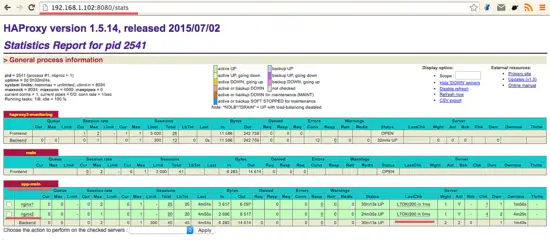
HAProxy is working successfully and acts as a load balancer for our two Nginx web servers.

HAProxy or High Availability Proxy is an open source TCP and HTTP load balancer and proxy server software. HAProxy has been written by Willy Tarreau in C, it supports SSL, compressions, keep-alive, custom log formats and header rewriting. HAProxy is a fast and lightweight proxy server and load balancer with a small memory footprint and low CPU usage. It is used by large sites like Github, StackOverflow, Reddit, Tumblr, Twitter and others. It has become the most popular software load balancer and proxy server in the past years.
In this tutorial, I will guide you trough the HAProxy installation and configuration for 3 servers, one load balancer, and two Nginx web servers. We will install HAProxy on a single server and then install Nginx web server on the other servers. HAProxy acts as a load balancer for the Nginx web servers.
Basic Concept with HAProxy
Layer 4 and Layer 7
HAProxy can run in two modes: TCP mode Layer 4 and HTTP Mode Layer 7. In Layer 4 TCP mode, HAProxy forwards the RAW TCP packets from the client to the application servers. In the Layer 7 HTTP mode, HAProxy is parsing the HTTP header before forwarding them to the application servers. In this tutorial, we will use Nginx as the web server that only supports the Layer 7 HTTP mode.Balance Algorithm
This is the algorithm that is used by HAProxy to select the server when doing the load balancing. The following modes are available:Roundrobin
This is the most simple balance algorithm. For each new connection, it will be handled by the next backend server. If the last backend server in the list is reached, it will start again from the top of backend list.
Lastconn
The new connection will be handled by the backend server with least amount of connections. This is useful when the time and load of the requests vary a lot.
Source
This is for sticky sessions, the client IP will be hashed to determine the backend server that received the last request from this IP. So an IP A will always be handled by backend1, and IP B will always be handled by banckend2 to not interrupt sessions
There are oOther algorithm - check the official HAProxy site for details.
Prerequisites
- 3 CentOS 7
192.168.1.102
nginx1
192.168.1.104
nginx2
192.168.1.105
- Root privileges on all 3 servers.
Step 1 - Configure the /etc/hosts files
Log in to the load balancer server and edit the /etc/hosts file.
ssh loadbalancer@192.168.1.102
sudo su
sudo su
vi /etc/hosts
Add nginx1 and nginx2 hostnames:
192.168.1.104 nginx1.loadbalancer.me nginx1
192.168.1.105 nginx2.loadbalancer.me nginx2
Save the file and exit the editor.192.168.1.105 nginx2.loadbalancer.me nginx2
Next, edit the hosts file on the Nginx servers (nginx1 and nginx2):
ssh nginx1@192.168.1.104
ssh nginx2@192.168.1.105
Edit and add a new line for the load balancer in the hosts files:ssh nginx2@192.168.1.105
vi /etc/host
Add the loadbalancer hostname on each nginx server:
192.168.1.102 loadbalancer
do this on nginx1 and nginx2 server.Step 2 - Install and Configure HAProxy
HAProxy is available in the CentOS 7 repository, log in to the loadbalancer server and update the package lists:
ssh loadbalancer@192.168.1.104
yum -y update
Now install HAProxy with this yum command:yum -y update
yum -y install haproxy
When the installation is finished, go to the "/etc/haproxy/" directory and backup the original configuration file:
cd /etc/haproxy/
mv haproxy.cfg haproxy.cfg.orig
Next, add a new HAProxy configuration file "haproxy.cfg" file with the vi editor:mv haproxy.cfg haproxy.cfg.orig
vi haproxy.cfg
Paste the configuration below:#--------------------------------------------------------------------- # Global settings #--------------------------------------------------------------------- global log 127.0.0.1 local2 #Log configuration chroot /var/lib/haproxy pidfile /var/run/haproxy.pid maxconn 4000 user haproxy #Haproxy running under user and group "haproxy" group haproxy daemon # turn on stats unix socket stats socket /var/lib/haproxy/stats #--------------------------------------------------------------------- # common defaults that all the 'listen' and 'backend' sections will # use if not designated in their block #--------------------------------------------------------------------- defaults mode http log global option httplog option dontlognull option http-server-close option forwardfor except 127.0.0.0/8 option redispatch retries 3 timeout http-request 10s timeout queue 1m timeout connect 10s timeout client 1m timeout server 1m timeout http-keep-alive 10s timeout check 10s maxconn 3000 #--------------------------------------------------------------------- #HAProxy Monitoring Config #--------------------------------------------------------------------- listen haproxy3-monitoring *:8080 #Haproxy Monitoring run on port 8080 mode http option forwardfor option httpclose stats enable stats show-legends stats refresh 5s stats uri /stats #URL for HAProxy monitoring stats realm Haproxy\ Statistics stats auth howtoforge:howtoforge #User and Password for login to the monitoring dashboard stats admin if TRUE default_backend app-main #This is optionally for monitoring backend #--------------------------------------------------------------------- # FrontEnd Configuration #--------------------------------------------------------------------- frontend main bind *:80 option http-server-close option forwardfor default_backend app-main #--------------------------------------------------------------------- # BackEnd roundrobin as balance algorithm #--------------------------------------------------------------------- backend app-main balance roundrobin #Balance algorithm option httpchk HEAD / HTTP/1.1\r\nHost:\ localhost #Check the server application is up and healty - 200 status code server nginx1 192.168.1.104:80 check #Nginx1 server nginx2 192.168.1.105:80 check #Nginx2Save the configuration file and exit.
We will configure the rsyslog daemon to log the HAProxy statistics. Edit the rsyslog.conf file to enable the UDP port 514 to be used by rsyslog.
vi /etc/rsyslog.conf
Uncomment this line to enable the UDP connection:
$ModLoad imudp
$UDPServerRun 514
If you want to use a specific IP, you can add a new line like the one below:$UDPServerRun 514
$UDPServerAddress 127.0.0.1
Save the file and exit.Then create new haproxy configuration file for rsyslog:
cd /etc/rsyslog.d/
vi haproxy.conf
Paste configuration below:vi haproxy.conf
local2.=info     /var/log/haproxy-access.log    #For Access Log
local2.notice    /var/log/haproxy-info.log      #For Service Info - Backend, loadbalancer
Save and exit.
Now restart rsyslog and then start the haproxy:
systemctl restart rsyslog
systemctl start haproxy
Add haproxy to start at boot time:systemctl start haproxy
systemctl enable haproxy
Step 3 - Install and Configure Nginx
In this section, we will install Nginx from epel repository on nginx1 and nginx2 server.Log in to the servers:
ssh nginx1@192.168.1.104
ssh nginx2@192.168.1.105
Install the epel repository with the yum command below:ssh nginx2@192.168.1.105
yum -y install epel-release
Now you can install Nginx:
yum -y install nginx
Nginx is installed. Go to the web directory and change the index file so that we can see which of the two servers delivered the html file:
cd /usr/share/nginx/html/
echo "
echo "
Next, add Nginx to start at boot time and then start it:echo "
nginx1.loadbalance.me
" > index.html #For nginx1 serverecho "
nginx2.loadbalance.me
" > index.html #For nginx2 server
systemctl enable nginx
systemctl start nginx
Make sure you're doing this step on nginx1 and nginx2 server.systemctl start nginx
Step 4 - Testing
Testing from browser by accessing the loadbalancer IP: 192.168.1.102

Testing with curl command:
curl 192.168.1.102
Testing to login to the HAProxy web monitoring that is running on port 8080 with username and password "howtoforge":
http://192.168.1.102:8080/stats
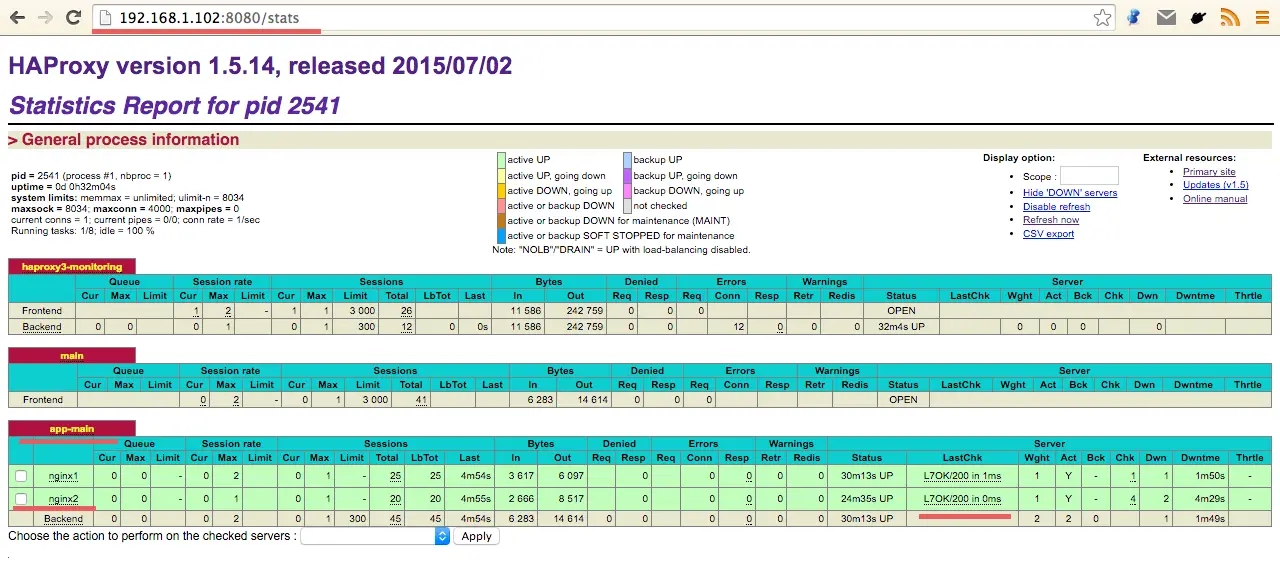
HAProxy is working successfully and acts as a load balancer for our two Nginx web servers.
Conclusion
HAProxy or High Availability proxy is an open source software that provides high availability for TCP-based services, it operates as HTTP load balancer and proxy server. The software is written in C and supports SSL, keep-alive and compression. HAProxy is the right choice for everyone who needs a load balancer and proxy server that is fast and lightweight with a small memory footprint and low CPU usage. Haproxy can run in Layer 4 TCP mode and Layer 7 HTTP mode. Nginx supports only the Layer 7 HTTP mode with HAProxy. If you want to use Layer 4 TCP mode, you can use other web servers like apache. On CentOS 7, HAProxy is available in the default repository. It's easy to install and configure.
No comments:
Post a Comment