http://xmodulo.com/build-kernel-module-dkms-linux.html
Suppose you wanted to install a device driver for a new graphics card, a WiFi dongle, or a network interface card that you purchased, and for whatever reason (e.g., missing prebuilt driver, outdated driver version, non-common build options), you decided to compile and install the driver module from the source. So you went ahead and downloaded the official source code of the device driver, compiled it against the kernel, installed and activated it. The new hardware is successfully recognized, and everything works fine.
Now think about what will happen to the driver if you upgrade to a newer kernel later. The driver was built "outside" the stock kernel source tree, so once your system is upgraded to a newer kernel, the driver you built will cease to work properly.
How to solve this problem? Well, you need to re-compile the driver against the newer kernel and re-install it. Obviously it becomes quite cumbersome if you have to re-build the driver manually every time you upgrade your kernel.
This is when dynamic kernel module support (DKMS) comes in handy. The DKMS framework enables you to automatically re-build kernel modules into the current kernel tree as you upgrade your kernel. Hardware vendors often distribute their hardware's device driver as a DKMS package, so that users can auto-update the installed driver while they upgrade to a newer kernel. As an end-user you can easily configure DKMS to auto-update any custom device driver or kernel module that resides outside the stock kernel tree.
In this tutorial, I will demonstrate how to auto-build a kernel module with DKMS on Linux.
Debian, Ubuntu or Linux Mint:
First enable EPEL repository and proceed with:
In this tutorial, I will use ixgbe Intel NIC driver as an example kernel module.
First, download and install the source code of the driver under /usr/src/-.
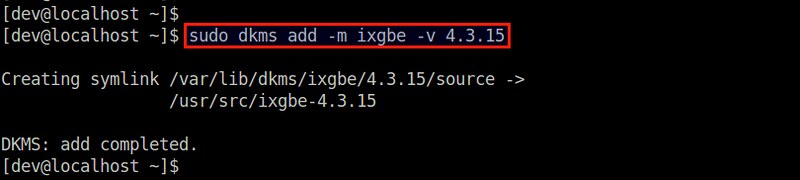
Next, add the module to the kernel tree.
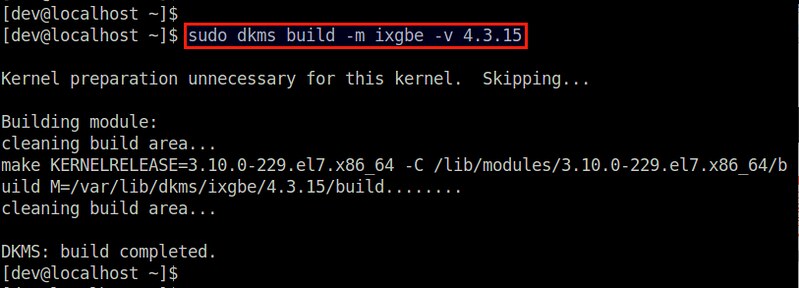
Build the specified module against the currently running kernel.
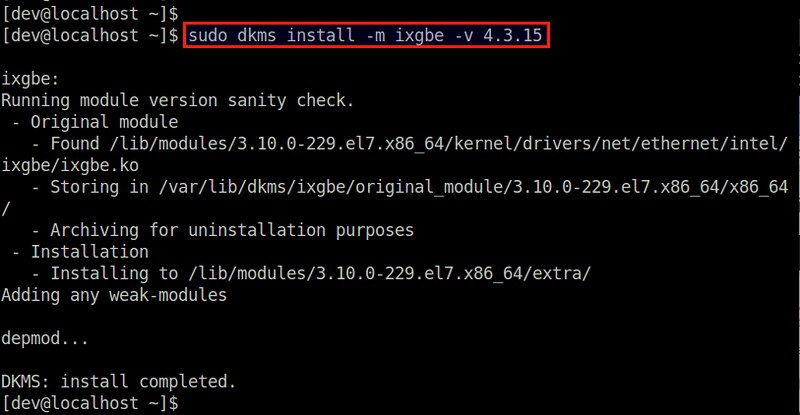
Finally, install the module under the current kernel tree.
At this point, the kernel module should be successfully installed. You can check the status of the module with:

Before upgrading the kernel, check the version of ixgbe driver and the kernel.
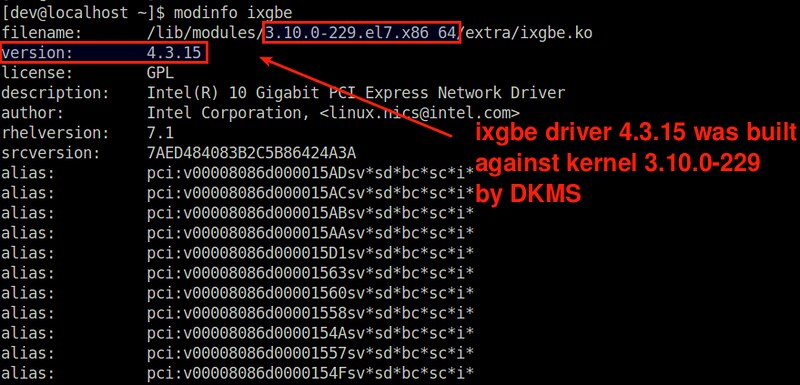
We can see that the device driver 4.3.15 was installed by DKMS for the kernel 3.10.0-229.
Now go ahead and install a newer kernel and matching header files.

You should see that the ixgbe driver of the same version has automatically been built for a new kernel 3.10.0-327.
Note that if you had upgraded to a new kernel without installing matching kernel headers, DKMS wouldn't have been triggered, and the driver wouldn't have been re-built from its source. Instead, a stock kernel driver (if available) that came with the new kernel would have been used.
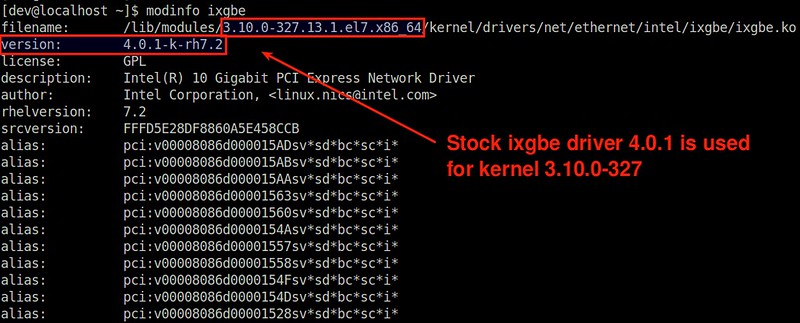
For example, the following is the result of upgrading to a new kernel without matching kernel headers, where you can see that the new kernel loaded a stock ixgbe driver whose version is a little outdated.
You can always re-build the custom driver at any time by triggering DKMS manually as follows. Be sure to install matching kernel headers first.
Download this article as ad-free PDF (made possible by your kind donation):
Suppose you wanted to install a device driver for a new graphics card, a WiFi dongle, or a network interface card that you purchased, and for whatever reason (e.g., missing prebuilt driver, outdated driver version, non-common build options), you decided to compile and install the driver module from the source. So you went ahead and downloaded the official source code of the device driver, compiled it against the kernel, installed and activated it. The new hardware is successfully recognized, and everything works fine.
Now think about what will happen to the driver if you upgrade to a newer kernel later. The driver was built "outside" the stock kernel source tree, so once your system is upgraded to a newer kernel, the driver you built will cease to work properly.
How to solve this problem? Well, you need to re-compile the driver against the newer kernel and re-install it. Obviously it becomes quite cumbersome if you have to re-build the driver manually every time you upgrade your kernel.
This is when dynamic kernel module support (DKMS) comes in handy. The DKMS framework enables you to automatically re-build kernel modules into the current kernel tree as you upgrade your kernel. Hardware vendors often distribute their hardware's device driver as a DKMS package, so that users can auto-update the installed driver while they upgrade to a newer kernel. As an end-user you can easily configure DKMS to auto-update any custom device driver or kernel module that resides outside the stock kernel tree.
In this tutorial, I will demonstrate how to auto-build a kernel module with DKMS on Linux.
Install DKMS on Linux
You can install DKMS on various Linux distros as follows. As part of DKMS installation, necessary build tools (e.g., gcc, make) and kernel headers will also be installed by the distro's package manager.Debian, Ubuntu or Linux Mint:
$ sudo apt-get install dkms
Fedora:
$ sudo dnf install dkms
CentOS or RHEL:First enable EPEL repository and proceed with:
$ sudo yum install dkms
Arch Linux:
$ sudo pacman -S dkms
Auto-Build a Kernel Module with DKMS
Now let me show how to configure DKMS to re-build a kernel module for a new kernel automatically. In a nutshell, you need to create a DKMS configuration for the kernel module, and install the module with DKMS. Then any subsequent kernel upgrade will trigger DKMS to re-build the module.In this tutorial, I will use ixgbe Intel NIC driver as an example kernel module.
First, download and install the source code of the driver under /usr/src/
$ wget http://tenet.dl.sourceforge.net/project/e1000/ixgbe%20stable/4.3.15/ixgbe-4.3.15.tar.gz
$ sudo tar -xf ixgbe-4.3.15.tar.gz -C /usr/local/src
$ sudo mv /usr/local/src/ixgbe-4.3.15/src /usr/src/ixgbe-4.3.15
Create the following dkms.conf file under this directory as follows.$ sudo tar -xf ixgbe-4.3.15.tar.gz -C /usr/local/src
$ sudo mv /usr/local/src/ixgbe-4.3.15/src /usr/src/ixgbe-4.3.15
$ sudo vi /usr/src/ixgbe-4.3.15/dkms.conf
1
2
3
4
5
| PACKAGE_NAME="ixgbe"PACKAGE_VERSION="4.3.15"BUILT_MODULE_NAME[0]="ixgbe"DEST_MODULE_LOCATION[0]="/kernel/drivers/net/ethernet/intel/ixgbe/"AUTOINSTALL="yes" |
$ sudo dkms add -m ixgbe -v 4.3.15
Or simply:
$ sudo dkms add ixgbe/4.3.15
Build the specified module against the currently running kernel.
$ sudo dkms build -m ixgbe -v 4.3.15
Or:
$ sudo dkms build ixgbe/4.3.15
Finally, install the module under the current kernel tree.
$ sudo dkms install -m ixgbe -v 4.3.15
Or:
$ sudo dkms install ixgbe/4.3.15
At this point, the kernel module should be successfully installed. You can check the status of the module with:
$ dkms status | grep ixgbe
Verify Auto-Build of a Kernel Module during Kernel Upgrade
With DKMS configured for ixgbe driver, let's see what happens to the installed driver when we upgrade to a new kernel. In this test, I am going to upgrade the kernel from 3.10.0-229 to 3.10.0-327. The test environment used is CentOS 7, so I am going to use yum to upgrade to the new kernel. Note that the new kernel's matching kernel headers also need to be installed for DKMS to re-build the device driver.Before upgrading the kernel, check the version of ixgbe driver and the kernel.
$ modinfo ixgbe
We can see that the device driver 4.3.15 was installed by DKMS for the kernel 3.10.0-229.
Now go ahead and install a newer kernel and matching header files.
$ sudo yum install kernel kernel-devel
After rebooting into the new kernel, check the module information of ixgbe driver again.You should see that the ixgbe driver of the same version has automatically been built for a new kernel 3.10.0-327.
Note that if you had upgraded to a new kernel without installing matching kernel headers, DKMS wouldn't have been triggered, and the driver wouldn't have been re-built from its source. Instead, a stock kernel driver (if available) that came with the new kernel would have been used.
For example, the following is the result of upgrading to a new kernel without matching kernel headers, where you can see that the new kernel loaded a stock ixgbe driver whose version is a little outdated.
You can always re-build the custom driver at any time by triggering DKMS manually as follows. Be sure to install matching kernel headers first.
$ sudo yum install kernel-devel
$ sudo dkms build ixgbe/4.3.15
$ sudo dkms install ixgbe/4.3.15
$ sudo dkms build ixgbe/4.3.15
$ sudo dkms install ixgbe/4.3.15
Conclusion
In this post I demonstrated how to use DKMS to auto-build a kernel module. Granted, DKMS may not always be preferred especially in production Linux environments where development packages and build tools are typically not allowed. But for development environments or personal desktop, if you have any custom-built kernel module, DKMS makes your life easy by keeping the module updated against new kernels.Download this article as ad-free PDF (made possible by your kind donation):

No comments:
Post a Comment