https://www.howtoforge.com/tutorial/how-to-setup-haproxy-as-load-balancer-for-mariadb-on-centos-7
In this tutorial, I will guide you trough the installation of a MariaDB Galera cluster on CentOS 7 which has an HAProxy load balancer in front. The total setup consists of 4 servers. I will use 3 CentOS 7 servers for the database nodes, 2 nodes will be active and 1 acts as the backup node. The fourth server will be used for the HAProxy load balancer. For the balance algorithm, we use leastconn (but you can use other algorithms).
MariaDB is one of the most popular relational database servers made by the original developer of the MySQL Database server. MariaDB is a fork of MySQL that supports the XtraDB storage engine, InnoDB storage engine and a new storage engine called aria.
MariaDB Galera Cluster is a synchronous multi-master cluster for MariaDB that is available only on GNU/Linux-based operating systems. Galera Cluster supports only the XtraDB and InnoDB storage engines. It uses the Galera library for replication with automatic member control, automatic node joining and for reading and writing to the cluster nodes.
Prerequisite
192.168.1.132
mariadb2
192.168.1.133
mariadb3
192.168.1.134
HAProxy
192.168.1.135
Next, disable SELinux on each server because it causes issues with MariaDB Galera. Disable SELinux with this sed command:
Create a new .repo file in the yum.repos.d directory with the vi command:
3306 = Used for MySQL/MariaDB client connections.
4567 = Galera Cluster replication traffic.
873 = Rsync ports.
4444 = For all other State Snapshot Transfer (SST).
9200 = xinetd - clustercheck.
Turn on the firewalld with this systemctl command:
On the server mariadb1, let's bootstrap the cluster with the command below:

mariadb2 and mariadb3 start.


MariaDB has been started on all nodes, now configure the root password for MariaDB on all servers with command below:
Go to the /tmp directory and download the script with wget:
Add clustercheck to the services list:
Then start the xinetd service:
At this stage, all MariaDB serves are synchronized.
Testing clustercheck:
Add the HAProxy configuration in rsyslog.d directory:
Go to the /etc/haproxy directory and backup the dafult haproxy configuration file.
Create new haproxy configuration file:
Port 9000 is the port for the web-gui, it allows monitoring of HAProxy from the browser.
Now start firewalld, open ports 9000 and 3030, and then reload it:

Before doing this test, enable remote access to the MariaDB server by creating a new user root with host "%".
Log into the MariaDB shell and create a new user "root" with password "aqwe123":
You can see the users of the database server by accessing the load balancer IP on port 3030. You can access the databases on the MySQL nodes by accessing the HAProxy IP on port 3030.
Another test of the server: the leastconn algorithm:
http://192.168.1.135:9000/stats
HAProxy has been installed successfully and you can see the MariaDB servers are monitored.
In this tutorial, I will guide you trough the installation of a MariaDB Galera cluster on CentOS 7 which has an HAProxy load balancer in front. The total setup consists of 4 servers. I will use 3 CentOS 7 servers for the database nodes, 2 nodes will be active and 1 acts as the backup node. The fourth server will be used for the HAProxy load balancer. For the balance algorithm, we use leastconn (but you can use other algorithms).
MariaDB is one of the most popular relational database servers made by the original developer of the MySQL Database server. MariaDB is a fork of MySQL that supports the XtraDB storage engine, InnoDB storage engine and a new storage engine called aria.
MariaDB Galera Cluster is a synchronous multi-master cluster for MariaDB that is available only on GNU/Linux-based operating systems. Galera Cluster supports only the XtraDB and InnoDB storage engines. It uses the Galera library for replication with automatic member control, automatic node joining and for reading and writing to the cluster nodes.
Prerequisite
- 4 CentOS 7 servers - 64bit:
192.168.1.132
mariadb2
192.168.1.133
mariadb3
192.168.1.134
HAProxy
192.168.1.135
- Root privileges on all four servers.
Step 1 - Install and Configure MariaDB Galera Cluster
In this step, we will install and configure the MariaDB Galera Cluster on 3 CentOS servers. We will install MariaDB-Galera server, then enable the firewall and open some ports for the database and other services. Then we will install the clustercheck script on each MariaDB server, so we can check the server status from the HAProxy.A. Configure the hostnames and prepare the base system
Login to all database servers with your ssh account:
ssh mariadb1@192.168.1.132
ssh mariadb2@192.168.1.133
ssh mariadb3@192.168.1.134
Switch to the root user with the sudo command:ssh mariadb2@192.168.1.133
ssh mariadb3@192.168.1.134
sudo su
Edit the hosts file on each MariaDB server and add all server IP addresses and hostnames of the other nodes:
vi /etc/hosts
See my /etc/hosts configuration below:
192.168.1.132 mariadb1
192.168.1.133 mariadb2
192.168.1.134 mariadb3
Save the file and exit.192.168.1.133 mariadb2
192.168.1.134 mariadb3
Next, disable SELinux on each server because it causes issues with MariaDB Galera. Disable SELinux with this sed command:
sed -i -e 's/SELINUX=permissive/SELINUX=disabled/g' /etc/sysconfig/selinux
sed (stream editor): replace "SELINUX=permissive" with "SELINUX=disabled" on /etc/sysconfig/selinux file.B. Install MariaDB Galera Server
In this step, we will install MariaDB Galera 10.0 which is available in the MariaDB repository.Create a new .repo file in the yum.repos.d directory with the vi command:
vi /etc/yum.repos.d/mariadb.repo
Paste the MariaDB Galera repository details below and save it:# MariaDB 10.0 CentOS repository list - created 2015-07-09 14:56 UTC # http://mariadb.org/mariadb/repositories/ [mariadb] name = MariaDB baseurl = http://yum.mariadb.org/10.0/centos7-amd64 gpgkey=https://yum.mariadb.org/RPM-GPG-KEY-MariaDB gpgcheck=1Now install MariaDB Galera Server and Client, and some other packages that are required for this tutorial:
yum -y install MariaDB-Galera-server MariaDB-client galera rsync xinetd percona-toolkit precona-xtrabackup xinetd wget
Wait until the installation process finishes.C. Configure Firewalld
We will turn on the default firewall of CentOS 7 called Firewalld. We will turn it on and open the TCP ports that are used by the services that we will install.3306 = Used for MySQL/MariaDB client connections.
4567 = Galera Cluster replication traffic.
873 = Rsync ports.
4444 = For all other State Snapshot Transfer (SST).
9200 = xinetd - clustercheck.
Turn on the firewalld with this systemctl command:
systemctl start firewalld
Now open the ports with the firewall-cmd:
firewall-cmd --permanent --add-port=3306/tcp
firewall-cmd --permanent --add-port=4567/tcp
firewall-cmd --permanent --add-port=873/tcp
firewall-cmd --permanent --add-port=4444/tcp
firewall-cmd --permanent --add-port=9200/tcp
and reload firewalld:firewall-cmd --permanent --add-port=4567/tcp
firewall-cmd --permanent --add-port=873/tcp
firewall-cmd --permanent --add-port=4444/tcp
firewall-cmd --permanent --add-port=9200/tcp
firewall-cmd --reload
D. Configure MariaDB Galera Cluster
Go to the /etc/my.cnf.d/ directory and edit the server.conf file with vi:
cd /etc/my.cnf.d/
vi server.conf
Uncomment and add some configuration lines, you can see the details below:vi server.conf
wsrep_provider=/usr/lib64/galera/libgalera_smm.so   # Path to wsrep provider library
wsrep_cluster_address="gcomm://192.168.1.132,192.168.1.133,192.168.1.134"   # Group Node, add all MardiaDB Server IP
binlog_format=row
default_storage_engine=InnoDB
innodb_autoinc_lock_mode=2
bind-address=0.0.0.0

# Add some configuration below
# Cluster Name
wsrep_cluster_name="mariadb_cluster"

# Add Server IP - on mariadb2 = 192.168.1.133 - on mariadb3 = 192.168.1.134
wsrep_node_address="192.168.1.132"

# Replication Provider with rsync
wsrep_sst_method=rsync
Save the file and exit.
On the server mariadb1, let's bootstrap the cluster with the command below:
/etc/rc.d/init.d/mysql bootstrap
result:
Bootstrapping the cluster.. Starting MySQL.. SUCCESS!
On mariadb2 and mariadb3 server, start MariaDB normally:
/etc/init.d/mysql start
mariadb1 bootstraping.
mariadb2 and mariadb3 start.


MariaDB has been started on all nodes, now configure the root password for MariaDB on all servers with command below:
/usr/bin/mysql_secure_installation
E. Configure Clustercheck
Clustercheck is a useful bash script to make a proxy (ex: HAProxy) capable of monitoring the MariaDB server.Go to the /tmp directory and download the script with wget:
cd /tmp
wget https://raw.githubusercontent.com/olafz/percona-clustercheck/master/clustercheck
Now make the script executable by changing the permission and move it to the /usr/bin/ directory:wget https://raw.githubusercontent.com/olafz/percona-clustercheck/master/clustercheck
chmod +x clustercheck
mv clustercheck /usr/bin/
Next, create a xinetd script for the clusterchek with the vi command in the "/etc/xinet.d/" directory:mv clustercheck /usr/bin/
vi /etc/xinetd.d/mysqlchk
Paste the configuration below:# default: on
# description: mysqlchk
service mysqlchk
{
disable = no
flags = REUSE
socket_type = stream
port = 9200 # This port used by xinetd for clustercheck
wait = no
user = nobody
server = /usr/bin/clustercheck
log_on_failure += USERID
only_from = 0.0.0.0/0
per_source = UNLIMITED
}
Save and exit.Add clustercheck to the services list:
vi /etc/services
Go to the line 10101, comment the services that use port 9200 and add a new line for mysqlchk/clustercheck.
mysqlchk 9200/tcp # mysqlchk
#wap-wsp 9200/tcp # WAP connectionless session service
#wap-wsp 9200/udp # WAP connectionless session service
Save the file and exit.#wap-wsp 9200/tcp # WAP connectionless session service
#wap-wsp 9200/udp # WAP connectionless session service
Then start the xinetd service:
systemctl start xinetd
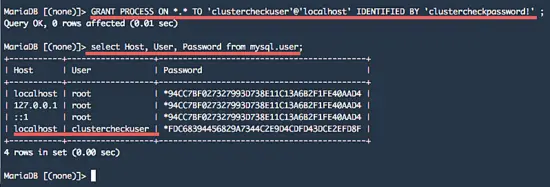
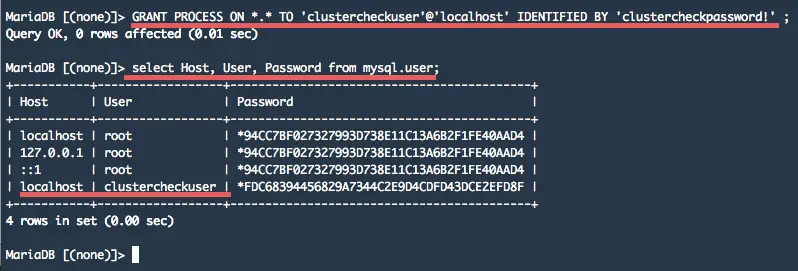
To perform the clustercheck, you must create a new user in MySQL. Login to the MariaDB shell and create a new user with the name "clustercheckuser" and password "clustercheckpassword!".
mysql -u root -p
GRANT PROCESS ON *.* TO 'clustercheckuser'@'localhost' IDENTIFIED BY 'clustercheckpassword!' ;
exit;
GRANT PROCESS ON *.* TO 'clustercheckuser'@'localhost' IDENTIFIED BY 'clustercheckpassword!' ;
exit;
At this stage, all MariaDB serves are synchronized.
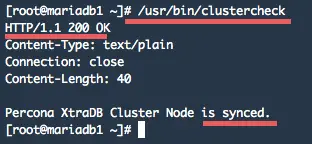
Testing clustercheck:
/usr/bin/clustercheck
Make sure the results code is 200.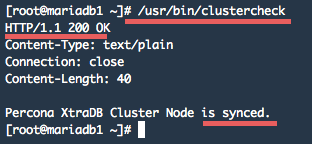
Step 2 - Install and Configure HAProxy
Login to the HAProxy server:
ssh haproxy1@192.168.1.135
Become root user and add the MariaDB server IP and hostname to the "/etc/hosts" file:
sudo su
vi /etc/hosts
HAProxy is available in the CentOS base repository, run this yum command to install it:vi /etc/hosts
yum -y install haproxy
Then configure the log for HAProxy by editing the rsyslog configuration file:
vi /etc/rsyslog.conf
Uncomment the udp port:# Provides UDP syslog reception $ModLoad imudp $UDPServerRun 51Save the file and exit the editor.
Add the HAProxy configuration in rsyslog.d directory:
vi /etc/rsyslog.d/haproxy.conf
Paste configuration below:local2.=info /var/log/haproxy-access.log local2.notice /var/log/haproxy-info.logSave the file and restart rsyslog:
systemctl restart rsyslog
Next, create a new HAProxy configuration file.Go to the /etc/haproxy directory and backup the dafult haproxy configuration file.
cd /etc/haproxy/
mv haproxy.cfg haproxy.cfg.orig
mv haproxy.cfg haproxy.cfg.orig
vi /etc/haproxy/haproxy.cfg
And paste the HAProxy configuration below:global log 127.0.0.1 local2 maxconn 1024 user haproxy group haproxy daemon stats socket /var/run/haproxy.sock mode 600 level admin # Make sock file for haproxy defaults log global mode http option tcplog option dontlognull retries 3 option redispatch maxconn 1024 timeout connect 5000ms timeout client 50000ms timeout server 50000ms listen mariadb_cluster 0.0.0.0:3030 ## MariaDB balance leastconn - the cluster listening on port 3030. mode tcp balance leastconn option httpchk server mariadb1 192.168.1.132:3306 check port 9200 server mariadb2 192.168.1.133:3306 check port 9200 server mariadb3 192.168.1.134:3306 check port 9200 backup # Make mariadb3 as backup - automatic replication data listen stats 0.0.0.0:9000 ## HAProxy stats web gui running on port 9000 - username and password: howtoforge. mode http stats enable stats uri /stats stats realm HAProxy\ Statistics stats auth howtoforge:howtoforge stats admin if TRUEPort 3030 is the load balanced MariaDB port, we can access the databases on all MariaDB servers with load balancer IP and that port.
Port 9000 is the port for the web-gui, it allows monitoring of HAProxy from the browser.
Now start firewalld, open ports 9000 and 3030, and then reload it:
systemctl start firewalld
firewall-cmd --permanent --add-port=9000/tcp
firewall-cmd --permanent --add-port=3030/tcp
firewall-cmd --reload
Start HAProxy with the systemctl command:firewall-cmd --permanent --add-port=9000/tcp
firewall-cmd --permanent --add-port=3030/tcp
firewall-cmd --reload
systemctl start haproxy
Step 3 - Testing HAProxy and MariaDB
A. Replication testing
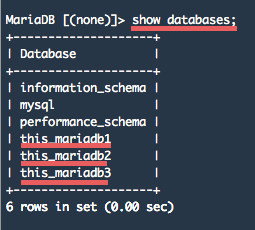
Login to the MariaDB server, access the MySQL shell and create a new database from mariadb1, then from mariadb2, and finally from mariadb3.
mysql -u root -p
create database this_mariadb1; # Run this on mariadb1 server
create database this_mariadb2; # Run this on mariadb2 server
create database this_mariadb3; # Run this on mariadb3 server
Check the databases:create database this_mariadb1; # Run this on mariadb1 server
create database this_mariadb2; # Run this on mariadb2 server
create database this_mariadb3; # Run this on mariadb3 server
B. Access the MariaDB Server trough HAProxy
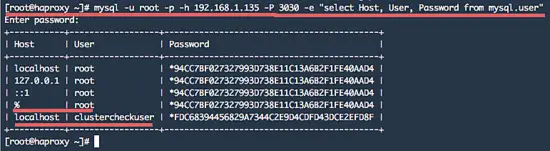
Now we access the MariaDB server cluster and databases trough the HAProxy IP on port 3030.Before doing this test, enable remote access to the MariaDB server by creating a new user root with host "%".
Log into the MariaDB shell and create a new user "root" with password "aqwe123":
mysql -u root -p
GRANT ALL PRIVILEGES ON *.* TO root@'%' IDENTIFIED BY "aqwe123";
Next, access the 'mysql.user' database table trough the HAProxy server:GRANT ALL PRIVILEGES ON *.* TO root@'%' IDENTIFIED BY "aqwe123";
mysql -u root -p -h 192.168.1.135 -P 3030 -e "select Host, User, Password from mysql.user"
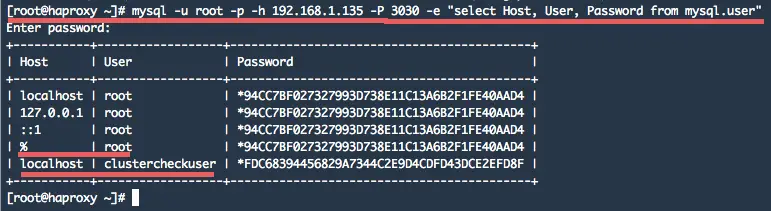
You can see the users of the database server by accessing the load balancer IP on port 3030. You can access the databases on the MySQL nodes by accessing the HAProxy IP on port 3030.
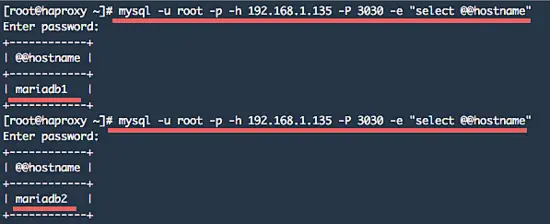
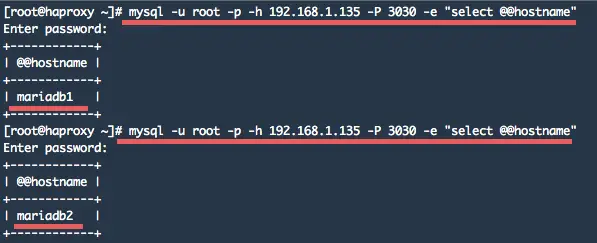
Another test of the server: the leastconn algorithm:
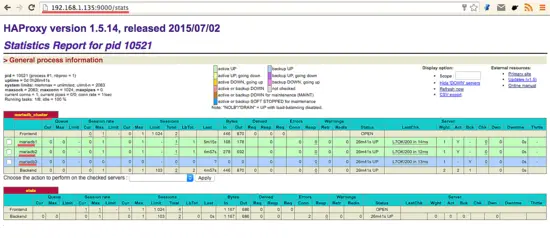
C. Login to the HAProxy Web-Gui
You can access the HAProxy monitoring server on port 9000, with username and password "howtoforge" to show the HAProxy web UI:http://192.168.1.135:9000/stats

HAProxy has been installed successfully and you can see the MariaDB servers are monitored.

No comments:
Post a Comment